
Activities and investigations
By Mary Bigelow
Posted on 2008-12-23
 I was facilitating a workshop once, and I overhead these statements from two science teachers: My students are so busy, they don’t have time to think and We have so much fun, the students don’t know that they’re learning.
I hope that the teachers were oversimplifying their classroom environment. I can certainly understand the teachers’ desire to engage students actively and to make science enjoyable, but I think what might be missing in their classes is a chance for students to connect new learning to what they already know, to ask questions, to predict, to apply what they are studying to new situations, or just to quietly reflect on what they are doing. There is a difference between doing busywork and being cognitively engaged in a task. (When I do the laundry, I’m busy, but I’m not very engaged!) I’m also curious as to why students have the impression that learning is a chore or a dull experience rather than an enjoyable, positive one? If students don’t know what and how and when they are learning, how can we ever expect them to become independent, lifelong learners?
Fortunately, this month’s Science Teacher has many suggestions for engaging students in meaningful tasks and making learning a positive experience.
The article Energizing Students describes how to apply concepts from neuroscience to “maximize student engagement and attention.” For our colleagues at the primary level, moving around, stretching, and varying the activities are standard procedures. High school teachers may be skeptical at first, but I’ve seen for myself how even a simple stretch break can help students to re-focus, and I would certainly explain to them why we’re stretching–to get more oxygen to the brain. The relationship between learning and the brain is a fascinating one, and two interesting neuroscience resources are Neuroscience for Kids and The Brain from the Franklin Institute.
Another interesting concept is using the arts to get students actively engaged, whether it’s creating a video (Movie Mitosis) or a cartoon ( The Art of Physics) to illustrate what the students are learning in science. Both of these include rubrics to help students focus their learning and their creativity. (See the August 2008 blog for more on rubrics.) And when the students have completed their projects, the projects can be shared with other classes, especially younger students.
The article “Life” in Movies has great suggestions for getting students to think about the science (or lack of scientific accuracy) in popular films. If you ‘re an elementary or middle school teacher in a school where films are shown at the end of a marking period or before a break, check out the potential discussion topics for films such as Finding Nemo and A Bug’s Life. Even if students have seen the films, you can engage them from a different perspective. There are also suggestions for how to select films to show in a school setting. The author of the popular Bad Astronomy site discusses movies that are (or are not) scientifically accurate. It’s a fun (and engaging) site.
I was facilitating a workshop once, and I overhead these statements from two science teachers: My students are so busy, they don’t have time to think and We have so much fun, the students don’t know that they’re learning.
Light and mirrors
By Peggy Ashbrook
Posted on 2008-12-22
 Give children tools for exploring a concept and they almost always show me a new way to teach it. In a session of flashlight and mirror exploration, Walter began building by putting a flashlight on top of a single-eyepiece, single-mirror periscope. “Look!” he said, pointing to a beam of light exiting the periscope. He was able to see that mirrors can change the direction of a beam of light. (Click on photos to see details.)
We were using flat plexiglas mirrors, a variety of flashlights, two kinds of periscopes, and some “half” pictures drawn on paper. Before handing out the flashlights, I always caution the children that they may not shine the lights into their own eyes or anyone else’s because bright lights can damage eyesight. Usually a few children test this rule and I take the flashlights away for a few minutes. LED, or light-emitting diode flashlights, have particularly bright, narrow beam.
 The “half” pictures idea comes from Make a Bigger Puddle, Make a Smaller Worm, also called The Magic Mirror Book (Scholastic 1979) and the Mirror Puzzle Book (Tarquin 1986), both by Marion Walter. Showing the children a drawing of one shoe, I tell them, “I was going to wear this pair of shoes today but I couldn’t find the other one. Can you help me find it with a mirror?” Then we hold a mirror perpendicular to the page and move it close to the shoe—ta dah! the other shoe appears (and I pretend to put them on). Other favorite images are a pizza missing a slice (make it whole or “eat” it bit by bit), an apple missing a bite, half a heart, half a moon, a soccer ball half deflated, and a broken plate. As the mirror is moved across the page, the other half is revealed (the “whole” section is reflected) completing the image and removing the bite or deflated area or broken edge from sight. As they manipulate the images the children are learning that mirrors reflect images (which are light but they don’t realize this) and the angle you hold them changes what is viewed.
Peggy
Give children tools for exploring a concept and they almost always show me a new way to teach it. In a session of flashlight and mirror exploration, Walter began building by putting a flashlight on top of a single-eyepiece, single-mirror periscope.
Overcoming socioeconomic hurdles
By MsMentorAdmin
Posted on 2008-12-15
Do you have any advice for working with students in a low-income school? This is my first year in this school, teaching 9th grade environmental science. Classroom management is not an issue and I have a good rapport with the students, but I haven’t been able to help them to achieve at the levels I think they can.
—Kathy, Vancouver, Washington
I’ve worked with students and schools in distressed communities. I’ve seen how heartbreaking the economic and social situations these students face every day are. These external situations can affect student learning and many are beyond our control. But we can do something about what happens within our classrooms.
Students need our love, respect, and patience. But if students have not had much success academically, they also need modeling, guided practice, feedback, resources, a positive classroom environment, and opportunities for using inquiry and creativity. From your question, it seems you’re already meeting some of their basic needs. You have high expectations for them, and your good classroom management and positive rapport show you’re establishing a good climate for learning.
In working with students who do not have strong academic backgrounds (regardless of their economic circumstances), you can’t assume anything. For example, you might ask them to “brainstorm,” “reflect,” “read and take notes,” or “review for a test,” but they may not really know how to do these. Model the processes you want them to use through “think alouds” in which you literally talk your way through a process, making the process visible (and audible). Make some intentional mistakes, verbalize how you recognize the errors, and ask the students how you could deal with the errors.
Show the students what a well-written lab report and a science notebook look like–they may have never seen one before! Take notes together at first, to show how to find and record important information. Break down a task into small, do-able components that lead to a successful finished product. Plan for most assignments to be completed in class at first, so you can guide the students through the task. After a while, these “scaffolds” can (and should) be scaled down for most students; others may continue to need support.
Environmental science is appealing to students, and you can incorporate real-life, relevant, interesting issues. Having a “big idea” or “essential questions” for each unit provides a focus and a structure for the content and activities. In class discussions try to use “wait time” (pausing to give students a chance to respond to a question or comment). It is a powerful but very underused strategy to get students thinking at higher levels.
When you provide feedback, comment specifically on what the student did well and on what the student could do to improve, more than just saying “good job” or “needs work.” This works best if you have rubrics for your reports and activities and the students know what the rubrics mean.
It’s also helpful if you can provide resources we may take for granted: pencils, paper, time in a computer lab, information about the public library, science reading materials or videos, and a quiet place to read or study.
Be sure your tasks become more and more challenging, while providing scaffolding, safety nets, and constructive, focused feedback. Give students the opportunity, the intellectual tools, and the encouragement to be creative and to solve problems.
Do you have any advice for working with students in a low-income school? This is my first year in this school, teaching 9th grade environmental science. Classroom management is not an issue and I have a good rapport with the students, but I haven’t been able to help them to achieve at the levels I think they can.
—Kathy, Vancouver, Washington
Science and winter
By Mary Bigelow
Posted on 2008-12-14
I was in a school once where the teachers did a “winter” unit on penguins with activities that included trade books, puzzles, writing activities, and the showing of several popular films. But there was not a lot of science involved, and one of their bulletin boards even showed a group of polar bears and penguins frolicking together (Arrgh!). They put a lot of time and effort into this, but I had to wonder what the students actually learned about these birds or about the winter season.
Any change of season can be a focus for science activities. A colleague starts each season by having students brainstorm seasonal questions and adding a few of her own. She shares some of the winter ones:
 Why do we have “winter?” What is a “solstice?”
What happens when animals hibernate?
How do frogs survive the winter?
Why should we “dress in layers” when it’s cold?
Is it true that no two snowflakes are alike?
What does a desert look like in winter?
Is there a difference between a conifer and an evergreen?
Are all conifers called “pines?”
Do we see different constellations in the winter? Why?
How does a thermostat work? How does a heat pump work?
Why do people put wax on skis?
What is the “jet stream” that seems to influence our weather?
Do El Ninos and La Ninas happen in the winter?
Why do icicles form? What makes ice slippery?
How does “insulation” work?
If ice is a solid, why does it float?
What is “frostbite?”
Does colder weather cause us to catch a cold?
What’s the difference between the Arctic and Antarctica?
Why do highway crews put salt on the road? What happens to the salt later?
Note how these questions include topics in the life, physical, and earth sciences. She puts them on her “seasons” bulletin board and refers to them in her lessons where appropriate. For example, during a unit on the states of matter she would address questions related to ice, a weather unit would incorporate the questions on El Nino. At the end of the season she wraps things up with any remaining questions.
She does not look up all of the answers herself to present to the students. Through hands-on activities and Internet searches, she guides students through the process of answering their own questions. That’s where SciLinks can help. Use keywords such as Snowflake, El Nino, Identifying trees, Ice, Season, Heat, States of matter, or Constellations to access web-based sources of information and ideas for related activities.
I was in a school once where the teachers did a “winter” unit on penguins with activities that included trade books, puzzles, writing activities, and the showing of several popular films. But there was not a lot of science involved, and one of their bulletin boards even showed a group of polar bears and penguins frolicking together (Arrgh!). They put a lot of time and effort into this, but I had to wonder what the students actually learned about these birds or about the winter season.
Common cold blues
By Peggy Ashbrook
Posted on 2008-12-11
I would like to curl up in a cave until this sore throat and runny nose goes away. And I would like to know exactly how to prevent the spread of cold viruses—me and every other early childhood teacher! Here are some resources on cold germs:
A December 8, 2008, article from The Boston Globe by Judy Foreman, Cold Comfort, quotes doctors as saying that the viruses are spread from nose secretions mainly through touch, to the nose or eyes.
Common Cold, a website with in-depth information and the goal of providing “a framework for critical thinking which will allow informed decisions about medical care for the common cold,” states that cold viruses are removed by the mechanical action of washing and that germicidal hand lotions do not reliably kill rhinovirus, the most important cold virus. So all I have to do is to keep my hands off my face and wash my hands frequently. Now I wish we had a sink in every classroom!
The National Institute of Allergy and Infectious Diseases’ pages on the Common Cold say, “Hand washing with soap and water is the simplest and one of the most effective ways to keep from getting colds or giving them to others.” And the Mayo Clinic recommends that children wash their hands for as long as it takes them to sing their ABCs, “Row, Row, Row Your Boat” or the “Happy Birthday” song. It seems to me that children spend more time to wash their hands with liquid soap than with bar soap, perhaps because it takes longer to wash off the squirt than it does to wash off the film of soap from a bar (no data, just an observation).
Do you have any tips for making washing or cleaning hands easier or more effective?
Peggy
I would like to curl up in a cave until this sore throat and runny nose goes away. And I would like to know exactly how to prevent the spread of cold viruses—me and every other early childhood teacher! Here are some resources on cold germs:
A December 8, 2008, article from The Boston Globe by Judy Foreman, Cold Comfort, quotes doctors as saying that the viruses are spread from nose secretions mainly through touch, to the nose or eyes.
Air is matter
By Peggy Ashbrook
Posted on 2008-12-11
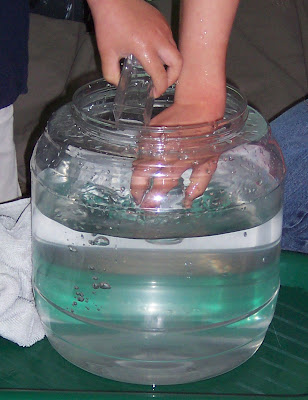.jpg "activity showing that air is matter") A classic activity to show that air is matter and takes up space is to tuck a piece of tissue into a small clear jar, up end the jar and lower it into a larger container of water. When the small jar is pulled out (still upside down), children are often surprised that the tissue is dry.
A classic activity to show that air is matter and takes up space is to tuck a piece of tissue into a small clear jar, up end the jar and lower it into a larger container of water. When the small jar is pulled out (still upside down), children are often surprised that the tissue is dry.
The range in development in preschool students is typically broad, with some of my 4-year-old students surprised because they expected the tissue to be soaking wet, and others unable to duplicate the position of the jar because they didn’t notice that it was upside down when I demonstrated it. Children of all ages love to play with water and air.
Please note a correction to my word choice in the December Early Years column: air is matter, not a single substance—it is a mixture of substances—so I should have written that air is matter. Thanks to Myrna Klotzkin for catching this incorrect usage of a scientific term!
What kinds of activities, or experiments, do you do with your preK through second grade classes to explore the nature of air?
Peggy
A classic activity to show that air is matter and takes up space is to tuck a piece of tissue into a small clear jar, up end the jar and lower it into a larger container of water.
Mentoring mentors
By MsMentorAdmin
Posted on 2008-12-09
I’m mentoring a new science teacher. I’ve never done this before, so I’m asking teachers, “What’s the best advice your mentor ever gave you?”
-Frank, Clarksville, Tennessee
I’m remembering myself as a novice teacher years ago, in a junior high school with some challenging students. I had a good background in the physical sciences I was teaching, but I really struggled with classroom management. There were days I felt like I was on the Titanic with no room in the lifeboats. We did not have official mentors then, so I was on my own. But my principal must have recognized my potential. He observed some classes and threw me a lifeline.
He suggested I establish routines and procedures for the beginning and end of class and for transitioning to and from lab activities. Since these are times most likely for disruptions, it is important for students to be engaged and to know what is expected of them. Having set routines frees time for more important topics and activities rather than dealing with discipline or logistic issues.
My principal also distinguished between routines and regimentation. Regimentation is when the teacher (acting like a drill sergeant) continually tells students exactly what to do and when to do it. In a classroom with routines, however, the students know what to do even if the teacher is not in the room.
Many of his suggestions became part of my repertoire:
- Greet students by name at the door.
- Establish a routine for getting ready for class, such as posting an agenda on the board with what students need for class (notebooks, textbook, pencil, assignments to turn in, etc.) so they can get ready while they chitchat,.
- Use a “bell-ringer” activity to focus students’ attention.
- Have a tray for each lab group to make it easier to organize and count the materials and to make sure everything is in place for the next class.
- Have assigned seats, assigned lab groups, and assigned roles for lab group members. These, of course, can be changed periodically.
- Designate and label places to turn in assignments and equipment.
- Put labels on shelves or tables to organize materials students may need during class.
- Conclude each class with a summary and a “preview of coming attractions”.
Some of these suggestions would be second nature to a veteran teacher, but to a novice such as myself they were life (and career) savers. It took a while that first year to get the routines in place. But in the following years, the students would quickly adapt from the start of the year. I think they appreciated the structure and the expectations (I know the substitute teachers did). Eventually, students can (and should) collaborate with the teacher to suggest or develop routines.
My principal was ahead of his time! Recent work of educators such as Robert Marzano notes the importance of routines and procedures. I would recommend Marzano’s book, Classroom Management That Works (published by the Association for Supervision and Curriculum Development)for additional suggestions. Even experienced teachers can learn a few new techniques!
I’m mentoring a new science teacher. I’ve never done this before, so I’m asking teachers, “What’s the best advice your mentor ever gave you?”
-Frank, Clarksville, Tennessee
Invertebrates in the classroom
By Peggy Ashbrook
Posted on 2008-12-08
 Children often do not think of invertebrates as animals. If we can train ourselves to talk about insects and other invertebrates not as “bugs” but as “small animals” we’ll help children make that connection. Visiting small animals, such as isopods (aka roly-polies or pill bugs) and slugs, allow observations to build into a body of knowledge.
Shrieks of delight let me know that a slug is on the move, and hearing excited consultation with the classroom’s confident “wrangler” tells me that the children have it under control.
Peggy
Children often do not think of invertebrates as animals. If we can train ourselves to talk about insects and other invertebrates not as “bugs” but as “small animals” we’ll help children make that connection.
Playing with magnets and learning about the property of materials
By Peggy Ashbrook
Posted on 2008-12-07
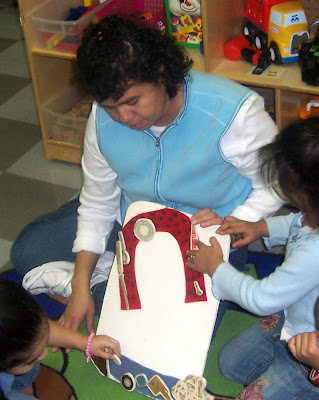
 Playing with magnets is a useful science activity in early childhood classrooms because it fosters conversation, exploration of materials, and learning to make predictions. Making a prediction means focusing on what you think will happen next based on your prior knowledge. We can help children develop this the skill of predicting (or guessing if there is no prior knowledge) what might happen any time we read to them, by asking them to predict what will happen next in the story. (See the discussion about the words “prediction” and “hypothesis”, in When a Hypothesis is NOT an Educated Guess by Louise M. Baxter and Martha J. Kurtz in Science & Children, April 2001, pg 18-20.)
Preschool teacher Ms. Kim reads a book aloud to her class and they respond with their predictions.
She encourages participation by making it clear that she wants the children to make the predictions and that she will respect and accept all answers (and not provide any). Any book will do but Fortunately by Remy Charlip, is a great book for getting children started thinking about what will happen next, noticing patterns and asking questions. After reading Ms. Kim followed up by asking the children if things turned out the way they thought it would (spoiler alert—it has a happy ending).
 Prior experience informs learning, so I try to expose children to many materials and the opportunity to manipulate them. While examining all the objects and testing their attraction to a magnet the children are talking, gaining language and social skills while doing science. (Click on the photo to see a larger view.)
 This week I’ve seen children building with the objects, creating a microphone with the ubiquitous preschool magnets with a handle, and delighting in possessing key or coin—objects of power so I include enough for every child. Using magnets in many shapes and sizes helps children understand that the property of magnetism is in the material, not a size, shape, or color. In the small science groups it is easier to note what is said and what happens, and assess each child’s understanding.
 After experiencing the force of magnetism using a variety of magnets and materials, children are ready to predict which objects will be attracted to a magnet.
Children can represent their understanding using a small set of new objects (at first without a magnet) and photocopies of those objects. The children represented their predictions by putting photocopied pictures of the objects either on the magnet picture (“magnet will attract the object”) or on the dish picture (“magnet will not attract the object”). Then they each tested an object using a magnet.
.jpg "making predictions about magnets") There is often disagreement among the children about whether or not an object will be attracted to the magnet. I use this as an opportunity to tell them that scientists don’t always agree on what they think will happen.
There is often disagreement among the children about whether or not an object will be attracted to the magnet. I use this as an opportunity to tell them that scientists don’t always agree on what they think will happen.
Even though they had experience with a magnet and a variety of metal objects, many children were still surprised when a brass key was not attracted to the magnet. This is a common misconception among the teachers as well, that magnets will attract all metals. Through experience the students learn that a magnet will never attract certain materials, and always attract others—metals but not all metals. Understanding why that is will have to wait until they are older, but by repeating the activity children come to know that each object reacts to the magnet the same way each time, and that this is part of the nature of the material. Magnet Man, offers much more on this subject on his website.
After testing the actual objects with a magnet, the children changed their arrangement of the photocopies of the objects as needed to represent the results rather than their predictions.
Peggy
Playing with magnets is a useful science activity in early childhood classrooms because it fosters conversation, exploration of materials, and learning to make predictions.
States of matter
By Mary Bigelow
Posted on 2008-12-07
I t’s one thing to get students to recite definitions for the states of matter. But what do they really understand? For instance, the word “gas” is confusing. My students had to stop and think whether the word was referring to a state of matter or to the liquid that is pumped into the fuel tank of a car. Likewise, when the textbook definition of “liquid” mentioned that it was a substance that could be poured and took the shape of its container, they wondered why sugar and salt weren’t considered liquids.
This Science Scope issue has lessons, background information, and teaching suggestions and SciLinks has many online resources for helping young students learn about matter. Just use the keyword matter and your grade level to see several categories of websites related to matter. Here is a sample of some that are geared to elementary grades:
- Science: Materials from the BBC is an interactive animation that could be used with a class or as a small group activity.
- Water and Ice is a three-part lesson plan from Science NetLinks
- Substances and Chemical Reactions is a lesson plan on chemical changes from Teachers Domain that also includes video clips.
- In Case of the Mystery Matter, a teacher-created Webquest, students play the role of investigators to identify and classify matter.
- Two sites, Four States of Matter and States of Matter provide information in a student-friendly style.
I was once observing a class in which the 4th-grade students were making “oobleck.” The teacher was well-organized, but she missed an opportunity to go beyond simply having the students make the substance and play with it. The article Concept-Focused Teaching describes how activities can help students learn and understand big ideas or concepts. The activity Oobleck from the Jefferson National Laboratory has some ideas for focusing students on the states of matter as they make (and play with) oobleck.
If you teach middle school, scan the table of contents in this issue for articles with some good teaching ideas for helping students who may not have a strong science background.
It’s one thing to get students to recite definitions for the states of matter. But what do they really understand? For instance, the word “gas” is confusing. My students had to stop and think whether the word was referring to a state of matter or to the liquid that is pumped into the fuel tank of a car.