
feature
Cool It!
Exploring the Engineering Design Process
Science Scope—May/June 2023 (Volume 46, Issue 5)
By Jamie W. Gutual, Latanya Robinson, Adam Kirn, and Indira Chatterjee

CONTENT AREA Engineering design process
GRADE LEVEL 6–8
BIG IDEA/UNIT Designing, building, and testing a prototype device to cool the human body
ESSENTIAL PRE-EXISTING KNOWLEDGE None
TIME REQUIRED 60–120 minutes
COST Approximately $160–$190 for a class of 30 students (most materials can be reused)
SAFETY Safety googles and a pair of heat-resistant nonslip oven mitts or similar heat protection. See also Safety Note in article.
Many students enter middle school with a limited view of the fields of engineering; therefore, they may have a narrow understanding of what engineers do (National Academies of Sciences, Engineering, and Medicine 2019). The Cool It! engineering design unit allows students to explore biomedical engineering and develop solutions to the real-world problem of heatstroke (or heat stress). Because of experiences and information shared throughout the unit, “students can better see how science and engineering pertain to real-world problems and explore opportunities to apply their scientific knowledge to engineering design problems” (National Research Council 2012, p. 32). Specifically, the unit combines science and engineering practices to develop students’ interest and competence across areas of STEM (Robinson et al. 2021) while highlighting the importance of teamwork and communication skills for the next generation of engineers. The unit builds on students’ understanding of energy and matter by allowing them to investigate a heat transfer system.
We piloted and refined this engineering unit through implementation in formal K–12 classroom settings, informal university outreach, and teacher education conferences to ensure that the target education standards were emphasized. Suggested times for elements of the lesson came from the extensive trial in three sixth-grade classroom visits, nine university outreach events, and one education conference. This lesson highlights NGSS science standard MS-PS3: Energy; engineering standard MS-ETS1: Engineering Design; and Common Core English standards 6.EE.C.9 and 6.SP.B.5 by guiding students through the development of a cooling prototype that allows them to generate data and test different design ideas while gathering and interpreting mathematical data.
Engage: Establish relevance and present the phenomenon (30–60 minutes)
Heatstroke and societal relevance
Heat-related illnesses, including heatstroke, account for nearly 660 deaths per year (Centers for Disease Control and Prevention n.d.); symptoms include the inability to sweat and feeling extremely hot and disoriented. It is important to begin the Engage phase by introducing the phenomenon of heatstroke (or heat stress) and its societal relevance. To begin this portion of the unit, the teacher presents the phenomenon of heatstroke by showing the videos “What Happens When You Get Heat Stroke?” and “Lancet Countdown: Heat Stress” (see links to videos in Online Resources). Next, the teacher shows graphs displaying the data for heat-related deaths and illness (data and graphics available from Environmental Protection Agency [EPA] and Global Health Information Network sites listed under Online Resources), while bringing up the point that heat-related deaths are becoming more frequent due to climate change (EPA 2021). Further discussion about the impact of such deaths on society can be prompted with the following questions:
- How many people are affected yearly? (average of 658 deaths per year [EPA 2016]; in data from 20 states, more than 28,000 people were hospitalized due to heat-related illness [EPA 2016])
- Who is most at risk of suffering heatstroke? (at-risk populations such as the elderly, outdoor workers, and low-wage earners [Global Heat Information Network 2022])
The discussion helps students understand the effects of heatstroke and the need to find solutions to help people throughout society through engineering and science-based solutions.
The teacher then prompts students to create a list of driving questions relating to the phenomenon of heatstroke. A possible question students may come up with is how to help people experiencing heatstroke. The teacher can then introduce students to the idea of heat transfer and various methods of cooling down the human body (e.g., cold shower or bath, ice packs, cooling blankets, evaporative cooling, circulating water). The teacher can also detail the relation to heat transfer within the body—thermal energy is “removed” from the body when it is cooled down. Later in the unit, students take on the role of a biomedical engineer designing a prototype cooling device to help their (fictitious) classmate “Rudy,” who is experiencing heatstroke.
Engineering design process
Before presenting students with their main challenge—designing a prototype device to help cool Rudy—it is important to introduce the steps of the engineering design process (EDP). The EDP is used by engineers to promote an open-ended approach to solving problems. The process moves through seven steps: Ask, Research, Imagine, Plan, Create, Test, and Improve (Teach Engineering n.d.). The Ask step is where constraints are identified. The second step, Research, includes looking into solutions that already exist. After the Research step, possible solutions are brainstormed in the Imagine step—there is no limit to the ideas produced in this step. After brainstorming, a possible solution is selected in the Plan step, and then the Create step focuses on building a prototype of the selected solution. The Test step includes evaluating the performance of the prototype. Finally, the Improve step includes redesigning the prototype as needed to better meet the constraints (Teach Engineering n.d.).
To provide students with a concrete, common experience related to the EDP, guide them through the “Design a Better Pencil” activity shown in Figure 1. This activity takes approximately 10–15 minutes depending on the depth of student discussion. The pencil example will provide students with the initial model of using the EDP to design prototypes before students are tasked with designing a prototype to cool down a physical representation of the human body. By guiding students through the EDP with a relatable example, students can understand the EDP’s various phases, how the phases will be used in designing a prototype cooling device, and the engineering practices. Students utilize the workbook (see student workbook in Supplemental Materials) to record their thoughts and ideas as the lesson progresses through each step of the design process. Now that students have an initial model of the phases of the EDP, they are ready to use their foundational knowledge to develop a device prototype later in the unit.
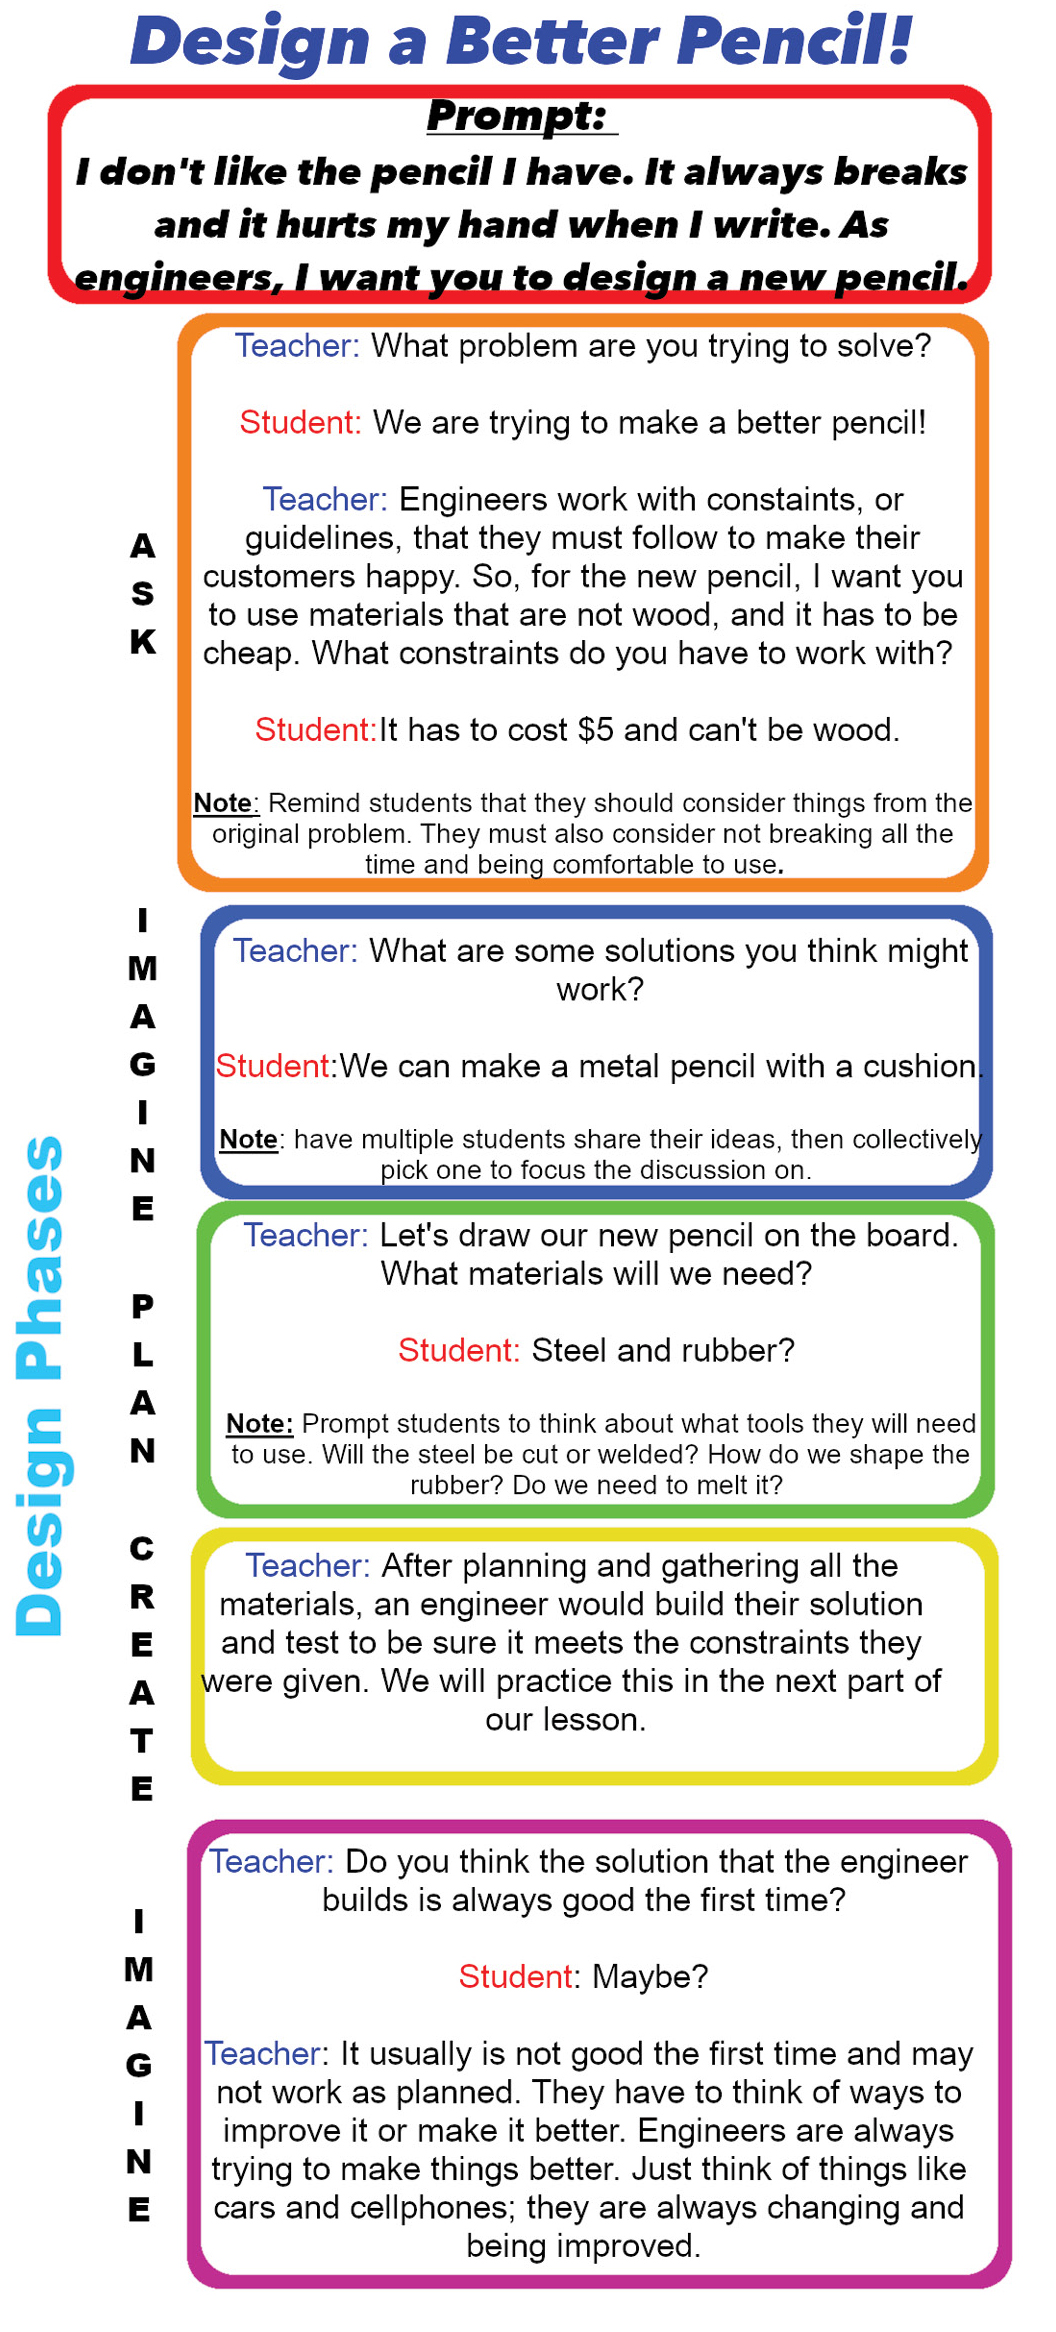
“Design a Better Pencil” activity.
Explore: Setting the scenario and using the EDP (60–150 minutes)
For this phase, students will begin the engineering process for the cooling device to help their classmate, Rudy. Following the “Build a Better Pencil” activity, set the scenario and task students with using the same process (the steps of the EDP) to design a device prototype to help cool their classmate down. The necessary materials and associated costs per class of 30 are provided in the teacher’s guide (see Supplemental Materials). Foil bags can be donated by local coffee shops—they are inside of coffee traveler boxes.
The scenario
With background knowledge of heatstroke and the EDP, students are ready to be introduced to the problem they will solve as newly appointed biomedical engineers. The students will model the work of biomedical engineers who design medical and health-related technologies that work with the human body, including products related to athletics. In this case, students will work to design a device for Rudy, who is showing symptoms of heat stroke (simulated using an insulated foil bag filled with hot water). Figure 2 provides an example of the insulated foil bag representing Rudy and the use of other materials for the device. The hot water should only be as hot as a hot bath (37–38°C), so as to limit injury risk. A physical representation of a human body is used so students can create a prototype device, observe the results of their designs, and mirror common modeling practices of biomedical engineers in a cost-effective manner. The relevant context in this lesson centers around the problem of heat-related illnesses and designing a wearable device that allows people to stay cool while playing sports on high-temperature days.
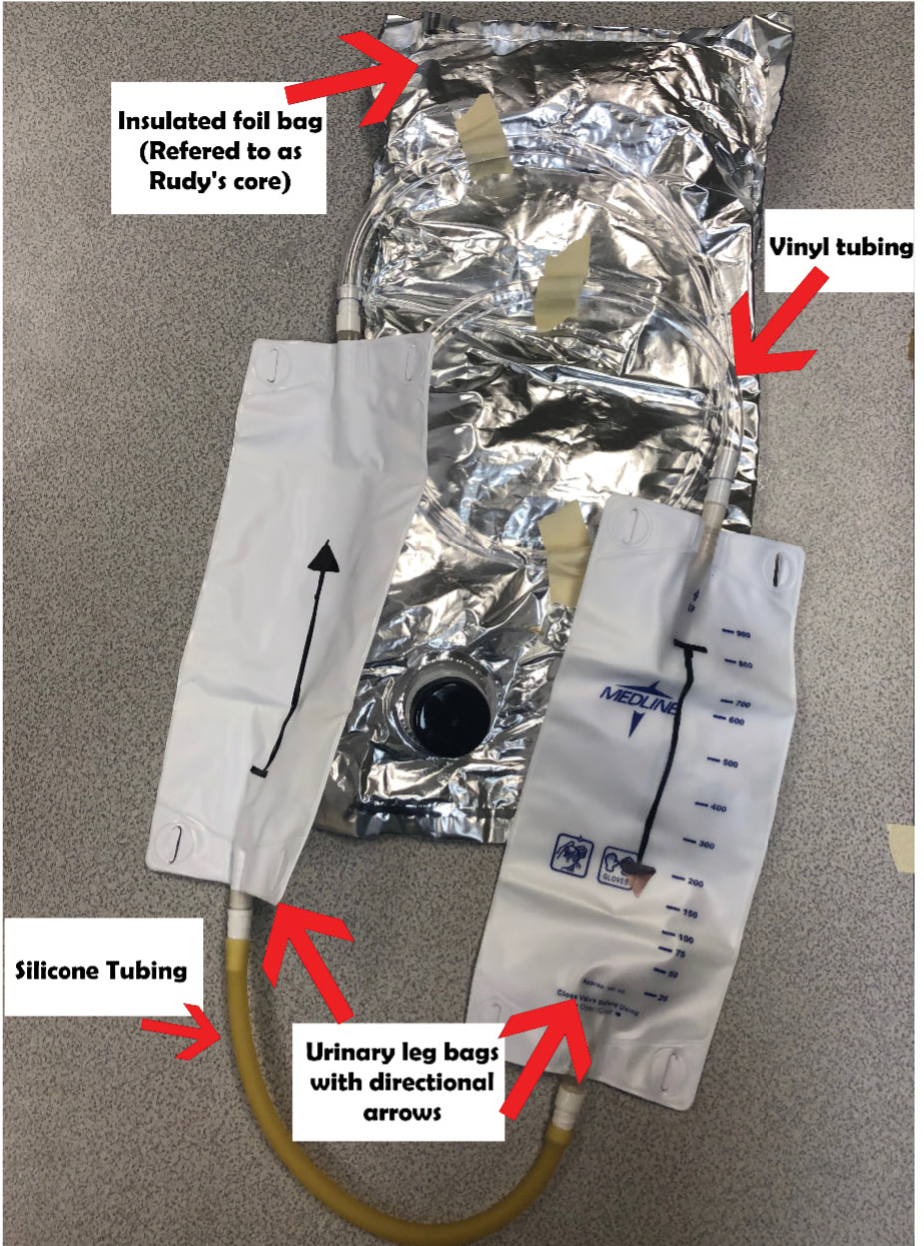
Materials used for activity with example of a device attached. Silver bag represents Rudy’s overheated core that students must cool down.
The teacher presents the class with the scenario that Rudy, their classmate, is not feeling well after playing outside in the sun all day. Rudy did not have much water to drink. After coming back inside, Rudy said, “I am feeling so hot, but I am not sweating, and I am a little disoriented.” To help conceptualize the problem, ask the students to recall the heatstroke symptoms presented in the videos (see video links in Online Resources). Engage the class in a discussion about the symptoms of heat-related illness by asking, “Is Rudy showing signs of heatstroke and how do you know?” All student answers should be acknowledged; the class consensus should be that Rudy is showing signs of heatstroke. In small groups of three to four, students share and write down their considerations for the human body that must be in their solutions in the note-taker section of the student workbook (see Supplemental Materials).
Ask (10–25 minutes)
To begin, ask students to write down the problem they are trying to solve. As engineers, following design specifications is crucial. In brief, the specifications for the cooling device are: (1) the device must cool Rudy at a rate between 2–3°C/minute, (2) the device should be lightweight (less than 250 units) and portable, and (3) the device does not fall off when Rudy is lifted by the teacher during testing.
A list of suggested materials and assigned weight units is provided in Figure 3 and is also provided to students in the workbook (see Supplemental Materials). To meet the design constraints, students must utilize only the approved materials in their designs. For the Ask phase, instruct students to write down what problem they are trying to solve, including all specifications and constraints.
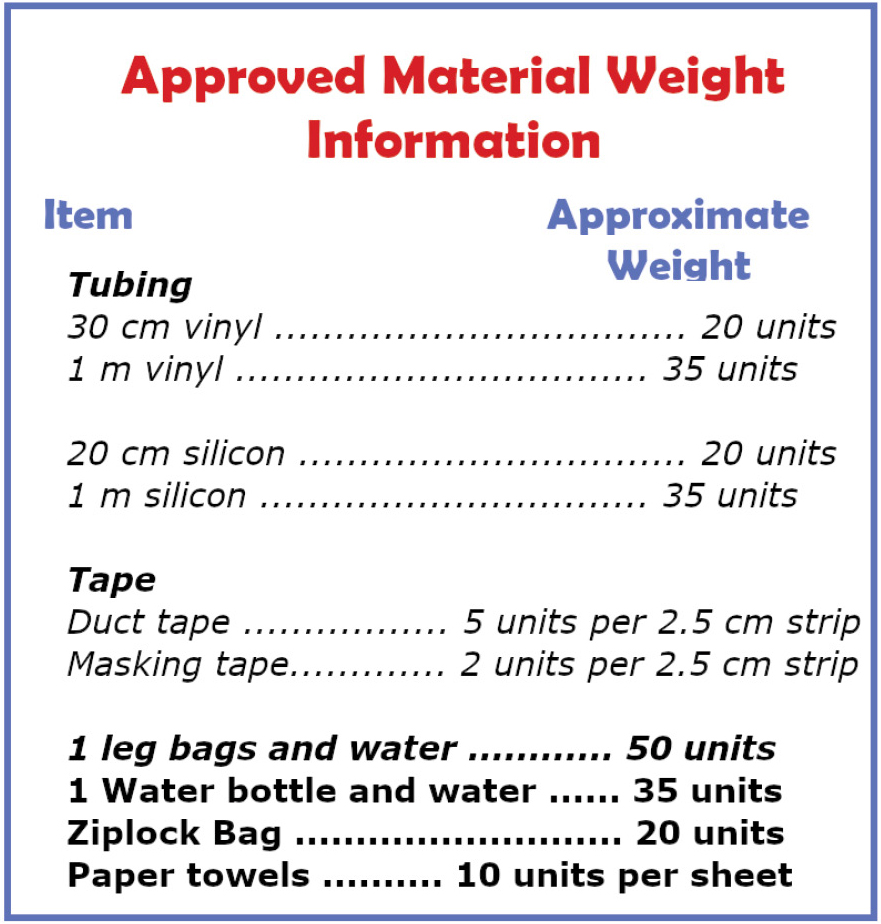
Weight information provided to students to meet the weight constraint (also included in student workbook).
Imagine and Plan (20–30 minutes)
As students transition to the Imagine and Plan phases of the EDP, ask students questions about their ideas and help them focus on how the constraints and design specifications will affect their design ideas. Questions include, “How will your selected materials meet the design specifications?” and “Why do you think your design will cool Rudy down?” To help students imagine and plan possible cooling prototypes, give each group their own Rudy (foil-insulated bag inside a onesie). This will help them visualize and plan for the size of their prototype and how the materials function and serve as an additional constraint in the design process.
During this time, the students should have access to a set of sample materials outlined in Table 1. Individually, each student documents at least one design sketch. Students should sketch their ideas and list the materials that they plan to use for each design. If needed, the design sketch work can be differentiated according to your students’ needs. Based on your preference of small group work or two-student pairs, arrange students into pairs or heterogeneous small groups from the beginning of the design plan activity. Struggling students may be overwhelmed with the design activity if they begin completely on their own. This lesson is designed to ensure that all students are positioned to engage throughout the experience of working collaboratively, and for this reason, we did not assign set roles like “materials manager.” We recommend using a range of intellectual roles associated with the collaborative learning process to foster team decisions.
Examples of student sketches from initial implementations of Cool It! can be seen in Figure 4. The student samples demonstrate initial ideas sketched during the Imagine and Plan phases.
| Table 1. Materials needed for Cool It! with associated quantity and cost for a class of 30 students. Asterisks indicate materials that can be reused. | ||||||||||||||||||||||||||||||||||||||||||||||||||||||||||||
|---|---|---|---|---|---|---|---|---|---|---|---|---|---|---|---|---|---|---|---|---|---|---|---|---|---|---|---|---|---|---|---|---|---|---|---|---|---|---|---|---|---|---|---|---|---|---|---|---|---|---|---|---|---|---|---|---|---|---|---|---|
|

Student sketches from the brainstorming phase.
The possible design solutions that the students come up with will vary from very simple to complex. For example, students may just wrap Rudy’s core in a wet paper towel. In contrast, a more complex design may include elaborate coils of tubing that are taped to Rudy’s core with cool water from the leg bags or bottles being manually pumped through the system. Variation in design ideas should be encouraged and celebrated with students as there is more than one way to solve engineering problems.
After sketching their individual designs, have students use the engineering problem statement and evaluate potential solutions using sections of the teacher/student engineering design rubric (see Supplemental Materials) to discuss their ideas with their groups and to help them in evaluating their progress as they work through their solutions. As a group, the students will decide on a final design sketch that will be used to build their first cooling prototype. These designs must be approved by the teacher before students begin the next phase of the EDP. The approval process focuses on how well students’ explanations and solutions are meeting the worked-on sections of the rubric. After planning their designs and gaining approval, students build and test their devices, as described in the Create phase, next. Before letting students begin the Create phase, discuss how the devices that they are about to create are not going to be suitable for actual human use and are only meant to model a prototype of the solution for classroom testing purposes.
Create (20–45 minutes)
Once the teacher approves the design, allow the students to gather their materials. Emphasize that the material tracking sheet must be filled out according to the materials being used (this is important for the weight constraint) for the Create phase of the EDP. Two example prototypes built by students are shown in Figure 5. The top example shows the use of the tubing to circulate water, and the bottom example displays the way a student used contact with the cold water in leg bags and attached them using tubing. There are no right or wrong ways to design the devices, so all design ideas that fit the constraints are allowed.
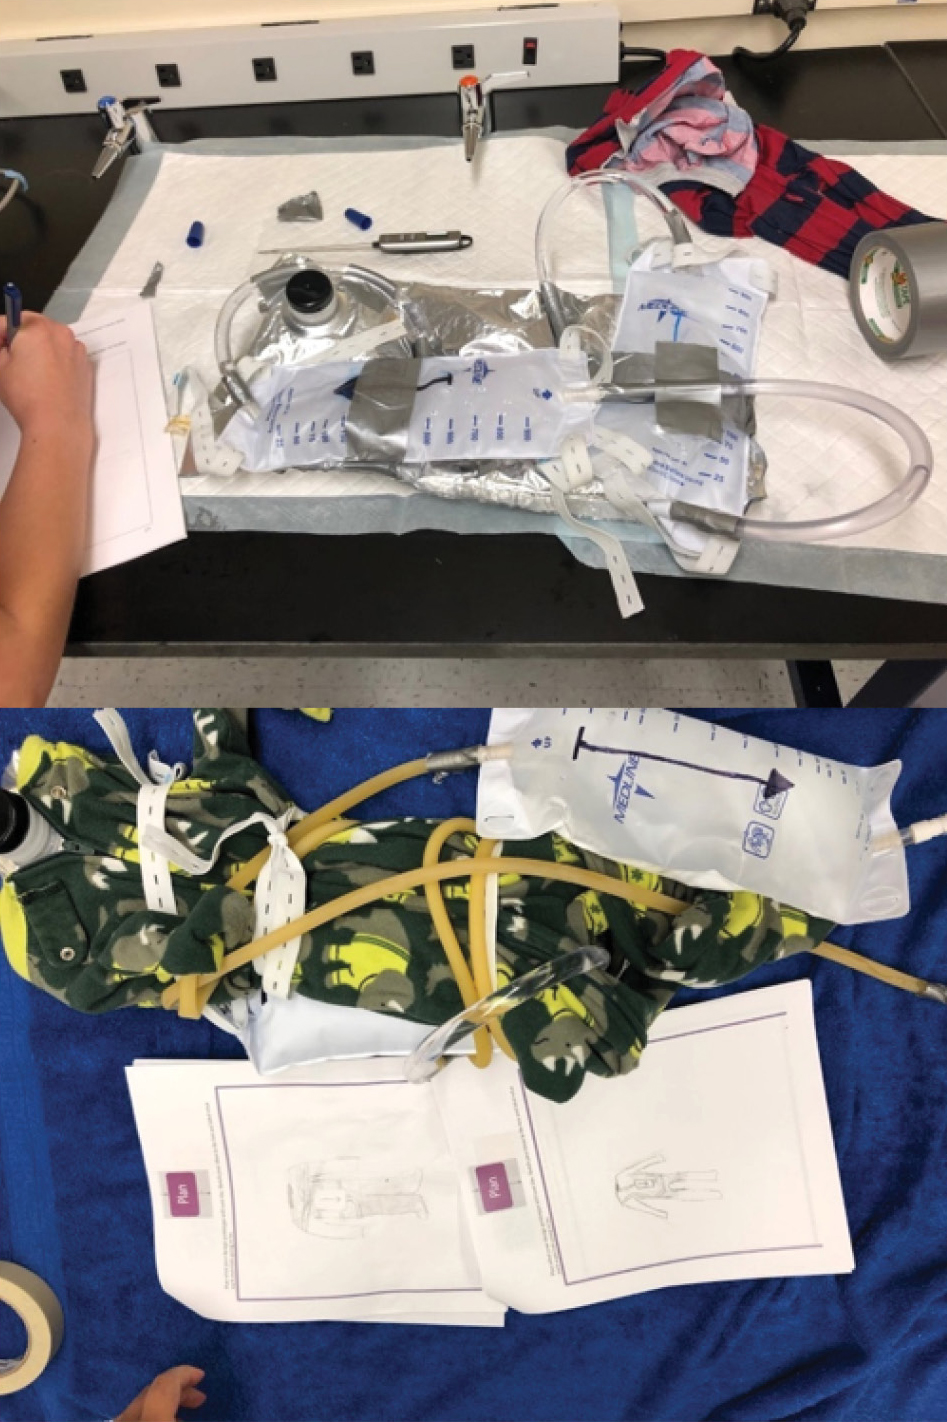
Prototype cooling devices built by students.
A troubleshooting section is provided in the teacher’s guide (see Supplemental Materials) that includes common challenges encountered by students. Be sure to reiterate that students must secure their tubing connections with the 2.5 cm pieces of duct tape to avoid any leaks that may occur. Figure 6 demonstrates the use duct tape at the connection points to avoid spilling the cool water inside the leg bags.
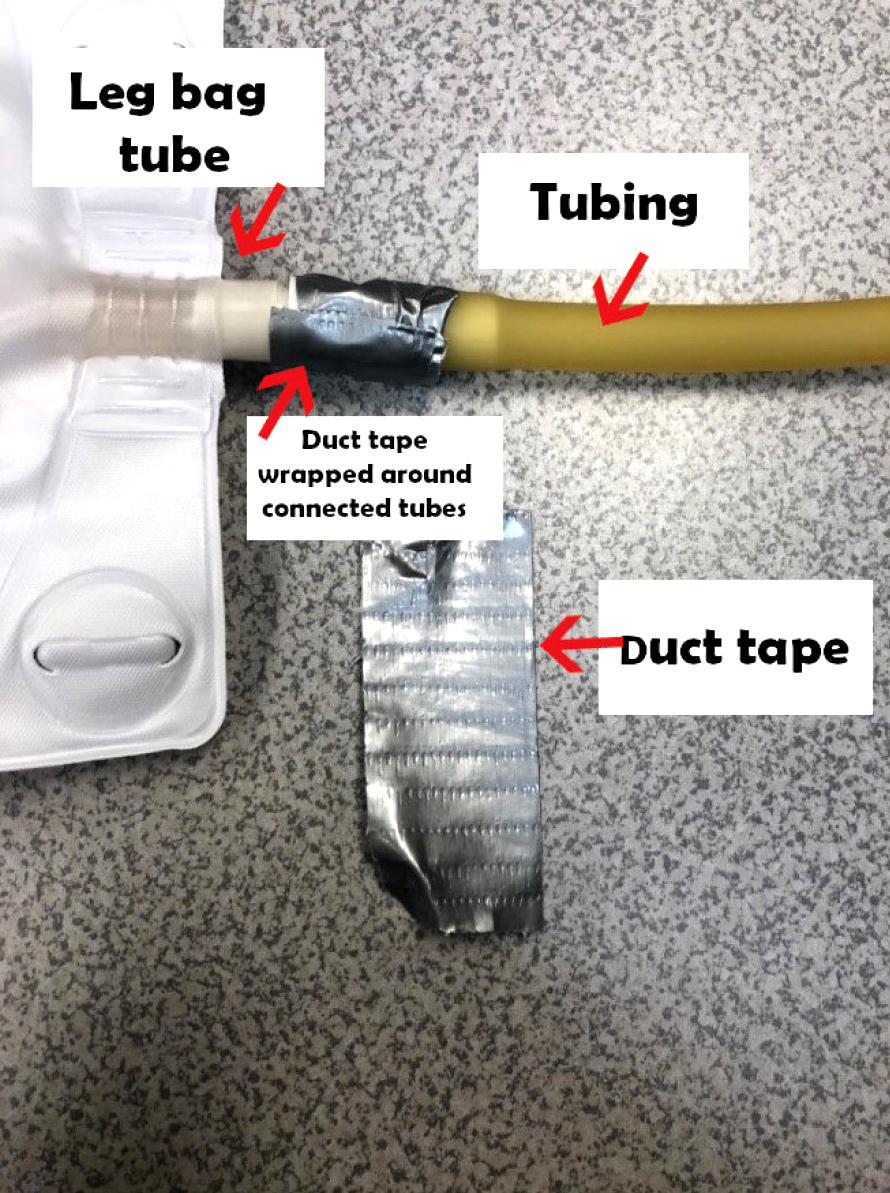
Duct tape wrapped around the tubes connected to the leg bags to avoid spilling the cool water inside them.
Safety note: Cool It! involves the use of hot water to simulate heat stroke. Do not exceed 37–38 °C for the water, which is about the temperature of a hot bath.
This temperature range is safe for skin contact if accidental spills are to occur. Ensure that students follow proper safety procedures while doing the activity. Students should wear splash goggles when near the hot water. The teacher should pour the hot water into the insulated bags (Rudy’s core) to minimize student contact from potential spills. While preparing and pouring the hot water, the teacher should also wear splash goggles and heat-resistant nonslip oven mitts or similar heat protection.
Prototype testing
After creating the prototypes, it is time to test! When students have finished building their device, they need to attach it to Rudy. The teacher prepares Rudy for testing by warming the water to fill Rudy. As the teacher fills the bag, remind the students that the water is hot. Do not let the students pour this water. Before closing the cap of the insulated foil bag, allow the students to take a reading of their starting temperature using the thermometer (remember, this should be between 37–38°C). After recording their starting temperature, the students will begin the process of demonstrating their prototype by either manually pumping the cool water through their devices by pressing on the leg bags or plastic bottles attached to tubing or allowing time to pass (for more passive prototype designs) to cool Rudy down for the specified length of time. Once the two-minute testing period has elapsed, the teacher will open the insulated bag’s cap and take the ending temperature of the water inside of Rudy using the thermometer. Have the students record the temperatures they measured in the Create section of the student workbook (see Supplemental Materials). To determine how well their devices meet the cooling rate constraint, have the students calculate their cooling rate based on the starting and ending temperatures they measured by using the following equation:
cooling rate = (starting temp. – ending temp.) ÷ time pumped
During testing, meaningful feedback and instruction can be given by asking students questions that prompt further, such as “Which features of your cooling prototype are addressing the design constraints?” and “How will the design of your device help cool Rudy down?” These questions help the students focus on the parts of their device that connect to heat transfer. They are observing how energy is being spontaneously transferred out of hotter regions (Rudy) and into colder ones (cooling device). To assess student understanding of the Disciplinary Core Ideas of Conservation of Energy and Energy Transfer, ask students to articulate how the tubing layout they selected affects Rudy’s internal temperature. Then ask students to describe what they think is happening on the surface where the tubing is touching Rudy (specifically focusing on where the heat is going). Assessment for these questions is provided in the rubric presented in the Evaluate section.
After designing and testing the prototypes, provide students with 20–30 minutes for the Improve phase of the EDP. The Improve phase consists of redesigning and retesting the prototypes as described in the Create section. Before allowing the students to improve their devices, they should evaluate their device against the design specifications. To start the discussion, ask students to talk about what did not work in their groups as expected and why. Teachers can highlight that this is a common engineering practice. The small-group discussion then transitions into a whole-class discussion to help students see the connections between the design specifications, the videos in the Engage section, the problem of helping Rudy cool down, and their group’s first plan. This discussion should assist the students in thinking at the broad level of how energy flows from hotter objects into colder ones. From this conversation, students should identify features of their group’s first design plan that cause their designs to fail or not work as desired. Students should develop a plan in their workbook to address the identified weaknesses of their designs and articulate why certain features were problematic. By reflecting on their first cooling prototype, students are better prepared to make informed decisions as they redesign their device to improve its performance.
After reflecting and planning an improved design, students build and test the new prototype to compare the designs’ performance in the Explain section. To compare how well the first device and improved device meet the cooling rate constraint, once again have the students calculate their cooling rate based on the starting and ending temperatures they measured by using the following equation:
cooling rate = (starting temp. – ending temp.) ÷ time pumped
Differentiation and inclusion strategies such as having calculators available to students who need extra support, or having students focus on only one test result at a time to break the complex task down into smaller steps, may help students who feel overwhelmed by the idea of evaluating the results from multiple tests at once.
Explain (20–30 minutes)
To further assist students in understanding the performance of the two designs, have them explain how well their cooling rates from the Create and Improve phases compare to the cooling constraint of 2–3°C/minute. If students’ designs do not meet this constraint (or even if they do), this is a great time to talk about failure and redesign in the EDP. Teachers should highlight that engineering resolutions often take many prototypes before they solve a problem and that learning happens when things fail or do not work as expected.
After the discussion of failure and redesign, have each group reflect on what they believe might lead to the design of the optimal device if the design specifications and constraints were removed. Possible prompts include:
- If we had an unlimited number of resources, how would we create an even better device for cooling down Rudy?
- How would you use technology like sensors, pumps, or electronic devices help to further improve your design?
- If any liquid could be used besides water, what would you pick and why?
Elaborate: Apply understanding of phenomenon or problem
To allow students to use their knowledge and explore further implications of the topic, prompt them to think about transferring what they did with Rudy to an actual human (you can tell them to imagine using the device on themselves, a friend, or their teacher). For example, they can be prompted to think about what additional constraints must be considered because the human will be moving. Encourage them to think about other constraints related to using similar designs on humans. This can either be done in writing or in a discussion among the entire class. In setting up this discussion, it is important to highlight the idea that engineers design and test their ideas many times before creating a final product.
To drive the idea home, the class can create a shared design using the best parts/functions of all the devices that were created. This directly connects to what the students learned about the EDP in the Explore/Explain phase of the lesson.
Connections to cooling can also be made by relating cooling to pumps and circulation; these topics are related to the students’ activity because they are acting as a pump circulating water through the devices. For additional information to present to the students on the topic of circulation and pumps, see the Teacher Background Information section of the teacher’s guide provided in Supplemental Materials.
Evaluate: Assess understanding
There are opportunities for formative assessment throughout the lesson as each student maintains an engineering workbook. The first opportunity for assessment is during the group discussion to determine if Rudy’s symptoms are heat stroke. An additional assessment checkpoint at this stage is when students work in small groups to list the considerations for the human body that must be in their solution. The subsequent assessment checkpoints are facilitated by using the teacher/student engineering design rubric (see Supplemental Materials). Student teams use the rubric as a self-assessment tool to check their work in the engineering workbook during the Ask, Imagine and Plan, Create, and Improve stage in the EDP. Using the rubric as a self-assessment tool helps students identify and define the problem to be solved, prioritize constraints and criteria, select a preliminary design that best meets the identified constraints and criteria, and evaluate the strengths and weaknesses of the design through testing. The teacher can use the rubric to check students’ understanding of the main ideas and concepts during each stage of the EDP and clarify misunderstandings.
Conclusion
Cool It! was purposefully designed to integrate math, science, and engineering practices in a meaningful way that piques student interest. The project allows students to use mathematical equations to determine how well their design meets the project criteria. By working through the EDP, students are encouraged to improve their designs to better meet the criteria. Overall, the project exposes students to the connection between real-world phenomena and problem-solving techniques that are beneficial inside and outside of the classroom.
Online Resources
“What Happens When You Get Heat Stroke?” [video]—https://bit.ly/3yHYglC
“Lancet Countdown: Heat Stress” [video]—https://ghhin.org/heat-and-health/
EPA Climate Change Indicators: Heat-Related Deaths—https://bit.ly/428S03X
EPA Climate Change Indicators: Heat-Related Illnesses—https://bit.ly/2EM5Mmf
Global Heat Health Information Network: Heat & Health—https://ghhin.org/heat-and-health/
Supplemental Materials
Engineering design rubric—https://bit.ly/3UgnSAo
Teacher’s guide—https://bit.ly/3mehUmT
Student workbook—https://bit.ly/3Ky4IT7
Jamie W. Gutual (jamiegutual@unr.edu) is a lecturer in the College of Engineering at the University of Nevada, Reno. Latanya Robinson (lrobi071@fiu.edu) is a PhD candidate at Florida International University. Adam Kirn is an associate professor in the College of Engineering at the University of Nevada, Reno. Indira Chatterjee is associate dean of engineering at the University of Nevada, Reno.
5E Engineering Labs Lesson Plans Mathematics NGSS Science and Engineering Practices STEM Middle School