
The Online Teacher
Conducting Science Labs in a Virtual World
Science Scope—November/December 2020 (Volume 44, Issue 2)
By Denise Wright
Students participating in lab experiences are an important part of any science course. When teaching science online, educators can create scaffolded experiences that allow students to experiment, study the world around them, collect data, and analyze it. Virtual labs provide concrete experiences that help students understand science concepts while allowing them to work at their own time and pace. In addition, some online experiments allow students to conduct labs that could not otherwise be done in the face-to-face classroom because of safety concerns or the lack of lab equipment (Roberts 2018).
Online science labs can help make science accessible by providing opportunities for all students to participate. For students with disabilities, virtual labs can contain accessibility tools, such as auditory descriptions, verbal feedback, keyboard navigation, and sonability (the use of nonspeech sounds to convey information). Online tools encourage autonomy as students build and design their own experiments, apply these lab scenarios to everyday life, and engage in scientific exploration (Perkins et al. 2012). As an online teacher, I incorporate virtual labs into my classroom using a combination of three strategies that are highly educational, engaging, and fun! These three strategies are virtual simulations, science at home, and the use of data sets.
Virtual simulations
There are a variety of open educational resources (OERs) that can be accessed to teach science labs online, such as CK12.org interactives, PhET virtual labs, PBS interactives, Howard Hughes Medical Institute Biointeractive, and Lab Exchange (see link in Resources to the Wakelet bookmarking tool for these free simulations and more). In addition to OERs, there are a number of free online labs and simulations available through organizations and university websites. Try searching for virtual simulations with key words such as online labs, virtual simulations, and virtual interactives (if you place the word “or” in between the two keywords it will bring up search results for both topics). When doing an online search for virtual labs, be sure to avoid Adobe Flash (URLs ending in .swf). Browser support for it was discontinued, and students are likely to experience issues with this file type.
I introduce lab simulations to students during a synchronous (live) session by completing a virtual simulation to demonstrate how to use the simulation. This is a great time to model your expectations, ask higher level questions, and check for understanding. It is also helpful for students to view and hear an example of how you expect postlab simulation questions to be answered. I place the written lab directions, a teacher-designed screencast that reviews the directions, and the simulation as an assignment in our learning management system. Prior to posting the screencast, I upload it to a website called Edpuzzle (for an example, see Resources). You can set Edpuzzle to pause the directions video at specific points and require students to answer teacher-created questions that check for understanding. I tell students they cannot complete the online lab until they receive a 100% on the lab directions video (Edpuzzle reports the student scores in an online gradebook). If a student is struggling with the lab, I call them and guide them through the lab simulation, but only after they have watched the video.
Another helpful strategy is to create a frequently asked questions (FAQs) discussion post in your Learning Management System (LMS). Students can use this area to ask questions and provide each other assistance. I check this discussion area for any misunderstandings and correct them during a live session or via a screencast. The screencast is then posted in the FAQs discussion area, and an email containing the screencast is sent to the entire class.
Some lab simulations contain student questions that can be used for formative assessment. For those that don’t, you can easily design your own to accompany the simulation. For example, a CK12.org simulation demonstrates the concept of density by using the sport of fishing. The student places lures of varying densities in the water. The lure’s density determines the depth at which the lure will float. In addition, there is a toggle in the simulation that allows students to change the mass and volume of each of the lure type (see Figure 1).
Some of the lab questions that I designed based on the density simulation include:
- Using the simulation, how does increasing/decreasing the mass of an object impact its density?
- Using the simulation, how does increasing/decreasing the volume of the object impact its density?
- After completing the simulation, explain how and why objects float. Would an object that has a density of .5 g/ml sink or float? Why or why not?
- In the simulation, click on “Make a Material” to design a fishing lure to go deep sea fishing. Discuss your values of mass and volume for the fishing lure. Why did you design the lure to have this density value? (See the CK12 Simulation Lab Data document in Resources.)
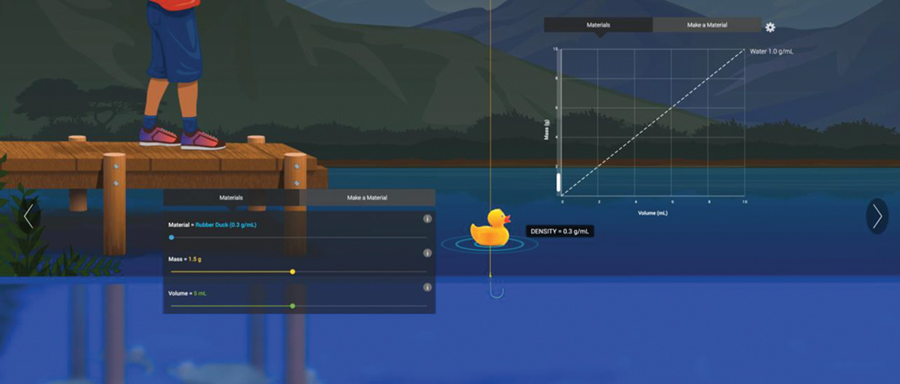
CK12.org virtual lab simulation on density (see Resources).
Once students complete the lab questions, I review their responses and provide written or verbal feedback on their document via Google docs or by using Screencastify (a Chrome extension). I prefer using Screencastify because it is more personalized. I have found students are more likely to listen and make corrections if the feedback is personalized. Screencastify is also beneficial for those students who are visually impaired, have a learning disability, or are English Language Learners. After returning their completed lab questions, I review the simulation with the correct answers during a live session using student exemplars and discuss how the student met or exceeded the expectations. Because middle school students are new to virtual learning and simulations, I allow them to resubmit the work corrected for a higher lab grade. This sets a positive tone and sends the message that you want your students to succeed.
Virtual lab simulations can also be purchased through a school district subscription service such as Explore Learning Gizmos or Labster. These labs include exclusive access to the online simulations, student lab questions, and teacher answer keys.
Science experimentation at home
At-home science activities allow students to collaborate with family members to create memorable learning. Because we were learning about density this past spring, I asked my students to create a density column with any five food or drink liquids in their home and gave suggestions for the materials during our live session. Some of the suggestions included olive oil, cooking oil, milk, water, salt water, juices, corn syrup, maple syrup, and salad dressing. I advised my students to wear safety goggles, an apron, or old T-shirt and to work under the supervision of a parent. I had the students create the density column in an old water bottle that could easily be thrown away. Once their density column was complete, they posted pictures of their density columns to our virtual class bulletin board on Padlet. (I choose to use Padlet for its numerous and varied features.) The students also listed the five food/drink items used and their densities (which were obtained via an online search; see Figure 2). During our live session, I shared my screen displaying the class Padlet, which led to discussions about the density columns on the screen. Other at-home experiments my students have conducted include making paper airplanes to evaluate the physics of flight, combining yeast and sugar to observe carbon dioxide bubbles produced by respiration, and recording a toy car going down a ramp at different inclines to explain how to calculate speed and acceleration.
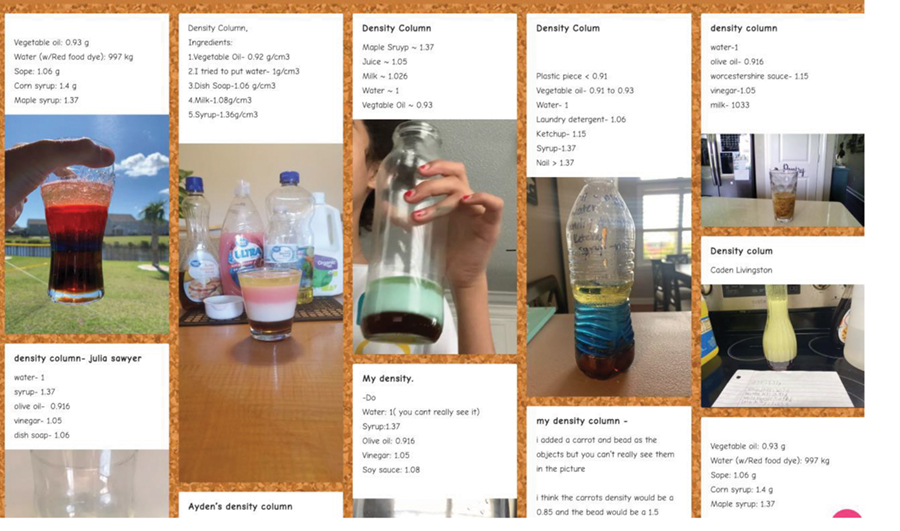
Students created density columns with liquids at home. After taking a picture of the results they uploaded it to a virtual bulletin board tool called Padlet (see Resources).
When having students complete experiments and projects at home, be flexible and understanding of the materials that are available to students. In some situations, students may have difficulty obtaining even common household items or may not have the support of an adult. You can address this by allowing students to create a digital version of experiments using a technology tool of their choice. For example, students can simulate the creation of a density column by looking up a set of liquids online and either drawing the column on paper or using a software program or app to design the column.
Safety and at-home science
There is no shortage of at-home science videos, articles, and websites that can assist you in finding ideas for students to conduct science activities at home. Places to find at-home science activities include Scholastic, Pacific Science Center, and STEM Scopes. When selecting at-home science activities, be sure to preview the videos for clarity and safety and consider the materials, age appropriateness, and how the lesson aligns with your curriculum standards. Always follow the NSTA Safety Guidelines (see Resources) when assigning any at-home science activity, and require that an adult be present when students are conducting experiments. When reviewing the directions be sure to emphasize and demonstrate proper safety precautions, such as the wearing of goggles, aprons, and gloves. Select only those experiments that require basic household or food items. Stay away from activities that involve any kind of chemicals or cleaning products. Be aware that common activities such as cooking and cutting materials with knives pose a hazard to students and should always be conducted under adult supervision.
Data sets
It is easy to find data sets from your local community such as changes in tidal currents, rain levels, temperature, and environmental landscape. The data sets can create prompts for asynchronous and synchronous discussions, as well as opportunities to interpret graphs and recognize patterns in the environment. Some of the places to find the data sets are: Weatherunderground.com, Tideforecast.com, National Oceanic and Atmospheric Administration, State Park websites, and your State Department of Environmental Resources. For example, my students analyzed ocean tide graphs and the moon phases to determine when the next “King Tide’’ would be in our area (King Tides are the highest and lowest tides of the year). After analyzing the data, students predicted when the next King Tide would occur and reviewed photos of the shoreline before and after the King Tide struck. The “after pictures” showed the impact of rising sea level and storm surge, creating an awareness of King Tides and how we should prepare and plan for these damaging events.
Another piece of data we explored was related to ecological succession (see Figure 3). Our community experienced a forest fire 10 years ago that burned 20,000 acres of forest. After the fire, photographs of the area were taken over the 10-year time period. Students could observe charred trees, small plants, and grasses in photos one year after the fire. When viewing a photograph taken six years later, the charred trees could no longer be seen; new trees were growing and the landscape was full of plants. From this photographic evidence, students were able to observe stages of secondary succession. Consider the community or state in which you live. Think about how you can use environmental data to help students improve their skills of making predictions, analyzing patterns, reading, and interpreting graphs. Some ideas of data to analyze in your local community are river levels, sunrise/sunset times, and biodiversity of plants and animals.
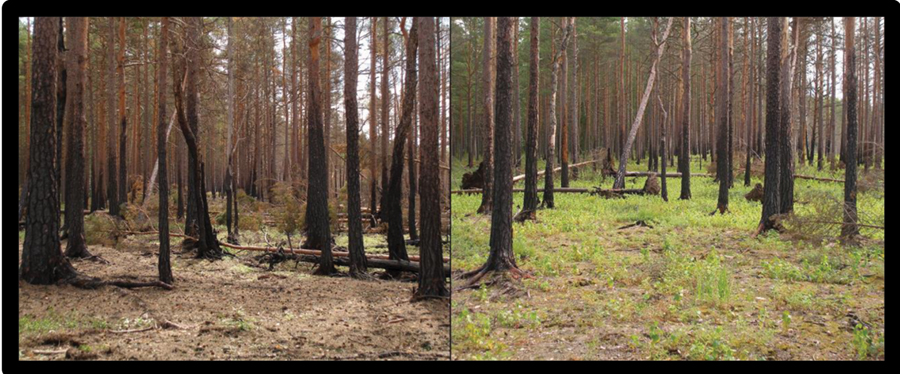
This is photographic evidence showing ecological succession. Photographic evidence can be valuable when analyzing data (https://commons.wikimedia.org; see Resources).
Summary
Online science labs can be rich experiences that students enjoy. Teachers can include labs in online learning by using:
- Virtual simulations that include written directions, a screencast explaining directions, and questions for discussion.
- Science experimentation at home with an emphasis on safety and family involvement. In this environment, don’t forget that flexibility can be provided by allowing digital options, which allows for student choice and equity. The results of these experiments can be shared on a virtual bulletin board. When conducting at-home science experiments, follow NSTA safety guidelines and require parent supervision.
- Data sets are a great way to get students to analyze scientific data.
Online science courses can contain virtual labs that can be applied to real life applications. In the online world, students have the opportunity to create their own experiments, analyze data, and participate in meaningful learning.
Resources
Boreal pine forest after fire—https://commons.wikimedia.org/wiki/File:Boreal_pine_forest_after_fire.JPG#/media/File:Boreal_pine_forest_after_fire.JPG
CK12—https://www.ck12.org/search/?q=interactives&referrer=search
CK12.org virtual lab simulation on density—https://interactives.ck12.org/simulations/chemistry/density/app/index.html?screen=sandbox
CK12 simulation questions—https://docs.google.com/document/d/1-Y75MNuRTSzLDQ7-3iK0bjLnL_cvMj7Ta7CGMYTVLU4/edit?usp=sharing
Collection of OER Virtual Labs—https://wke.lt/w/s/TK7ptw
Density At Home Activity Questions—https://docs.google.com/document/d/1M3U_FYdQcnlPjEDZQJzQrdHqywCw1
DdHWQXjYiFmae0/edit?usp=sharing
Edpuzzle Example—edpuzzle.com/media/5f19fd5187c4ef3f65b14a52
Explore Learning Lab Gizmos—https://www.explorelearning.com/
Howard Hughes Biointeractive—https://www.biointeractive.org/classroom-resources?search=&f%5B0%5D=resource_type%3A17
Labster—https://www.labster.com/
LabXchange—https://www.labxchange.org/library?q=interactives&page=2&size=24&order=relevance
NSTA Safety Guidelines—https://static.nsta.org/pdfs/MinimumSafetyPracticesAndRegulations.pdf
Padlet—https://padlet.com/dwright30/shv8cqay285ns0ax
PBS Interactives—https://scetv.pbslearningmedia.org/collection/simulations/
PhET—https://phet.colorado.edu/en/simulations/filter
Wakelet (virtual lab resources)—https://wke.lt/w/s/TK7ptw
Science At Home, Pacific Science Center—https://www.pacificsciencecenter.org/events-programs/curiosity-at-home/
Science At Home, Scholastic—https://www.scholastic.com/parents/kids-activities-and-printables/activities-for-kids/math-and-science-ideas/easy-and-mess-free-science-experiments.html
Science At Home, STEM Scopes—https://www.stemscopes.com/distance-learning
Tide Forecast—https://www.tide-forecast.com/
Weather Underground—https://www.wunderground.com/
Denise Wright (ienjoyteaching@gmail.com) is an experienced online instructor who currently teachers science at Ocean Bay Middle School in Myrtle Beach, South Carolina. You may contact her on twitter: @DenisecWright or at dwright@horrycounyschools.net with any questions or suggestions you may have for future columns.
Inclusion Labs Teaching Strategies Technology Grades 6-8