
Preparing the classroom and school grounds for science exploration
By Peggy Ashbrook
Posted on 2013-08-29
As we set up our classrooms and examine the school grounds we can make space for science exploration by putting out some simple tools and seeking advice from experienced teachers. If you have advice on setting up a classroom to support science exploration and engineering investigations, please give us advice by commenting below. Here are a few ideas I’ve learned from other teachers, and researchers, and used over the years.
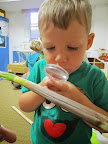 Magnifiers are a tool that can enhance children’s explorations. I have seen two-year-olds learn how to hold magnifying glasses to get a close-up look at leaves, feathers, and other interesting objects. A variety of these tools can be available to be used throughout a school:
- in the dress-up area for imaginative play or looking closely at fabrics,
- in the book corner for examining illustrations,
- at snack time to see the wrinkles in a raisin or the fibers of a celery stick,
- outside on the playground or in a teacher’s pocket to be available to look at small creatures or grass leaves, and
- at the fish tank to see the details of a fish’s body.
Measuring tools such as chain links, stacking cubes, measuring “hands” (see Oct 2006 The Early Years column) and rulers encourage children to make comparisons and document their observations. Bathroom scales, spring scales and balances are useful for measuring how much something weighs and answering the question, “Which one weighs more?” Measuring cups of various sizes with numbers on them support children’s exploration of volume of water or sand in the sensory table or on the playground.


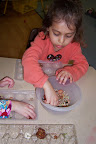 Egg cartons or other small boxes suggest making a collection and sorting—leaves, seeds, pebbles, beads, jar lids or alphabet tiles.
 Tools for exploring the properties of water can be as small as a pipette or dropper, and as large as a turkey baster, or even a hose! A variety of sponges supports comparing the ability to absorb water. A length of clear plastic tube can be part of an investigation into the movement of water or marbles.
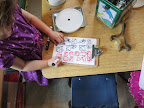 Small clipboards are fun for children to use to record their observations through drawing or writing. “Writing” can happen anywhere inside or outside a school, not just at a Writing Center. If you have a Science Center, be sure to include paper and drawing tools so children know that scientists draw and write about what they observe and think.
 Adding “water plants” or “feed fish” to a Job Chart is one way to involve all children in daily science tasks. If they have a recording page to draw on they may spend a bit more time in the process and notice a new leaf budding or the movement of the fish’s tail.
Check to see how sunny the windowsill is–you may be able to grow non-toxic houseplants such as spider plants or start seedlings for the fall school garden.
A space for conversation and group discussion while viewing documentation or introducing new materials is as important as the materials themselves. Reading about productive questions and “science talk” prepares us to develop these practices in ourselves and students. Science investigations take root where teachers lay the groundwork!
Disclaimer: The views expressed in this blog post are those of the author(s) and do not necessarily reflect the official position of the National Science Teaching Association (NSTA).