Elementary | Sponsored By: Corteva Agriscience
This Land Is Your Land

Earth & Space Science Is Lesson Plan Lesson Plans Elementary
Adapted from This Land is your Land by Ann Kennedy, Tami L. Stubbs, and Jeremy C. Hansen
Science & Children | December 2006 | Vol 44, Issue 4
Objective
After demonstrating the amount of soil covering Earth and how it is retained/eroded, students will work creatively as “farmers” to prevent soil erosion and save their farm, learning about a real-world problem.
Our Thin Layer of Soil:
Plants Make the Difference:
Protecting Farmland:
- Two apples of similar size
- Knife
- Three plastic shoeboxes, two-thirds full of regular garden soil. Boxes need to contain soil with varying degrees of plant cover: loose soil with no plants growing and no cover; soil with no plants growing and some type of cover (either straw or dried leaves); and intact soil with plants having welldeveloped root systems, like lawn sod.
- Four 500 mL clear plastic containers
- Three 5 cm X 10 cm blocks
- Sink or washbasin to collect excess water
- Plastic shoebox partially filled with moist sand and one 5 cm X 10 cm block about 15 cm long
- 5 small items representing the different buildings on a farm
- 4 to 5 rocks of different sizes
- 2 to 3 pieces of old sod
- 2 to 3 pieces of Spanish moss
- 3 or 4 trees from plastic floral arrangements
- 500 mL containers
- Water
- Big tubs or trays to catch water
- Paper towels
- Data sheets
Our Thin Layer of Soil Activity
Start with an apple to represent Earth and a sharp knife.
- Slice the apple into four quarters. Three-fourths of the apple represents water—set aside.
- Slice the land quarter in half, giving two 1/8 pieces. One-eighth of Earth is inhospitable to people (polar ice caps or mountain peaks)—set aside; 1/8 of Earth is the land area upon which people live and grow crops.
- Slice the 1/8 portion in half, giving two 1/16 pieces. One-sixteenth of Earth is too cold, wet, rocky, or dry to grow anything, especially food crops—set aside; 1/16 of the Earth can produce food for humans and animals.
- Slice the 1/16 in half again, giving two 1/32 pieces. One thirty-second of Earth is covered with highways, parking lots, malls, houses, and cities, so we are left with only 1/32 of Earth that can be used to grow food for humans and animals.
- The soil that we can use to grow food is even less. Carefully cut the peel off the 1/32 section, and compare it to the whole apple. This represents the surface of Earth and the soil that is used to grow food for humans and animals. We grow food in the top couple feet (that’s less than one meter!) of soil surface.
Plants Make the Difference! Activity
Now that students have an idea of the small amount of soil available for farming, this demonstration shows them how soil is conserved and what can occur if it is not.
- Prepare three plastic shoeboxes of the same size using regular garden soil to fill boxes two-thirds to threequarters full. Place one end of each shoebox on a block, so that the shoebox is on a slant and one end is 10 cm high. Measure 250 mL of water in a beaker. Have students predict what they think will happen and what the runoff from each of the three boxes will look like.
- Pour 250 mL of water at the elevated end of each shoebox, in the center and at the same height above the box. Have student volunteers collect the runoff water into a clear container. The students record the volume of the water and what the runoff water looked like (i.e., clear, a little muddy, or very muddy).
- Ask students which type of soil system they think would result in the least erosion. When the class agrees that the best way to hold soil in place is by having roots or some surface cover, they are ready to move to the next activity. Ask students what type of runoff would they want if they were farmers; emphasize that farmers want to keep their soil on the land—this leads into the next activity.
An adult should do the apple cutting demonstration, keeping the knife away from students at all times.
No matter what type of soil is used, make sure students wash their hands after the activity.
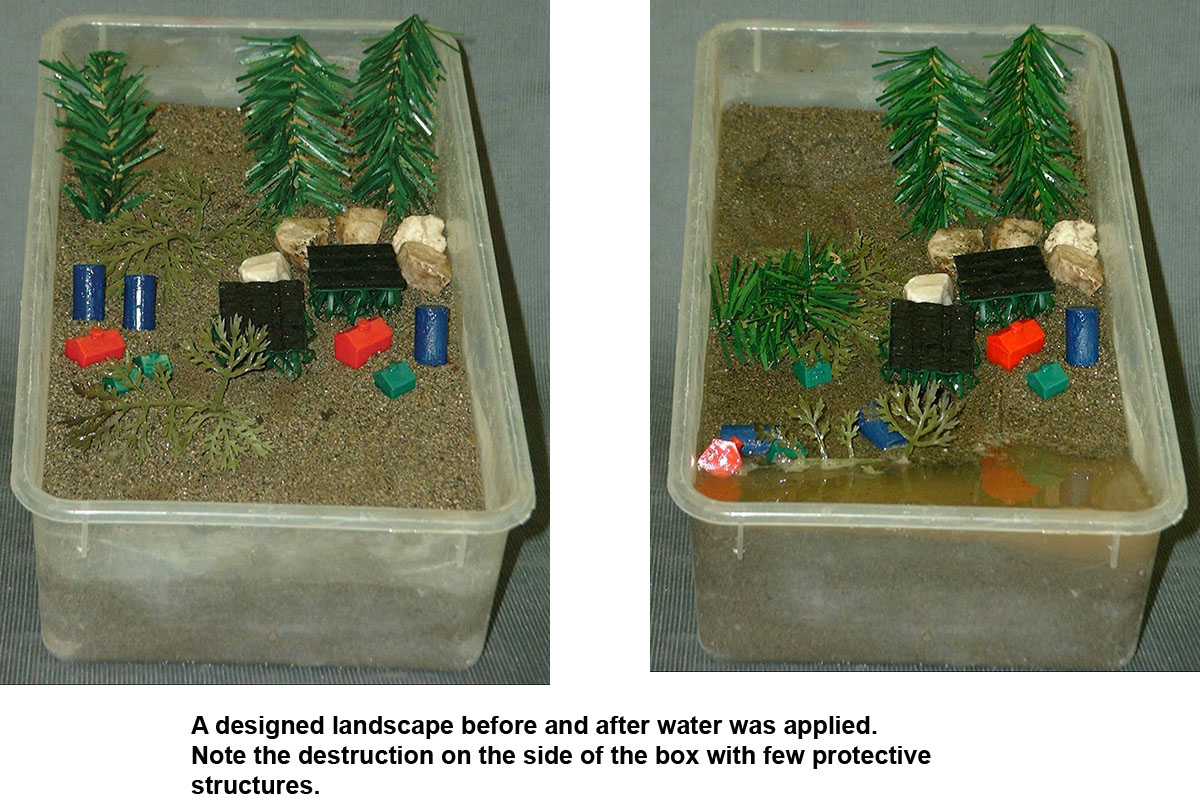
Protecting Farmland Activity
Students are responsible for designing and building a farm on their own land. The objective of this exercise is to protect the buildings and crops of the farm so they are not flooded or washed away.
- Students create their own model farms with the materials listed on at the top.
- Have students place one end of their shoebox on a block about 10 cm high. The uphill end will be where the “rainwater” is poured. Students will need to leave about 5 cm at the top and bottom with no landscape pieces for the water to collect. The students should think about which material would best protect their buildings and crops while diverting the water or holding soil. Some students will want to dig drainage ditches to protect their farmstead which is not allowed. Any sort of a ditch diverts water away from the landforms and students will fail to understand the purpose of the exercise.
- Students arrange the pieces on the surface of the soil. Buildings should be placed on the soil surface and not clustered together. The only pieces to be embedded in the sand are the sod, rocks, and the “roots.” Instruct students to draw a diagram of the farm on a data sheet. They should make predictions of what will happen when the water is poured—what will stay in place and what will move.
- Have students measure water in a beaker (150 mL) and pour it in the middle of the uppermost portion of the shoebox in a steady stream, as in the Plants Make the Difference! activity. If time permits, have students pour the water one shoebox at a time so they can observe each other’s results. They should complete their data sheets by drawing an “after” diagram of the farmstead.
- Follow the activity with a discussion of the results. Ask students to describe what happened to their landscapes and if it matched what they predicted. Discuss the importance of plants and roots in reducing erosion. Allow students to redesign and repeat the experiment as time permits. Note, additional dry sand may need to be added to soak up standing water.
Post Assessment
A successful farm is one where students are able to protect their crops and buildings from washing away. We end up tying all three activities together with student self-assessment questions.
Assessment Questions
- What can you do to help stop soil erosion at your house or on your farm?
- If a farmer came to you for help in stopping erosion on their land, what would you tell them?
- What was the most important thing you learned today?
- What part did you most enjoy? Why?
- What other questions do you have about soil erosion or soil conservation?