
A recipe for success
By admin
Posted on 2009-12-11

Creative Commons handwritten recipe photo posted to flickr by Deb Roby.
So much of science involves communication and skills in language arts. Follow this simple recipe to help your students become science communicators: Add 1 cup of science (life, Earth, physical, or general) to 1 cup of language arts. Blend well by attending sessions at the NSTA conference in Phoenix.
Sample these recipe variations.
Elementary Science Surprise
You’ll actually make ice cream—as well as build molecular structures and integrate elementary trade books—in the session titled “Infusing Literacy and Mathematics Skills in the Science Content of the Elementary School.” Science never tasted so good!
Earth Science as a Main Course
“Science, Math, and Literacy: The Three Essentials Needed for Success” will help teachers serve these three important ingredients, flavored with Earth science.
Chemistry Cookies
“Stirring Up Reading in Chemistry” will have middle school, high school, and college teacher “chefs” producing smart cookies who can understand what they read in chemistry. Are you hungry yet?
Creative Commons handwritten recipe photo posted to flickr by Deb Roby.
Exploring light
By Peggy Ashbrook
Posted on 2009-12-10
Young children love using a periscope. Maybe because when you look through one, the view is not what your brain expects, somewhat like using someone else’s glasses. (My sisters and I used to take turns running down a hallway wearing my mother’s glasses. This was probably early in the morning and she’d do anything for a few more minutes of rest. Because she has an astigmatism, when we looked through her lenses we saw the floor sloping away from us, a thrilling sight because it did not agree with the input from our feet—and our memory—which told us the floor was level. It was fun! What can I say, we didn’t have a TV…)
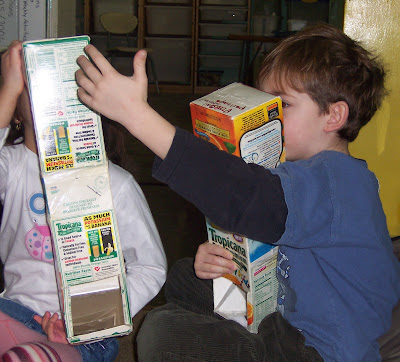 Surprisingly durable periscopes can be made using two cardboard half-gallon or quart-size milk or juice cartons, two small rectangular Plexiglas mirrors (size depends on the carton size), and clear packing tape. A wonderful thing about making your own is that you can fix it easily if someone steps on it or if the tape comes undone. You may as well make two or three while you are at it, to reduce competition for using them in the classroom.
Here’s how:
- Open the tops of the cartons completely, clean and dry them.
- Cut a square hole on one side of each carton, about ½” from the bottom –all the way across the side of the carton and an equal height up, to form a square.
- Position the cartons together so the open tops are touching and the cut holes are on opposite sides. The body of the periscope, formed by the two cartons, needs to be fairly straight to give a clear view so you may need to cut off the folded top portion from the length.
- Overlap the tops and tape them together, inside and outside.
- Now put each mirror in through a cut hole and tape the front edge of the mirror to the carton just inside the opening of each hole.
- Tape the opposite edge of the mirror against the far wall of the carton so the mirror rests at an angle.
- When both mirrors are in place you should be able to look into one and see what is reflected in the other. You may have to adjust the angle of the mirrors or straighten the cartons to get the best view.
The view will not be perfect unless you are very accurate with your cutting and the mirror angle, but children don’t seem to mind.
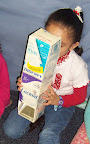 Children may need an introduction to the joys of creeping around a classroom looking through a periscope. Tell them that a periscope is a tool to see around corners. After a period of play, have the children pass it around the circle and ask them, “What do you see when you look into the periscope? How many mirrors are used inside?” The children can reach in through the holes and touch their hands together to learn about the construction. Older children can diagram out the construction (or even assist in the making) to show where the image (light) enters the periscope and where it exits.
Books to support learning about light and reflection include:
- I See Me by Pegi Deitz Shea, illustrated by Lucia Washburn (boardbook). 2000. HarperFestival.
- Shadows and Reflections by Tana Hoban. 1990. Greenwillow Books.
- Seven Sillies by Joyce Dunbar, illustrated by Chris Downing. 1993. Western Publishing Co.
- Reflections by Ann Jonas. 1987. Greenwillow Books
- Make a Bigger Puddle, Make a Smaller Worm, The Magic Mirror Book (Scholastic 1979) and the Mirror Puzzle Book (Tarquin 1986)—all by Marion Walter.
Read The Early Years column about predicting the path of light in the December 2009 Science and Children. Bring some light into your classroom with flashlights, mirrors, and periscopes. Children will be interested in documenting their exploration and thinking with drawings and dictated words in a Mirrors and Light “notebook” (several sheets stapled together). Email me a photo file of your children’s work and I’ll include them in a later post. (No faces or names please—they will know it’s theirs.) The address is: science is simple at yahoo dot com, no spaces.
Peggy
Young children love using a periscope. Maybe because when you look through one, the view is not what your brain expects, somewhat like using someone else’s glasses. (My sisters and I used to take turns running down a hallway wearing my mother’s glasses. This was probably early in the morning and she’d do anything for a few more minutes of rest.
STEM: Science, Technology, Engineering, and Mathematics
By Mary Bigelow
Posted on 2009-12-06
 How many of use chose careers in science, technology, engineering, or mathematics because of our experiences in school? Some topics or activities must have stimulated our interest and curiosity, and the authors in this month’s edition share some of their suggestions for integrating these topics to develop student interests in STEM.
Teaching with Laptops describes how this technology can provide variety of applications to differentiate assignments and activities, The PhET Simulations, mentioned in the article, have online visualizations in the sciences and math that allow the student to manipulate variables and analyze the results. (I wish my college physics classes would have had this type of visual learning tool.) The article also has a chart showing how the technology is an integral part of warm-up activities, investigations, assessments, and homework. The authors suggest adaptations for classrooms that do not have 1:1 computers.
“Finding real-world scientific data for use in the science classroom can be a challenge,” according to Solar Radiation: Harnessing the Power. In this activity, students used one of the real data sets from NASA (My NASA Data), students develop skills in analyzing and graphing data as they learned about Solar Energy. Another source of real-life data sets is a resource from NOAA: Data in the Classroom. Each earth-science related module has five levels of lessons ranging from teacher-presented ones through letting students explore the data to full-blown problem solving and invention. Each module shows the associated data in a variety of formats and guides the users through how to interpret it.
Drawing a diagram, labeling a handout, or dissecting a cow heart are useful activities in studying anatomy. But the author fo Working Model Hearts describes a project in which students make a working model to demonstrate their learning in physiology. Check out SciLinks for more resources about the heart.
The illustrated timeline in Our Polar Past shows that much of the exploration has taken place within the past 100 years. As students study the history of these explorations (which did not have the communications or survival technology of today), they can also get an update on recent explorations from Polar Discovery, including video clips, interviews with the scientists, and a comparison of the Arctic and Antarctic regions.
Earlier this month, President Obama announced the establishment of National Lab Day, a new science education initiative aimed at improving labs and inquiry-based science experiences for students in grades 6–12. The project website has many interesting possibilities for STEM projects, including a request for volunteer assistance and lists of resources.
How many of use chose careers in science, technology, engineering, or mathematics because of our experiences in school? Some topics or activities must have stimulated our interest and curiosity, and the authors in this month’s edition share some of their suggestions for integrating these topics to develop student interests in STEM.