
Feature
Engineering Clean Water
An integrated STEM activity involving water filtration and design
Engineering practices can foster critical thinking, problem solving, and communication skills. The emphasis of engineering practices in the Next Generation Science Standards underlines the importance of exposing students to STEM content areas and encouraging them to pursue STEM-related fields. Research indicates that STEM-integrated curricula and pedagogies have the potential to support student learning, nurture interest in STEM disciplines, and prepare students for future careers (Apedoe et al. 2008). Through engagement in these fields, students can develop the ability to think critically, solve intricate problems, and drive advancement that maintains a steady progression of society (Apedoe et al. 2008).
One such instructional pedagogy that works well with STEM integration is problem-based learning (PBL). Problem-based learning is a student-centered instructional approach that emphasizes practical experience in supporting learning (Hmelo-Silver 2004). In PBL, learning centers on a complex problem that does not have a single correct answer (Hmelo-Silver 2004). The learning environment is student centered, with the teacher as facilitator (Hmelo-Silver 2004) and responsible for providing guidance through scaffolding, modeling, and questions.
Learning in PBL does not initiate until the students have encountered an “ill-structured” problem, one that does not have all the necessary information to develop a solution (Chin and Chai 2008). These problems represent authentic real-world situations and can support STEM integration by providing students with rich interdisciplinary learning experiences that can cultivate higher-order thinking skills. One way to engage students in problem solving to solve an ill-structured PBL problem is through an Engineering Design Process (EDP).
Engineering Design Process
An Engineering Design Process allows students to mimic the way engineers solve complex real-world problems (English, Hudson, and Dawes 2013). More specifically, this iterative process allows students to ask questions, plan, test, and improve possible solutions, ultimately creating the best possible solutions. Engineering design lessons that focus on solutions and construction can stimulate creativity and foster critical-thinking and problem-solving skills (Siew, Goh, and Sulaiman 2016). In the following activity, the five steps of the engineering design process—Ask, Imagine, Plan, Create, improve—were used to solve a STEM problem-based challenge.
Filtration System Challenge
The problem scenario in the PBL activity described here engaged fifth-grade students in a six-week challenge to design a filtration system. In this PBL activity, students learned about various states and characteristics of matter, including filtration. This allowed the students to tap into their understanding of the disciplinary core ideas related to structure and properties of matter. The students worked on this challenge two days a week for 60-minute blocks.
Week 1: ASK
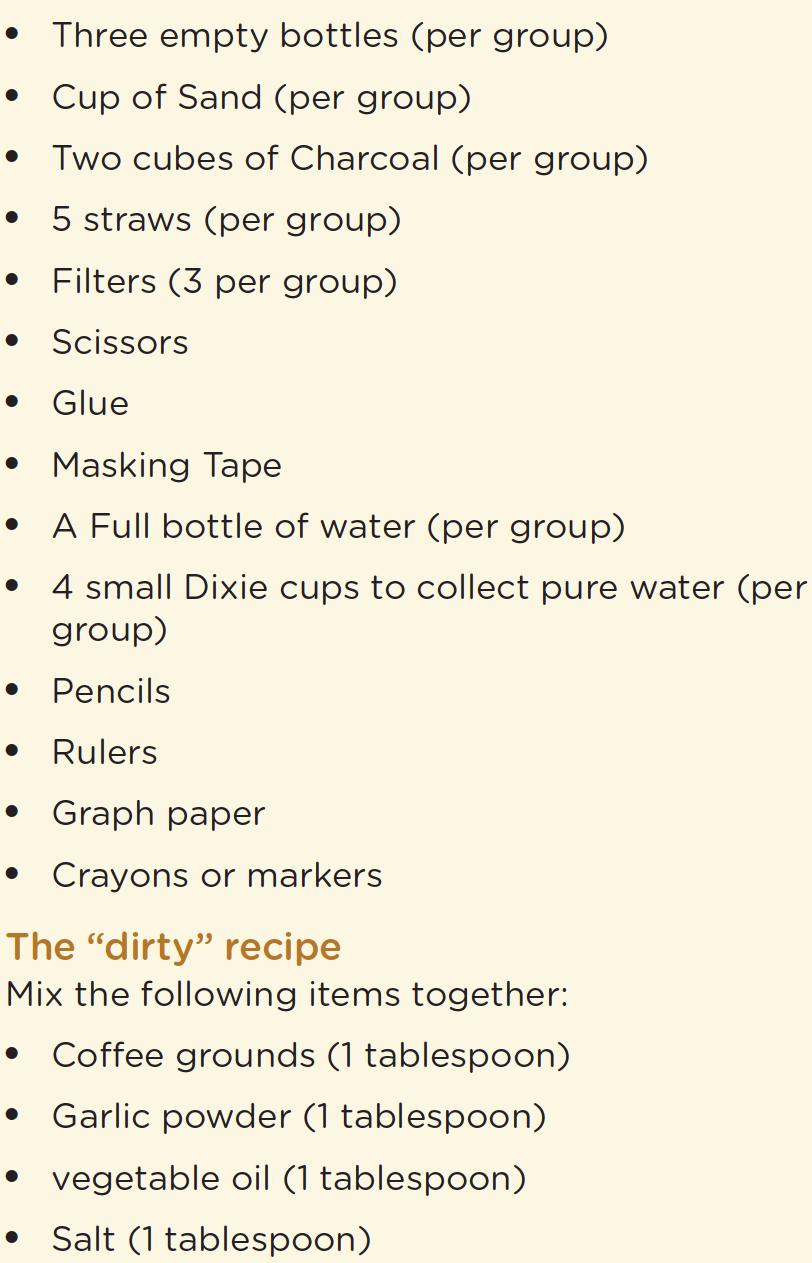
The lesson initiated with the teacher reading the problem (Figure 1). Students were asked to design a filtration system that can be used by people to purify water for drinking. This system needed to be created using inexpensive materials (Figure 2) to make it affordable for individual households to acquire. To sustain engagement, students were told that the best filtering system prototype would be shared with Aquasana, a water filtration manufacturing company, as well as the EPA, who will judge the quality of water. During this week, students read the problem scenario, identified the constraints, and asked questions.
The problem scenario
Filtration challenge materials.
The teacher used a need to know chart to have students ask questions and identify the problem. The three columns on the chart included: What do you know? What do you need to know? How can you find out what you need to know? The students were allotted 10 minutes to read the problem individually again and fill out information on their chart. Once the time was up, the teacher had them share with the person next to them. The teacher then engaged the students in a whole-group discussion to share their responses to each column, which was noted on the class chart (see Table 1).
| Table 1. The need to know class chart. | ||||||||||||||||||||||||||||||
|---|---|---|---|---|---|---|---|---|---|---|---|---|---|---|---|---|---|---|---|---|---|---|---|---|---|---|---|---|---|---|
|
Next, the teacher posed two questions (1) What is a filtration system? (2) What can cause water to be polluted? One student used his experience to respond to that question, “it’s a system used to clean water.” While another student stated, “I have one, that I put on a jug,” referring to a pitcher-based water purifier. Similarly, in regard to the cause of water pollution, student examples included, “people put waste in our rivers and lakes that cause pollution,” or “fertilizers on the plants can cause pollution,” and “oil spills cause water pollution.” All the student responses were recorded on a whiteboard. The class then watched a video on the filtration system and saw images of water pollution.
Next, the teacher divided the students into teams of four. The students were assigned to teams to accommodate the different skills of the students in the classroom. There was one ESL student in the class, who was placed on a team that had a student who spoke the same language. Because the unit was student-centered and hands-on, employing videos, internet, and children’s books conveniently allowed for integration of ESL strategies. Once the teams were formed, they were asked to decide on a name for their engineering firm (e.g., Whirl-Proof Environmental Engineers).
Prior to students exploring possible solutions and diving into planning, creating, and testing, classroom rules and safety procedures were discussed. This included appropriate ways to use supplies and no running or yelling in the classroom. Students were asked to at all times wear safety goggles to prevent any dirty water from splashing into their eyes.
Week 2: IMAGINE
Imagine was the focus of week 2. Students had an opportunity to use their Chromebooks to conduct research on various water filtration systems. As the teacher walked around to facilitate the learning, she saw students searching various water systems and how they functioned. It should be noted, the teacher did not offer guidance on determining which materials would work best for the filter. Part of the focus of week 2 was to allow the students to imagine their own different options. The students were only limited by what they were able to research online and the list of materials provided. During this week, students sketched multiple designs of a filtration system in their science notebooks. The designs incorporated the list of materials (Figure 2) the teacher had on the board and in their team bucket. The students were able to utilize all or some of the materials to create their filtration systems as they desired and deemed effective. After sharing their designs with their teammates, as a team they engaged in discourse to combine their individual designs and imagine one best possible solution. In their science notebook, they drew this final design that they as a team agreed upon and explained why the selected design would be appropriate for the challenge. Having students gather information and explain their design solution seamlessly integrated the science and engineering practice of constructing explanations and designing solutions. Last, students watched a video on the engineering design process to help them understand the iterative process.
Week 3: PLAN
Students were introduced to the plan step of the engineering design process via a book called What! Cried Granny (Lum 2002). This book provided students with examples of planning through drawings and a sample blueprint presented in the book. The illustrations in the book aided to jump start the planning process. The teacher read the book aloud to the whole class and shared images in the book plus several other examples of blueprints to provide students with some reference. After, the teacher handed graph paper to each team to create their blueprints. Students worked in their teams to plan out their filtration system prototypes and create a blueprint that highlighted materials and dimensions of their filtration system. Students were asked to make sure their blueprint specified materials, amount of materials required, and the dimensions of their prototype. The creation of blueprints fostered students’ understanding of mathematical modeling. Once student teams completed their blueprint and it had been reviewed by the teacher, they were allowed to gather their materials and begin creating. The review of the blueprint was a way for the teacher to formatively assess the students’ design as well as their progress. During this process, if the teacher recognized a team having difficulty, whether it be with conceptualizing their design or teamwork issue, the teacher facilitated a discussion with the team to help them reach consensus or provide guidance.
Week 4: CREATE
The fourth step of the engineering design process, create, was initiated with a book called The Most Magnificent Thing (Spires 2014). In this book the character and her dog have an idea to make the most magnificent thing, but after repeatedly trying, she gives up due to frustration and anger. However, her pet dog convinces her to try again and eventually, after she “tinkers, hammers, twists, and fiddles” (Spires 2014, p. 21), she ends up with her most magnificent thing. The book helped to reinforce the concept of trial and error as well as perseverance, while reinforcing the science and engineering practice of planning and carrying out investigations.
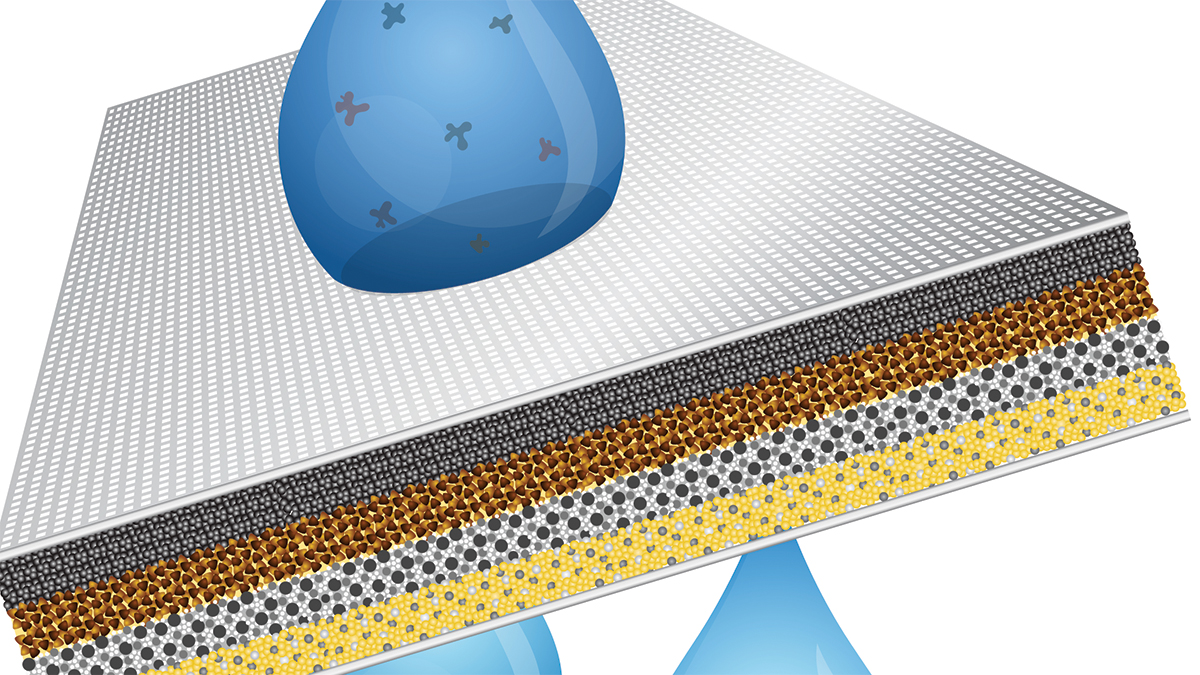
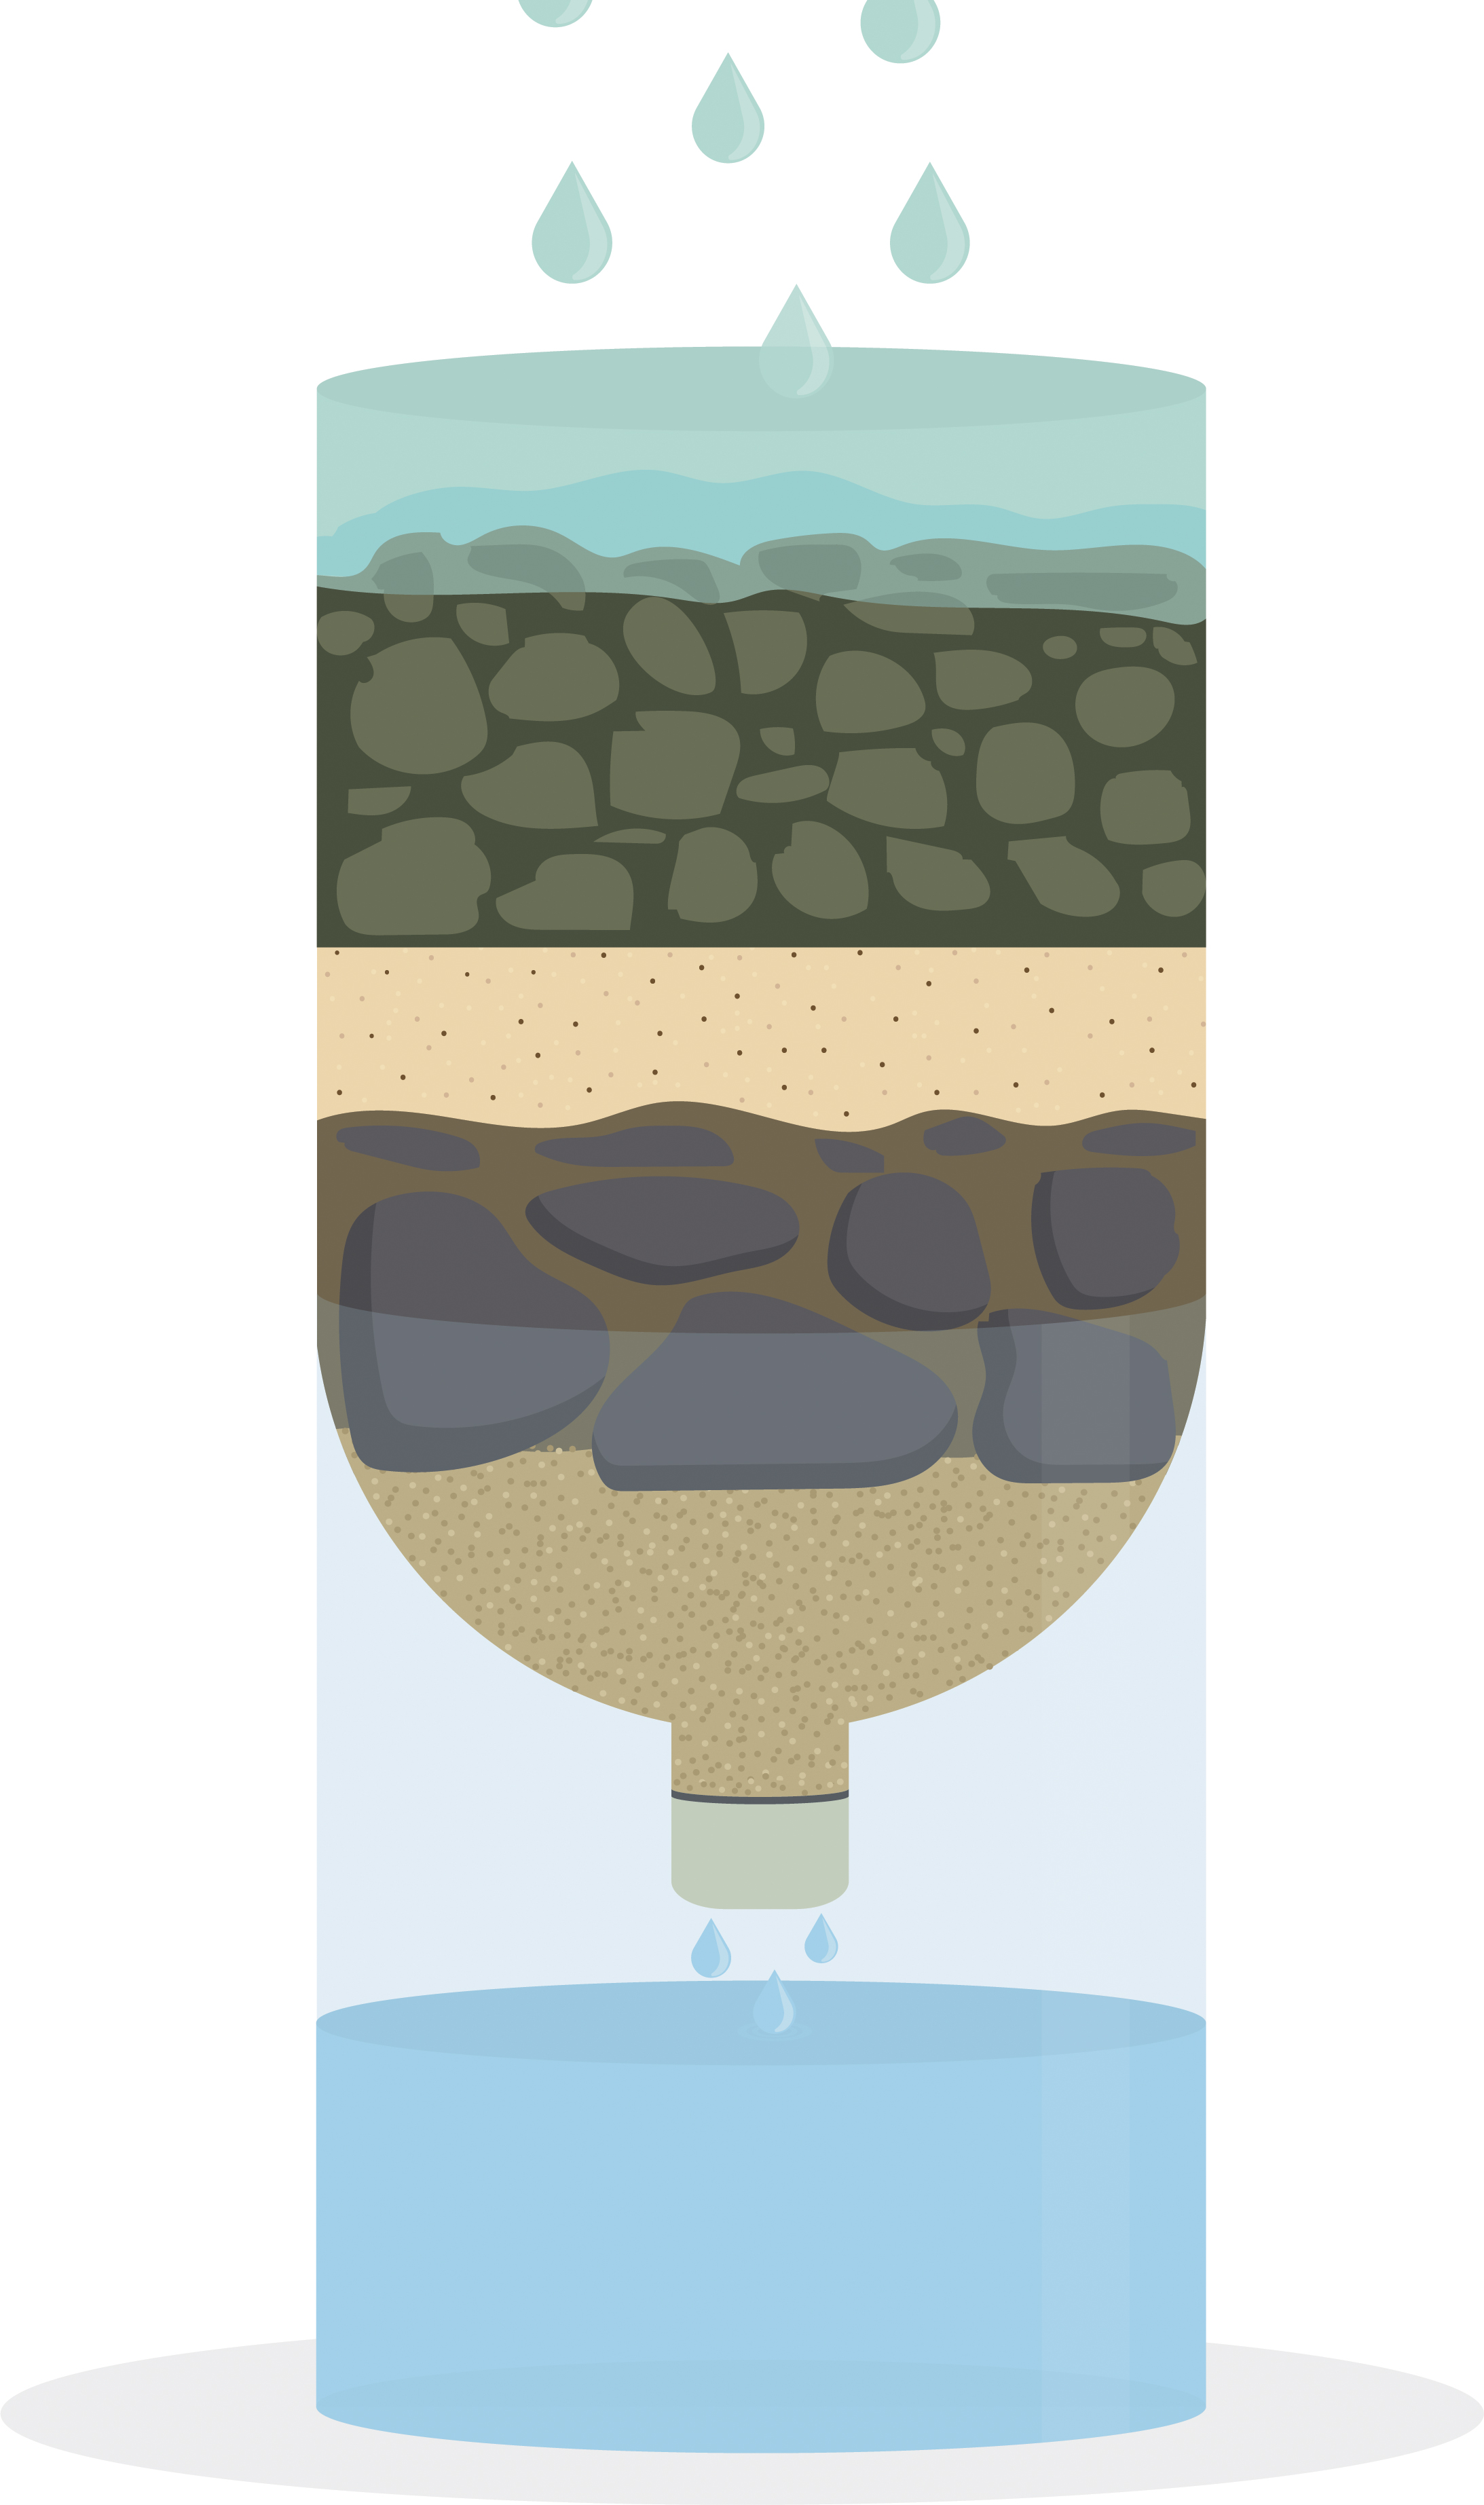
Students used filters to remove oil; sand to help hold solid particles from going through; and charcoal to remove odors, cloudiness, and bad taste. During the test process, students were asked to measure using measuring cups how much “purified” water
After the book was read, students began working with their teammates to create and test their prototypes. As they worked on their designs, they kept notes in their science notebooks regarding issues with their designs and/or strengths of their design. Although students had access to all the materials identified, they had a choice in whether to incorporate all materials in their design or only some, allowing them to strategize which specific materials would be appropriate for their design. Depending on the materials each team decided to use, students were able to test how well certain materials filtered.
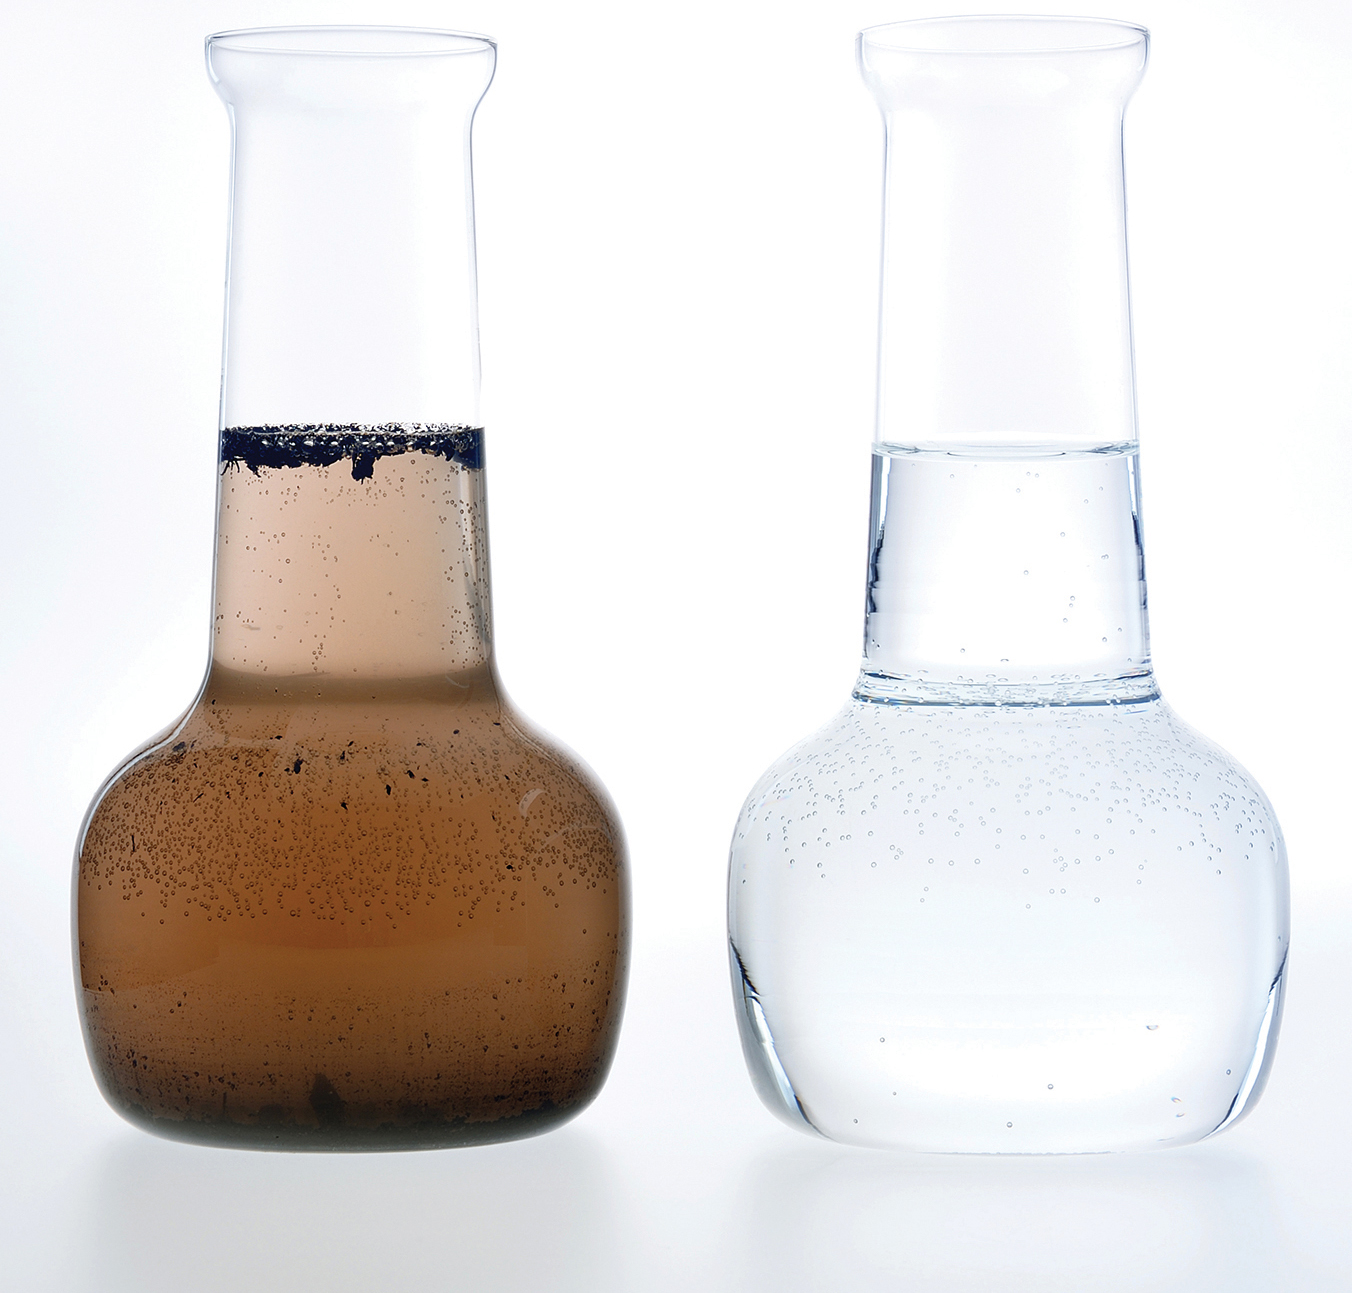
When students were ready to test their filtration system, the teacher provided each team a bottle of “polluted water” to test their designs. This water was created by mixing used coffee grounds, garlic powder, vegetable oil, and table salt in water. The students were initially not aware of the components of the bottle water but were asked to make predictions based on the appearance, which were noted on the board for later discussion. During this discussion, the teacher explained how the components of the dirty water represented actual polluted water.
Students used filters to remove oil; sand to help hold solid particles from going through; and charcoal to remove odors, cloudiness, and bad taste. During the test process, students were asked to measure using measuring cups how much “purified” water they were able to retrieve after each trial.
Week 5: IMPROVE
The final week of the engineering design process was spent on testing and improving the filtration system prototypes. Students were provided opportunity during the create and improve phases to test and modify their design based on the water purification after each trail. They conducted multiple trials, at least three to four. Additionally, students worked in teams finalizing their blueprints with the specifics of their final prototype. Once they were satisfied with their prototype, students worked on putting together their presentation, which included an infomercial of their filtration system. They used Animoto on their Chromebooks to record a video to sell their filtration system to Aquasana. The infomercial was three minutes and incorporated a demonstration of how their filtration system works and why their system is better while applying the engineering practice of constructing explanations and designing solutions.
Week 6: SHARE
During the last week of this activity, students presented their filtration system to their peers. Each team was given seven minutes to present. During the time allotted for each, they presented their infomercial, demonstrated their filtration system, discussed its functions/features, shared their purified water, and answered questions. As each team presented, their peers evaluated them and their presentation using an evaluation rubric. The teacher also assessed team presentations using the same rubric. Once all teams completed their presentation, the teacher closed up the lesson by having students reflect in their science notebooks. Students had to respond to two prompts, (1) What did you learn through this activity? and (2) How can you improve your design, if you had to do it all over again? The science notebooks were collected for grading. This reflection allowed them to use their knowledge and understanding of their filtration system to write about their design solution knowledgeably.
Assessment
Throughout the activity, formative assessment occurred through observations and questions as the teacher rotated through teams to monitor progress, observe their on-task behavior, and engage in discourse with teams for understanding regarding the content along with the engineering design process. Furthermore, the teacher observed how well the team members collaborated with each other.
Summative assessment occurred during the final presentation week, when a rubric was used to assess student presentations and prototypes. Student grades on their presentation counted toward a cumulative lesson grade. Each team also received feedback from their peers, which allowed students to be reflective of the different design solutions provided by other teams. Last, students’ science notebooks were collected at the end of the activity. During the presentation, the teacher and students used the rubric to assess each team’s performance and provide feedback. The rubric criteria included the prototype of the filtration system, the infomercial, how well students engaged in the design process, and teamwork. The effectiveness of the filtration system was based on the three trials each team conducted using their filtration system as well as the clearness of the water during each trial. Also, at the end of the lesson, the teacher collected the science notebook to grade their notes and reflections.
Conclusion
This six-week lesson promoted STEM integration by allowing students to delve into a problem-based scenario using the EDP. Throughout the lesson students employed various skills such as problem solving by developing possible design solutions, communication skills through working with team members and presenting, analytical skills when evaluating their prototype, and digital skills when creating an infomercial. Additionally, as students searched for possible design solutions, they employed their understanding in various content areas such as math, science, engineering, literacy, and technology. These content areas were seamlessly integrated, allowing students to transfer and apply specific skills and knowledge from each area to solve a real-world problem.
Abeera P. Rehmat (arehmat@iu.edu) is a postdoctoral research associate at the Center for Research on Learning and Technology at Indiana University in Bloomington, Indiana. Marissa C. Owens (marissa.owens@unlv.edu) is a research scientist affiliated with the University of Nevada, Las Vegas, and a NASA contractor at Marshall Space Flight Center in Huntsville, Alabama, specializing in online training and instructional design.