
Making the Most of a Makerspace
A three-pronged approach to integrating a makerspace into an elementary school
Science and Children—February 2020 (Volume 57, Issue 6)
By Rob Rouse, Katie Krummeck, and Olivia Uribe
Makerspaces are collaborative workplaces equipped with a variety of high- and low-tech tools and materials that individuals can use to create physical and digital products. School-based makerspaces have recently increased in popularity, in part because participating in maker-based activities engages students in valuable science and engineering practices such as defining problems and designing solutions (Martin 2015). It also promotes students developing 21st-century skills such as communication and collaboration (Kalil 2013). However, many schools do not have dedicated teachers on staff who are trained to manage their makerspaces, and there are few ready-made maker education resources available to these teachers to support them in implementing maker-based activities. As a result, schools often struggle with how to integrate makerspaces into day-to-day instruction in a meaningful and sustained way.
In this article we take the perspective that integrating a makerspace into a school is a proactive, thoughtful, and time-consuming process. To help meaningfully integrate a makerspace into an elementary school, we took a three-pronged approach: (a) aligning makerspace goals with the school mission, (b) designing and implementing structured maker-based activities, and (c) making all teachers aware of the importance of the makerspace.
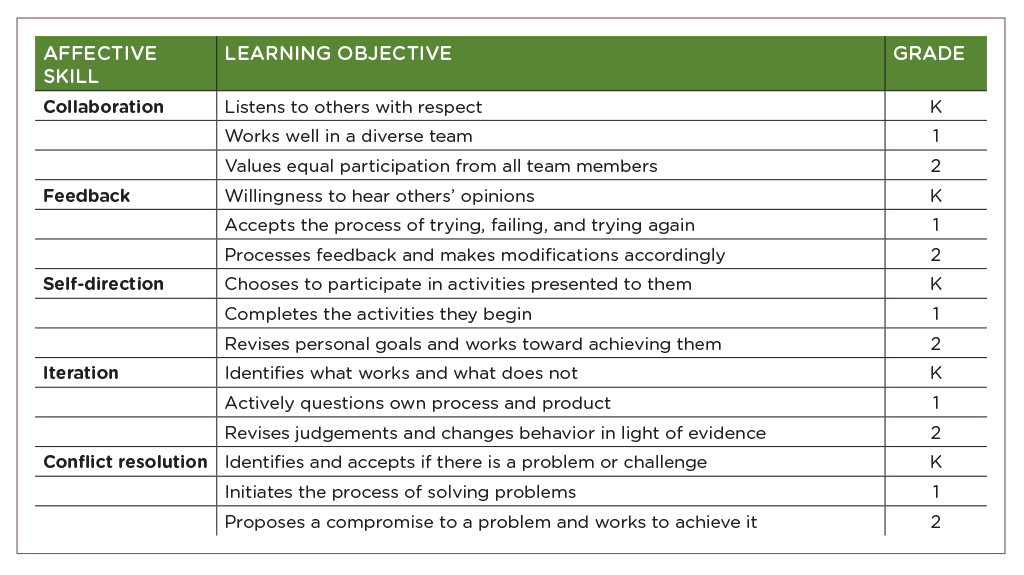
We reasoned that aligning the goals of the makerspace with the school’s overall mission, empowering girls to live and lead with confidence and purpose, would help the teachers better understand how implementing activities in the makerspace could benefit their students. To accomplish this alignment, we worked together to draft five affective skills that were related to the school’s mission: collaboration, feedback, self-direction, iteration, and resolving conflict. We then used Bloom’s affective taxonomy to draft three objectives related to each of these skills. During this process, we made sure to sequence the objectives we wrote so that they progressed logically from one grade to the next. (See Table 1 for a complete list of affective skills and associated learning objectives.) By participating in this process, teachers gained an understanding of how they could use the makerspace to push forward the school’s mission, and at the same time, they generated a list of specific objectives they could use to measure children’s progress. Importantly, this activity empowered a group of teachers who had no previous makerspace training. Teachers reported that this activity helped them connect makerspace activities with the activities that happened throughout the school and in each of the individual classrooms.
Affective skills and learning objectives.
Designing and Implementing Activities
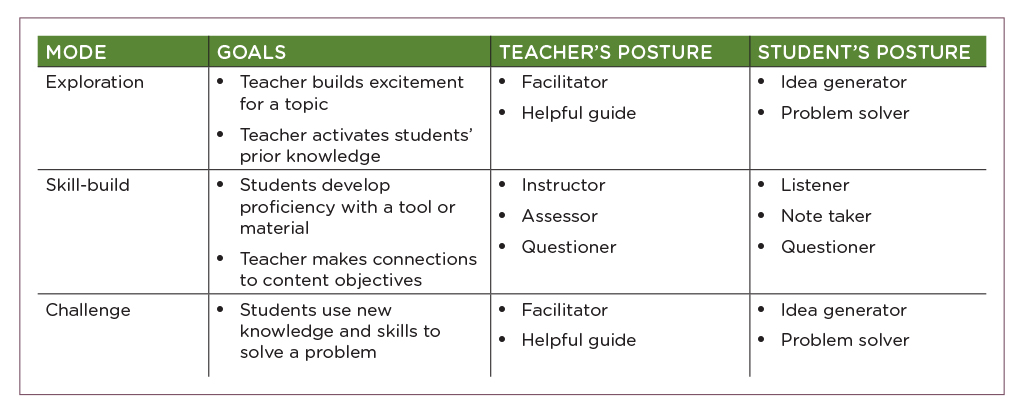
To make teachers more comfortable and confident while implementing maker-based activities and to normalize the student experience in the makerspace, we developed a framework for instruction called maker sprints. Each maker sprint had three modes: (a) exploration, (b) skill-build, and (c) challenge. During the exploration mode, teachers began by building excitement around a topic and activating students’ prior knowledge. During the skill-build mode, teachers instructed students how to develop proficiency with a particular tool or material (e.g., building with Legos, cutting with scissors) and how to make connections to a range of appropriate content objectives. During the challenge mode, teachers posed an open-ended problem and facilitated students using their newfound knowledge and skills to solve the problem. (See Table 2 for a description of the attributes of each mode of the maker sprint framework.) Maker sprints served as a model for planning instruction in the makerspace. Adhering to this model helped teachers structure the time students spent in the makerspace in a productive and predictable way and helped teachers gain confidence instructing students in the makerspace. Teachers reported that maker sprints made a huge difference because without the sprints, they were “always coming in and starting over from scratch every day.”
Maker sprint framework goals and postures.
We worked collaboratively with specials teachers to plan the maker sprints they implemented in the makerspace. During our first maker-sprint planning session, we brainstormed a list of the tools and materials available in the makerspace. To do this, we wrote the name of a single tool or material on a sticky note and attached each note to a whiteboard. Using this technique, we came up with a collection of high- and low-tech tools and materials (e.g., yarn, 3D printer, paper, Minecraft, sand, glitter). Our goal was to develop a comprehensive list of items available to teachers in the makerspace that would be appropriate to use in maker sprints. Next, teachers selected an item from the list to use as the focus of their first maker sprint. The result of this activity was that teachers planned maker sprints based on tools or materials of their choice. This promoted a sense of ownership over the tools and materials and the planning process. In addition, students were exposed to a variety of tools and materials across the year.
The five-day westward expansion maker sprint serves as an example of a teacher-developed maker sprint. To minimize classroom management issues and to maximize the time students spent engaged in maker-based activities, the teacher who implemented the maker sprint followed a strict routine in the makerspace. During this routine, she kept close track of time, kept materials organized, and managed students in an orderly way to ensure they could accomplish the posted daily objective.
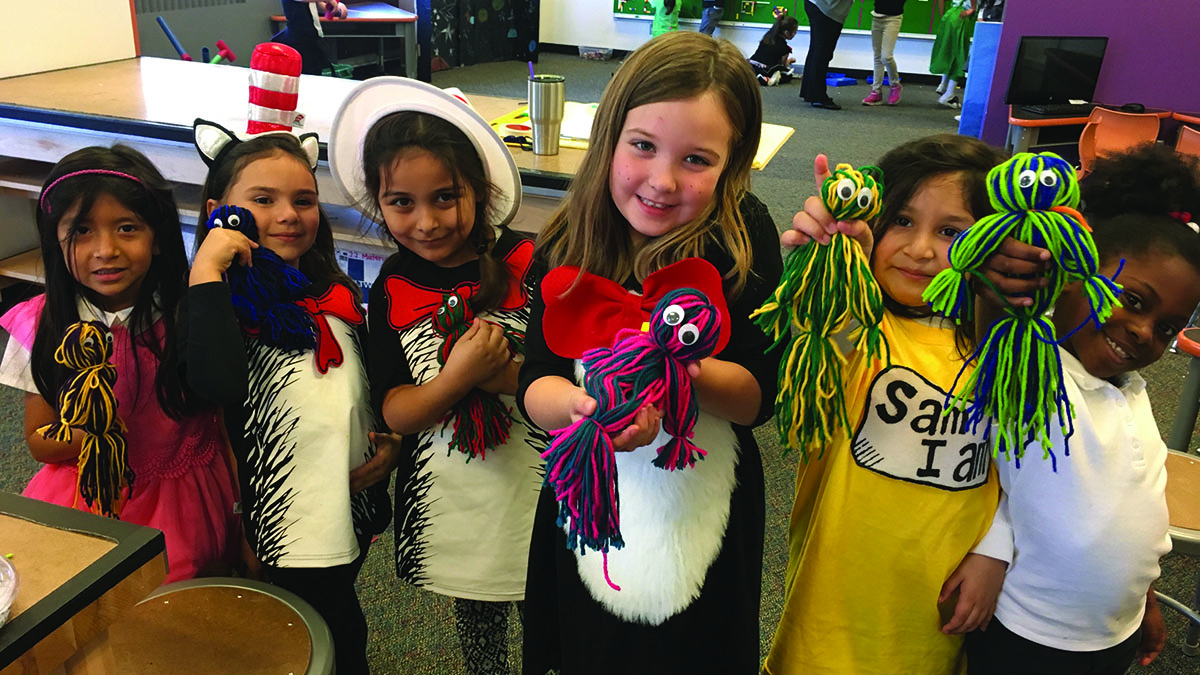
During the exploration mode, first-grade students examined historical photographs depicting children and the conditions in which they lived in the early 20th century. The teacher prompted students to think of a way in which they could improve life for the children in the photographs. Students noticed that compared to themselves, the children in the photographs seemed to work a lot and play infrequently. Students then brainstormed suitable materials for designing a toy for the children in the photographs so that they could play more often. With the teacher’s help, students decided to build the toy using yarn. By engaging in this process, children defined a problem and then proposed a solution to that problem. In addition, students activated their prior knowledge about toys and developed empathy for the children in the pictures.
During the skill-build mode, the teacher led students to explore the properties of yarn and its possible applications and to develop several skills related to building with yarn. For example, students learned how to hold the yarn and keep it organized (some students drew connections to techniques for braiding hair in this activity). In addition, students practiced unraveling yarn from spools and tying knots in yarn. By engaging in these activities, students became proficient in the techniques for working with and manipulating yarn. The teacher also made connections to what students were learning in their history class during the westward expansion unit, connecting to objectives outside of the makerspace. Students were excited to work with yarn and reported, “You have to be careful with the yarn if you want it to look good. You have to keep the yarn organized and cut it right.”
During the challenge mode, the teacher asked her students to design and build yarn dolls for the children in the photographs using a variety of tools and materials (e.g., yarn, scissors, rulers, sturdy cardboard, hot glue guns, glue sticks, ribbon, and googly eyes). Students used the skills they learned in the skill-build mode as well as skills they learned in previous maker sprints (e.g., cutting with scissors) to make their yarn dolls. (Safety note: when using items such as scissors, the teacher and students should take the appropriate precautions [e.g., wearing goggles] to prevent injury. Only teachers should operate hot glue guns.) The teacher scaffolded the process of designing and building by showing students a short video about how to build a yarn doll. In addition, the teacher modeled how to build a yarn doll by measuring and cutting out a 12-inch by 8-inch cardboard rectangle, cutting a notch in the cardboard to attach the yarn, winding the yarn around the length of cardboard 50 times, removing the yarn from the cardboard, and tying knots around the yarn to create the doll’s head, body, arms, and legs. After modeling the process, the teacher facilitated students building and customizing their own dolls by adding knots, adding pants or a skirt, and braiding longer pieces of yarn into the doll’s hair. At the end of the maker sprint, students shared their yarn dolls with their classmates. Students were highly engaged when creating their yarn dolls. One of them explained, “I’m going to give this doll to my little sister.”
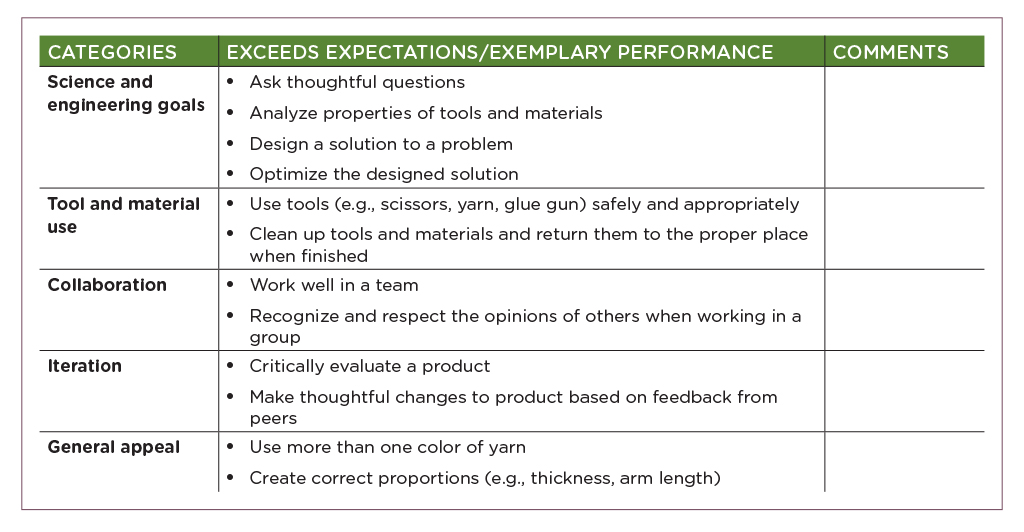
Students also evaluated their yarn dolls and made improvements based on those evaluations. For example, students carried their dolls to lunch to play with them and get feedback from their classmates. Getting feedback from their classmates prompted students to return to the makerspace to make adjustments to their dolls. Popular adjustments included tightening the knots so that dolls would not unravel and adding details such as hair, skirts, and googly eyes to make dolls unique. Throughout the project, the teacher evaluated the students on a number of aspects (e.g., science and engineering goals, tool and material use, collaboration, iteration, general appeal) and provided feedback when appropriate. Table 3 displays a sample rubric for assessing students’ progress during the western expansion maker sprint. After completing the maker sprint, the teacher offered the following rules of thumb for teachers new to working in makerspaces:
Sample rubric for the western expansion maker sprint.
Embrace variability: Although you may have a specific vision for what your students will create, do not be surprised or upset when they create unexpected products. When possible, encourage students to create unique products.
Balance your expectations: In some makerspace activities, you may focus more on students learning content and in others you may focus more on students exhibiting creativity. It is important to balance these sometimes-conflicting goals.
Step outside your comfort zone: Encourage your students to explore with different tools and materials even if it makes you nervous or uncomfortable. Allowing your students to do this will empower them and give them a chance to demonstrate their knowledge and skills to you in a novel way.
The Importance of the Makerspace
Early in the year, we realized that there was a tendency for some teachers to prioritize their own classroom content over makerspace content. This resulted in some students spending additional time working on content in their classroom rather than spending time in the makerspace. This tendency undercut our goal of meaningfully integrating the makerspace into the school. To combat this trend, we arranged to give teachers from across the school maker-based experiences and to keep them informed about what students were doing in the makerspace with the specials teachers. We reasoned that to make the most of the makerspace, all teachers should be aware of the type of instruction in the makerspace and how that instruction could support the instruction and activities they were implementing in their own classrooms.
Midway through the year, we held a half-day professional development in the makerspace in which we introduced all of the teachers in the school to the tenets of maker-based education, reviewed the history of the maker movement in education, and explained the maker sprint model of instruction used in the makerspace. In addition, teachers participated in the exploration mode of a maker sprint in which they brainstormed, prototyped, and shared designs for innovative methods of transportation that would help solve local traffic congestion problems and allow them to get to work more efficiently. Participating in this professional development allowed teachers to experience activities similar to those that students experienced in makerspace and gave them a better idea of how they might connect their own classroom instruction to what students did in the makerspace. Maker-based professional development is ongoing and will continue into the next school year as a schoolwide theme.
Creating Sprints and Sprint Cycles
We found that asking teachers to create maker sprints was a difficult and time-consuming process. Teachers had to learn about unfamiliar tools and materials and plan the various aspects of the maker sprint in addition to completing their regular teaching duties. Thus, we came to realize that it would be beneficial to create a collection of maker-based lessons for teachers to use who have access to a makerspace but no model for maker-based instruction. Remold et al. (2016) came to a similar conclusion in their survey of communities of maker educators.
At the end of the school year, together with teachers, administrators, and coaches, we made a plan to create a set of maker sprints for first, second, and third grade. In these maker sprints, students focus on learning to use digital and physical tools and materials (e.g., CAD modeling programs, 3D printer, cardboard, clay). In addition, we also made a plan to create maker sprint cycles in which teachers implement several maker sprints back-to-back and then pose an overarching challenge to students in which they use what they learned in each individual maker sprint to solve the challenge. Each maker sprint cycle is six weeks long, consists of four maker sprints, includes a culminating challenge, and details how teachers can implement the activities in their own makerspace. Currently, we have created six maker sprint cycles. Online (see NSTA Connection), we share an example of a maker sprint, sketching real-world objects. During the upcoming school year, teachers intend to use these maker sprint cycles to support their instruction in the makerspace.
Conclusion
In this article we have outlined a three-pronged approach to integrating a makerspace into an elementary school: (a) aligning makerspace goals with the school mission, (b) designing and implementing structured maker-based activities, and (c) making all teachers aware of the importance of the makerspace. Our approach is based on the belief that makerspaces are places where students can achieve affective and content-related learning objectives that align with the mission of the school and educational standards. For maker-based education to become more than a trend, educators must create and share resources and strategies that help teachers implement high-quality instruction in their makerspaces. Doing this will empower teachers, help them see the potential of maker-based education, and help them use makerspaces to their full potential.