
feature
Bee Time
Second-grade students lear about pollination and ecosystems through art-integrated modeling activities.
Science and Children—July/August 2023 (Volume 60, Issue 6)
By Bria Marty, Kristy Daniel, and Michelle Forsythe

Pollinators, especially bees, are critical for ecosystem health. To support students’ understanding of pollination interactions, we created a learning sequence that brings art and science together as second-grade students model and investigate the function of an animal pollinating specific plants. These activities provide elementary students the opportunity to design and use simple models of bees and flowers that are created using easily obtainable craft materials. They also support disciplinary core ideas and crosscutting concepts as students explore patterns in how the color and shape of flowers are related to pollination interactions.
Importance of Bees as Pollinators
Pollination is an important part of the life cycle of many plants. Many of the plants that we use for food, fuel, and raw fibers rely on bees for their pollination and reproduction needs. One common species of bee pollinator is the honeybee. Honeybees are distinguished by their roles in the hive: queen, drone, and worker. A honeybee colony will only have one reproductive queen bee that does not leave the hive and can live for a few years. Drone bees are males that only live for about two months or until they mate with a queen. All honeybees pass through a metamorphic life cycle, beginning as an egg laid by a queen bee that hatches into a larva after about three days. Larva are fed by nurse worker bees before later pupating and emerging as an adult bee. Worker bees are non-reproductive females that do all of the work needed to help the colony survive, including nursing larvae, defending a hive from predators, collecting pollen, and making honey.
Worker bees live for about two months and spend the first few weeks of their adult life working in the hive and their last weeks as a foraging pollinator. Worker bees travel in between flowers as they search for food resources such as nectar to bring back to their hives. As bees travel from flower to flower in search of the food necessary for their own survival, their actions enable the pollination that is in turn necessary for the reproduction and survival of the plants that they visit. Most flowering plants need pollen to be transferred between other plants to reproduce. This also introduces genetic variation, which can strengthen the next generation of plants against environmental changes and stressors. As a bee lands and makes contact with the reproductive parts of flowers, pollen sticks to the bee and accumulates in small pockets on each side of the bee’s legs, called pollen baskets. When the bee flies off and lands on another flower in search of food, the pollen the bee is carrying from the first flower often comes into contact with the reproductive parts of the second flower. If the flower is of the same species of plant, this can pollinate the second flower. The second flower will then begin to transform into a fruit with seeds, which will help spread the plant species.
Building a Bee
We launch our “Bee Time” lesson by first having each student build their own bee model (Figure 1; see Supplemental Resources for online instructions). This activity takes about 20 minutes and helps focus students’ attention on the structure of pollinators. After students create their bee models, we lead a short class discussion about what their bee model does and does not show about the structure of a bee and why animals such as bees travel to flowers. For example, one student noted how real bees don’t have “googly eyes” as their model did. We also ask students to predict how bees might choose which flowers to visit. At the end of the lesson, when they “grow a garden” of tissue paper flowers, students will return to their bee models and use them to simulate the process of pollination.
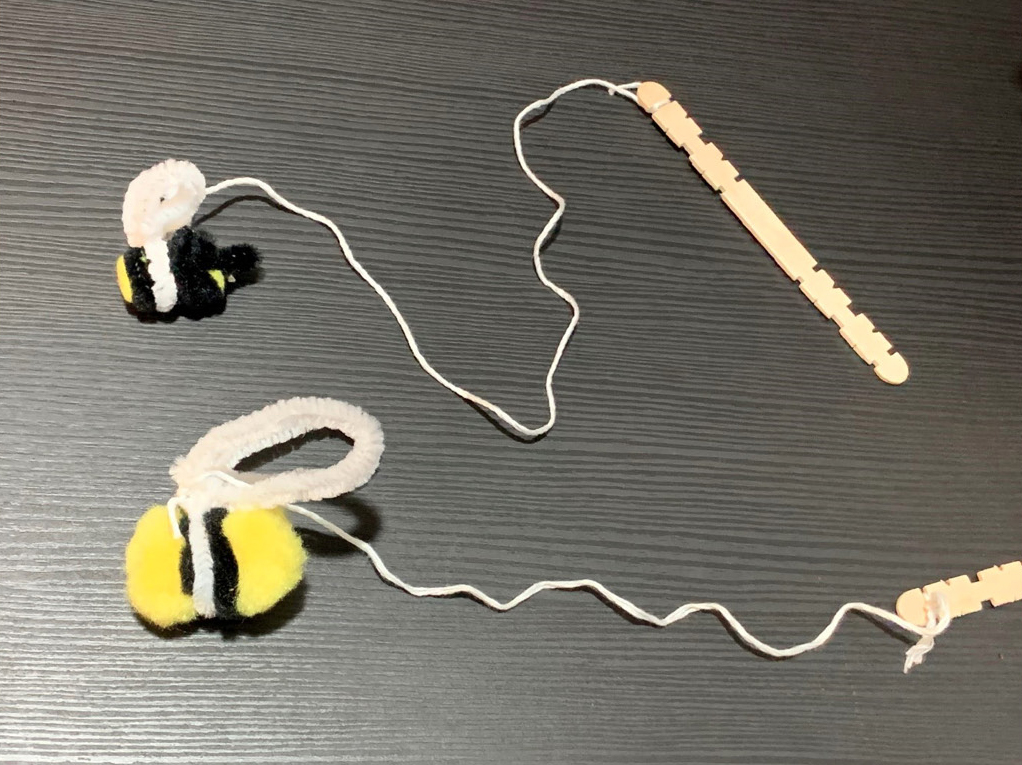
Bee models.
Finding Pollinator Friends
Next, we have students explore and explain various patterns found in pollination. The function of a flower is to attract pollinators through means of colorful petals, scent, nectar, or pollen. While some flowering plants such as grasses are wind pollinated (and others are water pollinated), most flowering plants are pollinated by animals, typically insects. This relationship benefits both the plant and animal species because the plants get their pollen transferred to another individual and the animals get a food reward from the flower. Flowers typically offer visual cues such as large or brightly colored petals or olfactory cues such as a sweet or rotten odor to attract animals and offer a food reward of nectar, pollen, or occasionally waxes or oils. Cross-pollination of flowers depends on a pollinator visiting flowers of the same species in sequence. To help ensure that this happens, plants have various characteristics that help specific pollinators locate specific flowers. Scientists have found that different shapes and colors of flowers attract different types of pollinators. For example, hummingbirds tend to be attracted to red flowers that have a long tube shape that accommodates their tongue. Bees prefer flowers that are white, yellow, or blue. Bees also prefer shallow flowers as this shape enables them to land and move around freely. This connection between the physical traits of a flower and the pollinator the flower attracts is called a pollination syndrome. Each flowering plant has evolved their own pollination syndrome to ensure effective pollen delivery through biotic or abiotic factors.
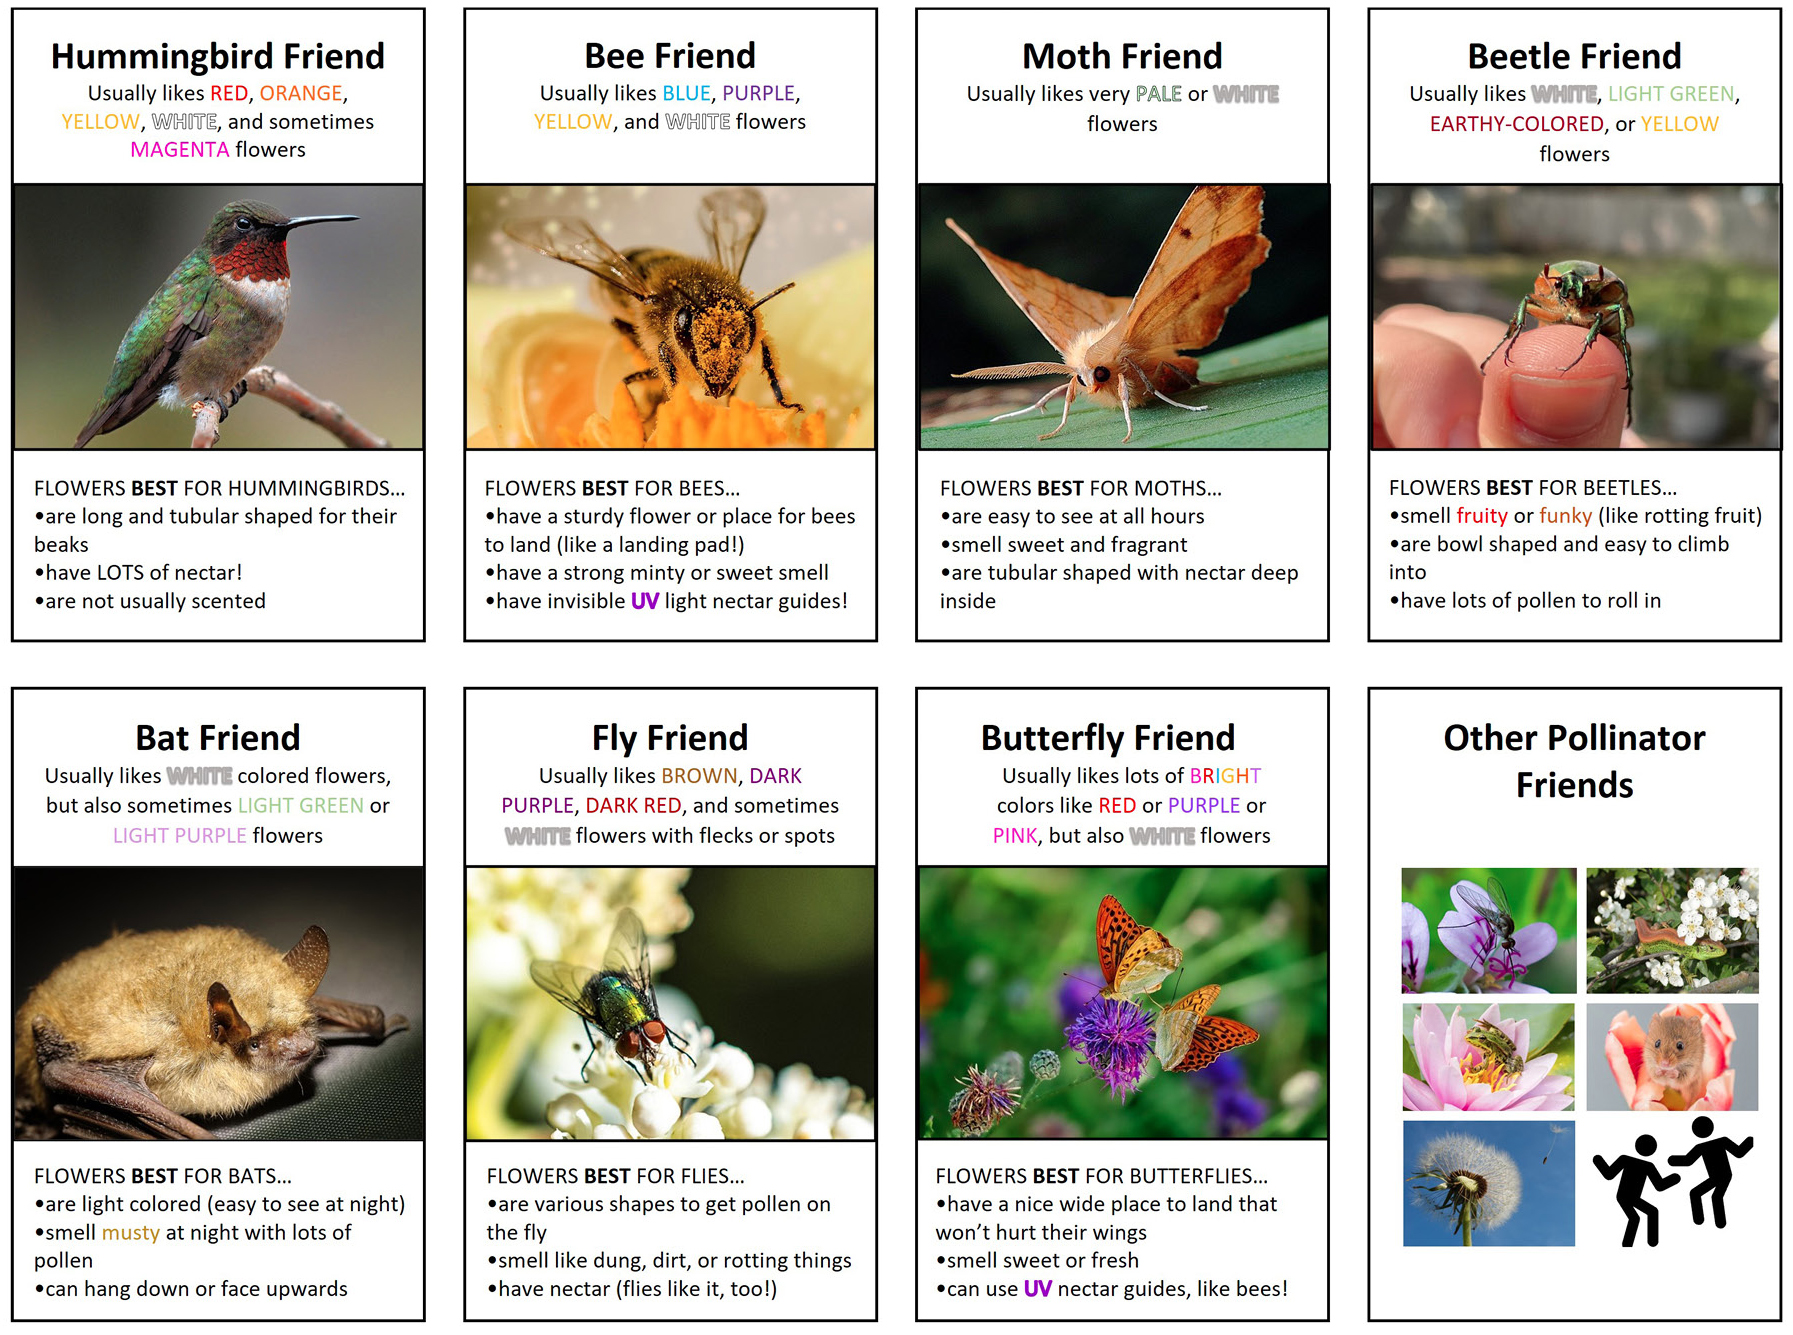
Pollinator Friend Cards
To scaffold student learning about the patterns in how the color, shape, and smell of flowers attract specific pollinators, we created “Pollinator Friend” cards describing various pollinators (Figure 2) and associated flowers (Figure 3). These cards help students match a local pollinator with the ideal plant flower according to its pollination syndrome. We print a set of cards for each student (or pair of students) on cardstock, mark each set of cards with a unique symbol such as a green star or red circle on the back in case the cards get mixed up, cut the cards out, and organize each set in a plastic bag or attached to a jump ring. Students then use their set of cards to match the flower cards with suitable pollinators and vice versa. We organize these matching activities in various ways depending on the learning context. Students individually use the information on a “Pollinator Friend” card to draw a picture in their science journal of what they predict would be an ideal flower for a specific pollinator. They also work in heterogeneous pairs to sort the set of cards by matching each flower card to the card of its most likely pollinator. Each pair records their work by writing down their matches in their science journal or by taking a picture of how they sorted their cards. At the end of these activities, students share their drawings and/or the results of their card sort with the rest of the class through gallery walks or class presentations. Collectively, these activities take approximately 20–30 minutes.
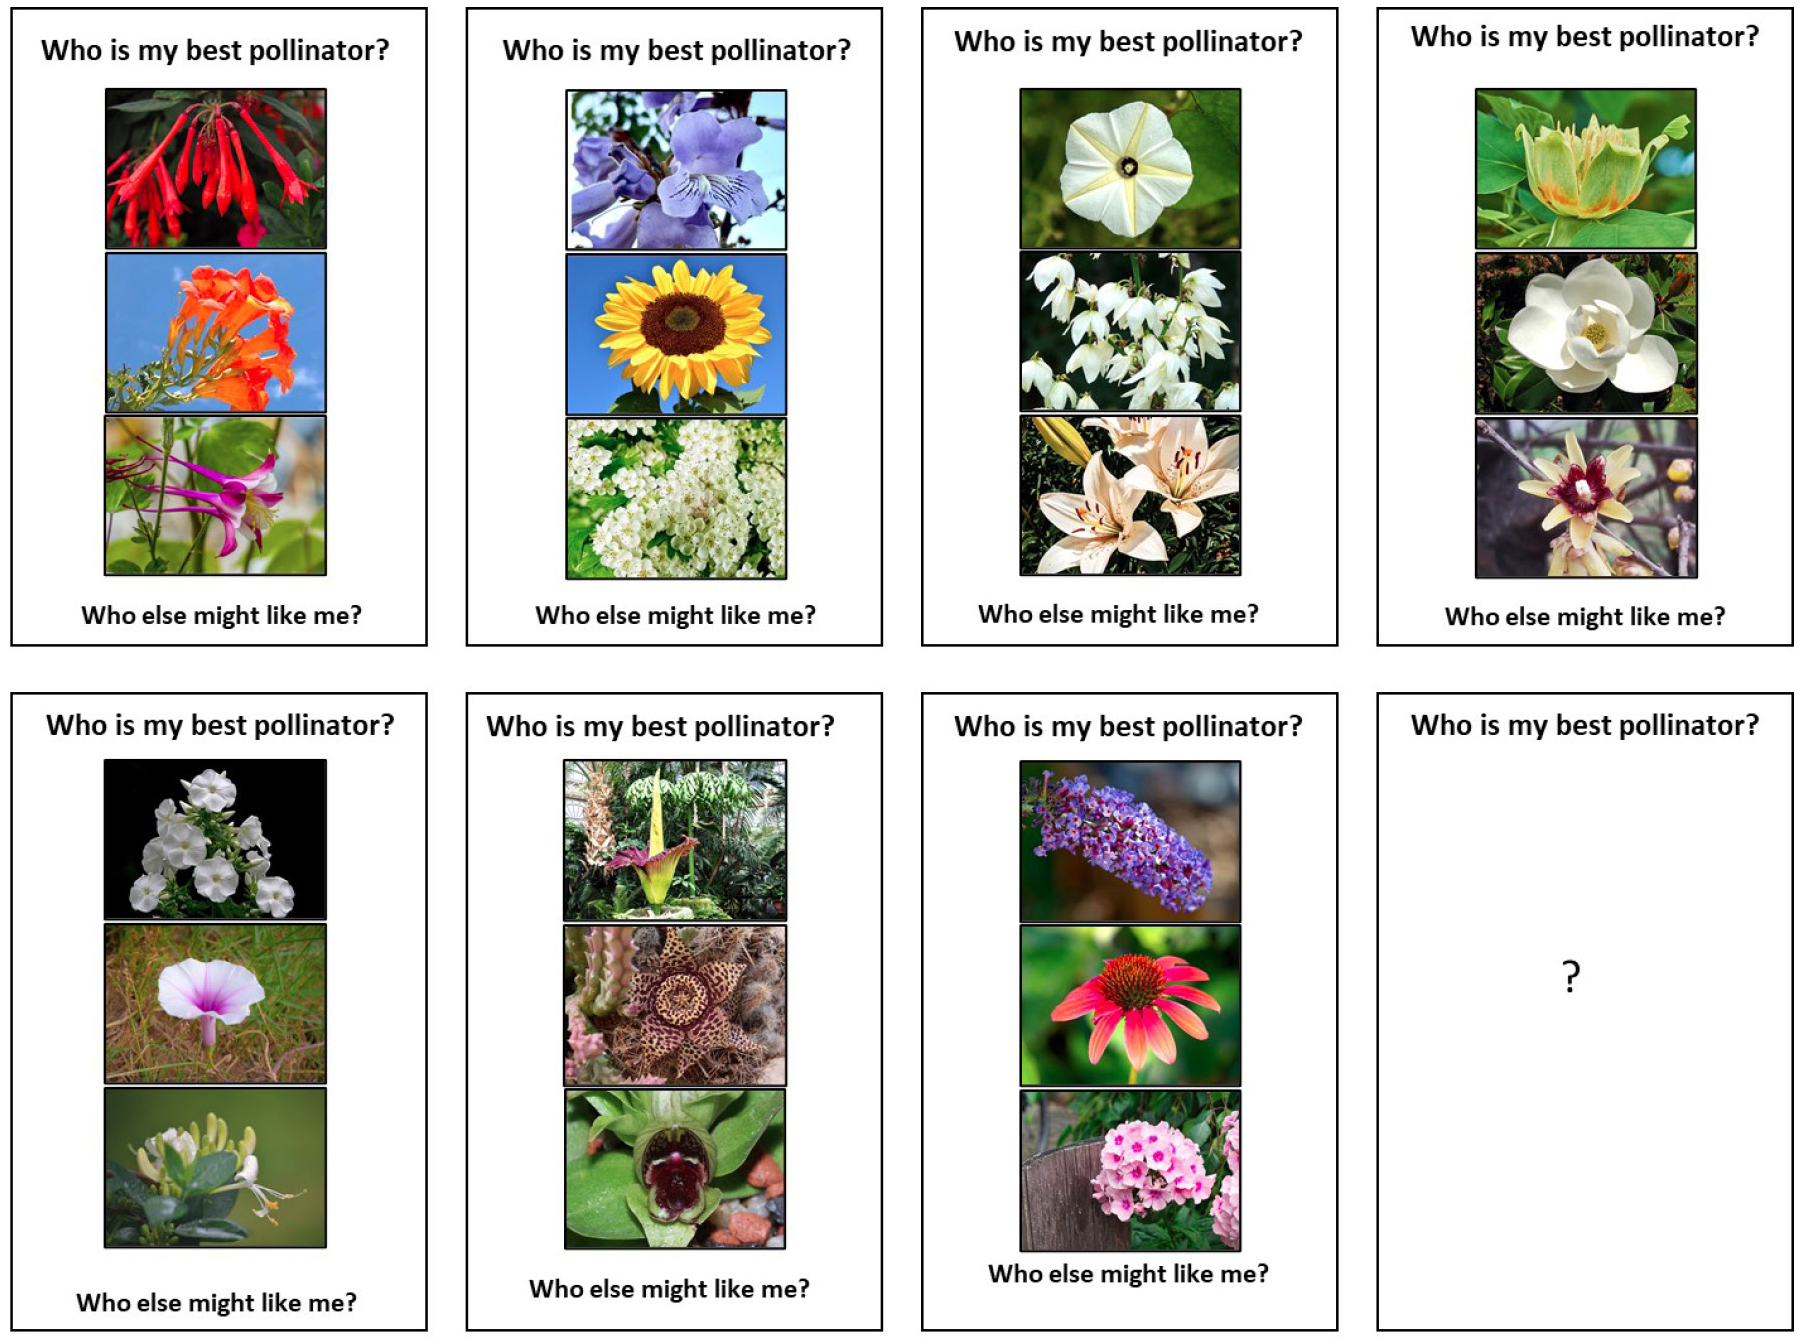
Flower cards.
We designed the cards that we use with students to reflect the pollinators and plants of our local Texas Hill Country and recommend that teachers adapt the cards used in these activities to reflect the specific pollinators and plants found in their own local environment. We suggest using references such as the table provided in Pollinating Partners (Lincoln Seets and Daniel 2022) or provided by the U.S. Forest Service (USDA). However, our set of cards can be used in any classroom if teachers do not have time for this modification. In addition, although the multimodal nature of the cards supports a variety of learners, teachers can also differentiate their set of cards by adjusting the reading level or translating the cards to additional languages.
Flower Hunt
When our school has an accessible outside garden or “wild space” with flowering plants, we extend this exploration by taking students on a 15–20 minute flower hunt where they work in pairs to observe and record suitable flowers for each pollinator in their schoolyard. If our students speak different primary languages, we try to pair students with the same home language together for this activity so that they can use this language as a resource during their flower hunt. When taking a class outside, teachers should be sure to choose a location that is physically accessible to all students and follow all proper safety procedures for outdoor learning investigations. These safety procedures include but are not limited to informing the office of where the class will be, checking the area for any hazards in advance, being aware of current weather conditions, and taking any necessary precautions regarding student allergies. In addition, instruct students to not touch any pollinators that they might observe around the flowers that they find. If there is no available outside space at school for a flower hunt, teachers can have students conduct their hunt with a parent/guardian at home, in their neighborhood, or at a park. Alternatively, teachers could share a video of a local garden during class, and students could “hunt” for flowers and pollinators seen in that video.
Students document their flower hunt by taking pictures on a class tablet of their partner holding the appropriate pollinator card next to each flower that they find. They also use their science journals to record the color, shape, and smell of the flower and any pollinators that they notice visiting the flower. Know, however, that depending on the time of day and weather conditions, many pollinators can be absent during student observations. Alternatively, teachers can give students a map of the schoolyard on which they draw each flower they observe and label it with the likely matching pollinator. Students can also use local field guides or apps such as iNaturalist to identify the flowers that they find. iNaturalist is a free app that provides a place for anyone to share pictures and geographical information of living things observed in nature. The app features a search algorithm to assist with identification, and other users of iNaturalist can assist with and confirm identification, which in turn makes the data “research-grade” and usable to other scientists.
When they return back inside to the classroom, students share what they noticed about the flowers in their schoolyard and look for patterns across their observations, such as which types of flower or pollinators they found most often or which pollinators were on flowers of a given shape, color, or smell. We use students’ collective data to develop explanations about the pollinators that we would expect to find in our schoolyard based on the plants that are growing there and to construct arguments about what plants we should likely add to our gardens if we wanted to attract certain pollinators. During this 15–20 minute whole-class discussion, we also explain the process and importance of pollination. As an extension, teachers could also use students’ data on the flowers in their schoolyard to introduce mathematical concepts related to representing and interpreting data. For example, students could count how many of each color flower they observed and draw a picture or bar graph to represent this categorical data. If teachers do not have access to outdoor spaces, this activity is optional or teachers may wish to use potted plants, a video showing pollinator visits, or adapt the context using the following paper flower garden instead.
Growing a Flower Garden
Finally, as an elaborate activity, students create a model of a flower that attracts bees or other pollinators using craft supplies such as construction paper, chenille and popsicle sticks, tissue paper, plastic or paper cups, tape, glue, markers, and scissors. They then use these flower models in conjunction with the bee models created earlier in the lesson to simulate the process of pollination. Collectively, these activities take approximately 30 minutes.
Craft materials can be distributed to students by either laying a collection of shared materials on a tray in the center of a small-group workspace or a set amount of each material can be passed to each student on a paper plate or in a paper bag. Students should follow proper safety procedures for using scissors and wear protective eyewear during these activities. Students may create basic flowers by either cutting out a disc in the shape of a flower head from a sheet of construction or tissue paper and gently poking a hole in the center to thread a chenille stick through to form a stem. The tip of the chenille stick that passes through the flower can be twisted into a ball or spiral to keep the paper part of the flower from slipping off. Students can also create a flower by wrapping a plastic cup in tissue paper and using tape or glue to adhere materials. The teacher can then carefully poke a hole in the bottom of the cup to thread a chenille or popsicle stick through as the flower’s stem. Tubular flowers, such as those ideal for hummingbirds, can be created by rolling part of a sheet of red construction paper into the shape of a narrow cone and using tape to secure the roll. A green chenille stick can be used as a stem and threaded through the hole at the smaller end of the cone to create a long, hanging flower.
We have each student select a specific pollinator (e.g., bird, butterfly, bat, etc.) and design their flower to specifically attract that pollinator. As an alternative, teachers may assign a student a pollinator but give the student the choice to create a flower that either would or would not be likely to attract that pollinator. As students work to build their flowers, we circulate and ask questions about their design choice, such as “What features of your flower would be likely to attract your pollinator?” and “How is your model of a flower similar to and different from the actual flowers in our schoolyard?” We heard typical student questions and remarks such as, “can a flower be a good for more than one pollinator?” (the answer is of course, “yes”) and requests about which pollinators may be pollinating the flowers they have seen outside. We addressed these remarks by asking students to look around and see what animals they can find on or around the flowers. And, if they could not find anything, then we encouraged them to use the provided chart and predict what might be pollinating the flowers based on physical features. Afterward, students compare their flowers with others in their table group and discuss how differences in their designs would attract different pollinator friends. Alternatively, if time is limited, teachers can purchase fake flowers from a craft or dollar store. Students could then select their individual flowers from this collection and justify their choice.
After students have created or selected their flowers, they each stick their flowers into a substrate such as a plain straw wreath or pool noodle taped into a circle to create a class “field” or “garden” of flowers (Figure 4). Any flat surface can be used to create this garden provided that the flowers can be attached so they face upright for pollinator access. Once the garden has been created, students take turns practicing their pollination and use their bee models from the lesson launch to demonstrate how bees pollinate specific flowers in their search for nectar. As an alternative, students can use stuffed animals or popsicle sticks with pictures attached of other pollinator friends such as bats to model pollination by other animals. As they simulate the process of pollination, students narrate why the pollinator is traveling to a flower, how the pollinator is attracted to certain shapes and colors, how the pollen gets transferred from one flower to flower, and why pollination is important for plants.
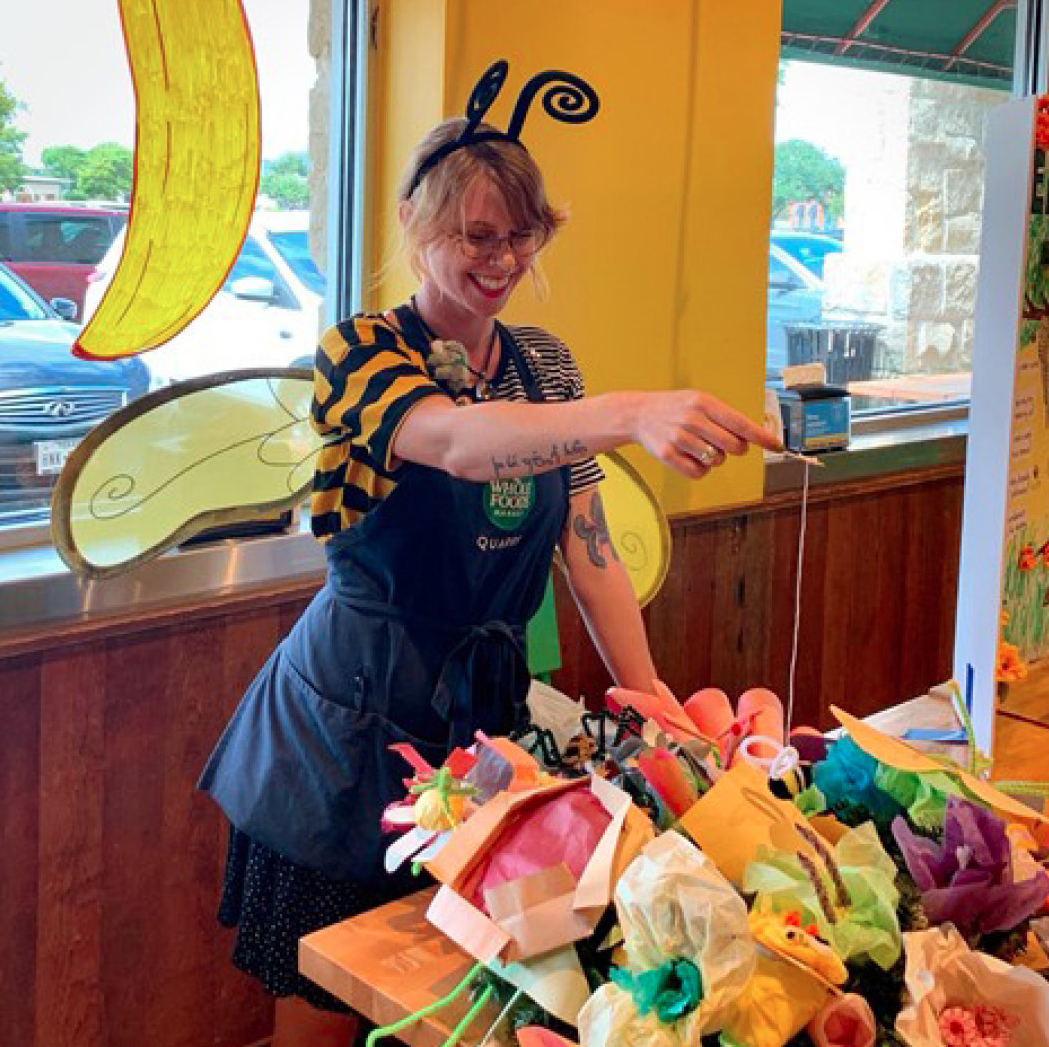
Demonstrating pollination activity.
Assessing Understanding
This lesson sequence provides multiple openings for formative and summative assessment of student learning. In the launch, we listen to students’ ideas about why animals such as bees visit flowers to draw out initial understandings of how animals use parts within the flower, such as nectar, as a resource for food. Teachers could also turn this question into a short answer or multiple-choice exit slip. During the investigations, we use student drawings and records of their matching activities to assess how students are making sense of the relationships between specific pollinators and flower forms. Students’ presentation of these patterns in the whole-class discussion or gallery walk also helps us trace the progression of their learning. Finally, we use individual student narration during the elaborate activity as a summative performance assessment. Online, we share a rubric listing four key components of pollination interactions that we look for in students’ narration (see Supplemental Resources).
Extending Learning
As a learning extension, students can also examine how changes to pollinators in an area can lead to other ecosystem changes. Bees are classified as a keystone species within their communities as they play a central role in holding a community together. The removal of a keystone species will have a dramatic impact across an ecosystem. If bees are removed from an area, many plants would lose their only pollinator and thus no longer be able to reproduce. This disruption would cause plant populations that depend on bees to die out. In turn, animal populations that depend on those plants would also likely decline. When time allows, we explore these topics in a read-aloud of the children’s book If Bees Disappeared by Lily Williams (2021). Students can also apply their learning by designing pollinator gardens for their schoolyard (Majewska and Altzier 2018; US Fish and Wildlife Service 2020). Scientists have found that bee populations have been declining in abundance and species richness steadily over the past 30 years (Zattara and Aizen 2021). Maintaining a school garden of flowering plants that represent a variety of pollination syndromes, while also avoiding pesticides, can be a way for students to directly provide needed food and healthy habitats for pollinators, such as bees, to thrive.
Supplemental Resources
Download the bee model making instructions, pollinator cards, and rubric at https://tinyurl.com/mww34pxv.
Online Resources
iNaturalist: www.inaturalist.org
Pollinator Partnership: www.pollinator.org/learning-center/education
US Fish and Wildlife Service: Pollinators: What you can do
https://fws.gov/initiative/pollinators/how-you-can-help
USDA: Pollinator syndromes: https://bit.ly/3Ibh6H8
Bria Marty is a doctoral student at Texas A&M in Corpus Christi, Texas. Kristy Daniel (kristydaniel@txstate.edu) is a professor of biology, and Michelle Forsythe is a professor of education, both at Texas State University in San Marcos, Texas.
Biology Evolution Life Science Elementary