
Science Sampler: Bushwhacking for Bones
Elementary students often have difficulty determining what makes something living and what those living things need to survive (Driver et al. 2015). For example, when I asked my kindergarten students, "How do you know if something is alive?", they often responded with simple, overgeneralized answers such as, "It moves," "It has a heart," "It eats food," and so on. While my curriculum standard related to the needs of plants and animals (K-LS1), I realized that I needed to first help students understand the difference between living and nonliving before I could help them deeply understand what is required to live. Although some believe inquiry-based instruction is unstructured or chaotic, carefully guiding students' thinking during inquiry-based instruction helps students make sense of their investigations (Wilcox, Kruse, and Clough 2015).
H2 This is the second level heading
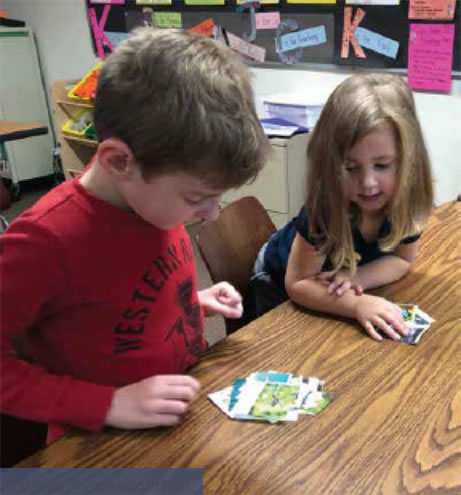
I engaged my students in collaborative group work for the first two lessons to have them discuss and classify pictures of living and nonliving things. The students were split into groups of two or three and were presented with a bag filled with picture cards. I try to keep the group sizes small for classroom management pur-poses and to encourage all students to remain engaged. Dur-ing any small-group activity, I am also sure to move around the room to check in with groups and redirect when neces-sary. I made the picture cards by simply googling nonliving objects (e.g., refrigerator, fan, marble, flip-flop) and living things (e.g., grass, lion, baby, sunflower, elephant, spider) and selecting realistic pictures rather than drawings or clip art. I printed the images and then had enough for each group to have a set of pictures that were randomly mixed and ready to sort. While pictures allow for a wider variety of objects, if some students have visual impairments, I bring in the real objects when possible (e.g., grass, marbles, leaves, rocks).
Figure H4 Title
Figure H5 heading
Figure H6 heading
Body Text. Lorem ipsum dolor sit amet, consectetur adipisicing elit, sed do eiusmod tempor incididunt ut labore et dolore magna aliqua. Ut enim ad minim veniam, quis nostrud exercitation ullamco laboris nisi ut aliquip ex ea commodo consequat.
Body Text. Lorem ipsum dolor sit amet, consectetur adipisicing elit, sed do eiusmod tempor incididunt ut labore et dolore magna aliqua. Ut enim ad minim veniam, quis nostrud exercitation ullamco laboris nisi ut aliquip ex ea commodo consequat.
- Greenhouse Gas Emissions (GHG) – Coalfired Power Plants in the U.S.
- USA Drought Intensity (Current Conditions)
I engaged my students in collaborative group work for the first two lessons to have them discuss and classify pictures of living and nonliving things. The students were split into groups of two or three and were presented with a bag filled with picture cards. I try to keep the group sizes small for classroom management pur-poses and to encourage all students to remain engaged. Dur-ing any small-group activity, I am also sure to move around the room to check in with groups and redirect when neces-sary. I made the picture cards by simply googling nonliving objects (e.g., refrigerator, fan, marble, flip-flop) and living things (e.g., grass, lion, baby, sunflower, elephant, spider) and selecting realistic pictures rather than drawings or clip art. I printed the images and then had enough for each group to have a set of pictures that were randomly mixed and ready to sort. While pictures allow for a wider variety of objects, if some students have visual impairments, I bring in the real objects when possible (e.g., grass, marbles, leaves, rocks).
I engaged my students in collaborative group work for the first two lessons to have them discuss and classify pictures of living and nonliving things. The students were split into groups of two or three and were presented with a bag filled with picture cards. I try to keep the group sizes small for classroom management pur-poses and to encourage all students to remain engaged. Dur-ing any small-group activity,
I engaged my students in collaborative group work for the first two lessons to have them discuss and classify pictures of living and nonliving things. The students were split into groups of two or three and were presented with a bag filled with picture cards. I try to keep the group sizes small for classroom management pur-poses and to encourage all students to remain engaged. Dur-ing any small-group activity, I am also sure to move around the room to check in with groups and redirect when neces-sary. I made the picture cards by simply googling nonliving objects (e.g., refrigerator, fan, marble, flip-flop) and living things (e.g., grass, lion, baby, sunflower, elephant, spider) and selecting realistic pictures rather than drawings or clip art.
I engaged my students in collaborative group work for the first two lessons to have them discuss and classify pictures of living and nonliving things. The students were split into groups of two or three and were presented with a bag filled with picture cards. I try to keep the group sizes small for classroom management pur-poses and to encourage all students to remain engaged. Dur-ing any small-group activity,
H3 This is the third level heading
I told students to sort, or classify, the cards into two groups. Students were encouraged to discuss with their group mem-bers how to sort them (as I gave no classifiers) and I circu-lated among the groups.
Some of the classification systems the groups came up with included: animals and not animals, metal and not metal, inside and outside, animals and inside, animals and things, and electric and not electric. During this initial sort, I walked around and posed questions to small groups such as:
- How do you decide where to put things?
- What might be another way you could sort/classify?
- What items were you unsure of how to sort and why?
- How do you think your organization will be different if you sort things into living and nonliving?
- What patterns do you notice?
alternative ways to sort the cards. We finished the first lesson by drawing students' attention to how the activity models what scientists do. I asked, "Why do you think scientists sort or classify things into groups?" "What are some things sci-entists might try to group?" Students noted that sorting can help organize things and help scientists see how things are similar or different. They mentioned scientists might try to group dinosaurs, animals, plants, and rocks.
H4 This is the fourth level heading
On the second day of the lesson, I had students briefly review how they organized their pictures. I then displayed a picture of three living things (i.e., a dog, spider, plant) and asked, "What makes these things similar?" After students discussed ideas with their partners, they agreed all of them were alive. I then said, "Today I want you to sort the picture cards into living and nonliving things." As students worked in small groups, I noticed they had the most debate, disagreement, and confu-sion over where to place the flower, tree, sprout, and grass picture cards. While circulating among the groups I heard comments such as, "Anything that needs water is alive," but it doesn't move unless the wind blows it," "A cookie isn't living be-cause it can't talk ... a tree can't talk either but it can grow so it's living," "A tree doesn't breathe so it's not living," and more. I posed questions to small groups while I was circulat-ing to help them clarify their think-ing such as:
Figure H4 Title
Figure H5 heading
Figure H6 heading
Body Text. Lorem ipsum dolor sit amet, consectetur adipisicing elit, sed do eiusmod tempor incididunt ut labore et dolore magna aliqua. Ut enim ad minim veniam, quis nostrud exercitation ullamco laboris nisi ut aliquip ex ea commodo consequat.
Body Text. Lorem ipsum dolor sit amet, consectetur adipisicing elit, sed do eiusmod tempor incididunt ut labore et dolore magna aliqua. Ut enim ad minim veniam, quis nostrud exercitation ullamco laboris nisi ut aliquip ex ea commodo consequat.
- Greenhouse Gas Emissions (GHG) – Coalfired Power Plants in the U.S.
- USA Drought Intensity (Current Conditions)
- What can a cat do that a rock cannot?
- How do you know a car is not living, even though it moves?
- What do babies need to live and grow?
- If spiders don't talk, then why are they still alive?
These questions helped to challenge students' ideas and helped them refine their thinking regarding the characteris-tics of living and nonliving things.
H5 This is the fifth level heading
I engaged my students in collaborative group work for the first two lessons to have them discuss and classify pictures of living and nonliving things. The students were split into groups of two or three and were presented with a bag filled with picture cards. I try to keep the group sizes small for classroom management pur-poses and to encourage all students to remain engaged. Dur-ing any small-group activity, I am also sure to move around the room to check in with groups and redirect when neces-sary. I made the picture cards by simply googling nonliving objects (e.g., refrigerator, fan, marble, flip-flop) and living things (e.g., grass, lion, baby, sunflower, elephant, spider) and selecting realistic pictures rather than drawings or clip art. I printed the images and then had enough for each group to have a set of pictures that were randomly mixed and ready to sort. While pictures allow for a wider variety of objects, if some students have visual impairments, I bring in the real objects when possible (e.g., grass, marbles, leaves, rocks).
After reading the nonfiction text about living and non-living, my goal was for the students to develop and create a checklist to help them determine if something is living or nonliving. To get the discussion going, I first asked students how they decided what went into their living and nonliv-ing sorts. Student responses included ideas about move-ment, growth, and food/fuel. As students mentioned ideas, I documented them on the whiteboard. To help students think more about movement, I referred back to the text we had read and asked questions like, "Why is a car not living?" Students realized even though it moves it, it doesn't grow or eat and therefore movement cannot be a key characteristic of a living thing.
I then asked guiding questions that helped students add on to their list. For example, I asked students "What hap-pens if we forget to water our plants?" When the students note that, "they die," I use this idea to go further by asking, "if plants and animals eventually die, why will there still be plants and animals 100 years from now?" The students sometimes need to talk to a partner about this question, but eventually students explain that the animals have babies and plants make seeds to make new plants. After this short dis-cussion, we make a new checklist for living things. In the sec-ond iteration, students included "eat," "drink," "grow," and "make new ones" (reproduce).
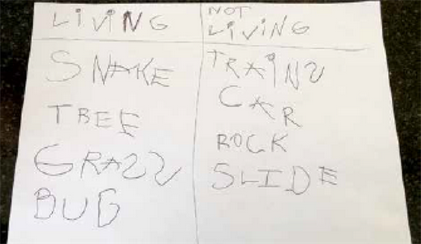
After collaboratively developing our checklist, students ap-plied their ideas. To do this, students worked on graphic organizers (e.g., t-chart organizers [see Figure 1] and Venn diagrams), went outside to observe and collect items (leaves, grass, twigs, bugs, and so on), and discussed their collections with peers going through their class-created checklist to de-termine if the items were living or nonliving. Importantly, prior to students collecting items, we discussed how they can stay safe and what not to pick up, and we have students wash their hands when they return to the classroom.
During this pplication time, students sometimes en-counter difficult items (e.g., a dead bug or an old exoskel-eton). When students ask about such an item, we try hard to not simply answer the students' question for them. Instead, we ask, "Why do you think it might go in the living cate-gory?" and "Why might it go in the non-living category?" Students typically note that the thing used to be alive, but isn't any more, so we ask them to think about their checklist. When comparing to their checklist, student recognize that the dead bug no longer eats, drinks, grows, or reproduces.

- "What evidence or clues helped you decide which things were living or nonliving?" "Living things move, but some things move that aren't alive like cars. But cars don't need food."
- "Why do scientists use evidence?" "They use evidence to` explain how things work."
- "You changed your mind about where some of the cards belong (living or nonliving). Why do you think scientists change their thinking sometimes?" "Because that can make them better scientists. Just like practicing helps us be better."
- "How is your sorting like a pattern?" "Patterns are like A,B,A,B,A,B. Putting things in groups is kind of like that."
- "How do you think scientists use patterns?" "I think they do that so they can learn about new things in the future."
- "How is what you did–sorting, investigating, and discussing–like what scientists do?"' "I think they can learn about things in lots of kinds of ways." "They talk to each other and learn."
Assessing Students' Thinking
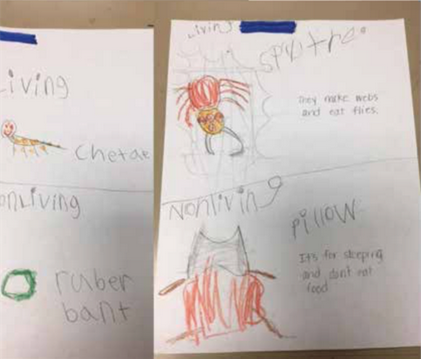
To assess the students, I used a draw, write, and explain activity. I asked the students (individually) to draw a picture of something they knew was living and something that is nonliving (see Figure 2). I then asked them to write and explain how they knew the thing was living or nonliving using the characteristics, or traits, of living things to guide their explanations. I evaluated student work by noting whether they could correctly identify living and nonliving things and whether their explanation accurately reflected the checklist created by the class. This data is used to determine if students are still developing or are proficient with respect to their understand- ing of living and nonliving things. For example, if a student accurately identifies living and nonliving things but struggles to connect their thinking to the checklist, I document their understanding as still developing. However, I am sure to ask students to verbally explain to accommodate students who are still developing writing skills. Oftentimes, students verbally make connections to our class-developed checklist and some students even go well beyond to talk about "a pumping heart" or specifically note that flowers make blooms to produce seeds.
The living and nonliving activities concluded by revisiting the original picture cards. When the students sorted the picture cards this time, I noticed they were asking questions such as, "Does it make new ones or have babies?" "Does it grow?" "Does it need sunlight or water?" and making com-ments such as, "The tree grows and drops apples with seeds to the ground and then it starts again, so it's alive."
Upon completion of the final picture sort, the students gathered for a whole-group discussand I asked questions to target nature of science ideas and the crosscutting concept of Patterns. Some questions I asked and some student re-sponses included:
Conclusion
As part of the Next Generation Science Standards (K-LS1-1), students are expected to develop an understanding of what living things need in order to live and grow. Un-derstanding the difference between living and nonliving through the above lessons provides important background knowledge to help students work toward the standard. By developing their key indicators of what makes something living, students were able to use patterns in at least two different con-texts and compare/contrast their work in the two activities. By including content learning beyond the targeted disciplinary core idea (DCI), students developed a deeper under-standing of the crosscutting concept patterns, developed a deeper understanding of the DCI