
feature
The Moon’s Inclined Orbital Plane
The Intersection of Learning Lunar Phases and Solar/Lunar Eclipses
CONTENT AREA Earth Science
GRADE LEVEL 8
BIG IDEA/UNIT Using 3D models of the Moon’s orbital inclination to effectively integrate the study of Moon phases and solar/lunar eclipses
ESSENTIAL PRE-EXISTING KNOWLEDGE Phases of the Moon, solar and lunar eclipses
TIME REQUIRED 4–5 class periods
COST $25
SAFETY See individual activities for safety notes.
Eclipses are one of the most exciting events to experience in person and to learn about in the classroom. By using multiple 3D models and merging two concepts of lunar phases and eclipses, students will better understand why and when we have eclipses. Middle school students often struggle to understand scientific and spatial concepts (Kavanagh, Agan, and Sneider 2005). The value of 3D models to promote middle school students’ understanding of lunar phases and eclipses has been demonstrated (Miranda, Kruse, and Hermann 2016; Thornburgh and Tretter 2017; Young and Guy 2015). Table 1 identifies the central concepts learned in this series of activities using 3D models.
Instructional flow
We present six activities in a sequence that will incrementally build a better understanding of the Moon’s orbit and how, through data-driven models, the occurrence of lunar phases and solar/lunar eclipses is explained. Activity 1 involves creating a visual 3D model of the ecliptic plane. Activity 2 has the students act out the phases and eclipses. Activity 3 uses NASA data to verify the number of eclipses in a year. Activity 4 involves creating two data-driven 3D models of the lunar orbit. Activity 5 introduces a fixed orbit for the Moon, the hula-hoop. In Activity 6, students create a 3D paper model. An explanation of the geometry of the system is given in the sidebar (see also Figure 1).
| Table 1. Central concepts learned with the 3D models instruction. | ||||||||
|---|---|---|---|---|---|---|---|---|
|
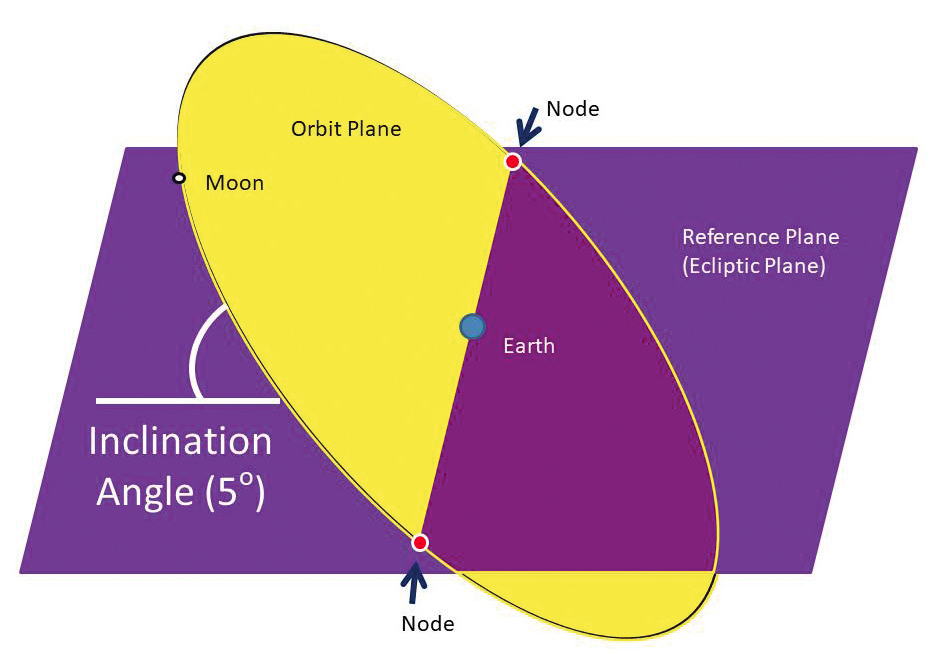
Two intersecting planes: ecliptic plane and lunar orbit plane. Lunar orbit plane is inclined at an angle with respect to the reference plane.
Activity 1: Viewing Earth’s ecliptic plane (15 minutes)
Materials: clear container, corn syrup, assorted small colored balls that float in corn syrup.
Safety: Corn Syrup is sticky—be sure to have wet towels available and at the end when removing objects.
For each group of four to six students, pour two cups of corn syrup into a four-cup empty clear plastic/glass container. Add one ball (1-inch diameter) in the center to represent the Sun. Add another smaller ball (1/4 inch in diameter) to represent Earth and an even smaller ball (1/8 inch in diameter) to represent the Moon. All three balls should rest in a level position in relation to each other. The surface of the corn syrup is a plane that represents the plane of Earth’s orbit around the Sun and is called the ecliptic plane. The students create a labelled diagram of the three balls in the corn syrup from a side view. Students’ understanding can be assessed by peers or the teacher checking their drawings to make sure that they have the ecliptic line (surface of corn syrup) running through the centers of each of the balls.
Geometry of Orbiting Objects
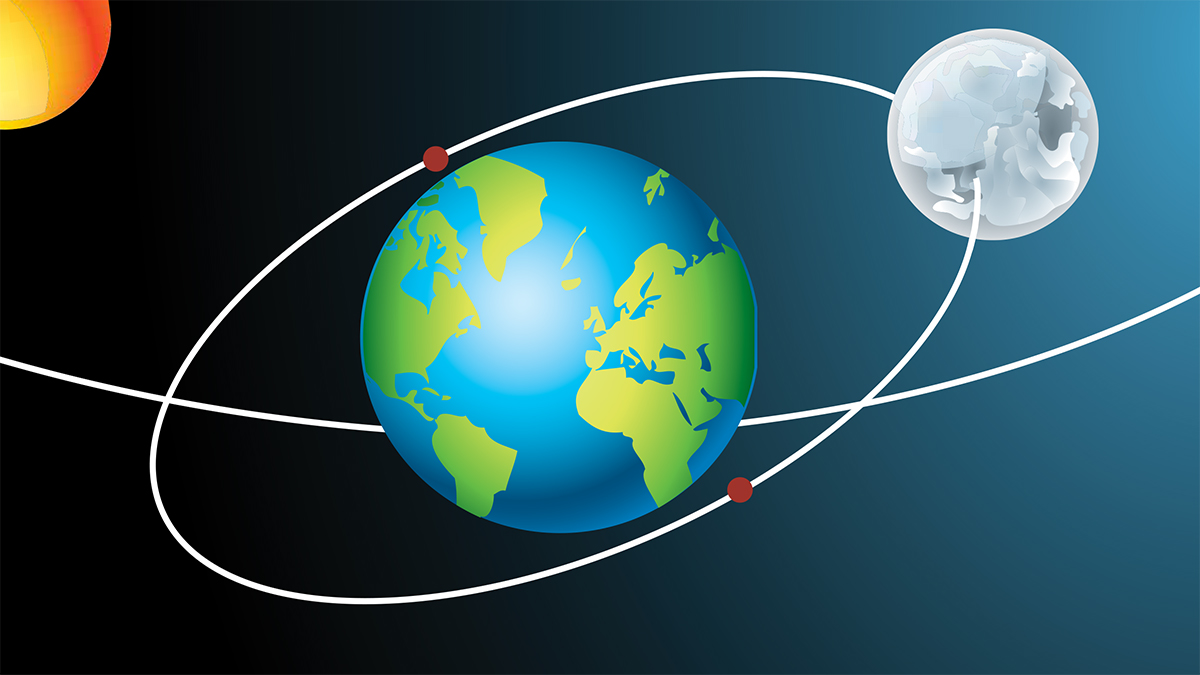
The geometry of an orbiting object in space is a circle (or an ellipse) but confined to a plane. To better understand the geometry of several orbiting objects, we need to investigate the orientation of each of the orbiting planes. The orbit of one object can be measured by an angle relative to another plane, called the inclination. The other plane is called the reference plane. The measurement of inclination is an angle. Figure 1 shows the Moon’s orbit around the Earth; the reference plane is the Earth’s orbit around the Sun, called the ecliptic plane. The Moon’s orbital plane is inclined 5o in relation to the ecliptic plane. By using the geometry of planes, students will understand the monthly and yearly progression of the Moon around the Earth and the Earth around the Sun. As the Earth orbits the Sun, the orientation of the plane of the lunar orbit approximately points in the same direction in space (in the classroom you can pick a wall or corner for the orbit to face). Note that this “facing” will be the case at all positions of the Earth around the Sun. Nodes are points where the Moon crosses the ecliptic plane. This happens twice a month. To get an eclipse, the Moon must be positioned at a node and the Sun must be in line with the nodes and the Earth.
Activity 2: Moon phases with 3D Moonball model (45 minutes)
Materials: One racquetball/Styrofoam ball on skewer stick or pencil for every two to three students and a room that has no windows or one with shades completely closed, making sure a self shadow can be seen on the Moonball. We use a single bright light source (unshaded bright lamp) elevated to students’ eye level.
To make the Moonball, we simply inserted the skewer into the racquetball/Styrofoam ball or used an awl or other pointed object to puncture each racquetball (students should wear safety goggles when preparing the Moonball). Stick the skewer or pencil into the hole and hold the stick end with the ball at the top. We did this for the students ahead of the class. We set up a variation of a conventional Moon phase kinesthetic activity (Kavanagh, Agan, and Sneider 2005; Schatz and Fraknoi 2017) with students arranged in a large circle in the classroom around a single bright light source representing the Sun. Then we turned off the regular classroom lights, leaving the center lamp on.
We have the students hold their “Moon” at arm’s length and rotate counterclockwise near the light source (this represents the position of the Moon during each lunar phase). We introduce the concepts of self and cast shadow (using Young and Guy 2008) and have the students view the self shadow, the dark part, on their Moonball. We then have the students name the phase going counterclockwise from the Sun: new, waxing crescent, first quarter, waxing gibbous, full, waning gibbous, third quarter, and waning crescent. Note that from a “space view,” the Moon is always half lit and half in self shadow. However, while the student holding the Moonball rotates in a level motion, the size of the lit side and the self shadow appears to change. Thus, from the perspective of an observer at the center of the orbit (“Earth view”), an accurate sequence of lunar phases can now be seen.
Arrange 12 students in a circle around the Sun representing 12 months in a year (Figure 2 shows four students). Have them all turn so they can see a full Moon phase with their backs facing toward the Sun. Then have students count off how many lunar eclipses are seen. All 12 students should say they see the Moon in a cast shadow, meaning a lunar eclipse would occur each month.
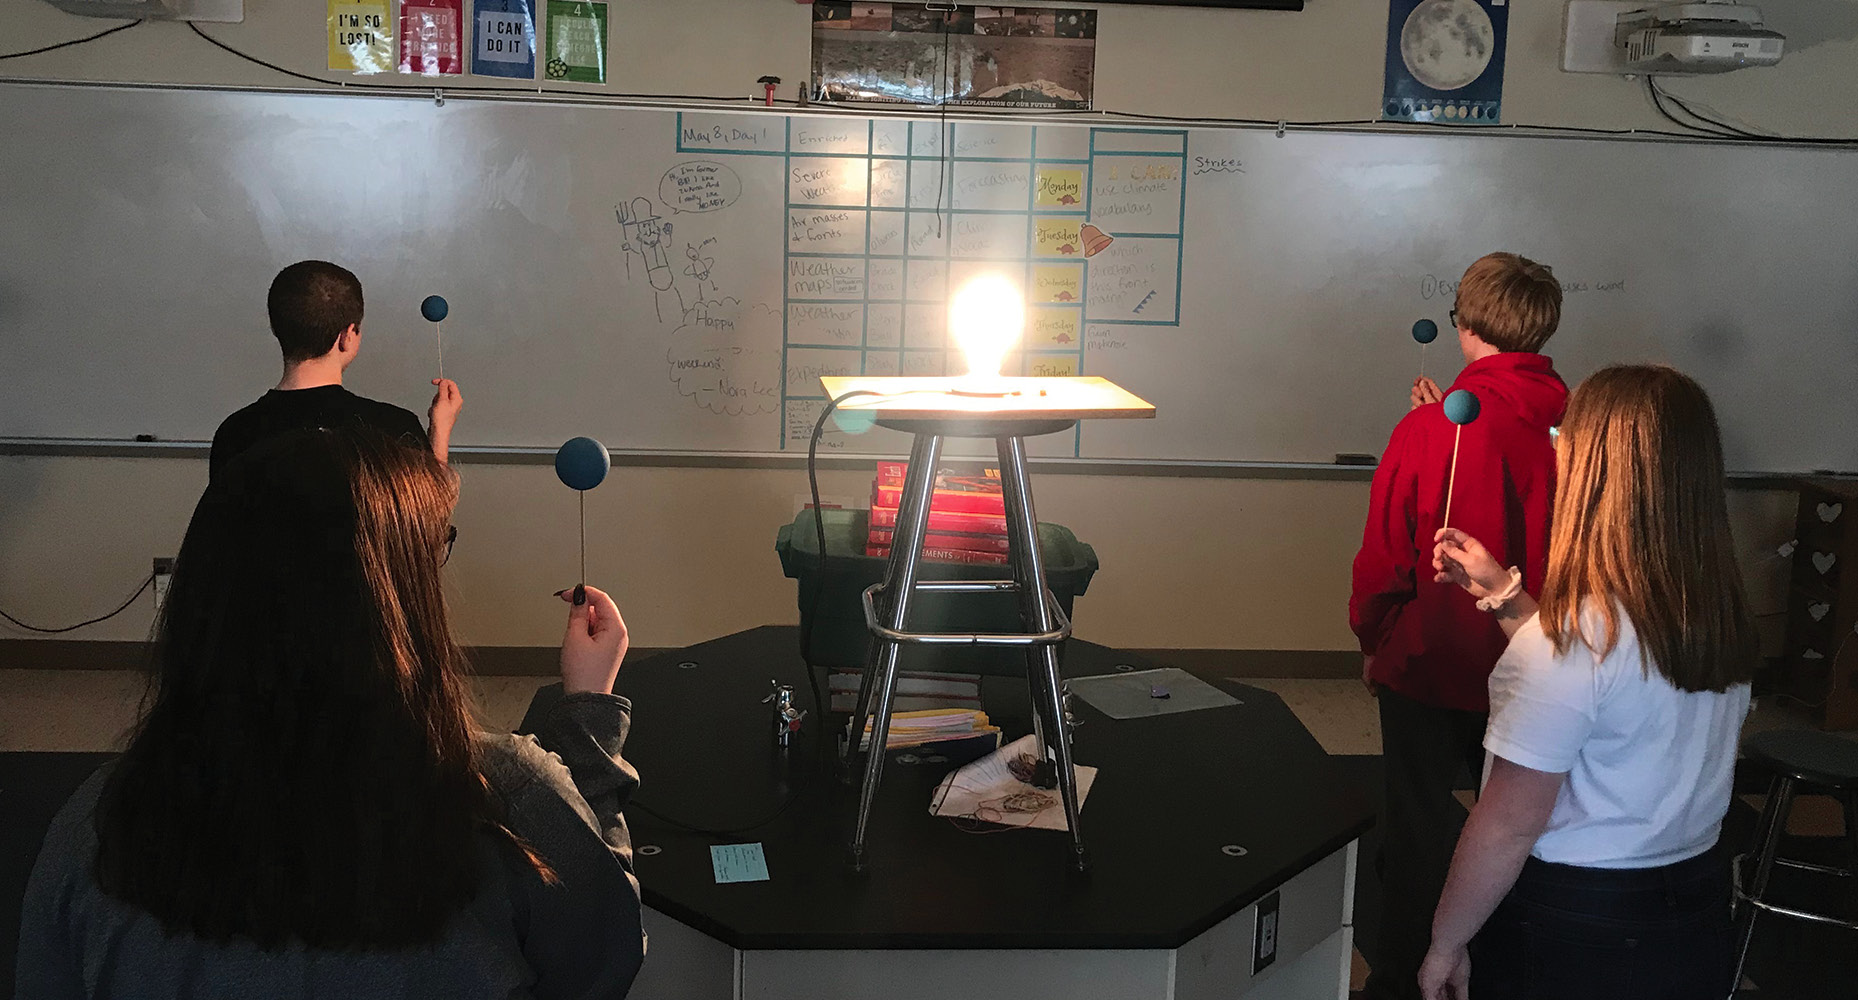
Students stand around the Sun (light bulb) with Moonballs facing different directions, resulting in students seeing different phases.
Ask the students, “Is there a lunar eclipse every month?” Some of the students may respond, “No that is not possible.”
Then have the students turn and align their Moonball for a solar eclipse by facing the Sun. Now ask, “How many solar eclipses do we see? 12? Is that likely? Now let’s look at the NASA eclipse data!”
Activity 3: NASA eclipse data (45 minutes)
Preparation: Print out one eclipse calculation handout (Worksheet 1) per student and NASA solar and lunar eclipse data tables (Worksheets 2 and 3) per group (see Online Supplemental Materials for worksheets you can print out). For a link to the NASA website, see Resources.
For eclipses, we hand out Worksheets 2, 3, and 4 and have students count eclipses, realizing that the most common number of eclipses is four a year, consistent with pairs of eclipses at each node (crossing of the two planes, Moon’s inclined orbit and the ecliptic). We then ask the students to find the time interval between eclipses to get an idea of the length of time between actual eclipses—a list of dates is on the handout. An average time is about 172 days and approximately half a year (10 days shorter than 6 months).
For phases, we then want the students to confirm that Moon phases also line up with the occurrence of eclipses. Using a calendar with Moon phases, students identify the number of days when the same phase occurs (i.e., new Moon to new Moon, which is 29.5 days). We have students begin the math sequence by starting the lunar cycle at a solar eclipse, so that the new Moon and an eclipse occur at the same starting day. We have the students count out six lunar cycles or six new Moons (math: 6 × 29.5 = 177 days).
Students discover that one new Moon to the next closest new Moon to 6 months is consistent with the NASA eclipse data for the time period between two solar eclipses. The next activity allows student exploration of the Moon’s orbital models that fit the data. What does the Moon’s orbital path look like? As a closing to analyzing the NASA data, we suggest to the students that there must be an added motion to the Moon’s orbit to cause the less than six-month occurrence of eclipses. This motion will be explained in a future article. For now, we make the approximation that eclipses occur every six months.
Activity 4: Data-driven models—pipe cleaner orbit and swinging orbital model (45 minutes)
Materials: Piper cleaner model: Pipe cleaner for each student. Swinging orbit model: metal nut or large washer (½ inch in diameter) and 18-inch piece of string per group of two to three students. One end of the string is tied to a metal nut or washer and the other end is tied around wrist. With string pinched in fingers, swing washer in a circular motion to create the orbital motion.
Safety: The swing nut/washer has two safety issues. Students need to wear safety glasses during this activity. The orbiting object can hit other objects in the classroom. Be sure to secure an area so things and people are out of the way. The string must be securely tied to the nut/washer and the other end to the wrist to prevent a projectile. During the swinging motion, students can’t let go of the string until the movement has ended.
Students break up into small discussion groups to discuss their ideas of the motion of the Moon based on the frequency of eclipses from the NASA data. Students offer many ideas about the Moon’s orbit—for example, bobbing, sloping up or dropping down of the Moon. This leaves an open question as to the actual path of the Moon’s orbital.
The teacher hands out a pipe cleaner to each student. Students make pipe cleaner models they believe depict the orbital path of the Moon (see Figure 3).
Groups then share their pipe cleaner models and any other notes/drawings. The teacher states that all models are considered valid at this point and the class shares ideas.
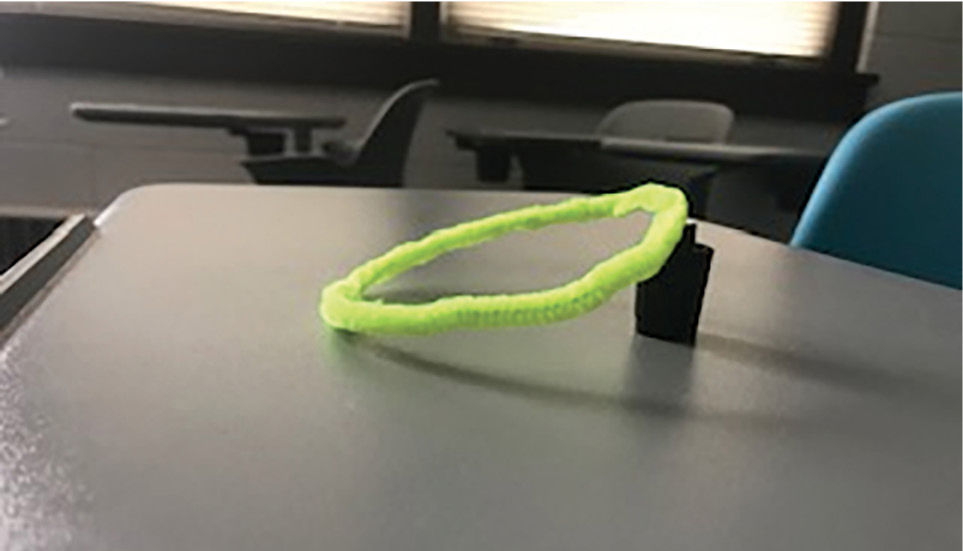
Pipe cleaner used by students to make models of the Moon’s orbital path.
Students now explore and investigate orbital motion with a metal nut or washer tied to the end of a string. Have the student groups experience rotating the weight on the string in the air to represent the Moon’s orbit. To rotate the weight smoothly, students grab the string with their fingers and swing the washer in a circular motion by holding the string (see Figure 4). Swing the nut/washer fast enough so that it makes a circular path. Now the challenge is to make the swinging nut/washer trace out the students’ predicted orbital path made with the pipe cleaner models. Vital question: Which orbit can be sustained and avoid eclipses every month but will at least have two to four eclipses?
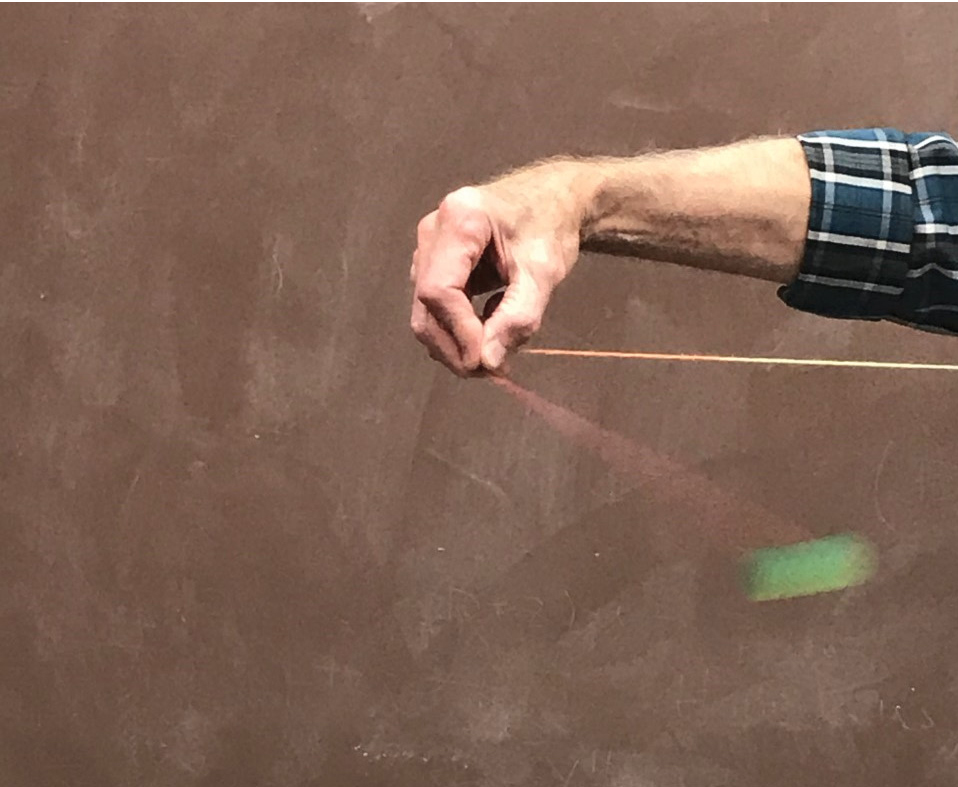
Action shot of an orbiting metal nut/washer.
This orbiting nut/washer on a string shows the “planar” motion of the Moon’s orbit around Earth. It is important to note that the inclination of the orbital plane can be changed by each student by restarting a new swinging orientation, thus attaining its own unique planar orbit! Once a sustained orbit is attained, students find it challenging to quickly change the inclination. This model reinforces the idea that the Moon can stay in a stable inclination. The Moon’s orbit does have a small inclination only 5o away from the ecliptic plane. This is small, but large enough for the Earth/Moon cast shadows to miss hitting the Moon/Earth most of the time.
A key idea to distinguish concept and terminology: The object that is revolving maps out a plane that can be inclined. An object, like the Earth, that is rotating on an axis can be tilted toward a reference plane.
Have the students draw/video the observed planar orbit from this exploration and compare with their earlier drawings or pipe cleaner models of the Moon’s orbit. Students typically have wavy patterns in the pipe cleaner models and don’t match the swinging washer/nut motion of a circle. The teacher leads a discussion with the class arriving at a model of the orbit picked from various pipe cleaner models.
Activity 5: Enhanced 3D Moonball model using hula hoops (45 minutes)
Materials: Moonballs and hula hoops, one set for each group of three to four students. A bare lamp bulb at center of the room at students’ eye height.
Safety: The room is lit by one light, but care should be taken when moving around the room.
We give a hula hoop to each small group (three to four students) and have one student in the middle of each hoop representing the Earth. This student will move their Moonball along the hula hoop edge. The other two students oversee holding the hula hoop (see Figure 5). We then have groups of students spaced equally around the light source (Sun), at least four groups with two that will show eclipses, aligned 180° from each other. We tell students holding the hula hoop to incline it at a slightly exaggerated angle (representing the Moon’s 5° inclination). We make sure that all hula hoops are inclined at the same angle (above and below each student’s head) and point toward the same classroom wall. The room is lit with a single light bulb representing the Sun.
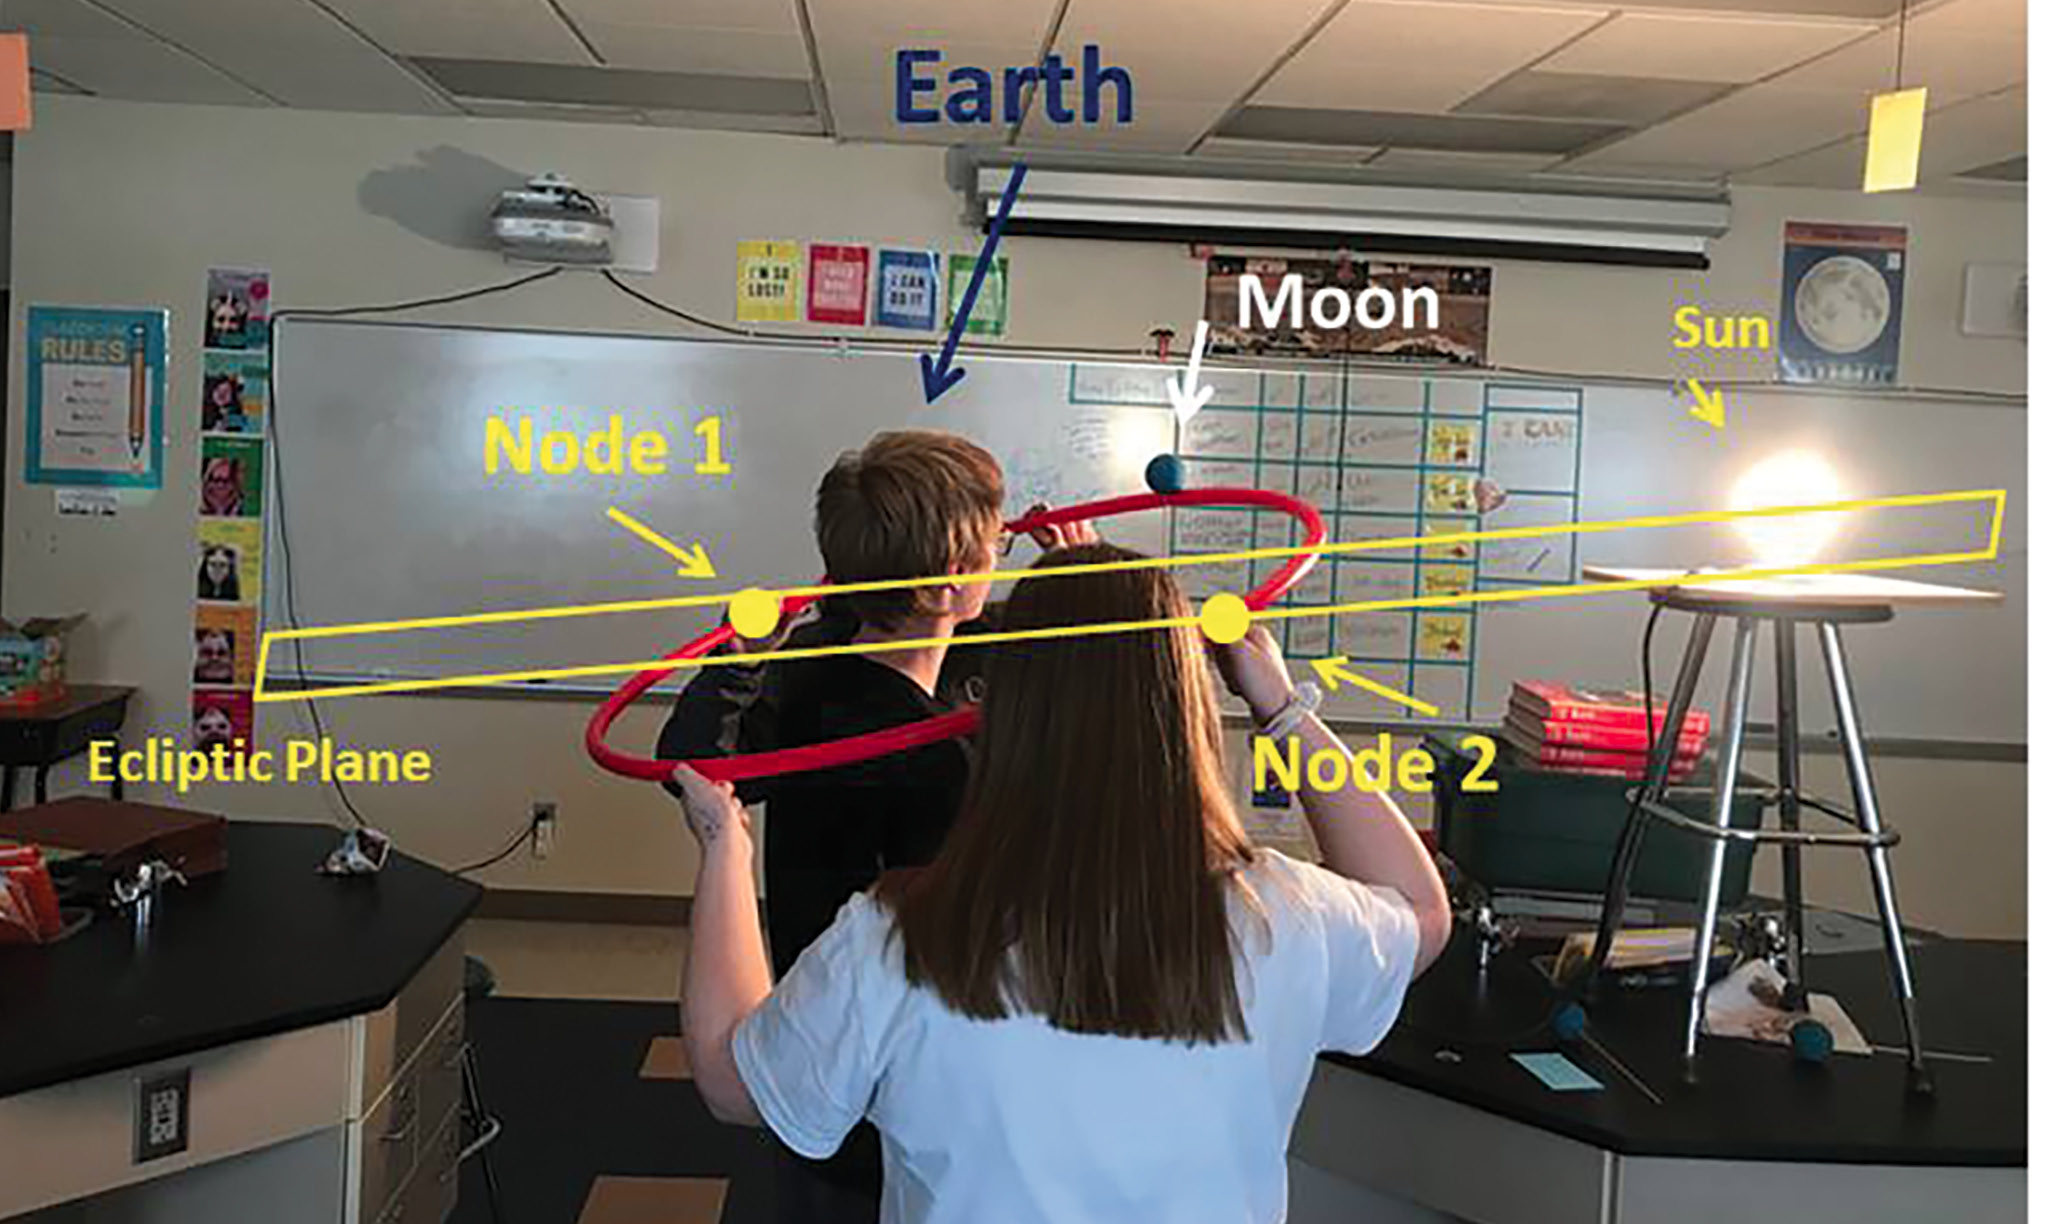
Students using a hoop to constrain the Moon’s orbit around Earth (student’s head in the hoop) and approximately illustrate the 5-degree inclination of the Moon’s orbital plane in relation to the Earth–Sun plane. The ecliptic is identified by student’s head in line with the light bulb. Image shows no eclipses because nodes are not in line with the Earth and Sun.
We have the student in the middle of each hoop slide the Moonball, still on a skewer, around inside the hoop. We then asked the students if eclipses happen each month, reminding them that all three objects must be in a line for an eclipse. They usually have an ah-ha moment and realize that there are only two locations for the hoop to be in. The two positions in which eclipses will occur are six months apart, or halfway around in the Earth’s orbit. At one of these locations, we have the students place the Moonball at the two points on the hoop that line up Earth–Moon–Sun. The two points on the hoop where the Moon crosses the ecliptic plane are called nodes. We then discuss the frequency of eclipses with this model and that there are two sets of nodes that cause on average four eclipses to occur every year.
For review, the teacher picks one group with its Earth, Moonball, and hula hoop and has them start at a position in the orbit around the Sun to act out a full year. Have the class confirm that the following aspects of the motion are done correctly: the counterclockwise orbital motions of the Earth around the Sun; the counterclockwise motion of the Moon around Earth; the unchanging inclination of the Moon’s orbit during a whole year; and sequences of the Moon’s lunar phases throughout the year. The students should go through 12 months to firmly identify the occurrence of both phases and eclipses.
Activity 6: Creating 3D worksheets (30 minutes)
Materials/Preparation: Moon phases Worksheet 4 (see Online Supplemental Materials) for discussion.
We have the students draw a self shadow on the Moon as the cause of Moon phases as observed from Earth (use Worksheet 4). On the same worksheet, students draw cast shadows for eclipses. The questions are designed to explore both phases and eclipses, and at the same time introduce some puzzling aspects of the system in 2D. For example, can you get two eclipses every month? Or, is the full Moon always blocked by the Earth’s cast shadow, as the filled-out diagram suggests? We let the students know that inconsistencies can become apparent as you draw certain phases when an eclipse should be occurring, and we let them start to think about the pitfalls in the 2D model.
We find the students realize that the Moon’s orbit must come out of the page and ask if they can cut along the dotted lines, making a 3D orbit (see Figure 6). For differentiated instruction, we allowed students to cut any half circles of their choice. But they also must include two opposite Moons uncut to allow at least two moons to remain in the ecliptic plane, meaning the “gap” in the dotted lines can be along any two opposite Moons.
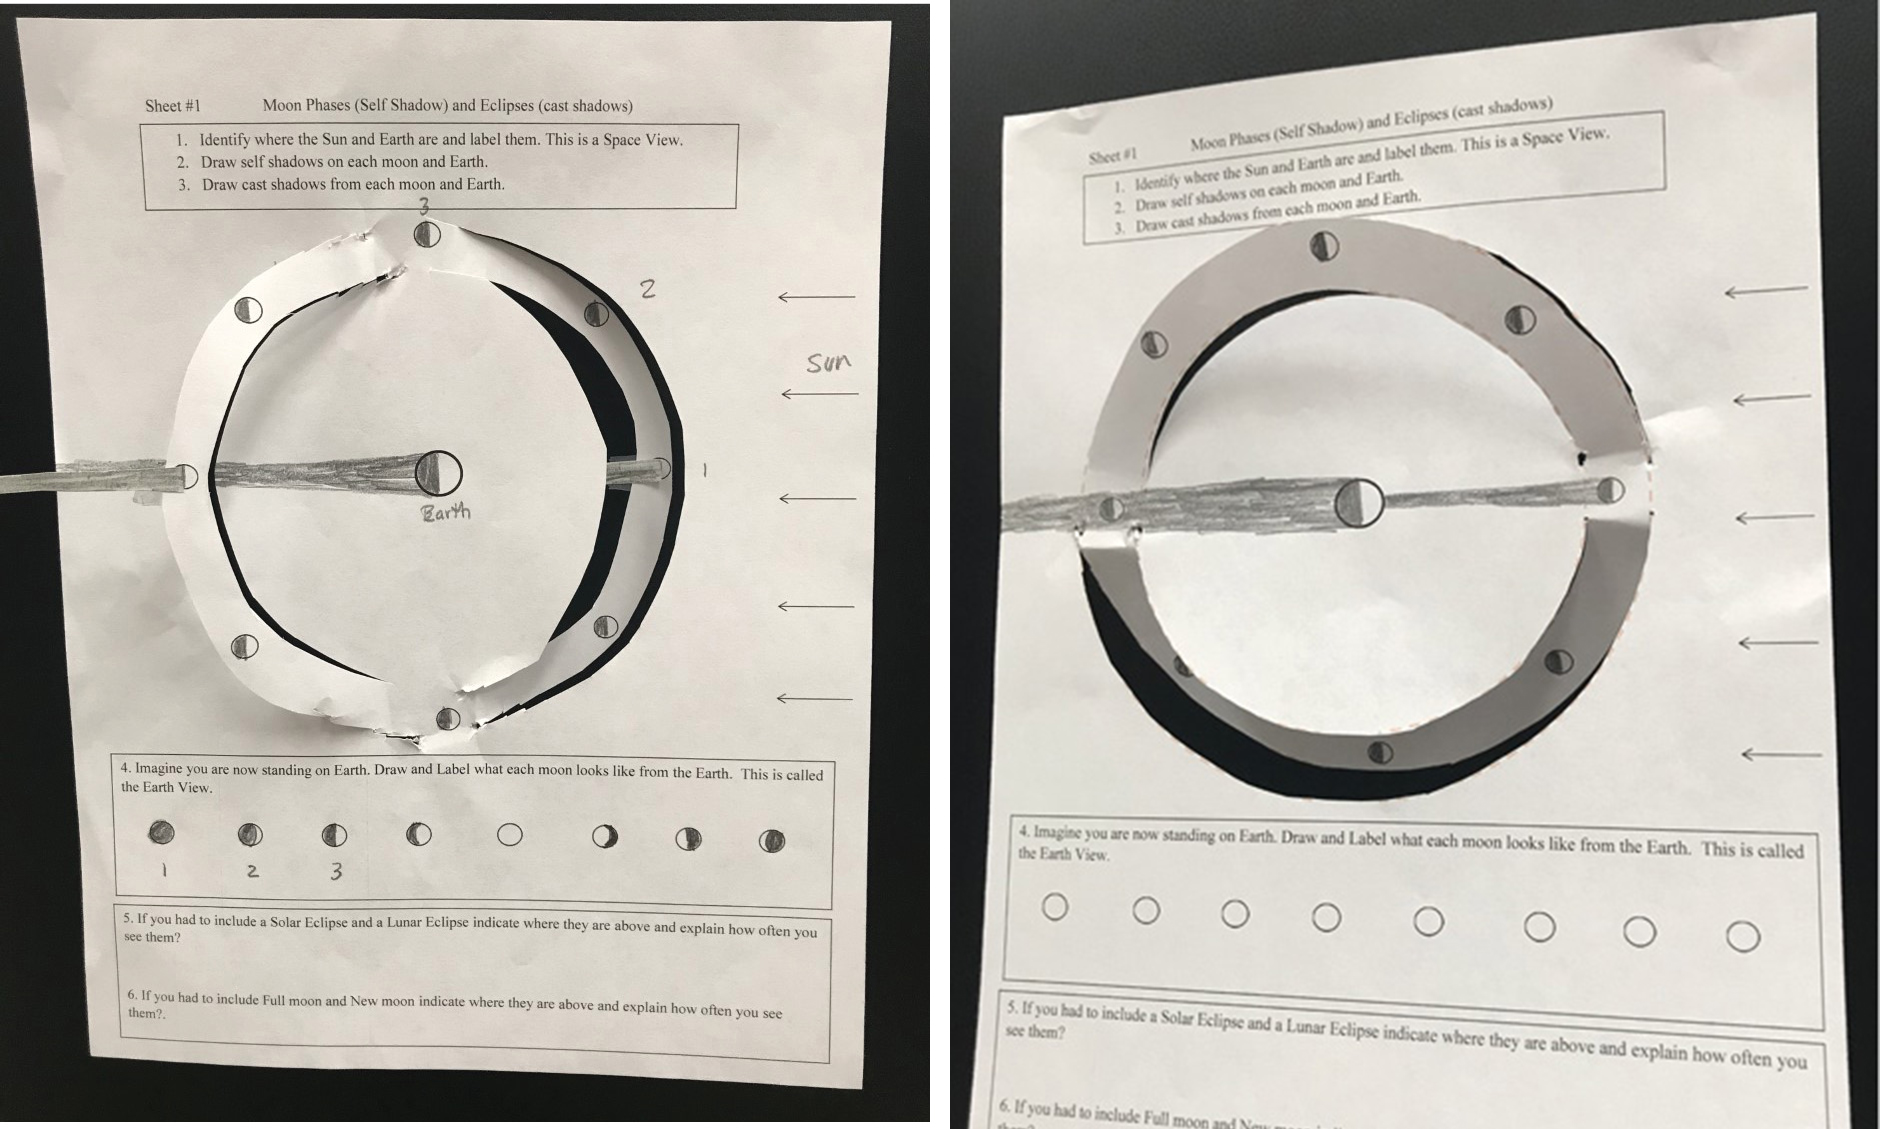
Student worksheets with lunar phases with self shadows and cast shadows. The plane of the paper is the ecliptic plane. Left: Cuts in paper indicate the Moon’s inclined orbit with no eclipses occurring and gibbous and full Moon above and crescents and new Moon below the ecliptic. Right: The Moon’s inclined orbit with waxing phases above and waning phases below the ecliptic plane. Both solar and lunar eclipses are seen.
Video assessment
Have students create a video in which they explain the integration of eclipses, lunar phases using models and diagrams. To show an extra level of comprehension, students pinpoint “flaws” in the various models and explain why they are necessary and how they could be fixed. We have supplied a sample rubric for the video assessment (Worksheet 5; see Online Supplemental Materials).
Final demonstration
As the grand conclusion, to demonstrate the Moon’s inclined orbital plane in the corn syrup model, we introduce a plastic washer secured by a stiff wire and a small white ball (for the Moon) glued to the plastic washer. The hole in the plastic washer is centered at Earth and placed in different orientations in the corn syrup model. Discuss and explain the Moon’s orbital inclination with ecliptic plane (see Figure 7). The teacher and students hold the Moon’s orbit in different orientations, but always inclined, to visualize when eclipses and phases occur.
Conclusion
This article describes the creation of innovative 3D models of the Moon’s inclined orbital plane around Earth to foster student conceptual understandings of the causes of both lunar phases and eclipses taught together, not separately. All models offer effective visualizations that demonstrate how lunar phases and eclipses follow different but inherently related cycles due to the Moon’s inclined orbital motion. •
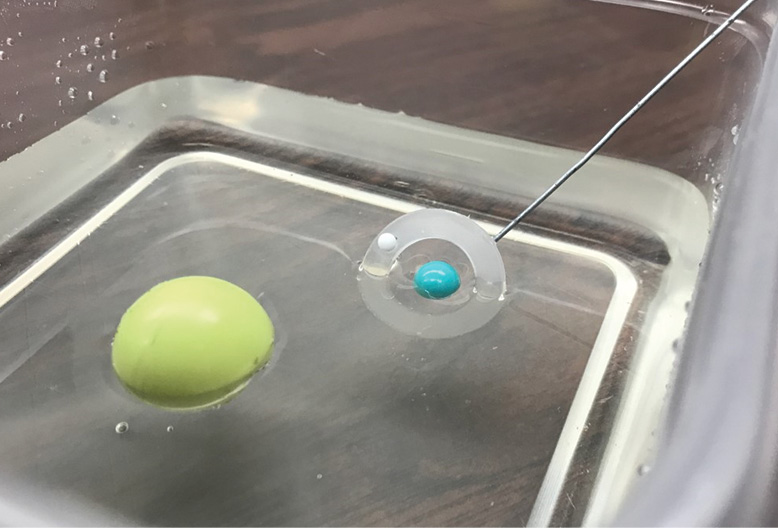
Corn syrup model with moon’s inclined orbit. Moon is attached to a disk and submerged halfway into the level of the corn syrup with Earth at center.
Resources
NASA website—https://eclipse.gsfc.nasa.gov/SEsaros/SEsaros.html
Useful simulations:
Online Supplemental Materials
Worksheets 1, 2, 3, 4, and 5—https://www.nsta.org/online-connections-science-scope
NGSS chart—https://www.nsta.org/online-connections-science-scope
Timothy Young (tim.young@und.edu) is a professor in the Department of Physics and Astrophysics and Mark Guy is a professor emeritus in the Department of Teaching and Leadership, both at the University of North Dakota in Grand Forks.
Astronomy Physical Science Middle School