
Integrating Technology
Engaging With VR
Where Will You Take Your Students?
Science Scope—July/August 2020 (Volume 43, Issue 9)
By Christopher Long and Lauren Eutsler
Virtual reality (VR) is a new and exciting tool available to science education. Immersive VR, using a head-mounted viewer, is an effective learning tool to help improve science understanding because students perceive themselves as being inside the proposed setting (Ferdig, Gandolfi, and Immel 2018). VR involves viewing 360° images of any environment. Each photo is a scene, which then becomes a part of a tour. Tours are accessed by downloading freely available apps to any smartphone or tablet; for a more personalized experience, insert a smartphone into a head-mounted viewer. Immersive VR has been shown to have measurable effects on student learning. For example, in a group of students learning high school physics, 90% of students using VR passed their subject matter exam compared with a 40% pass rate for students who did not engage with VR (Beijing Bluefocus E-Commerce Co. 2016). This article familiarizes you with using VR in your classroom, acquaints you with free VR apps to explore, presents strategies for assessing student learning, provides safety precautions, and includes tips on selecting VR hardware.
Using VR in the classroom
One of VR’s greatest benefits is that you can transport your students to locations much too distant or dangerous. In a classroom experience where we used Google Expeditions (a free VR app), we were able to virtually travel tens of thousands of miles to experience the expedition “Volcanoes Around the World” without having to leave our classroom (Figure 1). During this tour, we took students into the caldera of volcanoes in Russia, Ethiopia, Indonesia, and Hawaii, which allowed them to experience stunning, immersive, and three-dimensional views of dangerous lava filled environments from the safety of their desks (see Figure 2). Part of the class was spent letting the students explore the scenes, after which we directed students to an active lava flow, using the guided narrative text. When we noticed that students were starting to focus on another feature in the scene, this time a brightly colored thermal pool, we were able to quickly shift into a discussion about bacteria in extreme environments. Besides visiting far away locations, students can also visit places that are only accessible under a microscope. For example, Google Expeditions offers a tour called “Molecules” that lets students explore molecular and atomic structures. This tour includes scenes that explain compounds, ionic and covalent bonding, polymers, and enzymes. Perhaps you want to take students on an inner space Google Expeditions tour called “Human Anatomy–Respiratory System”—with this tour, you can take students inside of a human lung so they can closely observe the various structures of the lung. See Callout Box for example teacher script.

“Volcanoes Around the World” Google Expeditions screenshot.
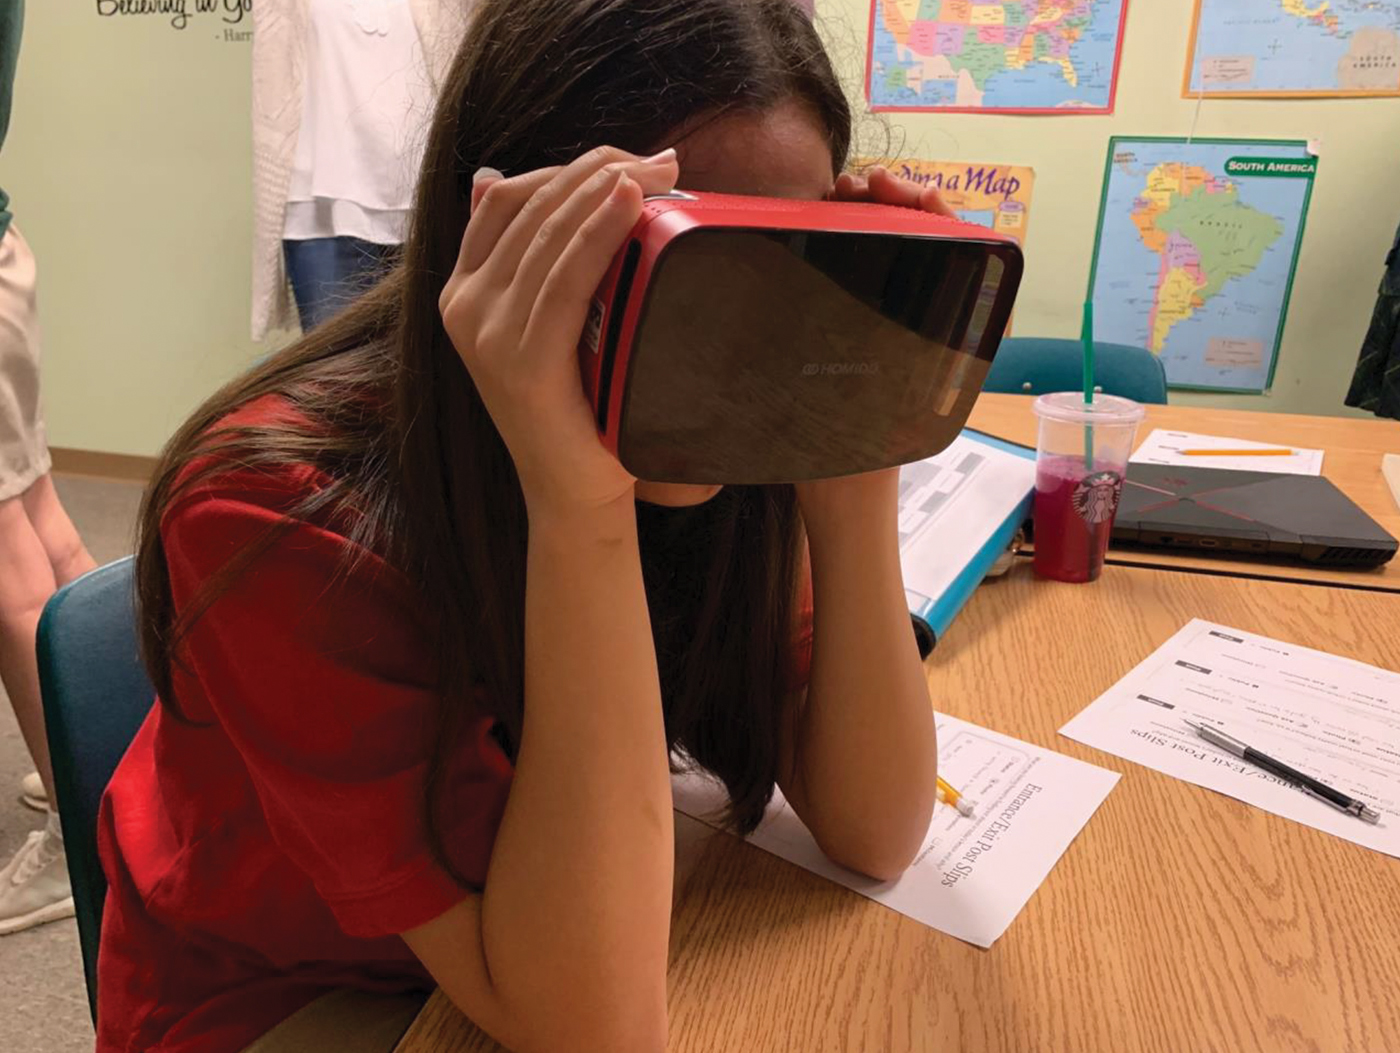
Student VR user.
Immersive VR is not appropriate for use during an entire lesson cycle, such as the 5E, but it is quite suitable during any of the individual stages of the 5E lesson cycle. For example, a virtual roller coaster ride is fitting for the Engage step within a lesson on potential and kinetic energy. Rather than a traditional PowerPoint as the centerpiece of your Explain step, interactive lectures will certainly be more engaging when using a VR tour. Taking students on VR tours is also very useful as an Explore activity as students wander from scene to scene, discovering new landscape. An Elaborate activity might include students designing their own VR tour. Last, you might Evaluate student learning by creating supplemental learning guides (more on assessment later). While our brief examples show some responses from the lower end of Bloom’s Taxonomy, VR-centered lessons could easily be adapted toward higher level questions and activities.
Free VR apps to explore
There are many free VR apps that can be used to enhance otherwise traditional instruction (Table 1). Google Expeditions, the app used to illustrate our vignette, is our preferred VR app because it does not require students to access the school’s WiFi network, and it is easy to incorporate the expanding list of 900 tours into your instruction (Figure 3). No account is needed, but the app has to be downloaded to a smartphone or other viewing device. The Google Expeditions app is available in the Google play store and on the Apple app store.
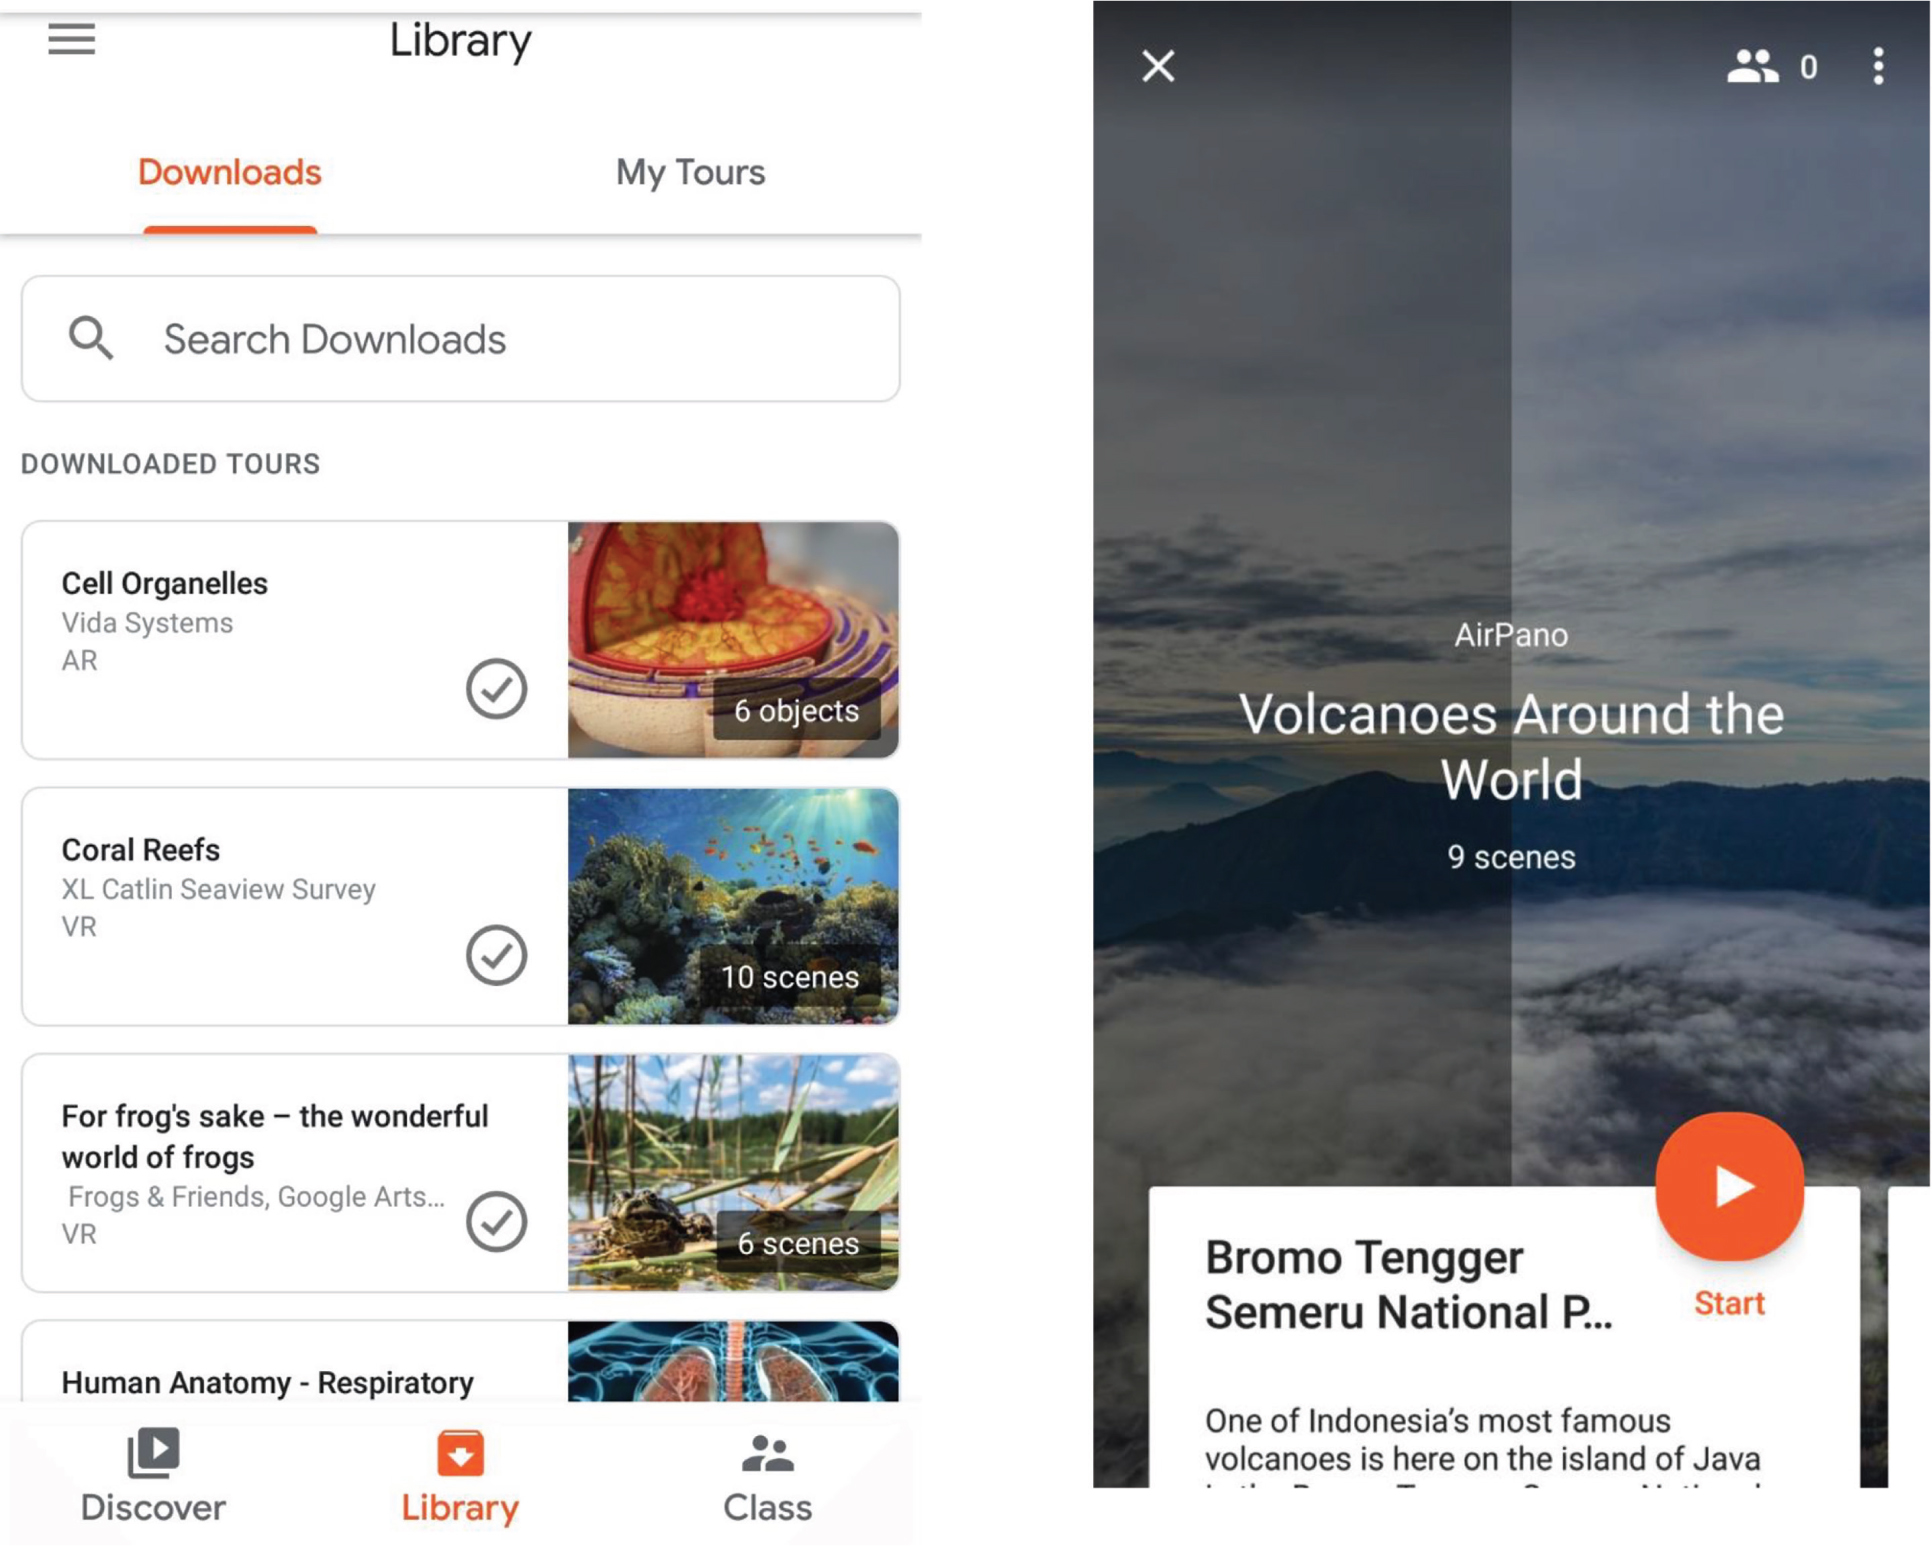
Left: Google Expeditions library. Right: Volcanoes Expeditions student view.
| Table 1. Free VR science apps. | ||||||||||||||||||||||||||||
|---|---|---|---|---|---|---|---|---|---|---|---|---|---|---|---|---|---|---|---|---|---|---|---|---|---|---|---|---|
|
To the best of our knowledge, Google Expeditions is the only VR app that allows the teacher to guide instruction without using external WiFi. The tours can be downloaded onto the teacher’s device and stored in a personal Google Expeditions library. Once the tour(s) are loaded into the teacher’s Google Expeditions library, internet access is not required. Many of the tours are created by recognized authorities such as National Geographic, the American Museum of Natural History, and the Guggenheim. The tours are not identified by grade level, but the content in many of the tours is appropriate for a wide grade range. While there are numerous science- oriented tours, Google Expeditions offers tours in other content areas, such as English language arts, social studies, and art. Another feature of Google Expeditions is its descriptive explanations, which you might consider using to anchor interactive discussions and facilitate students’ understanding of the material. The explanations are provided on the teacher’s guide view.
To demonstrate how to get started with Google Expeditions, open the app, click “Guide,” and select the tours that align with your instruction. Students power on their smartphone, connect to the private WiFi network (using any router), open the Google Expeditions app, click “Join,” and close their head-mounted viewer to begin the tour. While a head-mounted viewer provides the most immersive experience, the tours can also be viewed on a smartphone or tablet without the viewer. With the teacher tablet set to Guide, press play to begin the tour. From here you can view how many students are on the tour and where they are looking, and you can guide students from one scene to the next, pausing at your convenience (you do not need a head-mounted viewer to do so). From the view on the teacher tablet, you may elect to read-aloud the paragraph describing each scene and ask students the supporting discussion questions, while clicking on the available guideposts (icons that direct students where to look.
Example script of a teacher guiding students on a virtual tour.
Right now, we’re above one of the most famous volcanoes on the island of Java. This is Bromo, an active volcano. It’s not as high as volcanoes go, only about 2,900 meters. You can drive a car up to the base of Bromo and take the 250 steps to the edge of the crater. If you look over here, you can see a Hindu temple. During the month-long holiday called Yadnya Kassada, worshippers throw fruits, rice, poultry, and even small cattle into the volcano to appease the gods. If you look over here, you can see Mount Semeru, the tallest mountain on Java, it’s an active volcano, too.
Shifting to Ethiopia, we’re now at the Erta Ale volcano. Erta Ale means “smoking mountain.” Erta Ale is one of only five volcanoes in the world to have a lava lake in its crater. Here’s a close up look into the lake of lava. This lava will eventually cool into what kind of rock? That’s right, igneous rock…yes, extrusive igneous rocks. This is another Ethiopian volcano, Dallol. I want to show you this one because of the really strange-looking acid pools. These pools are colored the way they are because of bacteria that live in the pools. This type of bacteria is called extremophiles because they love extreme environments. These pools and vents occur because this part of Ethiopia is in a rift valley where two tectonic plates are pulling apart from one another.
Assessing student learning
Immersing students in VR tours is highly engaging, but you might also consider how to measure student learning. To help students synthesize learning between VR tours and other curriculum material (e.g., textbook, online), we recommend having students record their observations and reflections by utilizing science notebooks, concept maps (e.g., Thinking Maps), and other graphic organizers such as the I-chart (Hoffman 1992). See students’ recorded notes related to tours in Online Supplementary Materials. Other ways to have students demonstrate content mastery include having them locate tours and lead the class in their own instruction, or sending them on scavenger hunts within a tour.
To make VR a more personalized experience and give students more autonomy in their learning, you might consider having students create their own VR tour. When our students created their own VR tour, this increased their motivation and engagement and doubled as formative assessment. We asked students to create a VR tour of an outdoor science education environment to showcase their knowledge of abiotic and biotic features. Students were instructed to annotate each VR scene to describe these scientific features (the link to the tour created by students is available at https://www.tinyurl.com/UNTelm fork).
To create your own VR tour, you will need a smartphone, computer, and 360° camera (cameras are available for less than $200). Place the camera where you want to capture an image, and use the free compatible camera app and a GPS-enabled smartphone or tablet as a remote to capture 360° images. Then connect the USB cord to the computer and upload the images directly to the free Google Expeditions Tour Creator software (https://vr.google.com/tourcreator/). Students can personalize their tour by adding a title, general description, and a title and description for each scene (360° image). Students can also add narration and ambient audio features. After the tour has been uploaded, simply click on the heart icon to “like” the tour and navigate to your “likes” page in your Google Expeditions library, where you or student leaders can guide a tour just like the teacher would with the Expeditions tours. Students can choose the privacy level of their tour and share the web address with friends, family, and the world.
Safety precautions and accommodations
Before using VR with your students, it is important to obtain parent permission because some students may have a condition that could be exacerbated by VR, which may lead to dizziness, nausea, or lightheadedness. As a result, we suggest limiting each VR experience to 10-minute increments. Also, while using VR in your classroom, ensure each student is aware that others will be maneuvering 360°, which is why we recommend students sit cross-legged on the floor or remain in their chair. You may also need to make accommodations; for example, if a student is unable to use the head-mounted viewer, perhaps the student can view the tour from a tablet, or you or a teaching assistant can hold the viewing device. The personalized nature of VR lends itself to easy differentiation for students with an individualized education program (IEP) or other special need. If a student is hearing impaired, most VR experiences are supported by on-screen text; the teacher could also provide written supplemental material within the student’s science notebook.
Selecting VR
Cost is often cited as an obstacle to using VR in the classroom, with some top-of-the-line classroom setups, creeping as high as $18,500. You might consider pursuing a grant to secure funding (e.g., ; Bryson 2007). Another option is to obtain support from a crowdfunding source (e.g., https://www.gofundme.com; https://www.donorschoose.org). However, with little effort and investment, there are many possibilities for creating your own VR kit by acquiring refurbished or earlier smartphone models. Additionally, for those without head-mounted viewers who want to get a feel for VR, “you can watch 3D, 180°/360°, and full VR videos, on your PC. It’s not as immersive, but you can still get a lot of the exciting virtual reality experience” (Steinbrueck 2019). Any computer will suffice as long as it is connected to the internet and has a web browser.
There are two options when selecting VR. If devices are shared and managed by a school librarian or technology specialist, you might consider a comprehensive VR kit (Table 2). A VR kit for 10 students typically includes 10 viewers, 10 smartphones, 10 USB charging ports, one WiFi router, one tablet and charger, one 360° camera, and one transportable protective carrying case.
| Table 2. Comprehensive VR kit options. | |||||||||||||||||||||||||||||||||||
|---|---|---|---|---|---|---|---|---|---|---|---|---|---|---|---|---|---|---|---|---|---|---|---|---|---|---|---|---|---|---|---|---|---|---|---|
|
Although a classroom kit (see Figure 4) may seem cost prohibitive, each kit comes with a travel case, which allows for mobility between classrooms and transportability to any space (e.g., outside). With multiple classrooms sharing the kits, the cost becomes more reasonable. Because VR is suitable for many subject areas, the cost could be shared across the entire school, and the equipment could be checked out from the librarian. The kits come equipped with a router that creates its own private WiFi network, which will also work with supplied devices or a BYOD program. With this setup, students cannot access the internet to download apps or browse the web, thus keeping them focused on learning. The setup is user-friendly and should not require assistance from technical staff. There are no additional costs associated with WiFi access. Although one device per student is optimal, it might be practical to share one device between two students or use a handful of sets within a learning station.
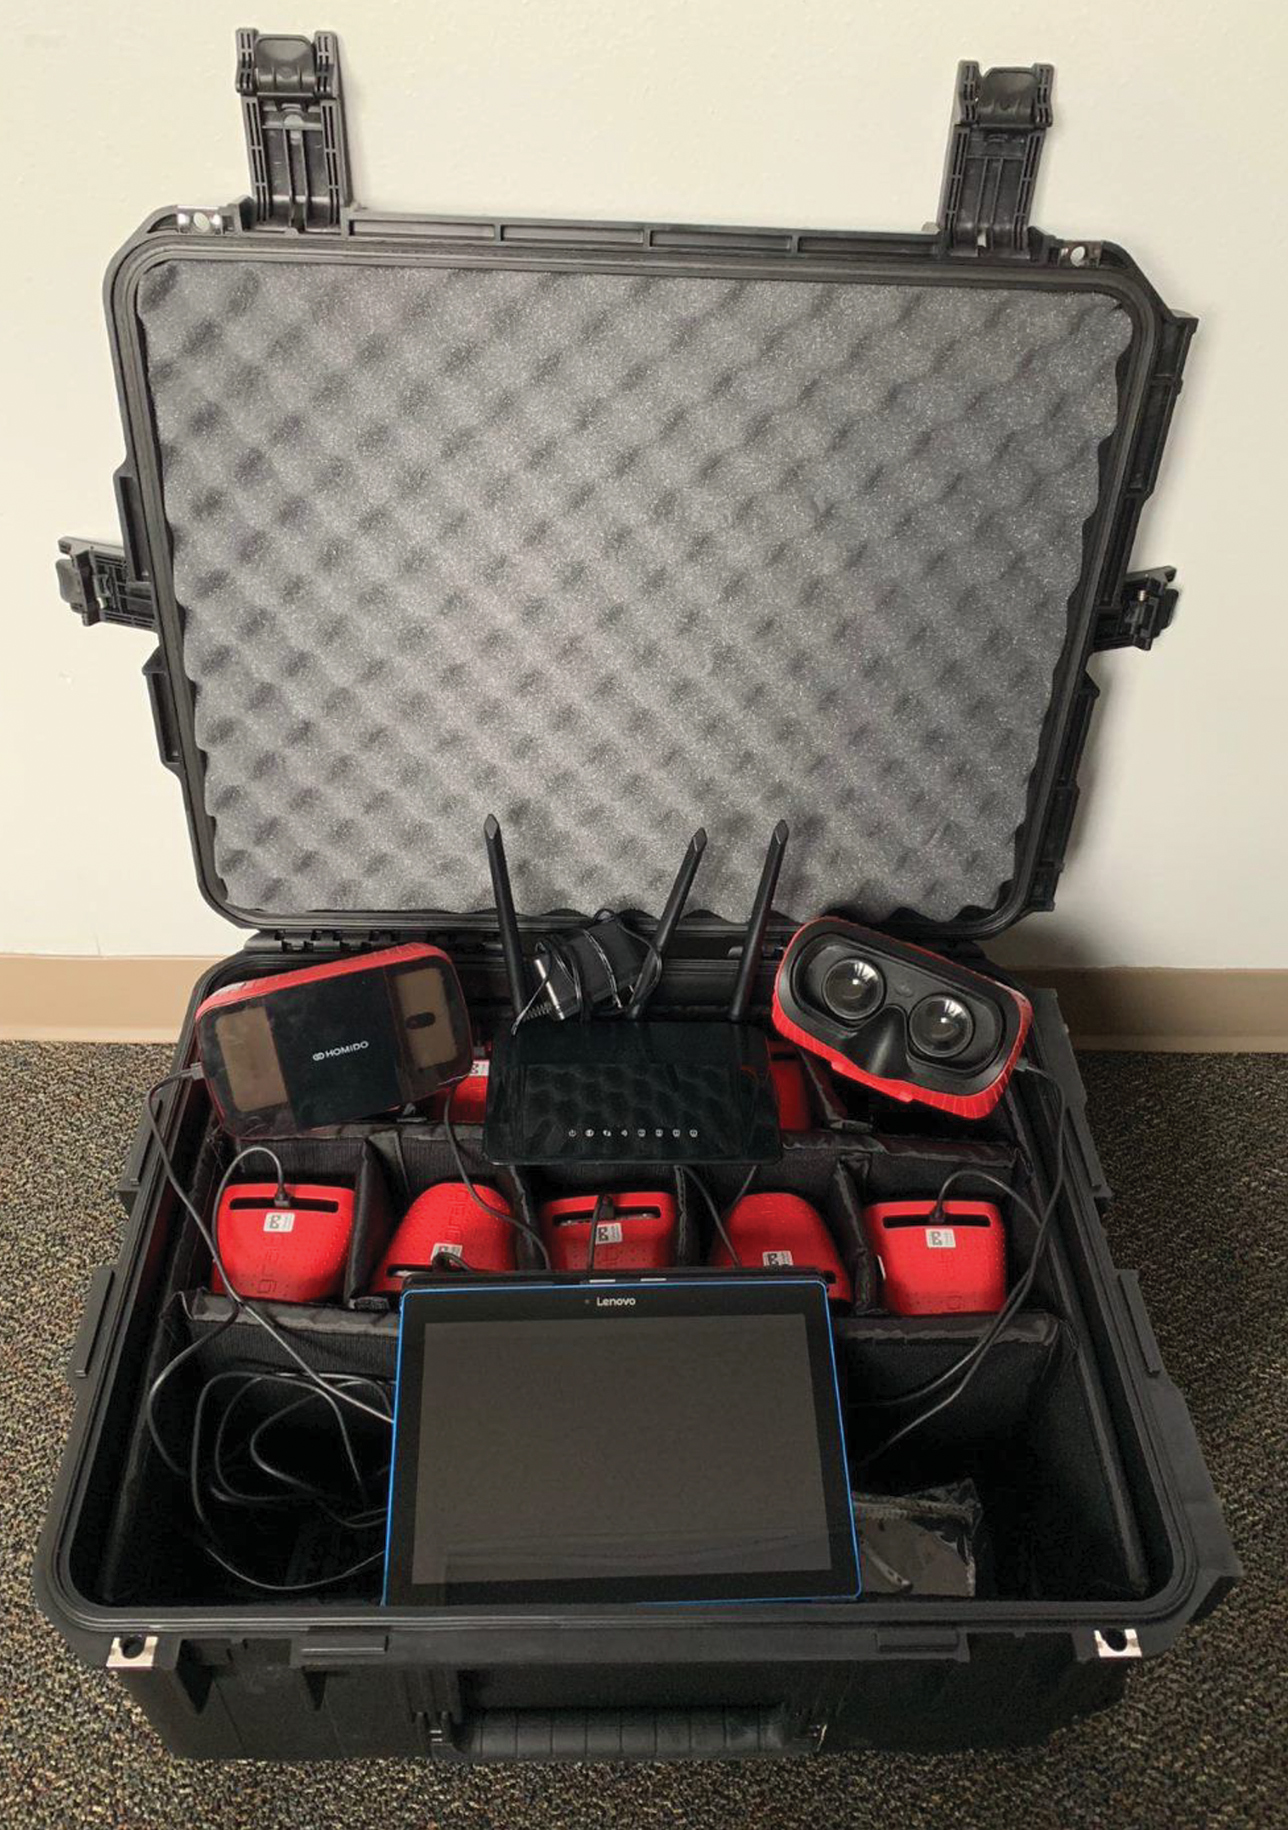
VR comprehensive kit.
The second option involves putting together your own classroom kit by purchasing the gear separately. While this option is not as convenient as the comprehensive kits, the cost savings are substantial. For about $150, you can support a small group of 10–15 students by purchasing a handful of smartphones, VR head-mounted viewers, and a router, making VR an inexpensive reality in your classroom. For example, if your school has smartphone devices (any standard smartphone will fit inside of the VR head-mounted viewer) or a BYOD program, all you need are the head-mounted viewers ($5.00–$129.99 each) and a smartphone or tablet for the teacher to guide the VR tour. For example, Google Carboard viewers are available for $15.00. There are other even less expensive options available (). If you’re using an app that requires WiFi, you may need to work with your IT support personnel to facilitate WiFi connectivity.
Parting insights
VR is an engaging tool to enhance science learning in the classroom. With only $5 for a VR head-mounted viewer and your own smartphone, get started by downloading the Google Expeditions app to immerse yourself in the environment of your choice. We do our best to explain how to get started with VR, but since VR is such an immersive technology, it is important for you to use the technology to fully understand this teaching and learning experience. You and your students can experience science in new ways by visiting places around the world that are otherwise inaccessible, like coming face-to-face with a bear, traveling inside of the human body, visiting remote locations, or venturing into outer space. With VR, the sky is no longer the limit!
Christopher Long (Chris.Long@unt.edu) is an assistant professor and Lauren Eutsler (Lauren.Eutsler@unt.edu) is an assistant professor, both in the Department of Teacher Education and Administration at the University of North Texas College of Education in Denton, Texas.