
Making in the Middle
Making Sense of the Human Body
Science Scope—March 2020 (Volume 43, Issue 7)
By HELENA CASTLE, KIRA LOWERY, AND SHELLY R. RODRIGUEZ
CONTENT AREA Life Science
GRADE LEVEL 7
BIG IDEA/UNIT In multicellular organisms, the body is a system
of multiple interacting subsystems.
ESSENTIAL PRE-EXISTING KNOWLEDGE Students should be able to define and explain the connection between cells, tissues, and organs.
TIME REQUIRED 5 weeks including introduction of each of the human body systems. 2.5 weeks for Single Human Body Project and Coding Connections
COST $200 (including upcycled materials, crafts materials, and 5 micro:bit kits). *Project can be adapted to fit context-specific budget and resources.
SAFETY Precautions should be taken when using cardboard cutting tools and hot glue guns. Correct operating procedures should be modeled for students prior to use.
Making is a process of fabrication rooted in the notion of personal motivation that sits at the intersection of STEM, the arts, and traditional crafts knowledge (Marshall and Harron 2018). During maker- centered learning, students connect to content as they build something meaningful, engage in iterative fabrication, collaborate, and present their work (Rodriguez et al. 2018).
The hands-on, interactive nature of maker-centered learning is ideal for adolescents who favor active learning strategies that involve collaborating with their peers (Kellough and Kellough 2008). Maker-centered learning also promotes habits of mind such as creative thinking, playfulness, resilience, and reflection known as a maker mindset (Martin 2015). It is for these reasons that the National Science Foundation (NSF) has acknowledged the potential of making to promote innovation, increase student retention, and broaden participation in STEM (NSF 2017).
Rationale
This article features a maker- centered human body unit, in which students were challenged to make a physical model that demonstrated the main function of a specific body system. In the second phase of the unit, students used coding to make computational models of connections between body systems. In addition to developing maker skills, identifying the main functions of human body systems, and exploring connections among body systems, students reflected on body positivity while making personal connections to the content. The body positivity movement advocates for the acceptance of all bodies no matter the form, size, or appearance. Middle school students have been shown to have prevalent body dissatisfaction across gender lines (Hausenblas et al. 2002). Thus, the lesson aimed to help students establish positive relationships between their body system models and the great things their bodies do.
The unit spanned five weeks, including multiple days set aside for project design and fabrication. These days were interspersed with content-specific activities and lessons that provided information about the body as a system of multiple interacting subsystems that are specialized for particular functions. Figure 1 shows an overall timeline for the unit.
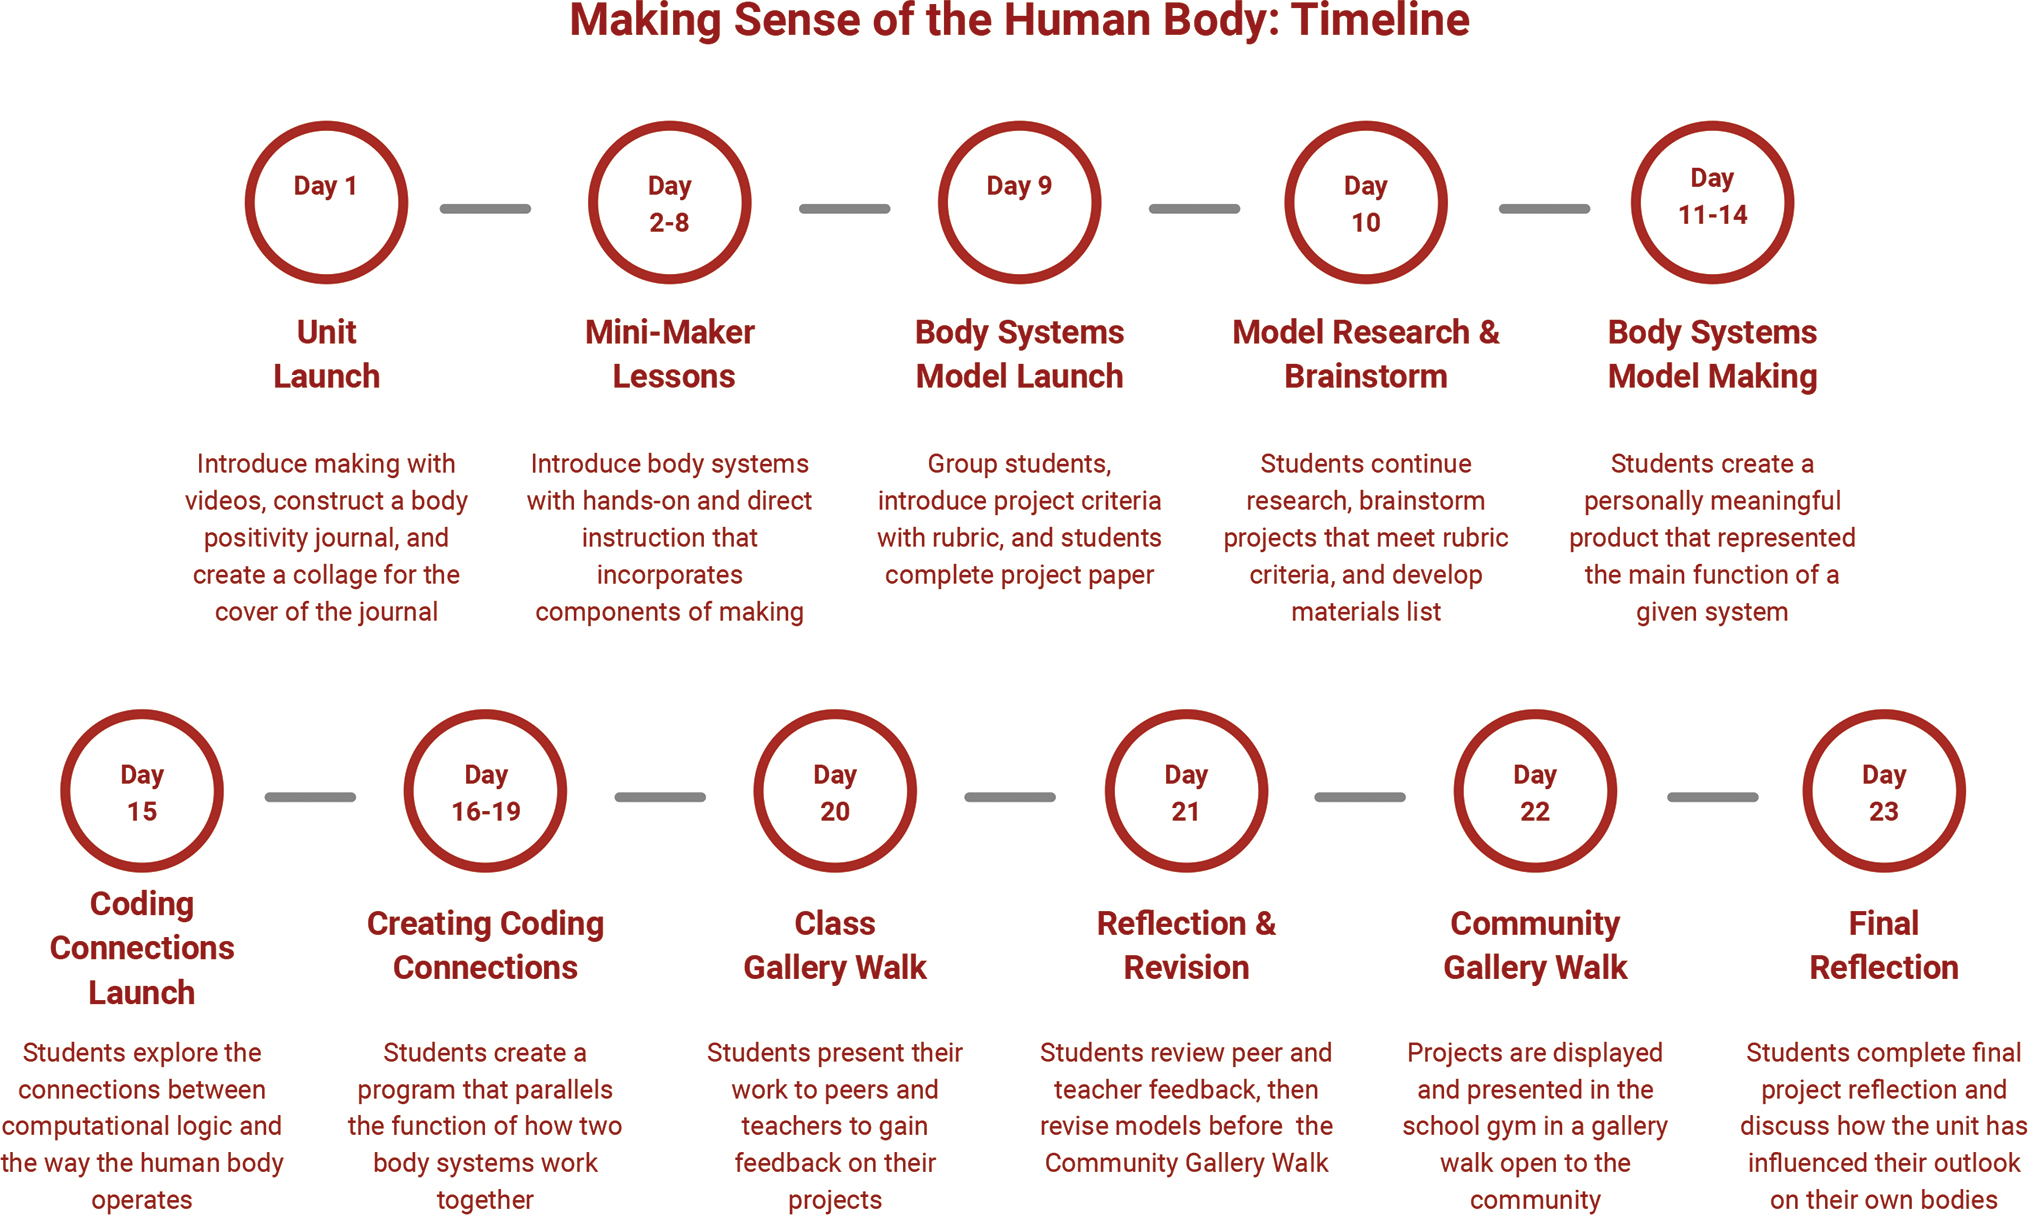
Making sense of the body unit timeline
Body systems models
To learn about making, students watched several videos including “Flourishing” by Ken Robinson and “What Is a Maker” (see “On the Web”). The purpose of the videos was to help students gain an understanding for what it is to be a maker. At the start of the unit, students wrote short reflections about two of the main ideas of this unit: “What does making mean to you?” and “What does body positivity mean to you?” Students’ responses to the first prompt included comments like, “It means creating something meaningful to you” and “It means being creative and building something beautiful.” Students’ responses to the second prompt included comments such as “[body positivity] is doing good for your body” or “keeping your body in good shape and being healthy.” There were also several student responses that spoke directly to mental health, for example, one student said, “[body positivity] is taking time to relax and have positive mental health.” During this time, the teacher should have conversations with students about the beauty of diversity and the importance of accepting everyone for their unique traits, including themselves.
Next, students were paired up to foster positive group dynamics that could endure for both the length and the collaborative nature of the unit. Students who had a track record of working well together and who could challenge each other creatively and academically were paired together. These pairs were assigned to a human body system and created a group contract where they discussed what jobs they would create for their project. Examples of jobs included creative director, materials organizer, peacekeeper, time manager, and building manager. The group contract also allowed students to discuss how they would handle disagreements.
Next, students worked to brainstorm, sketch, and research their assigned body system. After initial ideas were established, the pairs were organized into collaborative groups to share their ideas with other classmates. For the initial brainstorming, collaborative groups of four to five students worked together. This provided time for the exchange of ideas between makers. After the brainstorming phase, groups were broken into pairs for project construction. The pairs provided the instructors with a materials list that described the items they would need to build their model. Following the artist practice of bricolage (creating from available or found objects), students used upcycled materials and readily available materials to create their models. Most materials were recycled goods such as cardboard, foam packaging, straws, bottles, and donated clothes/fabric. The community of teachers and parents also made donations of items such as clay, paint, craft sticks, and other crafting supplies. The micro:bits were purchased using grant funds, and they remain in the school inventory for use in future projects.
Students were given a total of five 55-minute periods to design, build, and decorate their models. Throughout the building process, students learned how to use various tools including ZipSnip (see lesson materials and management tips in “On the Web”), an electric rotary tool that can be used to cut cardboard, plastic, cloth, paper, and leather. Many students also learned introductory stitching and sewing techniques. Teachers gave demonstrations of the proper use of each tool. The students were asked to create a materials list that was checked and signed by the teacher prior to students accessing the resources.
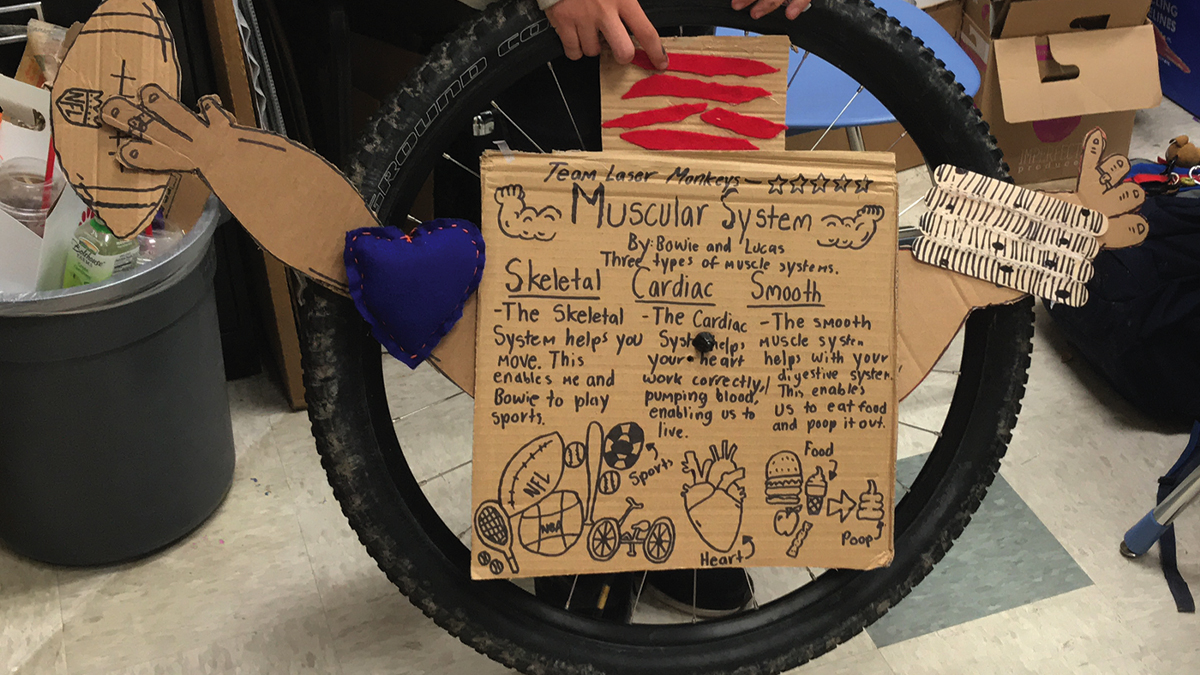
Many students used this project as an opportunity to connect their project to their lived experiences. For example, two students had lost their grandfathers to heart disease and used their circulatory project to tell the stories of their experience. Another group of students integrated their interests in mountain biking and football into their muscular system model. They crafted a cardboard illustration that spun on the axle of a bike wheel to demonstrate the main function of the muscular system: movement (see Figure 2). Other groups used their projects to connect to real-world problems they felt passionate about. For example, two students who cared about the environment created a digestive system out of straws and Styrofoam to represent the threat to ocean ecosystems, specifically the digestive systems of marine animals (see Figure 3). It should be noted that at the end of each day, students completed a project reflection and were asked to maintain a checklist of the specific structures and functions for their organ system. Instructors used daily student reflections and the checklist as a formative assessment throughout the project.
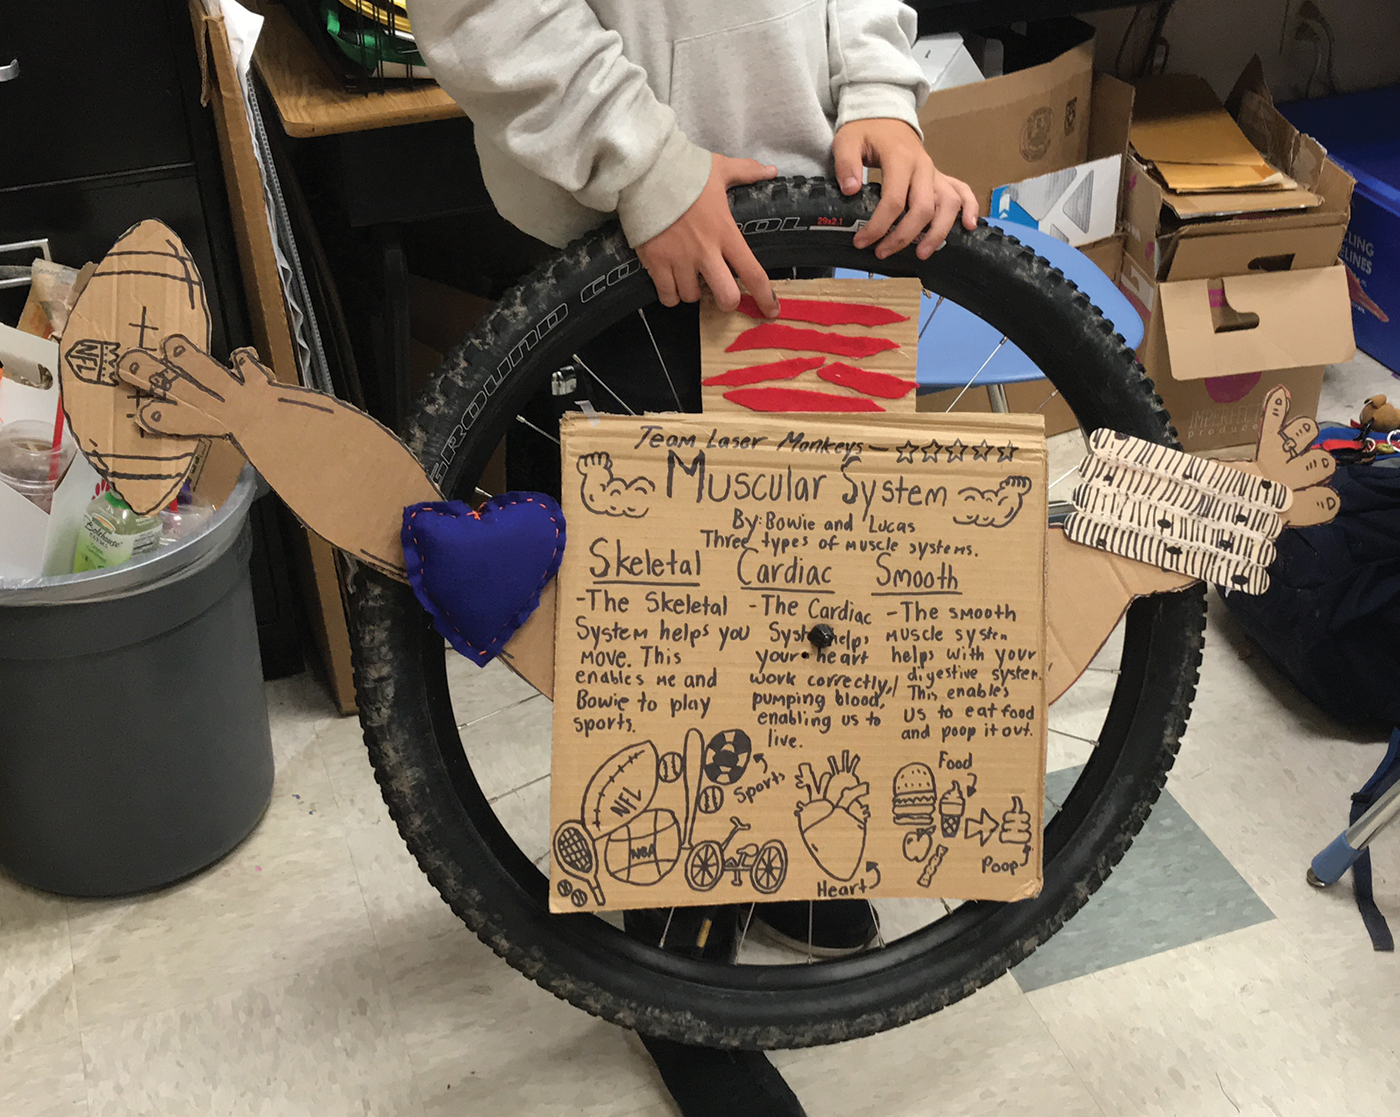
Student model of the muscular system
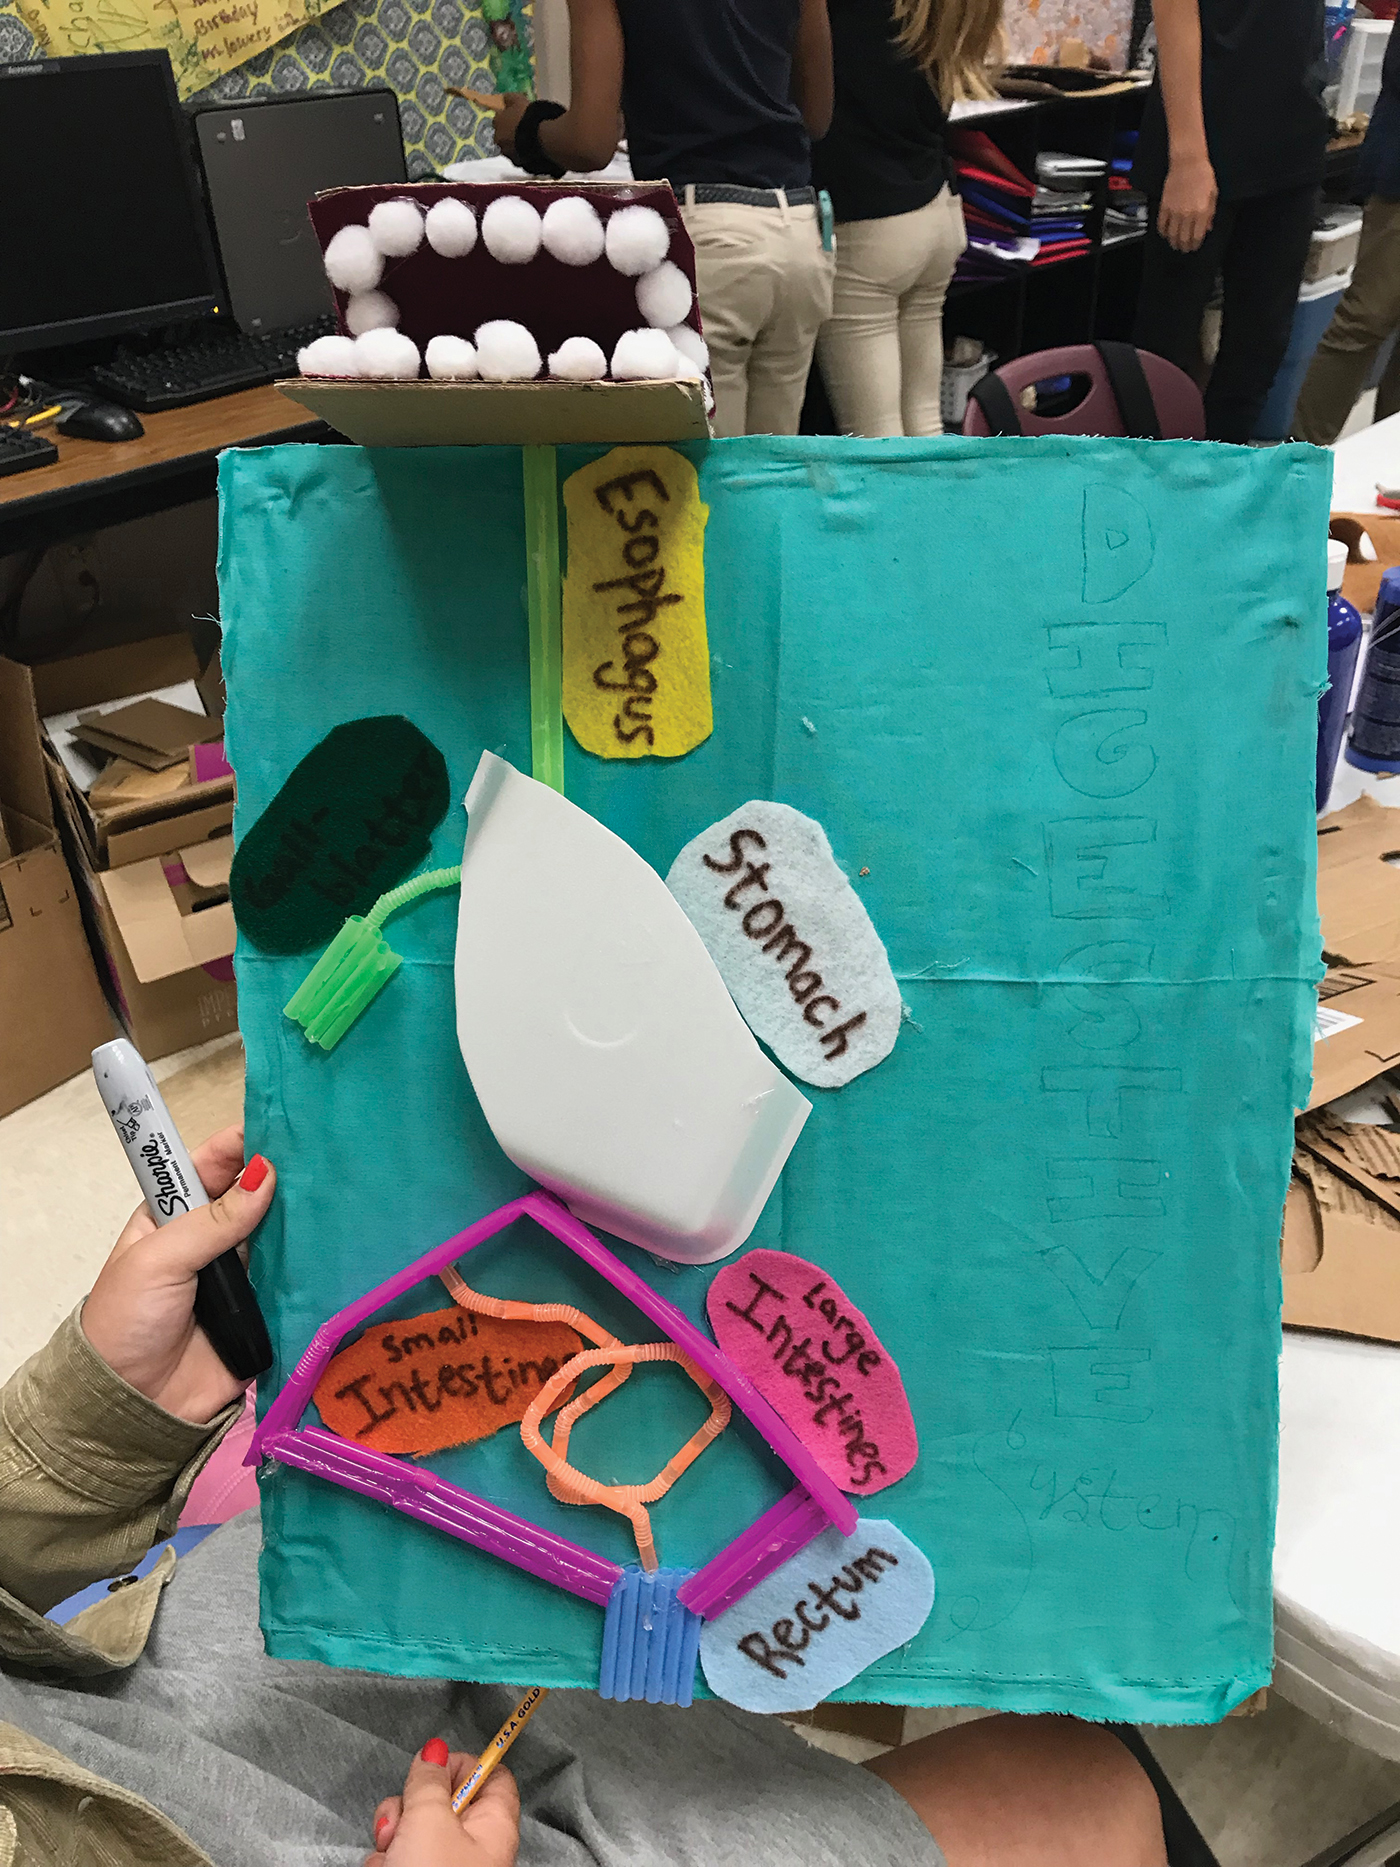
Student model of the digestive system
Coding connections
For the second part of the unit, students were matched with new partners who had studied different body systems. Teachers divided students into new pairs based on known interactions between their given systems. For example, the circulatory and respiratory systems were paired to show the connection between how oxygen and nutrients are circulated through the body. Other pairs included nervous and muscular systems as well as the digestive and integumentary systems. The new pairs of students were tasked with creating a representation of the interactions of the two body systems that involved an element of computer programming. Using school Chromebooks, students were introduced to several block-based coding languages like Scratch and similar programs on (see “On the Web”). After the students completed a few block coding challenges (see lesson materials and management tips in “On the Web”), the class discussed how computer logic parallels the human body in terms of being a complex system that receives inputs, executes complex programs, and performs outputs.
Students then created a program that paralleled the function of how two body systems worked together. Some students used Scratch to create their project, which ranged from video tutorials to interactive animations that showed how their two body systems worked together. Other students used Make Code.org to program a micro:bit, a circuit board with an LED array that can display animations and messages and send radio signals to other micro:bits (see Figure 4). For example, two students used two micro:bits, each representing a system, to create a program showing how the nervous system communicates with the respiratory system to speed up how fast a person breathes.
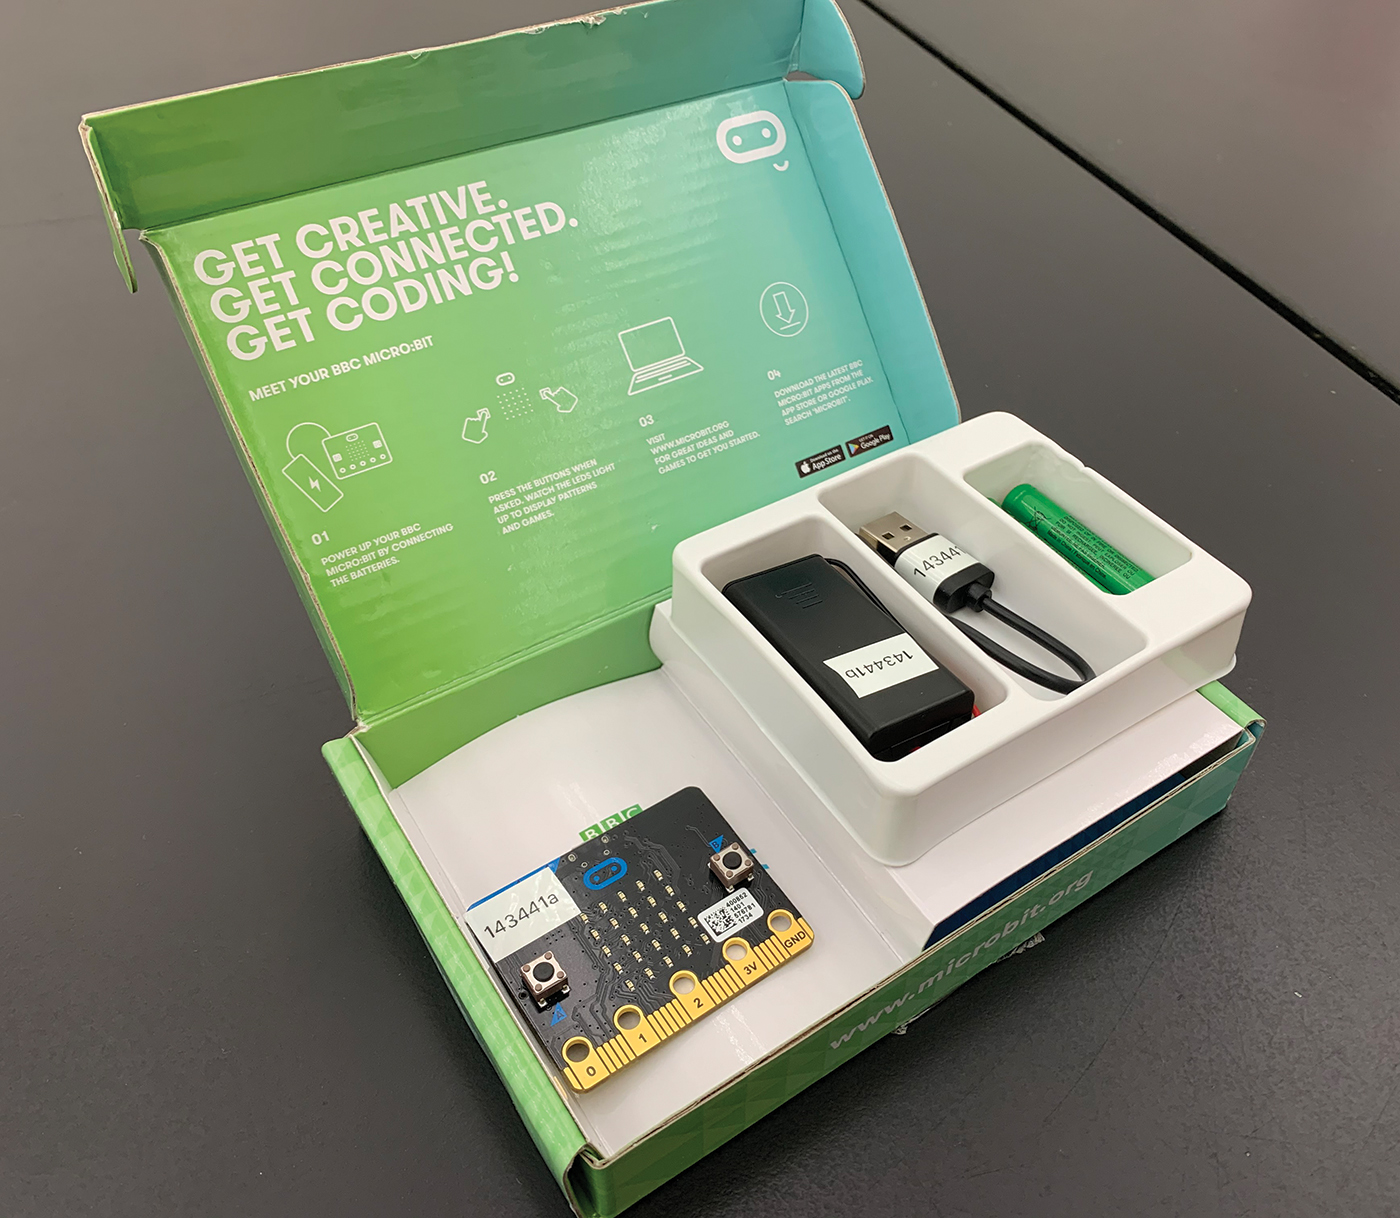
Example of a micro:bit
By programming the systems to work together, students learned the importance of this intersystem cooperation and gained an appreciation for how the systems in the human organism function. Because this was the first time that many students had created projects with these resources, it was a productive introductory coding experience.
Public presentations
The primary form of assessment for the unit came via the performance task of publicly presenting work. The unit culminated with a public gallery walk where students presented their interactive models to multiple audiences. To prepare, students presented to each other in class and evaluated the products of their classmates after each part of the project. Student work was also assessed by the teacher with rubrics used to provide feedback (see lesson materials and management tips in On the Web; see rubric in Online Supplemental Materials). The presentations took place in the school gym and were attended by school staff, administrators, and students from other grades.
Student reflection
Throughout the unit, students were challenged to reflect through personal journal entries. Students were provided with prompts that addressed body positivity, making, and each body system. Daily reflections in a journal allowed students to articulate the process of their projects and formulate their ideas about how parts of each body system work together. The journal was used as a formative assessment tool to evaluate students’ understanding of the functions of each human body system.
Student reflections revealed a positive reaction to the unit. Some students faced frustration when their model did not work on the first try. For example, one student group wanted to show the flow of food through the digestive system. They wanted to build structures that visually showed the food’s movement. After several attempts using transparent materials such as cling wrap and plastic bags, students instead cut out small sections from each structure they designed so that the moving food particles could be seen in various sections of the esophagus and stomach. Thus, this project provided a platform for discussion about persistence, iterative design, and working collaboratively to make needed adjustments. Furthermore, the reflections of students who excelled in creative arts showed that they embraced these projects. These students were excited to show off skills that they were typically not able to exhibit in the science classroom, which was a big confidence boost.
Conclusions and going further
Balancing content and structure with freedom and creativity allowed students to run with the tasks and create something they were excited about. This unit showed that through making, students established relationships between the science content and their lived experiences. By tying the maker project to their own bodies and body images, students created content-specific models with purpose.
Though we were excited about initial project outcomes, in a true maker fashion we continue to reflect and revise. As our understanding of contemporary research in science education, as articulated in A Framework for K–12 Science Education (NRC 2012), continues to evolve, we plan to modify the unit to further support our students in making sense of the science ideas through deep engagement with science and engineering practices. Choosing a relevant, authentic phenomenon such as “Why do marathon runners collapse at the end of the race?” or “Why am I out of breath when finishing my 300-meter run?” may help frame students’ learning through the unit. In the future, we will begin by asking students to make observations of a specific phenomenon. Students will then create and use models to explain how body systems interact to cause what they’ve observed.
ACKNOWLEDGMENTS
This lesson was developed in connection with UTeach Maker at The University of Texas, Austin. UTeach Maker is funded in part by a Robert Noyce Teacher Scholarship grant from the National Science Foundation (1557155). Some lesson materials were funded by a grant from The Powell Foundation. Opinions expressed in this article are those of the authors and do not necessarily reflect the views of Powell Foundation or NSF.
Helena Castle is a preservice teacher with the UTeach Program at The University of Texas at Austin, Kira Lowery is a seventh-grade science teacher at NYOS charter schools in Austin, Texas, and Shelly R. Rodriguez (rodriguez@uteach.utexas.edu) is an associate professor of practice at The University of Texas at Austin.
Labs Life Science Makerspace Middle School