
Archaeology-in-a-Box
By Anne Farley Schoeffler
Applying geology concepts to an investigation into human behavior
Some years ago, I was assigned to teach soil science to sixth-grade students. I looked forward to doing some outside and analytical activities, but I also wanted to encourage students to apply those lessons in a meaningful way. In the summer prior, I had served as a volunteer on an archaeological dig that took place in northeast Ohio. Thus, my personal, multicurricular opportunity could be adapted to serve my purpose. I found that my students were interested in archaeology and eager to participate in a classroom “dig.” I have refined the activity over a three-year period, giving many students the thrill of modeling an interesting career that involves aspects of science, history, anthropology, and geography. It also helps students make a connection between prehistoric peoples and their reliance on natural resources present in the ecosystem.
My first challenge each year is to clarify for students what archaeology isn’t as well as what it is, as many students immediately visualize dinosaur bones and fossils! Archaeology is the study of human history and prehistory through the excavation of sites and the analysis of artifacts and other physical remains. Some of the latter relate to an Earth science curriculum, including soil color and consistency and soil stratigraphy (layering). This lesson gives students an opportunity to apply geology curriculum to an investigation into human behavior. Ideally, these lessons could be conducted in partnership with a social studies teacher. The social studies teacher could introduce archaeology as a discipline that helps us relate culture to history; in my case, we are relating the Ohio woodland ecosystem to Archaic Indian culture. The science teacher would be responsible for teaching geology (soil science) and observation, measurement, and recording skills.
Prior to this activity, these sixth-grade classes have completed a unit of study devoted to soil. They have learned about soil color, consistency, and composition. They have compared soil samples using chemical tests for pH and nitrates. They have taken core samples on the school grounds and observed soil horizons.
Soil develops as mineral and organic materials accumulate over very long periods of time as a result of erosion and deposition, vegetation cycles, and decomposition. Additionally, human activities such as agriculture, construction, and midden (trash) deposition disturb soil and leave manifestations of earlier cultures. Geologists and archaeologists study the color and chemical make-up of soil to characterize soil and identify unique horizons (layers), including those that are rich in organic material (roots, fungal mycelia, worms, etc.) and that show signs of past human habitation. Because the Law of Superposition states that newer deposits develop atop older ones, conclusions can be reached about the relative ages of horizons and artifacts found within them. Thus, this activity is summative in the sense that it requires students to apply their knowledge of stratigraphy and color to a novel situation. (It is important to note that because humans only arrived in North America at least 16,000 years ago, human organic artifacts can be radiocarbon dated, but cannot be dated by comparison to fossils or other mineral deposits.)
Lesson: Day 1
In order to set the stage for our classroom experience, we first brainstorm about what students remember about the prehistory of our state (Ohio), which is fourth-grade curriculum. With a little prodding, students readily recall that Native Americans preceded European settlers; housing structures were lodges made with posts; stone tools were used; and food included local flora and fauna, including deer, rabbits, fish, nuts, berries, and so on. Then, I use a YouTube video (see Resources), featuring the Cleveland Museum of Natural History’s Dr. Brian Redmond, as my introduction to archaeology. Redmond describes a dig at a site in northeast Ohio that presents realistic expectations for the archaeology that takes place in many regions of the United States (rather than archaeology as portrayed in popular film). The dig he describes occurs in a field (formerly a 19th- and 20th- century farm, and now a park) near a wooded hillside, involves excavation of the 4,000-year-old evidence of Archaic peoples, and shows in a straightforward fashion the characteristics of a real archaeological dig. Without overwhelming detail, the video shows the structure of dig units, careful measurement, stone artifacts, organic artifacts, site documentation, and kids at work as well as adults. Although the local ecosystem is not woodland in all areas of North America, this introduction to archaeology and prehistoric North American indigenous cultures is helpful because it is brief, but relays the essential basics of field archaeology.
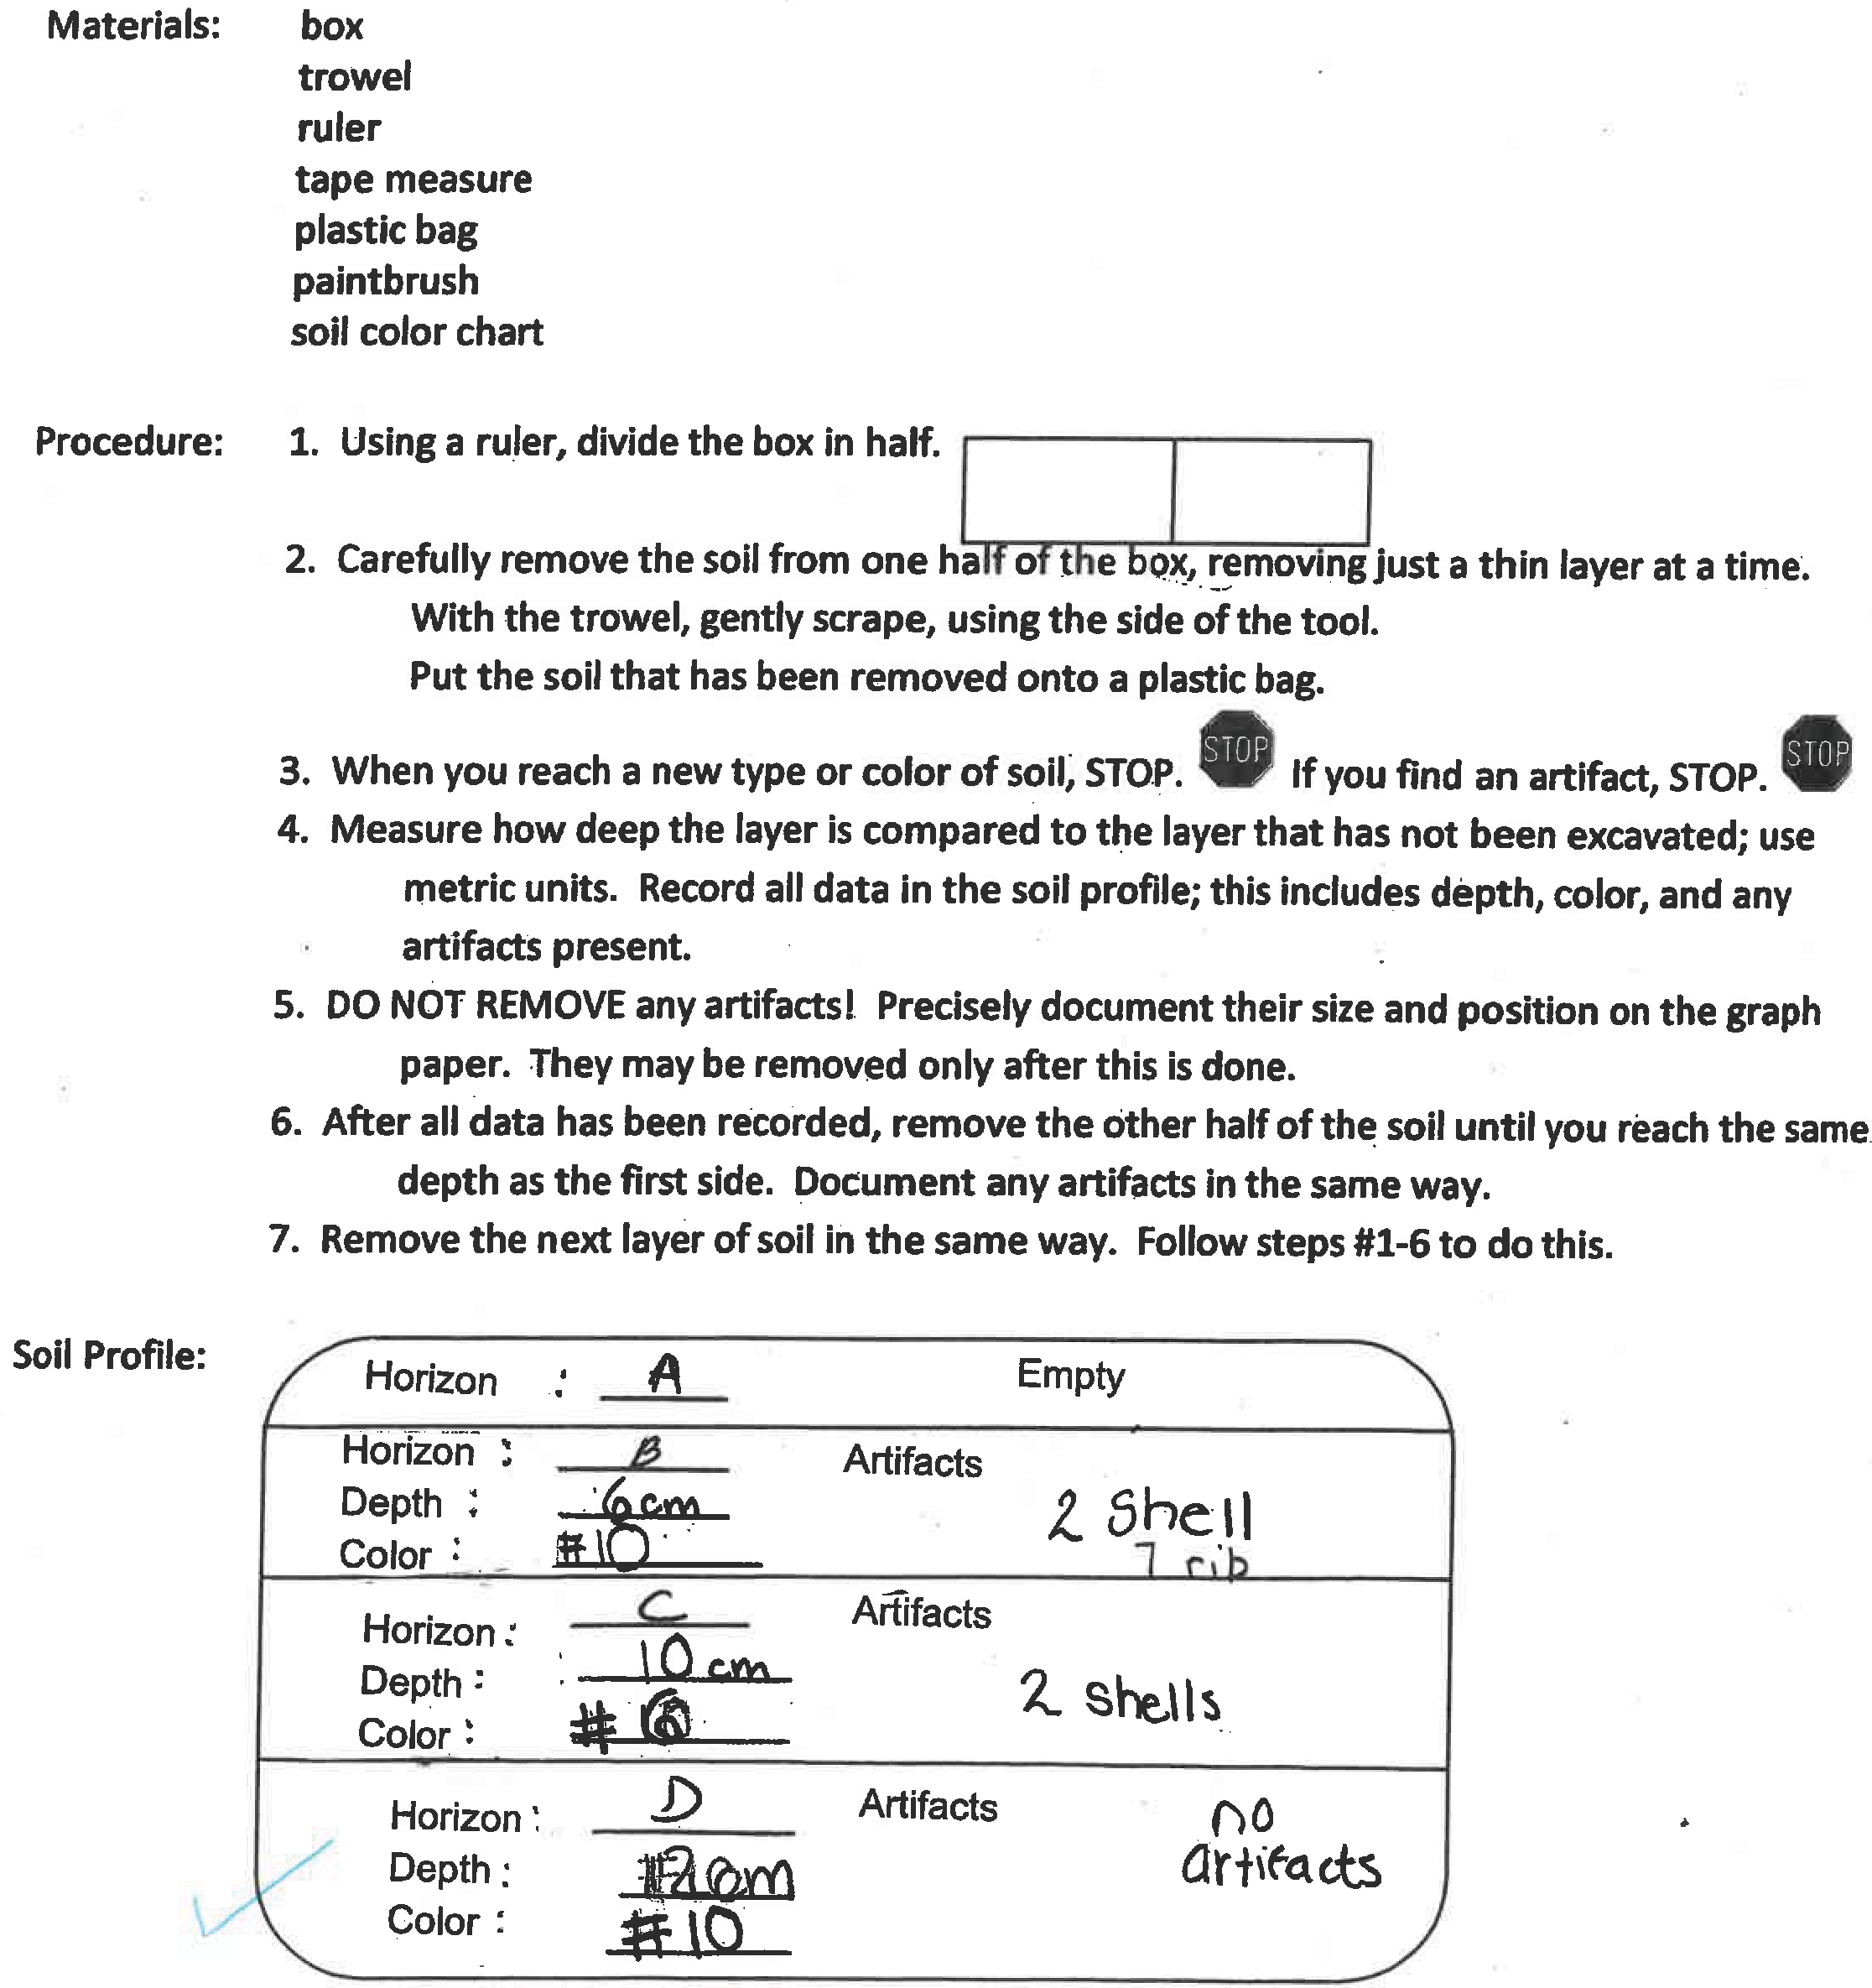
At this time, it is also necessary to discuss measurement and scale relationships. When students discover artifacts in their archaeology units/boxes, they will have to measure the objects as well as their location in the box (e.g., distance from each side of the box); then they will document their finds. Use the student data sheet (Figure 1) and graph paper to show the size and location of each artifact. In order to successfully do so, students must understand that each square on the graph paper can be related to the measurement of each object; each square represents 1 cm (0.4 in.) for the physical space; thus, it represents a scale of 1 cm (0.4 in.) to 1 square. A close viewing of the YouTube video will show an archaeologist’s rendering of an actual unit on graph paper.
Once I have piqued students’ interest, I introduce our classroom dig. While originally I considered making this an outdoor experience, I had to discard that idea for a number of reasons; most importantly, the facts that creating the dig sites (excavating and interring artifacts) would be extremely time-consuming, and the weather might not cooperate afterward. Consequently, I have developed archaeology boxes for use in the classroom; these model a unit of excavation at an archaeological dig as shown in the YouTube video. They have very straight sides, as do actual archaeological dig units, and help students to keep their efforts neat and careful as archaeologists do. The plastic boxes hold approximately 15 L (4 gal.), and each box has a lid (to keep moisture in, as it is easier to work with damp rather than dry soil) and is either not transparent or is covered with black wrap (to avoid having students simply look at the sides to identify soil layers). Black plastic table covering or trash bags work well to wrap the boxes and are more durable than paper. Before beginning, I demonstrate to students: (1) how to use a trowel, excavating carefully using the side of the trowel (never the tip), and (2) how to document artifacts on the graph paper according to the scale on the graph paper.
Preparation
Set up the boxes with three layers of soil and artifacts interred in the top two layers; I have found that excavation and documentation of two layers takes a couple of class periods and that after that students begin to lose interest and get careless. Having that third layer leaves open the possibility that some groups, working faster than others, will excavate all three layers while other groups, working more carefully or more slowly, will find all of their artifacts in the first two layers and won’t miss out on anything when they leave the third layer untouched. This simple method of differentiation allows all groups to be ready to finish their reports at about the same time. In order to create layers, use soil that is different enough in color so that students will readily identify the layers as they excavate their boxes. Soil can be dug outside and/or purchased; soil types can also be mixed; see the preparation description below. If using soil from outdoors, avoid digging near treated wood or agricultural soil that has been treated with preventative chemicals. In order to kill any spores that may be present in the soil, heat the soil in an oven at 121°C [250°F] to kill any microorganisms. Keep the box lid closed when not in use. Check with the school nurse to see if any students have allergies, asthma, or other conditions that may be triggered while doing the activity. Have those students wear dust masks. Soil layers can be made more distinguishable by adding pony beads of different colors to different layers. Students should always wash their hands after working with soil. Assembling the three layers is described below.
- Using a permanent marker, number the boxes. Then label the rim of each box with N, E, S, or W to indicate the cardinal directions. This will help both teacher and students document artifact size and location.
- Place a layer/horizon of soil in each box. Add enough water to make the soil thoroughly damp, but not runny mud. It is easier for archaeologists to excavate soil that holds together than crumbly, dry soil; color distinctions are also more apparent when soil is damp or wet. This layer should be 3 cm (1.2 in.) or so deep.
- Consider local flora and fauna when selecting artifacts, as well as what you have on hand. I use deer bones and teeth and clam or mussel shells. I could also use fish bones, acorns, or a turtle shell, but a conch shell, for example, would not be characteristic of Ohio during the last 4,000 years when there is evidence of regular human habitation.
- Begin to place a second horizon of soil in the box. Be sure that the color is distinct, perhaps by using a mix of potting soil and outdoor soil or perhaps by mixing in pony beads; be sure to inform the students that the pony beads are helpful “soil” indicators and not artifacts. This time add a thin layer, then add artifacts, then add more soil to make the layer level and completely cover the objects. It will probably be deeper than the first layer to cover the artifact(s), perhaps 6–10 cm (2–4 in.). It is best to have at least one artifact toward each end of the box, so that students find objects fairly quickly and remain engaged with their dig. Again, the soil should be moist. The distribution of artifacts is dependent on my supply of bones, shells, and teeth, but I try to have either a large bone or two or three smaller objects in each half of each horizon. I document each horizon as I construct it, although the student groups are somewhat variable in the care with which they excavate; they don’t always find or document everything as I would. These different horizons are intended to show different midden layers as people inhabited the location; they do not show dramatic changes of ecosystem because the ecosystem did not change dramatically until settlers with agricultural intents arrived and plowed the land. (Despite the fact that the Law of Superposition indicates that deeper layers are older, human history in the United States is not so lengthy that the flora and fauna found in each layer would be different because North American ecosystems did not change radically in recent prehistory; rather, the differences in soil may indicate differences in discarded products. In North American archaeology, radiocarbon dating is necessary to date organic materials because the layers are not old enough to contain indicator fossils.)
- Document the size and position of artifacts by photographing each layer after it is constructed. This will help in assessing student accuracy later on; see <a class="fig" href="#SS_75_F2">Figure 2</a>.
- Repeat steps 3 and 4, creating a third horizon. The color should again be distinct, perhaps by mixing sand with soil and a different color of pony beads.
- Cover each box when not in use to retain moisture. Also, keep a squirt bottle on hand to moisten water during the dig, if necessary.
Activity: The Dig—Days 2 and 3
Group students in heterogeneous groups of about four; have them assign lab roles according to classroom routine. In my classroom, students decide for each investigation who will be the Team Leader, Materials Manager, Data Manager, and Speaker. Each group will receive a set of supplies (see sidebar on p. 78). Each student will be responsible for an individual data sheet as shown in Figure 1. The data sheet consists of a section for documentation of the “site” (box) and artifacts. A scaled sheet of graph paper for each layer of excavation should also be provided. For example, the scale on this sample is 1 cm (0.4 in.) to 1 square on graph paper. The data sheet allows students to carefully document the orientation (using the cardinal directions), location, and size of each artifact. Measurements should be accurate and precise; this is something that my sixth graders work on all year. It is important that the object remain in situ (in its location) until all documentation is complete. This is probably the most important lesson to learn about real archaeology. The value of a find declines dramatically if its provenance is not assured. This means that for any archaeological (or paleontological) find, the documentation must include location, relation to other finds, chain of custody, etc. Most students find the documentation to be the difficult part of this activity. The idea of scale and even orientation requires spatial awareness that many students don’t readily access, and here they are expected to try to relate their three-dimensional finds to a two-dimensional piece of paper. Thus, it is useful to take some time before beginning the activity to reinforce this expectation; see above. The idea that they are simulating real archaeology for Native American cultures as Dr. Redmond does in the field encourages them to be thoughtful and careful in their endeavor.
Student procedure
- Wear goggles throughout the activity. Students with allergies should wear dust masks.
- Identify the cardinal directions north, east, south, and west on the box and the data sheet.
- Using a ruler, students should demarcate the center of the box in order to work on half at a time. This is crucial for determining the depth of a layer. Students will excavate one side of the box, document all artifacts, and then measure the depth of the remaining side of the layer before excavating the layer on that side.
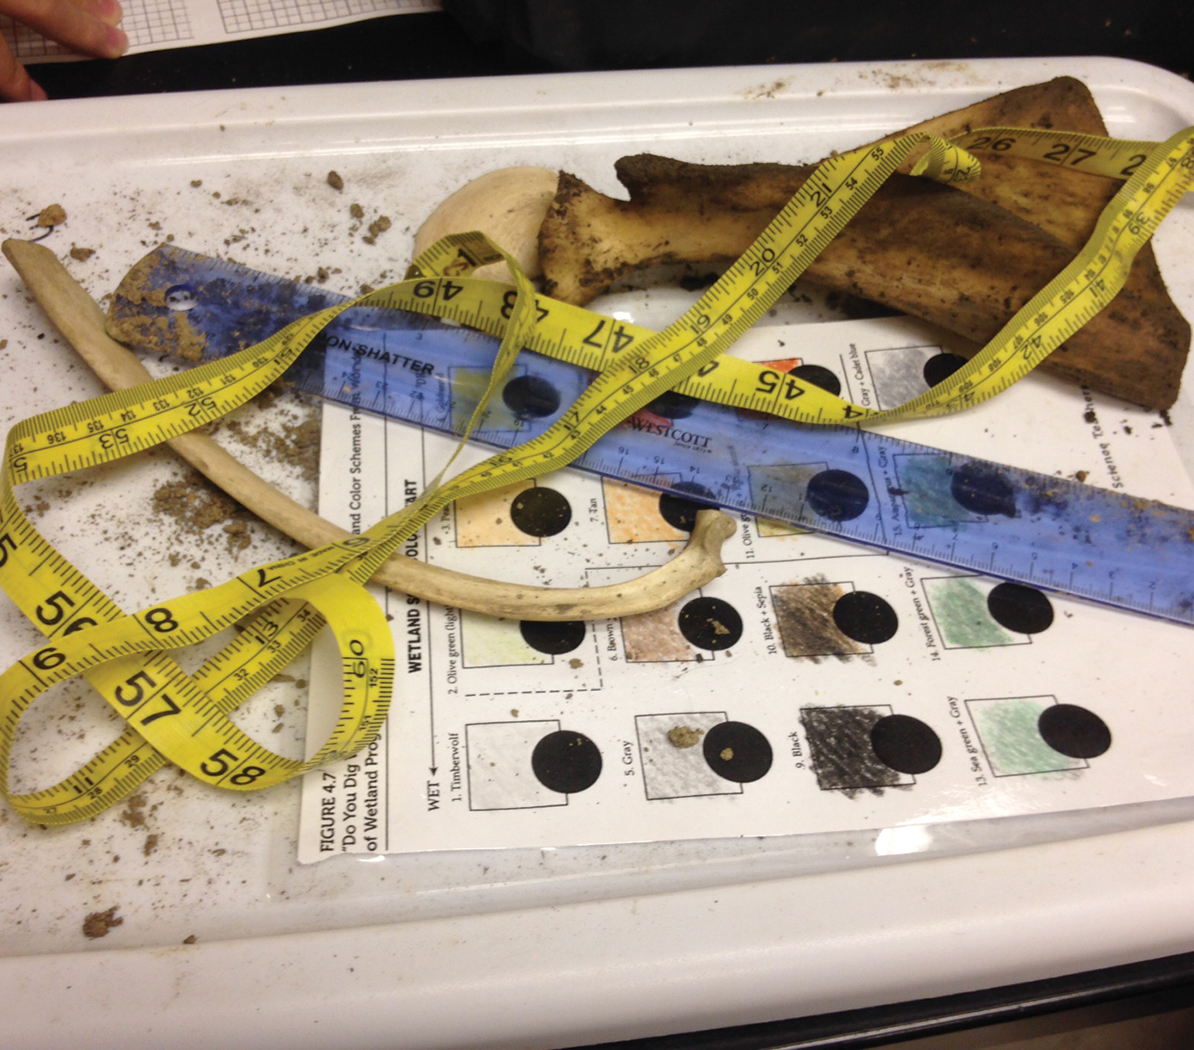
- Soil is removed using the side of the trowel, carefully lifting a small amount of soil at a time; see <a class="fig" href="#SS_75_F3">Figure 3</a>. The tip of the trowel is never used because this can cause damage to sensitive artifacts. Demonstrate the use of the trowel to students prior to their beginning to work on their own. Remove the soil to a plastic bag placed on the box lid. This accomplishes two goals: keeping the soil from a horizon together so that the preparation is much faster the next time this activity is prepared, and keeping most of the soil off the floor (hopefully!). Provide a separate bag for each horizon.
- When students make a find, they should stop digging with the trowel immediately. They should use the paint brushes to remove soil from the artifact, but leave it in situ until it has been documented. Students should measure the object and its position, including its distance from the sides of the box. It then should be documented on the graph paper, keeping in mind the scale of the graph paper (here 1 cm [0.4 in.]:1 square). Students could also take a photo of each find as archaeologists do in the field.
- Once the artifact has been documented by each group member, it may be removed from the box, and excavation may continue. Artifacts are kept together on the lid of the box, so they are not lost.
- After one half of the box has been excavated in a neat horizontal layer, students should measure the depth of the layer remaining on the other side of the box and record the depth on the data sheet.
- Students also record soil color. Note that a Munsell Soil Color Chart book ranges in price from $175–205, prohibitively expensive for my budget. Some alternatives include printing online charts that represent local color ranges, which can be searched on Google Images, or using the one from NSTA Press’s <i>Inside-Out: Environmental Science in the Classroom and the Field</i>, p. 76 (<a class="bibr" href="#SS_75_B1">Blake et al. 2010</a>) and then coloring it as instructed using a box of crayons; this is shown in <a class="fig" href="#SS_75_F4">Figures 4</a> and <a class="fig" href="#SS_75_F3">3</a>. A careful viewing of the YouTube video mentioned (see <a class="bibr" href="#SS_75_S12">Resources</a>) will show an archaeologist using a Munsell Color Chart to compare and identify soil color at that dig.
- Then, students may excavate the rest of the layer in the same fashion so that the box is empty to an even horizontal layer.
- Students will then repeat this procedure to excavate the next layer.
- Students should clean up and wash their hands when they are finished or when class time is over.

The teacher’s role throughout the activity is to be available to students as they reach consensus on how best to accomplish their dig. Students often need reminders for working on half of the site at a time, to use the side of the trowel, to collect the soil one horizon at a time, and to leave artifacts in situ until they are documented. Students also need assistance with identifying their finds and drawing them onto the graph paper, maintaining the proper scale. Most students can readily identify clam and oyster shells as well as teeth; they often need assistance in identifying specific bones. Students understand that this is a simulation and that the bones, teeth, and shells are recent finds that we are using to model prehistoric human artifacts. Many students are fascinated by archaeology, and their excitement when they find unexpected objects is almost as much fun for the teacher as it is for the students!
Summation
As a concluding step, students are individually expected to write a summary of the activity in their (digital) journal. Each student is to write a substantial paragraph (5–7 sentences) in which he/she describes the artifacts found and what life may have been like for the people who left artifacts of the type discovered in the archaeology box and how life is different compared to their own life. For example, the bones and shells are some of the detritus from a hunter-gatherer lifestyle in which they ate deer and shellfish and also used the bones and shells for tools and/or jewelry. Students are able to understand a more direct connection between prehistoric people and natural resources than they see in their own lives. An extension of this lesson is to help students explore the natural resources that they use, often in indirect and more processed forms.
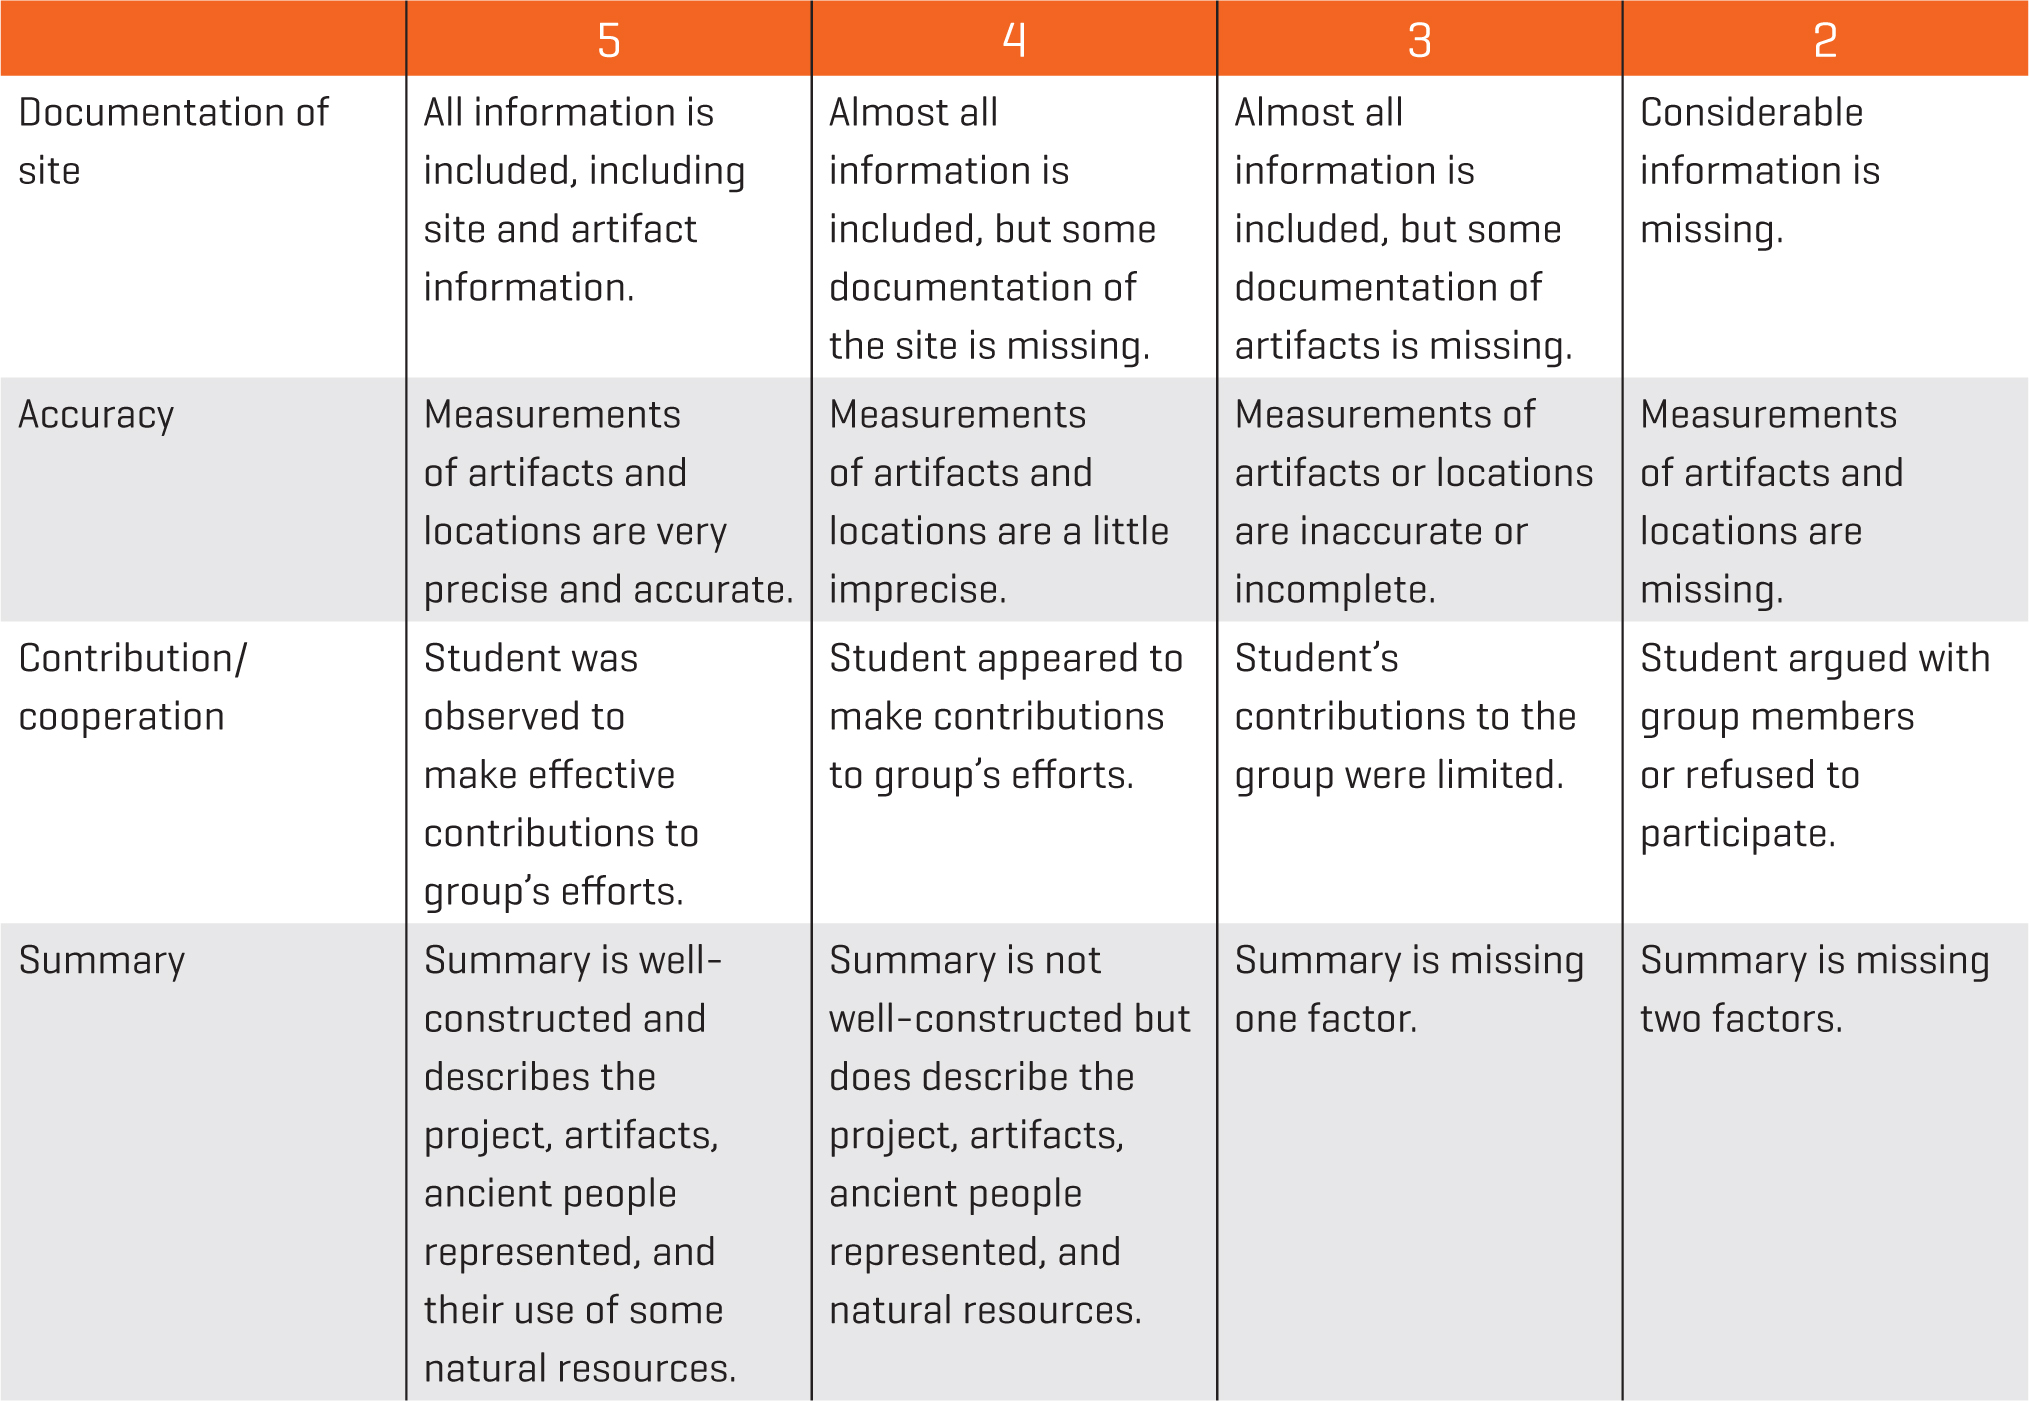
Students are assessed on their documentation (completion and accuracy) as well as their contribution to their group and their written summary (see the rubric in Figure 2): (1) Students’ page one documentation must be complete and accurate, representing their box, group members, depth and color of each horizon, and artifacts discovered. (2) The graph paper for each horizon should be reasonably accurate with respect to size and location of each artifact. (3) Students should make effective contributions to their group’s excavation of the box. (4) Students’ written summary should be a well-constructed paragraph that describes the investigation, the artifacts, and the use of natural resources by the ancient people’s represented.
Another extension to this activity would be to have student groups construct the boxes for other groups and then excavate one prepared for them by a different group. I usually find that I don’t have time because this would add one to two additional days to the activity.
Students enjoy this activity and are challenged by the responsibilities for careful excavation and documentation. The activity serves as a summative assignment for a soil unit; it requires that students identify soil stratigraphy/layering and recognize soil color differences, albeit artificially constructed ones. The activity also reinforces earlier lessons on accurate measurement and then requires the application of simple measurement skills to a two-dimensional scale model of a three-dimensional space. Students use mathematical and spatial skills in novel ways when completing this activity. Finally, students have the opportunity to model a type of investigation that is not usually accessible to children.
Connecting to the Next Generation Science Standards (NGSS Lead States 2013)
- The chart below makes one set of connections between the instruction outlined in this article and the <i/>. Other valid connections are likely; however, space restrictions prevent us from listing all possibilities.
- The materials, lessons, and activities outlined in the article are just one step toward reaching the performance expectation listed below.
Standard
MS-ESS3 Earth and Human Activity
www.nextgenscience.org/dci-arrangement/ms-ess3-earth-and-human-activity
Performance Expectation
MS-ESS3. Construct an explanation based on evidence for how the availability of natural resources have influenced human activity.
Connections to the Common Core State Standards (NGAC and CCSSO 2010)
ELA
RST.6-8.3. Follow precisely a multistep procedure when carrying out experiments, taking measurements, or performing technical tasks.
RST.6-8.7. Integrate quantitative or technical information expressed in words in a text with a version of that information expressed visually (e.g., in a flowchart, diagram, model, graph, or table).