
From Global To Local
Second graders learn basics of engineering through an exploration of Maglev technology.
By Hannah Kye
Second graders learn basics of engineering through an exploration of Maglev technology.
During a unit on electricity and magnetism, I spoke with students about how one in five people in the world do not have access to modern electricity (United Nations Sustainable Development 2015). I asked students about their ideas for ensuring more people have access to electricity. Students suggested, “We could put long wires between their country and New York City, so we can send them electricity,” and “They could call the Americans for help.” From this discussion, I was reminded that young children’s worldview is often limited to their experience, and I saw an opportunity to expand students’ U.S.-centric point of view. In this initial discussion, students also did not recognize that the United States has its own energy problems to solve. I identified a need to provide both a global and local perspective on science, technology, and society, so students could understand and appreciate the interconnected work of scientists and engineers around the world (Merryfield 2014).
I chose to develop lessons about magnetic levitation (maglev) technology for two reasons. First, the United States is less advanced in maglev technology than several countries. Japan, China, South Korea, and Germany have been using maglev technology for years. By recognizing other countries as innovators from whom we can learn, I aimed to help students locate themselves within a global science community, a foundation for students to “develop the knowledge, attitudes, and skills that will enable them to function in a global society” (Banks 2008, p. 129). The second reason I chose to teach about maglev technology was because of its utility in teaching children the engineering design process. Students are natural problem solvers, and the engineering design process can provide structure and common vocabulary for their instinctive work. This work is supported by the National Academy of Engineering, which affirms the value of teaching engineering concepts and skills, particularly engineering design, to young children.
I designed and taught the lessons to a class of 26 students enrolled in a monthlong summer science program. The students in my classroom had completed second grade and would be in third grade in the fall. The maglev lessons took place over three mornings (15 minutes for the first lesson and 40 minutes each for the second and third lessons) at the end of a unit on electricity and magnetism. Each afternoon, students had 45 additional minutes of "tinker time" to work on the projects in the lesson series. The summer science program provided a makerspace center in each classroom and provided tinker time for students, during which students worked with makerspace materials and tools, constructed prototype solutions to real-world problems, and tested and redesigned their solutions. Aligned with current research and standards emphasizing inquiry in elementary science classrooms, tinker time provided students with a reserved block of time to “think with their hands,” or to think about problems and solutions within their science topic through playful, hands-on, and child-led experimentation (NGSS Lead States 2013; Vossoughi and Bevan 2014).
The unit could be adapted to take place over two to three weeks by adding opportunities for small-group revision and whole-group reflection following each lesson. The goal of this 5E lesson series was to make explicit the connections between engineering, science, and society. Following were the objectives of the lesson series: Students will gather information on how scientists are using maglev technology to solve problems in other countries. Students will apply the engineering design process to solve local problems using ideas from around the world. Students will evaluate and defend possible solutions.
- Students will gather information on how scientists are using maglev technology to solve problems in other countries.
- Students will apply the engineering design process to
solve local problems using ideas from around the world. - Students will evaluate and defend possible solutions.
The materials required included six plastic bins (two for each group) filled with magnet strips, disc magnets, pieces of cardboard, pencils, paper, masking tape, and scissors. Optional additional materials included string and recyclables such as cardboard boxes and plastic containers. In preparation for this lesson, I identified three safety concerns: Tell students to keep magnets away from their mouths. Magnets available for home and classroom use should have magnetic fields that are too weak to damage smartphones, computers, or USB drives. Store magnets at room temperature to prevent demagnetization and in a drawer or sturdy container to prevent breakage.
- Tell students to keep magnets away from their mouths.
- Magnets available for home and classroom use should have magnetic fields that are too weak to damage smartphones, computers, or USB drives.
- Store magnets at room temperature to prevent demagnetization and in a drawer or sturdy container to prevent breakage.
Engaging Learners
At the start of the first maglev lesson, I set up levitating magnets on a table next to me and invited a student to review why the magnets levitated. Since these lessons took place at the end of their magnetism unit, students recalled their previous learning and said that similar poles repel each other (PS2.B). I told students that people around the world are using magnetic levitation (maglev) to work toward solving problems. Some of the solutions are only in development and are small models rather than scaled for human use. Students viewed and discussed a slideshow (see NSTA Connection) of the ways scientists and engineers plan to use maglev technology in three countries: the Philippines, Germany, and Japan. I introduced each application by defining a problem to reflect the beginning of the engineering design process.
First, I posed the problem of homes near the ocean getting flooded when waters rise. Students turned and talked about how magnetic levitation (maglev) could solve this problem. One student shared, “I would build a house that levitated, but it would come down when I need to go in or out of my house.” I showed photos of sketches and models created by Lira Luis, a Filipino American architect developing prototypes of maglev houses that she hoped to develop in the Philippines so that frequently flooded homes could remain above water levels despite rising tides (see Internet Resources). Second, I posed the problem of waiting for slow elevators that only move up and down. Students viewed pictures of a maglev elevator developed by engineers in Germany that moves quickly vertically and horizontally using maglev technology (see Internet Resources). I shared that the engineers created about 20 different designs for the part of the elevator track that changes directions, and they worked together to build, test, and improve prototypes to determine the best design. Third, I posed the problem of slow transportation that uses fossil fuels: cars get stuck in traffic, airports have long lines, and trains stop frequently. I told students to think about this problem and look for a solution while they watched a video. I showed a one-minute video clip of a maglev train in Japan (see Internet Resources). The video shows the train moving at high speeds and also shows a small, handheld model of a maglev train to demonstrate how it levitates above the track.
I invited students to think about the problems we had previously identified about living in New York City. Our list included air pollution, traffic, and long waits for elevators at home. In pairs, students talked about how they would build upon and rethink engineering innovations from other countries to solve a problem in our city. As a whole group, we discussed students’ ideas, many of which overlapped, and decided to focus on three possible solutions: maglev city buses to provide a faster alternative to buses and taxis that would not create direct pollution emissions; maglev skyscrapers to reduce traffic by allowing cars to drive under them; and maglev elevators inside apartment buildings to take you straight to your door (ETS1.A).
Exploring Phenomena
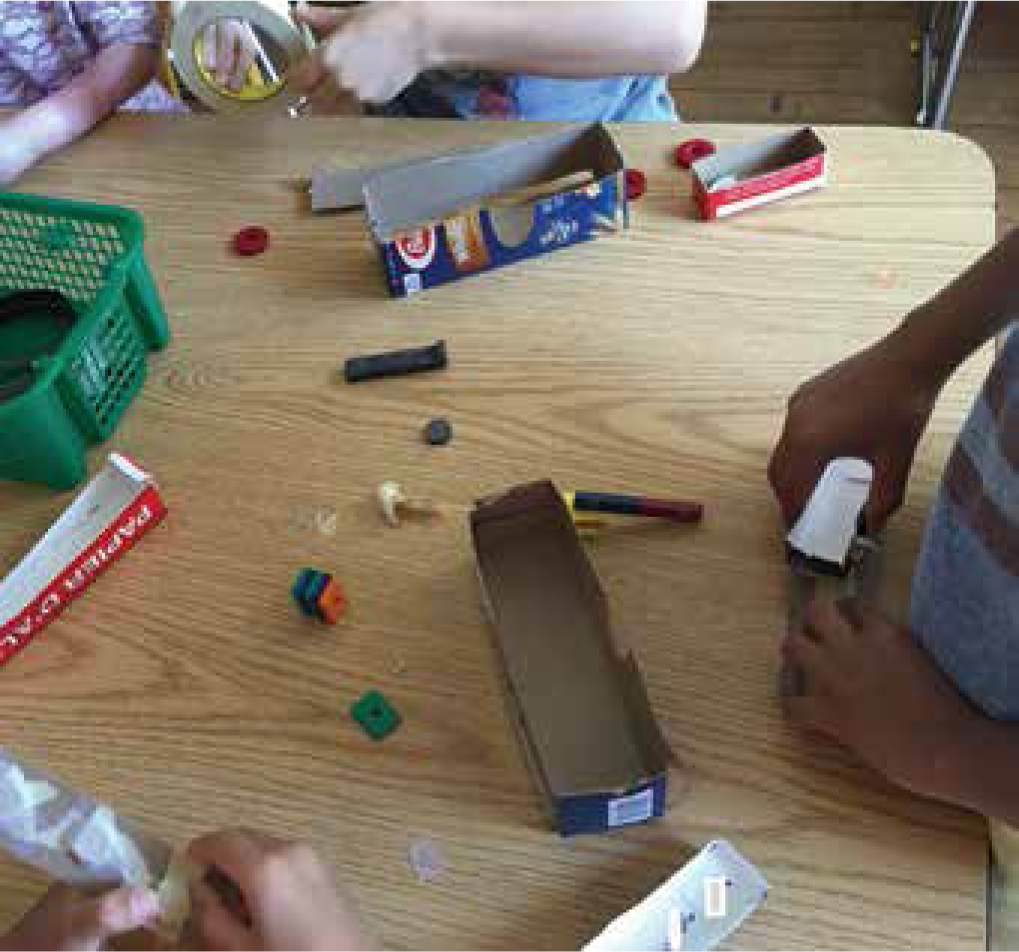
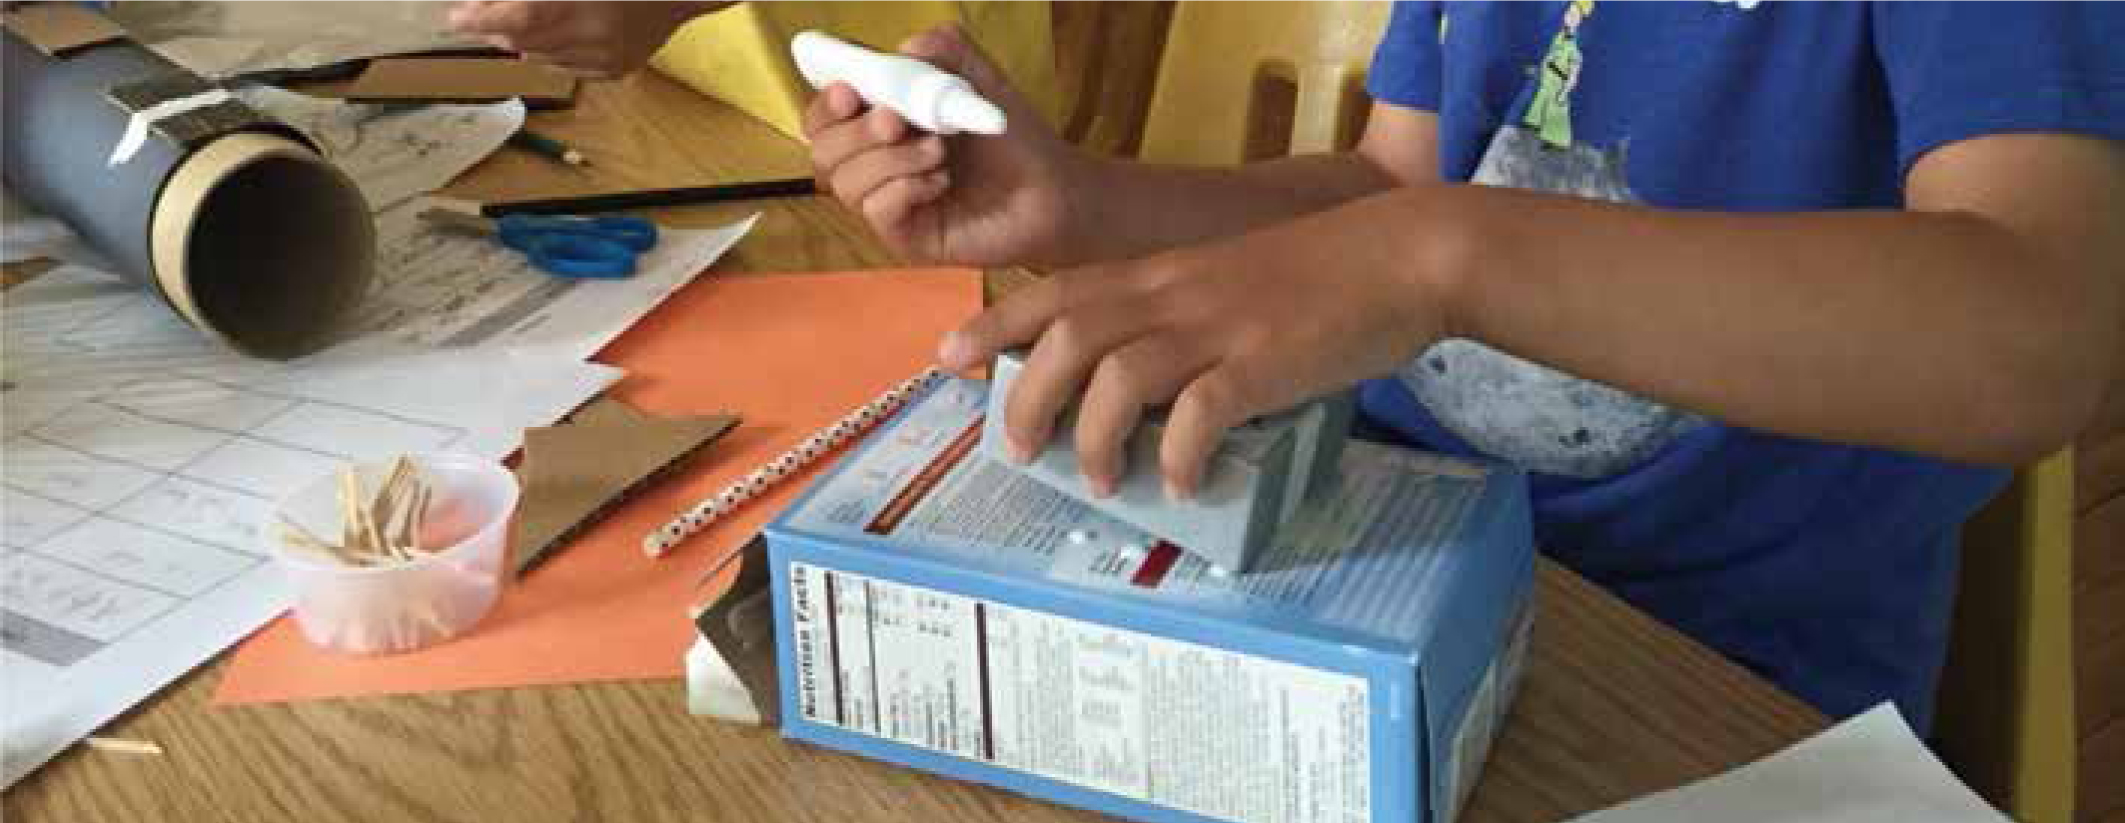
For the second lesson, I placed students into three “task forces” based on their interest in the three solutions: maglev city buses, maglev skyscrapers, and maglev elevators. Each task force of eight or nine students was responsible for addressing the local problem and creating a model to show the rest of the class their idea. I told students they would have 30 minutes to explore the materials with their groups, but first they should discuss their problem. At their tables, each task force split into smaller groups of two or three students to discuss their experiences with air pollution, traffic, and long waits for elevators at home. After three minutes, I told students to start discussing their solutions and constructing models to show their thinking, reminding them of the sketches and small prototypes Lira Luis had made of levitating houses. I passed out plastic bins filled with magnet strips, disc magnets, pieces of cardboard, pencils, paper, masking tape, and scissors. Students could also use items from the classroom makerspace, including boxes, plastic containers, string, and many other items. Students worked for 30 minutes, testing the attraction and repulsion of magnets, drawing plans to show their partners and group members, and assembling their models.
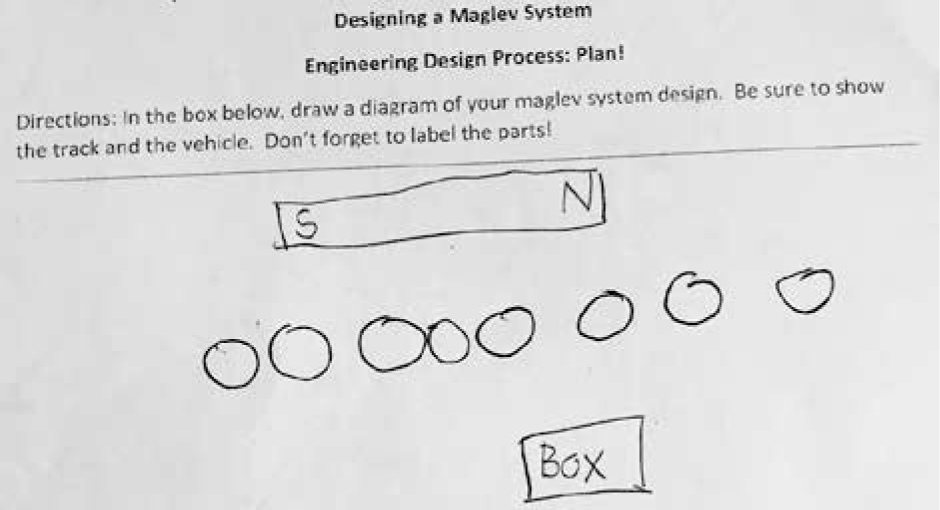
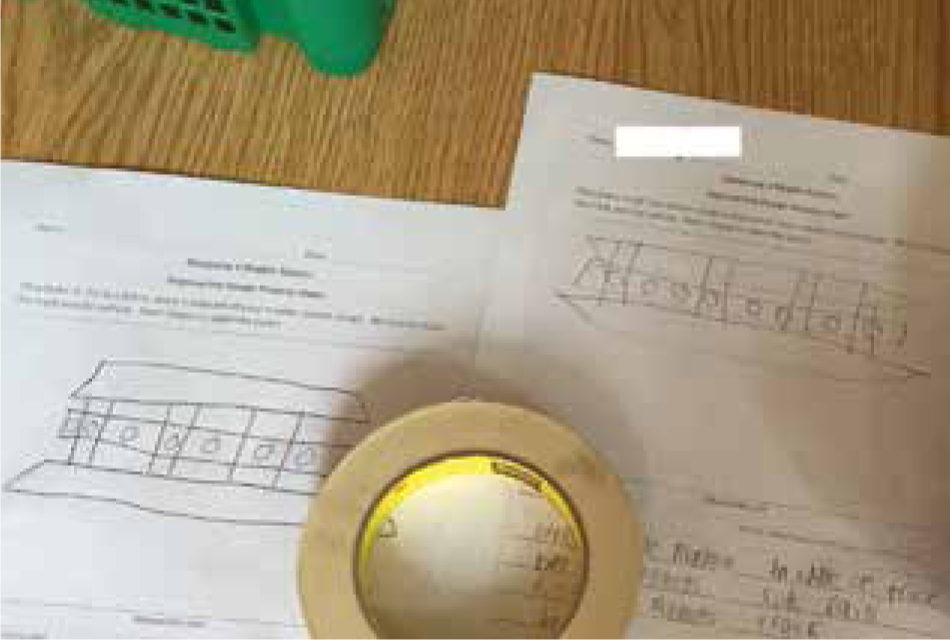
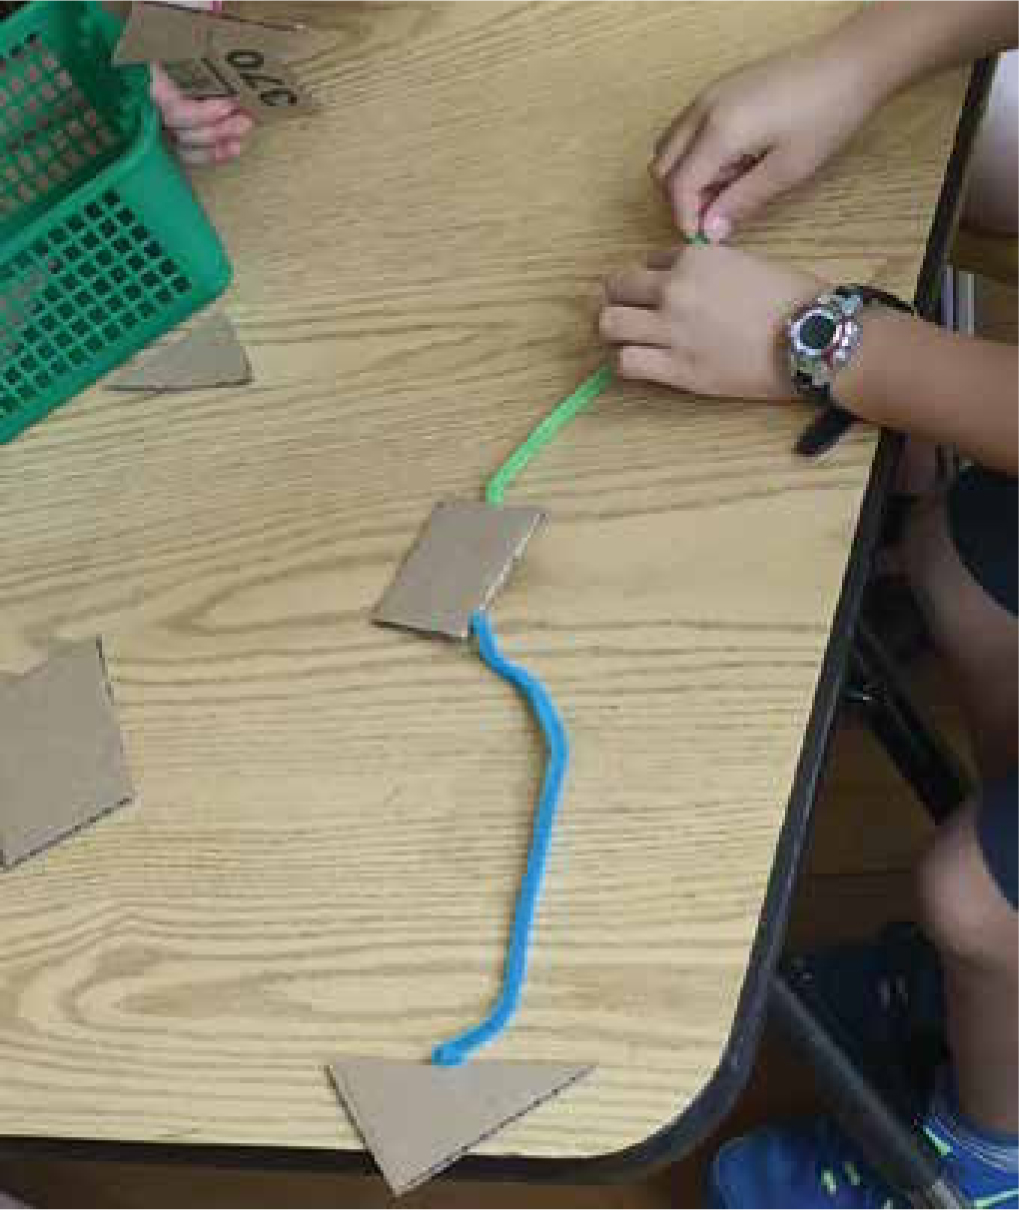
Throughout this exploration, I visited each task force and challenged students to evaluate and defend their possible solutions using the following questions: Why is this the best solution? How is your model different from the one in the slideshow, and why did you make those changes? Can you think of any problems with your model? When each task force had sketches of at least two possible solutions, the task forces reconvened. I encouraged students to share and offer feedback on the solutions, so they could learn from each other’s ideas and experiences. The city bus task force consisted of four pairs of students. They exchanged sketches and engaged in the following discussion: Student S:What is this magnet on top for? (Figure 1) Student O:That’s the magnet under the bus. These circles are the track on top of the box. Student S:Okay, everyone should write the parts of their drawings. Write the labels. Student V:Yeah. Student P:This one looks like ours, but we put a track on top, too. (Figure 2) Student V:Will it work? Student P:It works if you’re holding the bus. Student V:But if the bus falls down, then all the people will fall out. Student O:Or get hurt. Student P:I know. That’s why we put a track on top. It holds the bus from the top, too. Student V:I think it will be safer if there’s a track on top. We can add that to our bus. Student S:The train in Japan didn’t need one. We don’t need one. The buses don’t have to be the same.
Student S: What is this magnet on top for? (Figure 1)
Student O: That’s the magnet under the bus. These circles are the track on top of the box.
Student S: Okay, everyone should write the parts of their drawings. Write the labels.
Student V: Yeah.
Student P: This one looks like ours, but we put a track on top, too. (Figure 2)
Student V: Will it work?
Student P: It works if you’re holding the bus.
Student V: But if the bus falls down, then all the people will fall out.
Student O: Or get hurt.
Student P: I know. That’s why we put a track on top. It holds the bus from the top, too.
Student V: I think it will be safer if there’s a track on top. We can add that to our bus.
Student S: The train in Japan didn’t need one. We don’t need one. The buses don’t have to be the same.
During this time, feedback across the three task groups included addressing safety issues, adding specific labels to sketches, using materials that were sturdier or lighter, and combining solutions.
Although tinker time was a self-directed 45-minute block, all of the students chose to use that afternoon to continue working on their maglev models. Because tinker time was provided daily throughout the summer science program, students were accustomed to the exploratory process of accessing materials and tools in the makerspace, seeking additional information (often, this involved asking me to look up photos or details about current innovations), creating solutions to a particular problem, experimenting, making mistakes, and revising their creations. Early in the program, we had read Andrea Beaty’s book, Rosie Revere, Engineer (2013), and just as in the book, students were encouraged to share about and cheer for each other’s “perfect failures” as well as successes during this block of time. At the end of tinker time, students were expected to have produced or revised their ideas in physical form and shared about them with at least one other person in the room.
Explaining Phenomena
After tinker time, the students and I met on the rug to debrief their work and so that I could briefly and explicitly explain the engineering practices they were engaged in. I said, “Each one of you was part of a task force to solve a problem in New York City with a maglev solution. What steps did you take to do this work?” One student shared that after she and her partner had developed their prototype based on her own apartment building, they looked at the photos of the elevators being developed in Germany again. They were surprised to see that one of the photos featured 21 elevators in one building, which they noted would reduce crowding and wait times for residents. The students added a third elevator to their design but no more. When asked why, they defended their improvement by saying that buildings in New York City were not shaped the way the building was designed in Germany, with wide horizontal extensions. To use maglev elevators in existing city buildings, they would be limited by the shape of the buildings. As students shared, I modeled analyzing patterns in our work by pointing out the following similarities in their thought processes: Each group started by sharing their experiences with the problem, which helped clarify their challenge. Each group “thought with their hands” to develop a solution. And each group looked for ways to improve their design, whether asking for feedback, looking at maglev technology in other countries, considering constraints, or testing their prototype and fixing the parts that did not work. I also pointed out a difference in their work: Each group used an idea from a different country to solve a local problem. I explained that scientists and engineers around the world are able to share ideas and work together, because we have common ways of organizing our thinking. One of these is called the engineering design process.
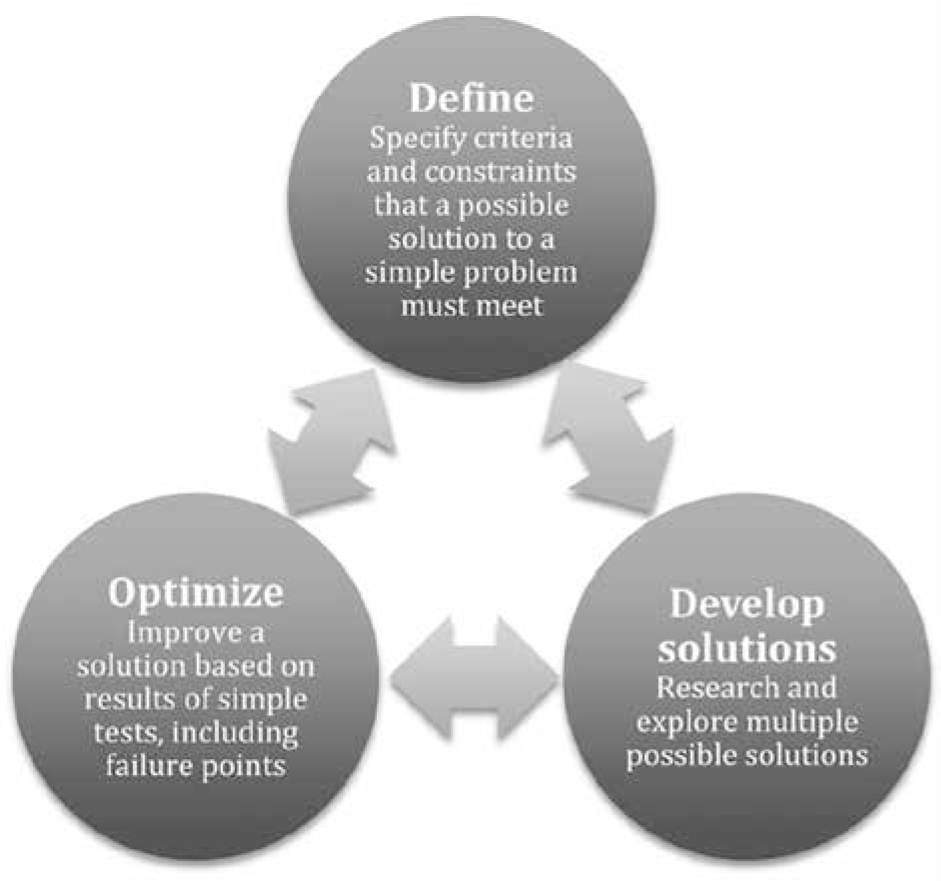
I showed students a chart of the engineering design process (Figure 3) based on the NGSS diagram for K–2. Altogether, we read aloud each question: What is the problem? What is your solution? How will you improve it? Students turned and talked with someone outside of their task force to ask and answer the three questions. I moved around the room to listen to students’ explanations. Organizing their ideas and experiences using the engineering design process required students to engage in higher-level thinking, and several students needed support to analyze their process in this way.
Student B: I think the problem is that your elevator is too heavy.
Me: Let’s take one step back. Why are you making a maglev elevator?
Student B: To make it lighter.
Student J: To make it faster. So people don’t have to wait as long. That was the first problem.
Me: Okay, long wait times was the first problem. And your solution was …
Student J: The maglev elevator.
Me: Then what part of the engineering design process are you in now?
Student B: Improving the solution. Theirs is too heavy.
Me: Did anyone improve their designs to make them lighter somehow?
Student F: It wasn’t really heavy, but our bus kept falling. We added a string on top to hold it up. That’s the top track for the bus.
Me: How could other groups use that improvement idea?
Student F: You could add a string for your elevator.
Student R: We used cups instead of boxes to make ours lighter. You could try that.
Some students were unsure about how they would improve their models, so I asked others to share their ideas. One student shared that she realized the disc magnets were the strongest, so she planned to take the strip magnets off of her elevators and replace them with discs to see if that would help them carry more weight. During the discussion, students evaluated their own designs, tried to solve each other’s problems, and applied solutions from one group to another— all examples of higher order thinking.
Elaborating Scientific Concepts and Abilities
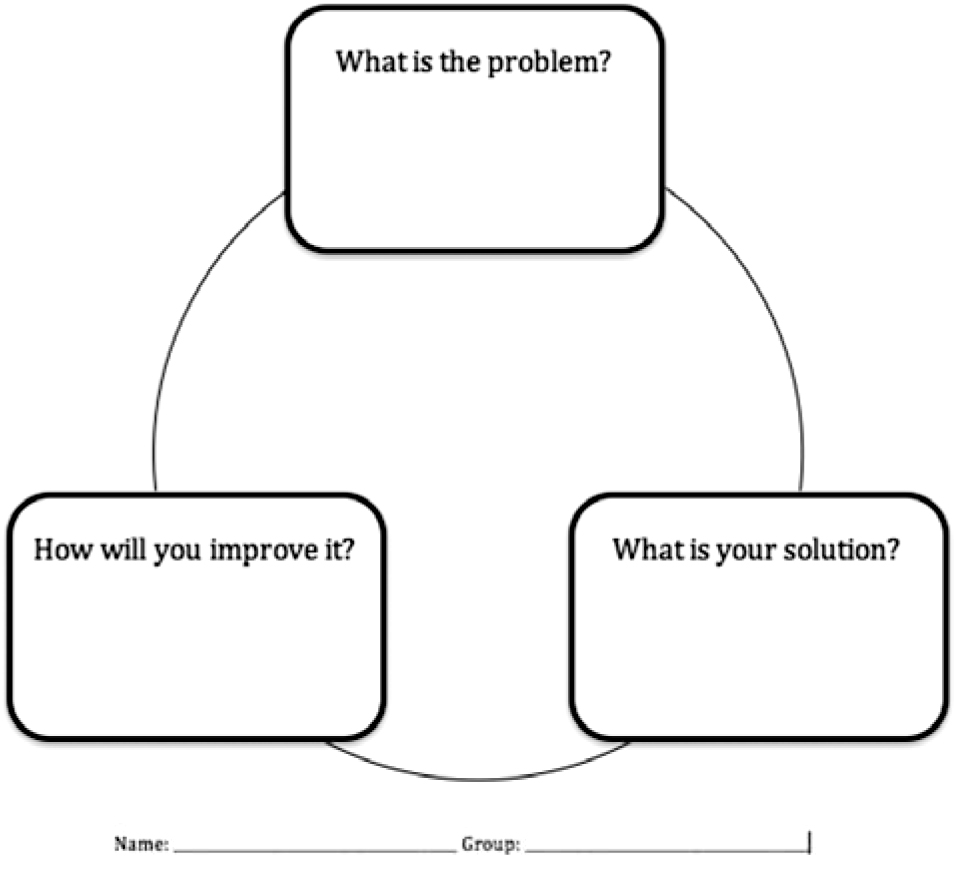
In the third lesson, students received a recording sheet to record their own engineering design process (Figure 4). I challenged students to be specific about the criteria and constraints (e.g., keeping the people inside the buses and buildings safe) and to decide how to improve their solutions. I told students that at the end of tinker time, each task force would present a model to the class as the closure for the lesson series. Students could present a work-in-progress, and they could choose to continue working on it during the afternoon tinker times throughout the following weeks to present their models at a community-wide event later that month.
During the third lesson, students had 20 minutes to work on their designs and complete the recording sheet. As students tested, revised, and recorded their work, I visited each group to listen and scaffold their thinking. Two students working on a maglev bus system expressed that they were stumped. I asked questions that led them to share what they knew about the purpose of guide rails in a maglev system.
Me: Why do you think the maglev train needed guide rails on the side? Why couldn’t it just go on an open road?
Student L: Because if it doesn’t have anything, it might not go.
Me: It might not go forward. Where else would it go?
Student L: It might be like this. [He holds the bus still above the table.]
Me: It might just stay still. What do you think, N?
Student N: It might fall off.
Me: It might fall off. The guide rails keep the bus on the magnetic path, so it doesn’t fall off or get stuck.
Student N: Okay, so we need a bigger box to hold this one inside. That will be the guide rail.
I encouraged the students to share their strategies for design with the rest of the group as a means to support students with less experience or fewer ideas.
Throughout the group work, I explicitly labeled their actions to emphasize the engineering design process. Two students shared that they used a large cardboard box for a maglev skyscraper at first, but they could not get it to levitate (ETS1.B). They remembered that the models for the homes in the Philippines were flat, so they worked on getting a flat piece of cardboard to levitate first, and then tried building a skyscraper onto the platform. I noted that they had developed a possible solution with a physical model, and by testing it, they learned more about what would make a good design. When I asked the pair what stage of the engineering design process they were in, they noted that they were in the “improve and redesign” phase, during which engineers continue to share ideas. To scaffold this sharing of ideas, I asked the two students to learn about what the rest of their group was doing, share their initial design, and then plan for their redesign with their group. The other seven students in the maglev skyscraper task force agreed that the pair’s plan was the best solution that had been suggested and, as a group, they began the redesign process.
Evaluating Learners
Throughout the three lessons and daily tinker times, I used an assessment sheet (see NSTA Connection) to keep track of individual students’ understandings and applications of the engineering design process and scientific ideas about magnets. As the groups presented their work to each other, I listened for students’ thinking around the three questions I outlined in the engineering design process: What is the problem? What is your solution? How will you improve it? I also listened for students’ higher-level thinking as they evaluated, argued for, and defended their solutions. As an example, I posed the question, “What are some pros and cons of your maglev solutions?” One student responded with a pro, stating, “Everyone will want to use the elevator.” Another student disagreed, stating, “It’s a con, because the elevator will be so crowded.” This sparked a discussion of structure and function as students compared the size and stability of the groups’ designs. Other examples of “Achieved” responses included, “It costs a lot of money to make, because you have to make so many prototypes,” and, “For the maglev trains, they had to blast holes in the mountains. We might have to do that for maglev buses, too.” I suggested that these constraints contributed to the part of the first step of the engineering design process and that, based on new information about the problem, students could further improve their designs.
Several students continued to work on their group projects during daily tinker times after the lesson series ended. At times, they engaged in the iterative process of engineering design by asking “What Ifs”: “What if we needed to build it over the river?” “What if kids with wheelchairs wanted to ride the bus?” At the end of the month, students presented their designs and works-in-progress to family and community members. Students reiterated classroom discussions to their visitors, sharing stories about the maglev innovations in other countries and how those designs were like and unlike the solutions they designed for their families and neighbors in New York City. Students were able to locate themselves within a global community of scientists and engineers and understood this work as relevant to their lives and families.
1. Practice tinker time procedures.
If you are introducing a makerspace and tinker time for the first time, allow a week to communicate and practice procedures. For example, have students create a list of materials they need from the classroom makerspace, so they can quickly find what they need and return to their work. Also, ensure students have a “Do Not Disturb” shelf or table to keep their ongoing projects.
2. Use small groups with similar interests.
Grouping students by interest ensures the task will be meaningful to them. Divide large groups into pairs and trios, so they can more easily communicate ideas and make decisions about their designs.
3. Instill a tinker mindset in children.
Provide focused time for ongoing projects, read children’s books that encourage problem-solving, and verbally celebrate both failures and successes. Become a model of this mindset by learning more about what’s happening in making and tinkering around the world:
- Maker faires take place in Africa, Asia, Australia, Europe, North America, and South America. Look up or participate in a maker faire close to you.
- Visit a makerspace at a local children’s museum, science museum, university, or library to gain ideas firsthand. If this is not possible, visit their website—many provide lists of their materials, events, and teacher resources to get started.