
feature
Qualitative Analysis of Ray Optics in a College Physics Laboratory: A 5E Lesson
This paper describes an alternative approach to teaching and learning practices in an undergraduate physics laboratory. The instructor plans and implements the 5E instructional model into the laboratory instruction. The article includes an example of the 5E lesson for the laboratory component of a physics course, which has separate lecture and laboratory sections. Through the use of a learning model, students could make predictions, exchange ideas, collect and analyze data, and construct evidence-based explanations about the ray optics topic. This approach of teaching in a physics laboratory promoted students’ engagement in scientific practices and learning of the fundamental concepts. The design of the lesson can be used as a model of a physics laboratory instructor’s attempt to put inquirybased instructional strategies into practice through the 5E cycle. This model can be useful for other instructors who are willing to improve or change their teaching practices and students’ learning experiences.
Science teachers change their instructional practices based on the reform-based standards to enhance student learning. The national reports, such as How People Learn II (NASEM, 2018) indicated that learning occurs through diverse experiences, and students need to be actively involved in their learning process and construct new knowledge about how the world works. Students need to be provided experiences that make them redefine, reorganize, elaborate, and change their existing ideas through self-reflection and interaction with others (Bybee, 2009). With the increase in the use of active learning strategies, science classrooms move from having a single lecturing component to having multiple components including demonstrations, group work, individual activity, whole-class discussion, clicker questions, simulation, laboratory activity, and assessment. In order to maximize student learning, teachers need to design the learning environments accessible to all students by the optimal order of sequencing of these components (Tanner, 2010). BSCS 5E Instructional Model, commonly called as the 5E model, is a learning cycle based on the constructivist view of learning and provides a sequence of instruction that places students at the center of their learning process (Bybee, 2009). The 5E model consists of the following phases: engagement, exploration, explanation, elaboration, and evaluation. Each phase has a specific function for teachers’ effective instruction and learners’ better understanding.
Lesson design
The 5E model is a natural way to create fully integrated instructional units that translate scientific practices into classroom instruction. In order to attain higher levels of student learning, Bybee (2013) suggests the adaptation of curriculum and instruction via integrating the 5E model into those science and engineering practices (NGSS Lead States, 2013). In recent years, physics education research in different institutions have developed student-centered curriculum materials and instructional tools to engage students in guided inquiry (Etkina & Heuvelen, 2007). This lesson was implemented in an undergraduate physics laboratory session of a physics course in a university in the southeast region of the United States. The physics course included separate lecture and laboratory components; students met weekly in a laboratory space for the two-hour laboratory component after the lecture. The class included 21 students (14 males, 7 females), who were science and engineering majors (including computer science, chemistry, and math).
The physics laboratory instructor aimed to modify her teaching in the physics laboratory based on the successes and challenges of students through using multiple tasks. As the instructor wanted students to engage in science and engineering practices, unlike “traditional” instruction, she drew on the eight essential scientific practices addressed in the Next Generation Science Standards. These eight features include the following: (1) asking questions and defining problems, (2) developing and using models, (3) planning and carrying out investigations, (4) analyzing and interpreting data, (5) using math and computational thinking, (6) constructing explanations and designing solutions, (7) engaging in evidence-based arguments, and (8) obtaining, evaluating, and communicating information (NGSS Lead States, 2013). These eight science and engineering practices were incorporated into the 5E model of science instruction while refining the physics laboratory experiment.
This paper provides the implementation of the 5E instructional model while teaching a specific topic from the physics laboratory instruction: ray optics. A detailed description of each phase is provided for the two-hour laboratory instruction based on convex lenses and ray tracing. The objectives of the lesson were to understand the ray model and its domain of applicability and image formation and to apply ray tracing from situations ranging from apertures to image formation.
The 5E lesson
Engage (10 minutes)
The lesson started with an activity about light rays to elicit students’ prior knowledge. This activity allowed students to remember what they have learned previously about plane, concave, and convex mirrors, and it enhanced students’ participation and curiosity. The instructor asked a question to understand students’ reasoning about mirrors and the image produced by different kinds of mirrors. The question and sample student responses are provided in Table 1. Students’ individual responses helped the physics instructor evaluate their conceptual understanding of the concepts. The instructor realized that students knew the basic information about the type and location of the image from plane, concave, and convex mirrors. In this phase, students could define whether the image was real or virtual and the location of the image. In the following phases, the instructor aimed to help students explain how and why questions about ray tracing through exploration.
| Table 1. Sample question used during the engagement phase and sample student responses. | ||||||||||||
|---|---|---|---|---|---|---|---|---|---|---|---|---|
|
||||||||||||
Explore (20 minutes)
In the exploration phase, students were guided to use the ray tracing method to find the image location of an object located in front of a converging lens. They were asked to explore the following question:
Experiment 1: What happens if you send a single ray coming from the left-up-side of a thick converging lens parallel to the optical axis? Please explore the same ray sent from the left-down, right-up, and right-down sides of the optical axis (Georgia State University [GSU] Introductory Physics Lab Information, n.d.).
Students were given a ray box, a thick converging lens, and white pages (Figure 1). The directions for the experiment were:
- Draw an optical axis on the middle of a sheet of white paper. Draw a perpendicular line to the optical axis in the middle of the page as the lens plane.
- Choose the thickest converging lens from the box and place on the white sheet.
- Send a parallel ray from the left-up, left-down, right-up, and right-down sides of the optical axis.
- During the observations, please do not change the position of the lens on the paper (GSU Introductory Physics Lab Information [n.d.].
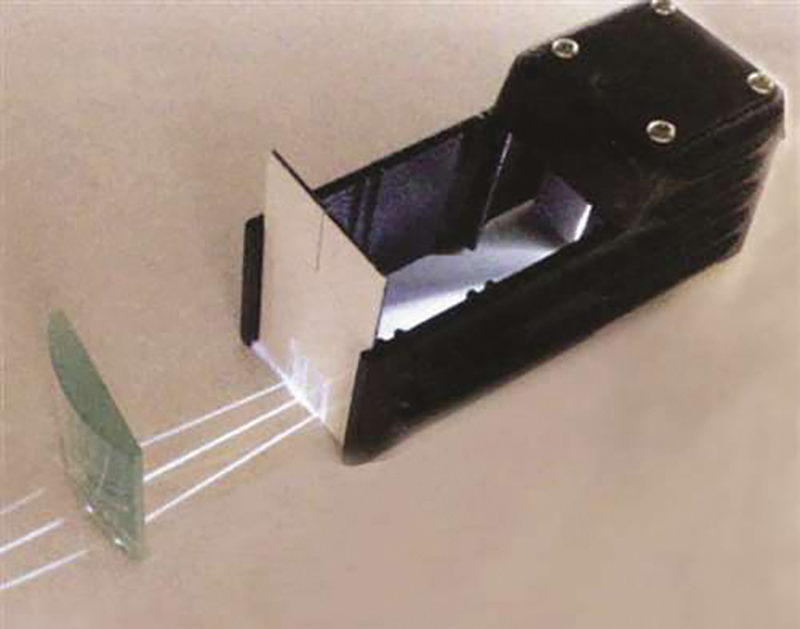
Ray box and converging lens for ray tracing activity.
The objective of the first activity was to help students understand how a ray parallel to the optical axis behaves through passing a converging lens. Students were encouraged to draw models and engage in argumentation from evidence. The instructor did not explain how to use the equipment; students decided what to measure and how to conduct the experiment, and they investigated the ways to develop claims and gather and analyze data to support their claims. This activity allowed students to find focal length of the thick converging lens, be familiar with the ray tracing, and understand how the rays behave through passing from a converging lens.
Experiment 2: After identifying the point of intersection of the parallel rays on the optical axis as the focal point, students were guided to explore the image location of a point by sending three different rays (GSU Introductory Physics Lab Information, n.d.):
- Ray 1 should be parallel to the optical axis.
- Ray 2 should pass directly through the central point of the lens.
- Ray 3 should pass through the focal point on the left side.
Students were guided to observe and explain how the light rays move through passing the convex lens in these three situations.
Experiment 3: Following students’ exploration for finding the image location of a point object by using these three rays, students explored the image of a 1 cm arrow perpendicular to the optical axis and located 10 cm away from the center of the lens on the left side of a converging lens (Figure 2). Through this activity, students also explored how the image of an object could be found and whether the image is real or virtual.
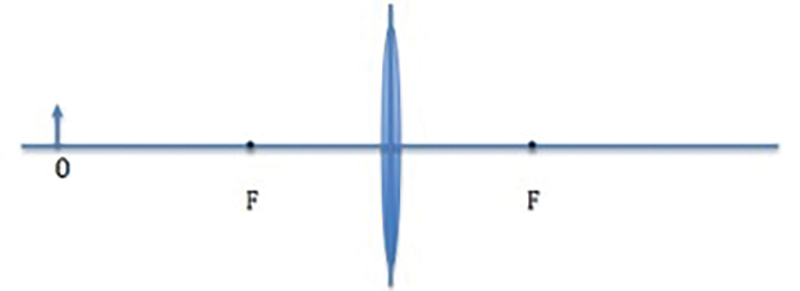
Exploring the image of an arrow by a converging lens.
In this phase, the instructor sought to assist students in using the ray tracing method for a point and an arrow object and enhance their scientific understanding through direct observations. The instructor aimed to understand whether students would be able to use models and make qualitative explanations through supporting their claims with evidence from their observations. Table 2 demonstrates an example of the student-teacher interaction during this stage.
| Table 2. An example of the student-teacher interaction during the exploration phase. | ||
|---|---|---|
|
Explain (20 minutes)
After students gathered the data about ray tracing from a converging lens, the instructor encouraged students to explain their observations in their own words. The instructor asked a question (Table 3) to help students clarify and refine their conceptions about how real and/or virtual images occur. The instructor aimed to explain what properties of a lens identify the relation between the object and its image.
| Table 3. Question guiding the explanation phase (Bloomfield, 2015). | |
|---|---|
|
During the whole-class discussion about the question students said, “The image goes from being real to virtual.” When the instructor asked, “In what conditions does the image become virtual and/or real?” a student gave an appropriate explanation and stated, “When the object is located between the lens and the focal point, the image will be enlarged and virtual.”
The next question was about the thickness of a lens. In order to help students understand the impact of the thickness, the instructor asked whether the focal length increases or decreases as the lens becomes thinner. The instructor wanted to assess whether students could make connections between the refracted angle and the location of focal point. Therefore, students were asked to calculate the magnification of the lens from their observations to understand how the change in the size of the image can be compared to the size of the object through magnification (magnification = m = h’/h where h’ = image size, h = object size). Students were also asked to explain how they can use geometry and provide evidence from their drawings to define the magnification. For all steps of the calculation part students were able to find the magnification of the lens considering the height of the object and image and the distance from the lens for the object and image. When they were expected to use the geometry, most students were able to use the trigonometry and the tangent rule to define the angle that the incident parallel ray is bending at the focal point.
Students had difficulty in calculating the magnification and identifying the angle. The instructor provided support to help students understand how they can draw triangles for tracing the light rays and modeling the calculations. After calculating the angle through the tangent value, students compared the actual value with the experimental value through general error calculation. Students were asked: “If you compare h/s (actual value) to h'/s'(experimental value), what will be the error of your observations?” Remember that error % =
![]()
One of the examples from students’ geometrical approach is presented in Figure 3. On average, the error for the actual and experimental value of the tangent value was identified with tan ʘ= h/s and tan ʘ’= h’/s respectively, and the error value was found smaller than 5%.
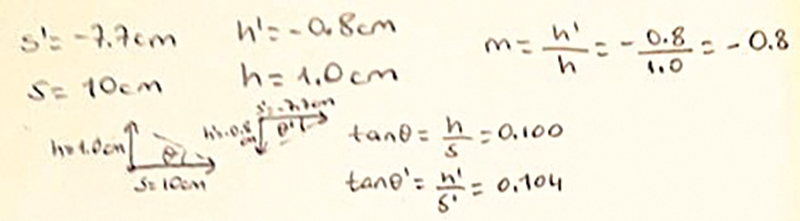
Example of a student’s geometrical approach to find magnification.
Elaborate (40 minutes)
During the elaboration phase of the 5E learning cycle students were asked to apply the same concepts and skills in a different situation to be able to have a deeper and broader understanding of the image formation in convex lenses. Students were given a light object, a thinner lens, and a screen and they were expected to predict whether the focal length of the thinner lens would be 20 cm or 30 cm and explain their reasoning. After their prediction, students were recommended to change the distance of the object from far away to a distance between the lens and the focal length. Students moved the screen at different distances from the lens such as d = 80 cm, 60 cm, 40 cm, 30 cm, 20 cm, and 10 cm, and they observed how the precision of the image changed. Students could explain how the image changed when the object was moved away from the focal point and located between the focal point and lens.
Students could observe the image only until 30 cm; they could not observe any real image between 30 cm and the lens. Thus, all groups decided the focal length as 30 cm. Some groups supported their claims as in the following: “When the object gets closer than 30 cm to the lens, the image becomes virtual. This means the focal length must be 30 cm.” “We set the object far away from 30 cm and an image appeared, as we moved the object closer to 30, it began to disappear and once you move the object less than 30 cm, there is no image.” “The object was fully focused at only 30 cm, but the image disappeared when we deviated from that point.”
This activity helped students understand how the real or virtual image was formed based on the distance from the focal point. After that, students were asked to conduct another experiment to find the image location at different distances from the focal point and record their observations on a table. Through this experiment, students could observe and support their claims—“magnification can be calculated both using the size and/or distance of the object”—with the evidence from their experiment. One of the groups provided Table 4 and concluded that the magnification calculated through the distance from the lens was close to the magnification calculated through the image size.
| Table 4. Sample values to calculate the magnification. | ||||||||||||||||||||||||||||||
|---|---|---|---|---|---|---|---|---|---|---|---|---|---|---|---|---|---|---|---|---|---|---|---|---|---|---|---|---|---|---|
|
Evaluate (10 minutes)
In this phase, the instructor was able to assess how students could apply what they have learned into the activities about ray tracing. The instructor asked a question (Table 5) to identify the location of the lens and the location of the focal point.
| Table 5. The question asked in the evaluation phase (Etkina et al., 2014). | |||
|---|---|---|---|
|

This assessment was the indicator of students’ understanding of ray tracing through a convex lens and how to find the focal point. A sample student answer is provided in Figure 4.
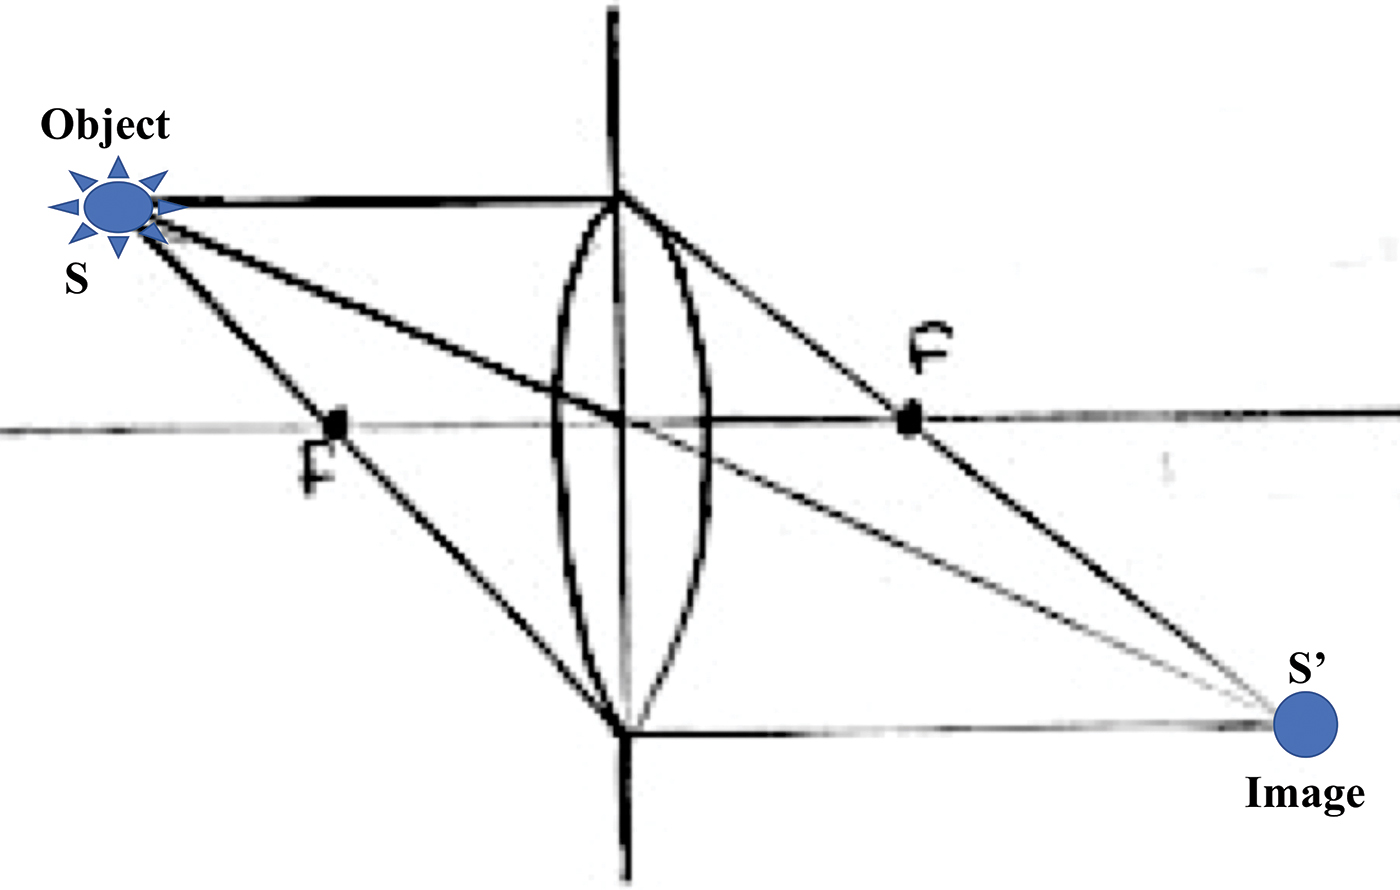
Sample student answer for evaluation question.
Conclusion
This lesson was designed to address the recommendations of national and international reform documents to help students have authentic science learning experiences in science classrooms (NASEM, 2018; NRC, 2012). The lesson aimed to support students’ engagement in different practices through exploring, explaining, and extending their ideas. It is important for teachers or instructors to consider incorporating the research-based strategies into their instruction to make the science more accessible to students (Idsardi et al., 2019).
The design of the lesson enhanced students’ participation and engagement. Students completing this lesson developed conceptual understanding of the ray tracing and image formation for convex lenses. Their answers on the different phases of the instructional model, including group discussions and use of mathematics and models, presented the effectiveness of the laboratory activity on students’ qualitative analysis of the physics concepts. In the different phases of the model, students could engage in scientific practices such as designing and conducting experiments, analyzing data, modeling, use of mathematics, and communicating information. Students’ reflections also demonstrated their learning experiences. For example, when students were asked, “Based on your experiences in class, what are the strengths and weaknesses of this lesson?”, one student stated: I was able to observe what happened actually. I did know them as concepts; I could understand how virtual and real images occurred and the magnification effects. The instructor’s instructions were really helpful, she also provided certain time periods to complete the experiment. By these experiments, I can learn the concepts easily better than lecture.
Using the 5E model was beneficial to integrate innovative strategies while doing an inquiry-based experiment. Students could develop their experimental abilities, as well as their knowledge of science and mathematics. These results are significant to help students enhance their understandings of the nature of science and experiences with scientific processes.
Ozden Sengul (osengul1.ga@gmail.com) is an assistant professor in the Mathematics and Science Education Department at Bogazici University in Istanbul, Turkey.