
Disequilibrium
Phases of the Moon
By COLE ENTRESS
Using discrepant events to confront misconceptions
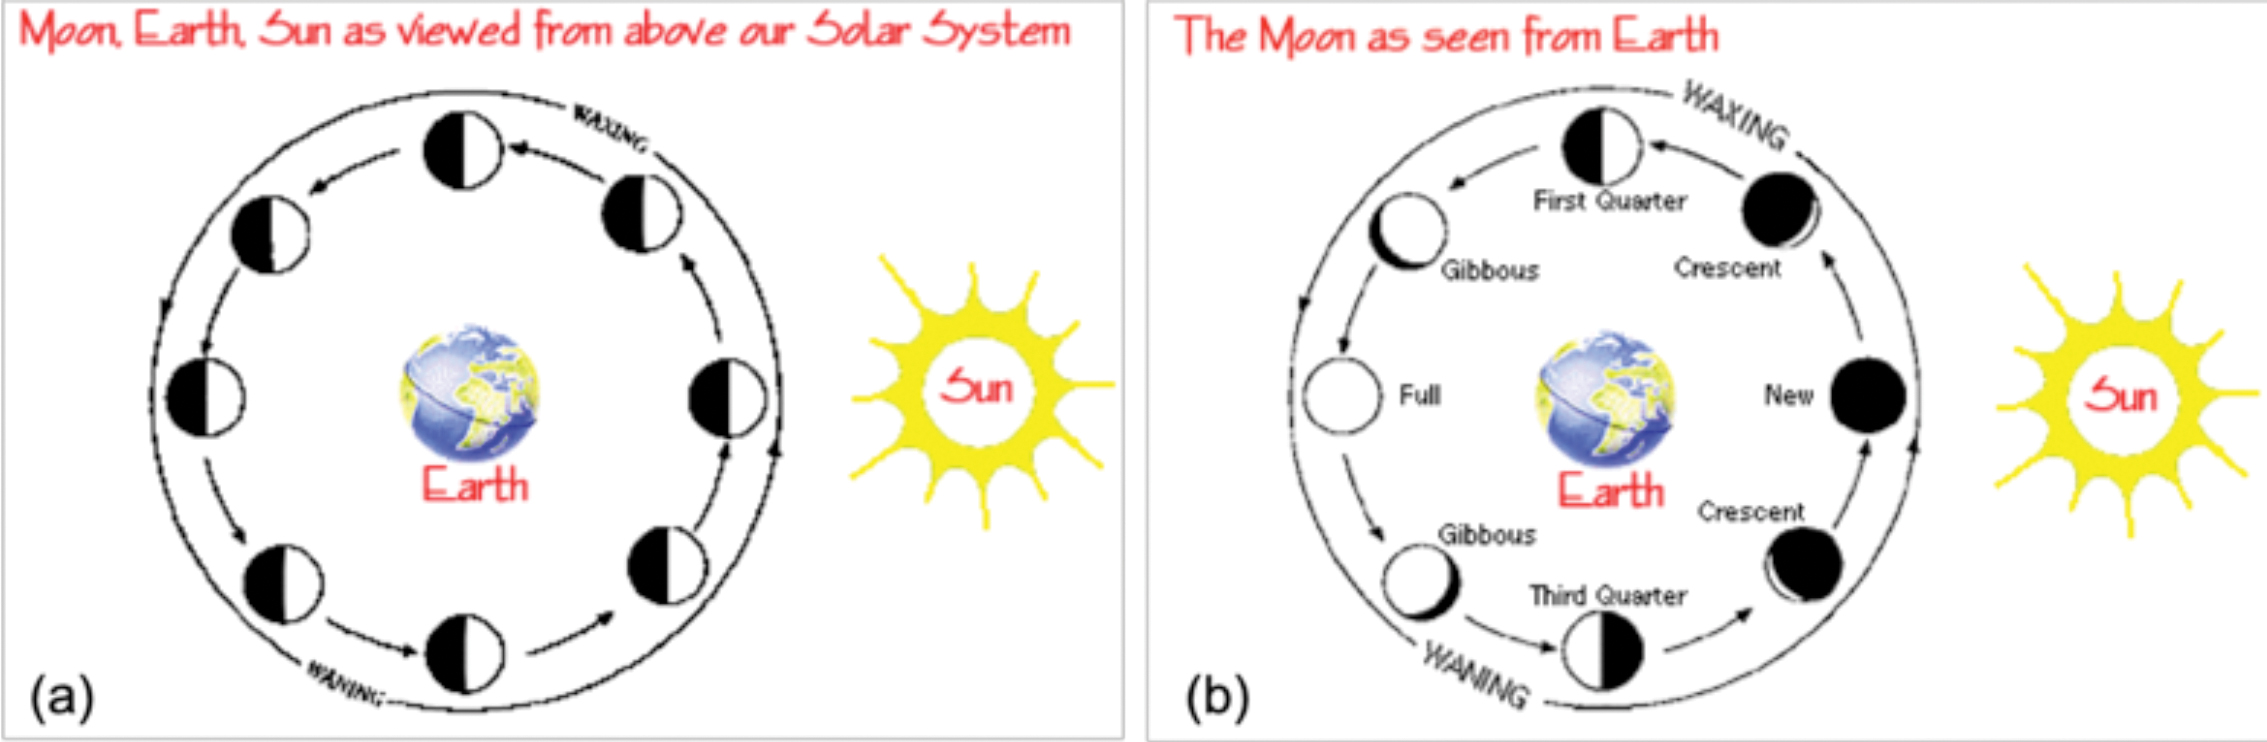
Next to the Sun, the Moon is the most luminous object in the sky. It is visible on most clear nights and often during the day as well. Most students know that the Moon has phases, but rarely understand why these phases occur. Middle-level students most commonly suggest that the phases of the moon are caused by the Earth’s shadow (Driver et al. 2015), though sometimes the shadows of other planets, clouds, and even the Sun are thought to cause the phases of the Moon (Dunford and Jones 2019). In fact, the Moon is illuminated by the Sun in much the same way as the Earth—that is, one side of it is continuously in the path of the Sun’s rays. However, as the Moon orbits the Earth, observers standing on the Earth’s surface can see more or less of the Moon’s illuminated surface (Figure 1), giving the appearance of phases.
This month’s Disequilibrium column explores how to help students refine their mental models about the phases of the Moon—an important component of MS-ESS1-1 (NGSS Lead States 2013)—using a kinesthetic demonstration that challenges the notion that the Earth’s shadow causes the Moon’s phases.
Engage
Project three pictures of the Moon on a whiteboard in various phases (bonus points if these are photos you’ve taken yourself, near a local landmark!). Ask students why the Moon looks different throughout the month, and then ask them to make drawings to explain this phenomenon. Specify that students draw a view from space that is a considerable distance away so that the Earth and Moon (and perhaps the Sun) appear in the drawing. After a few minutes, have students compare their drawings with others in the class, and ask groups to share a few of the ideas from their drawings. Be prepared to hear a diverse, possibly wild, set of ideas. Driver et al. (2015) found that at the middle level, some students still do not think the Earth orbits the Sun, so you can imagine how this might filter into a diagrammatic model of the Moon’s phases.
Explore: The Moon Walk!
Tell students that the drawings they just created and compared were a kind of model of the Moon’s behavior. Now, they are going to learn about how the Moon’s phases work using another kind of model—a physical model (adapted from NASA’s Jet Propulsion Laboratory [JPL], 2010) in which they will be a part of the system.
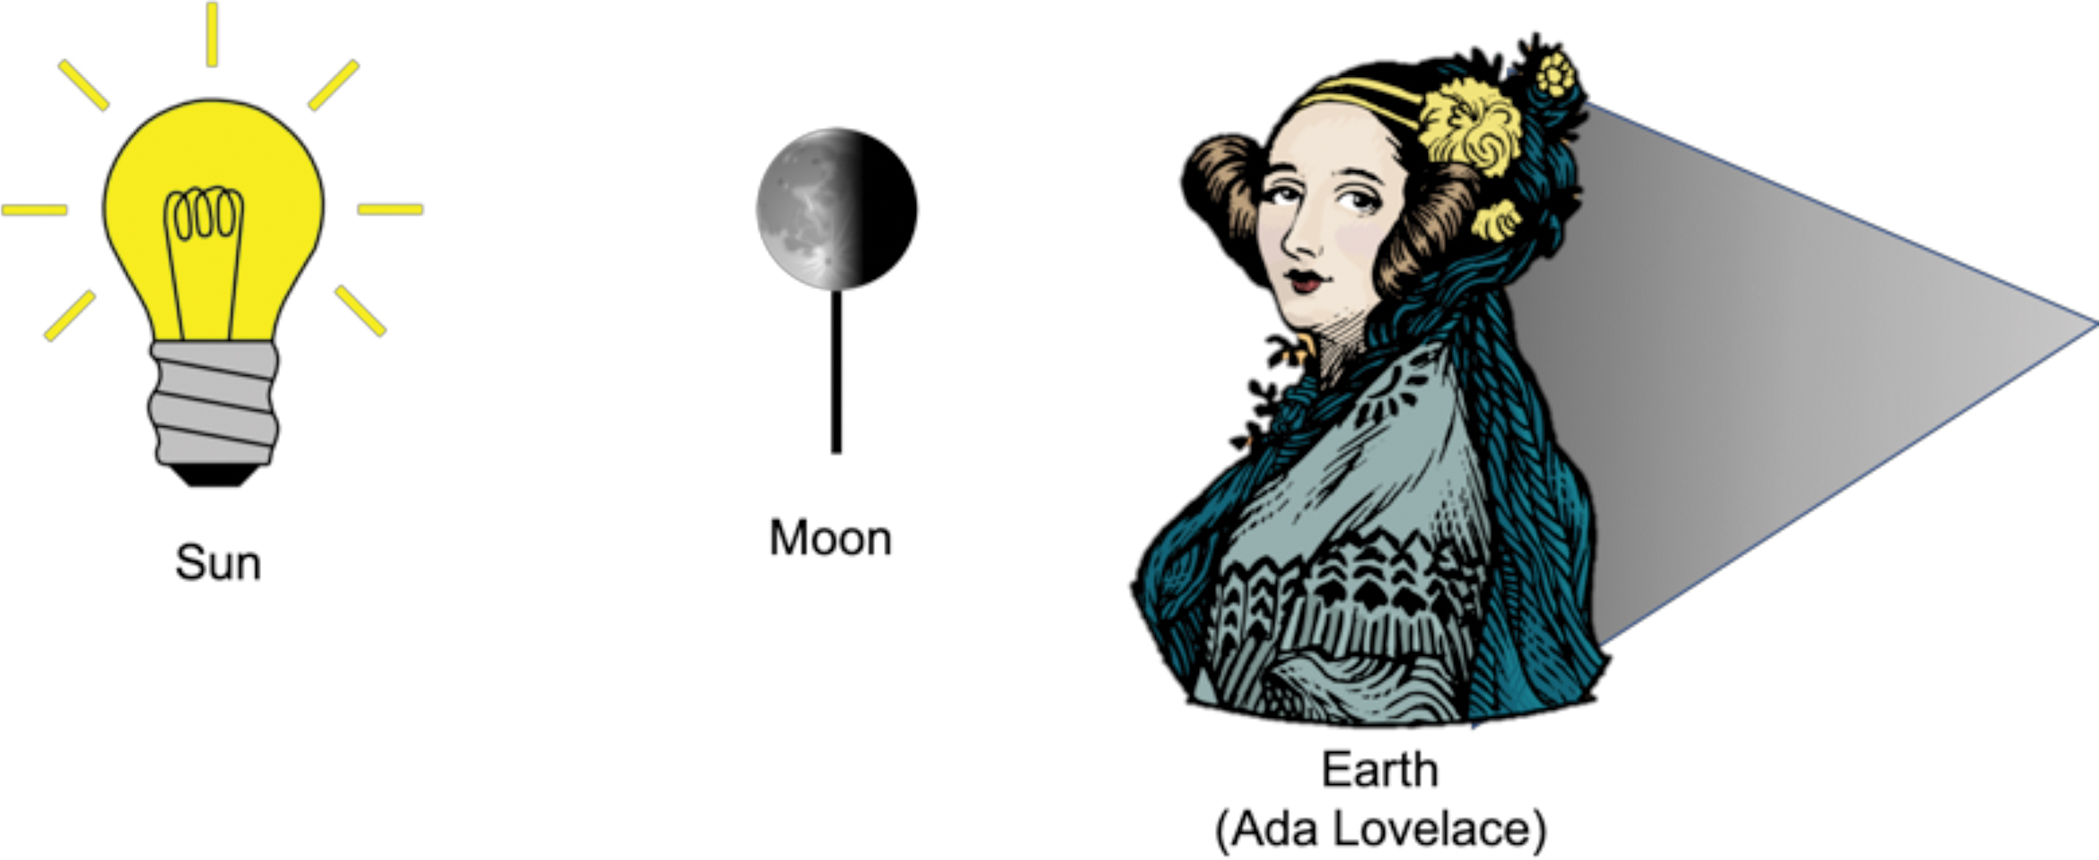
To represent the Sun in the model, place a bright, uncovered 100-watt lamp in the middle of the room. Then, take out a white Styrofoam ball (two to three inches in diameter is fine) with a pencil or dowel rod stuck into the ball, like an oversized lollipop. Tell students that the ball will represent the Moon and the pencil is a convenient way of holding it without your hand getting in the way of the Moon. Tell students that their heads will represent the Earth and that their eyes will give the viewpoint from Earth. In this model, the Moon will orbit the Earth, and we will recreate the apparent phases of the Moon. Divide the class into a few groups and give each group one model Moon. Materials allowing, you could give a model to pairs or even individual students. Just make sure that students have enough space for what follows.
To begin, darken the room except for the “Sun.” Write “Day 0” or the date of the most recent new Moon on the board. Instruct students to face the lamp from various places around the room and extend the model Moon directly in front of them, at about eye level (Figure 2). Safety note: Tell students not to look directly at the Sun/bulb. Students will see only the dark face of the sphere, equivalent to the new Moon (the Moon on Day 0 of the cycle). Ask students to identify where the shadow of Earth is during this phase—it will not fall on the Moon, but behind them. Have students draw or take photographs of this phase of the Moon.
Next, repeat the process at the following points, each time writing a new day or date on the board, and asking students to identify where the Earth’s shadow is at each phase.
- Day 4: Have students turn their bodies 45° counterclockwise, still holding the Moon out in front of their faces. They will see that a crescent-shaped sliver of the Moon is illuminated, while the rest remains dark. It is worth pausing here to ask students what is represented by this turn in their bodies. Students may think turning represents the rotation of the Earth—emphasize that it is actually the Moon revolving around the Earth, a process that takes about 28 days.
- Day 8 (first quarter Moon): Have students turn 90° counterclockwise from their original position.
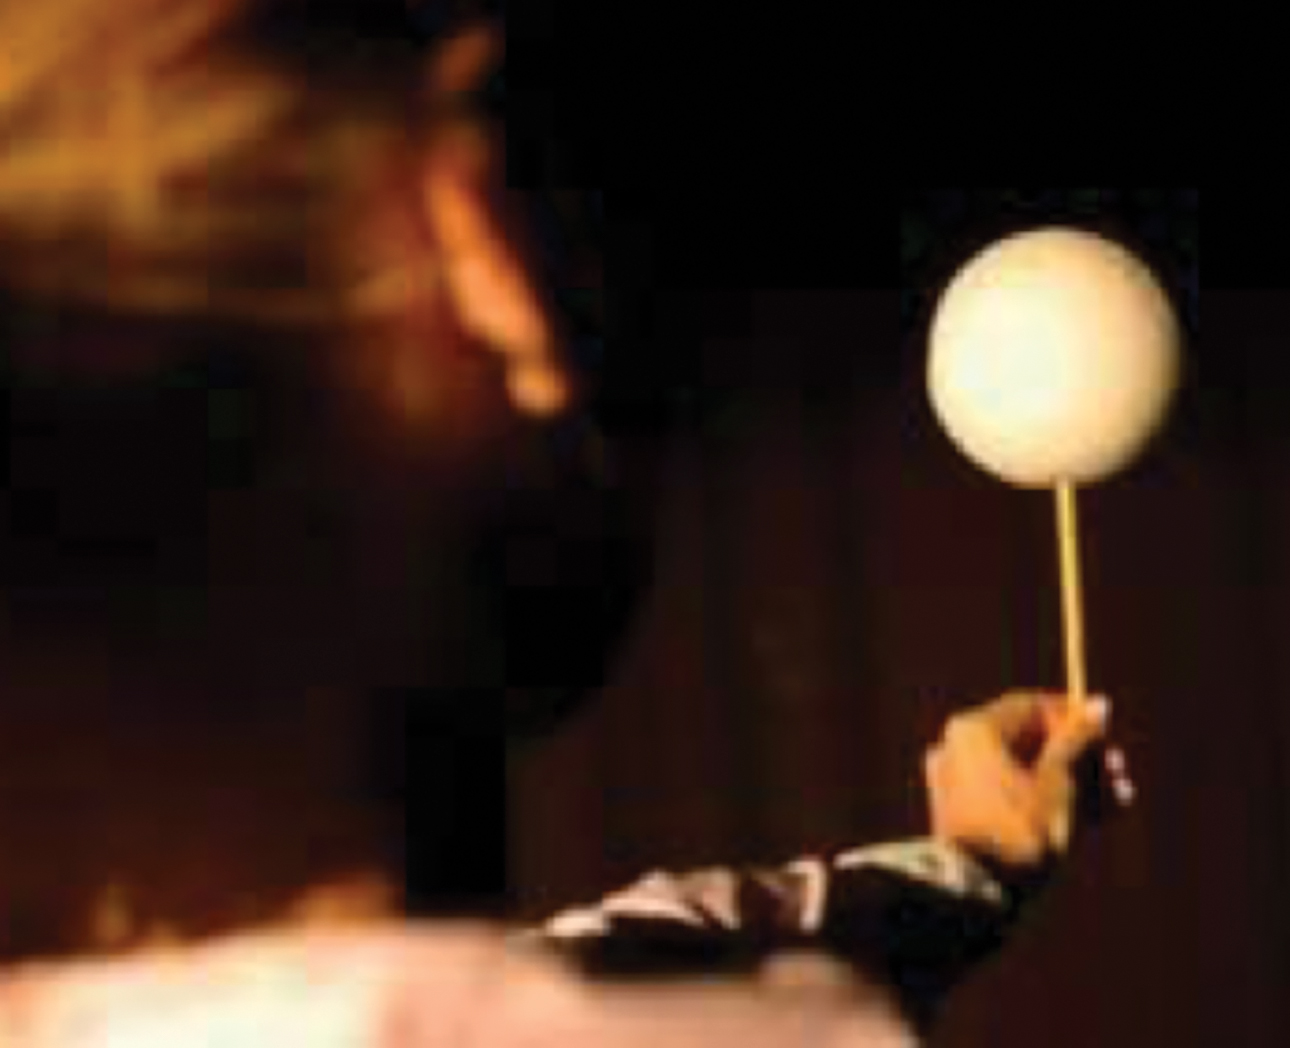
- Day 14 (full Moon): Have students turn 180° from their original position. Note here that the Earth’s shadow is cast toward the Moon, which is why lunar eclipses can happen during full Moons. However, if students are holding their models at about eye level, their own shadows should not be cast upon their model Moons (<a class="fig" href="#SS_40_F3">Figure 3</a>).
- Day 21 (third quarter Moon): Have students turn to 270° counterclockwise from their initial position.
- Day 28/Day 0: Have students slowly rotate counterclockwise to a full rotation, watching what happens to the Moon as they complete the cycle.
Extension
When the Moon is visible during the day, you can bring the Styrofoam balls outside, hold them toward the Moon, and see that they will be illuminated by the Sun in the same proportion as the visible Moon (see Resources). This is most feasible when the Moon is in the first- or third-quarter phases; first-quarter Moons are generally visible in the east during the afternoon, while third-quarter Moons are visible in the mornings in the west (see Resources to get more information on the moonrise and moonset in your area).
Explain
Ask students to identify, in their own words, the patterns they saw during the demonstration, and to describe the reasons for the phases of the Moon. Follow up with a video that describes the Moon’s phases in more technical terms—fifth and sixth graders may enjoy BrainPop’s video on the topic (sign in required), while PBS and Crash Course jointly host a slightly longer video for older students (see Resources).
Elaborate
Because the Moon has been an object of human interest for so long, activities about its phases are never in short supply. Here are a few possibilities!
History connection: Have students research some of the earliest calendars humans ever created, most of which were based on the Moon. There are also some modern lunisolar calendars, which students might find interesting to report on.
Model analysis: Probe more deeply into the ways the model used in the Explore section is accurate and inaccurate. The model, for instance, is not to scale, nor does it show the inclination of the Moon’s orbit. Ask students to design a model that corrects (some of) these inaccuracies and describe its pros and cons.
Lunar eclipses: Ask students to explore the NASA videos demonstrating how the Earth’s shadow does cause lunar eclipses on rare occasions (see Resources). Then ask students how the model used in Explore could be modified to illustrate this. This is a fun extension, but be warned: lunar eclipses are not an easy idea to grasp and may require a full lesson (or more) to clarify.
Solar eclipses: Solar eclipses are a rare and spectacular phenomenon, caused by the shadow of the new Moon. The United States will experience a total eclipse on April 8, 2024. Can our simple Moon model be made to show how solar eclipses happen, too? As with lunar eclipses, this is a complex but fascinating extension, ideal for students who need more challenging material. (See Resources for more information on solar eclipses.)
Evaluate
Finally, project the photos you showed at the beginning of class once more. Ask students to create a new and improved diagrammatic model showing how each of these phases are possible.
Conclusion
These activities give students repeated opportunities to engage with models illustrating various facets of the Sun-Moon-Earth system, which address the content, science practices, and crosscutting concepts associated with MS-ESS1-1 (NGSS Lead States 2013). Working with causal models of this sort can contribute to effective science teaching (Windschitl, Thompson, and Braaten 2018), and may allow your students to reason much more clearly about light and shadow in the solar system.