
start with phenomena
What’s the Buzz?
A hands-on, interdisciplinary, and fun way to learn about circuits, energy, engineering, bee communication, and pollination.
Science and Children—May/June 2021 (Volume 58, Issue 5)
By Christine Moskalik
How can a simple toothbrush-bot be used to model honey bee communication as well as the role of such communication in pollination? Learners explore basic circuitry through the popular toothbrush-bot activity, with a spin. After bots are made and decorated as a honey bee, they can be used as a model for honey bee communication and behavior. As the decorated bot moves and spins, it can resemble the waggle dance, a behavior performed by scout bees to communicate the location of a flower patch (nectar source) to other worker bees, who head to those flowers to forage and subsequently pollinate. Bee-bots then “fly” (via a fishing line “zipline”) to an artificial flower patch. In addition to developing and using models (bee communication and behavior) and exploring cause-and-effect relationships (circuits power a load and bee communication), learners are introduced to life science and physical science disciplinary core ideas involving interdependent relationships of insects as pollinators, as well as energy transfer. These interdisciplinary standards-aligned activities were done in an informal STEM enrichment setting for second graders but can be easily adapted to traditional elementary-level classrooms.
There is much to be discovered about the important role honey bees play in ecosystems as pollinators. Without honey bees, we’d have no honey, but we’d also have a much more limited selection of produce at the grocery store. Bees are social creatures that work together to run a successful hive and they rely on interesting ways to communicate to accomplish their many tasks. One mechanism of bee communication relating to pollination and honey production is the waggle dance, a precise way for scout bees to inform their hive mates where a food source (e.g., a flower patch) is located (Dyer 2002; von Frisch 1967).
In this article, we present a series of activities that not only help learners discover the waggle dance and its purpose but also introduce circuitry, engineering, and energy transfer using hands-on, inquiry-based strategies. These activities were conducted in a second-grade STEM enrichment setting with 20 students over approximately 90 minutes. The assessments were primarily formative, given the nature of the program.
Engage: Introducing Energy Transfer
Something familiar to students is the movement of objects, whether it is their own ability to move their bodies (from blinking an eye to swinging a baseball bat) or watching the movement of objects. Our first essential question was “How do things move?” We emphasized answers that addressed some type of force or energy. We asked “How were you able to raise your hand? That was a type of movement, right?” This lead to a brief whole-group discussion about brains, and muscles, and energy…and this helped us assess each student’s baseline knowledge, given that students in our setting were from different schools and had different levels of foundational knowledge. Using a familiar topic from the student’s daily lives helped them get comfortable answering questions in front of a large, unfamiliar group. Next, we started our discussion about energy transfer, asking questions like: Where did you get the energy you needed to raise your arm? While some students answered “sleeping” (rest was noted as an important part of energy transfer in humans) others suggested “our food,” which allowed us to talk about energy storage as we distributed a 3v coin battery (CR2032) and a small vibrating motor with two wire leads and started the explore phase.
Explore: Introducing Circuitry
Students were encouraged to make observations about the materials used during the engage portion. After noting key observations (below) the students were challenged to put them together somehow to make the motor move. Our battery observations were: round, small, silver, shiny, smooth side, bumpy side, + sign, and so on. Our expected motor observations included: small, black and silver, two wires, different color wires, metal sticks out at end of each wire, sticky backing, etc.
As students worked, we circulated and asked guiding questions such as: Why do you think there are two different surfaces on the battery? and Why do you think there are two different colored wires on the motor? Eventually, all students got their motor to vibrate by touching the metal ends of the wire leads to the battery. We reviewed energy transfer from battery to motor and related that to the prior example of us raising our hand after getting the energy from our food in a whole-group discussion.
We began our introduction of circuit basics using the materials they just explored (3v coin battery and small motor). We asked questions like: How did you get the motor to work? When did the motor not work? Students discovered that each wire from the motor had to be in contact with a different side of the battery. This allowed us to identify and introduce the basic parts of a circuit: power source (battery), load (motor), conductors (wires), energy (what is being transferred to allow the movement to occur). This was accomplished via whole-group discussion coupled with a drawing of a basic circuit on the board, which we labeled with all the parts of a circuit. Next, we asked: Did the motor stay on the whole time? allowing us to address open vs. closed circuits. For older or more advanced students, teachers could introduce circuit switches, electrons, current, energy flow within a circuit, etc.
Each student was given these materials to explore: a toothbrush tip; mounting tape; a black pipe cleaner bent into wings/stripes (Figure 1); googly eyes; two small, clear rubber bands; and a pre-assembled bee “body” (made of two yellow 1” pompoms and a smaller ½” black pompom, all of which were pierced with a coffee straw using a metal awl ahead of time, see Figure 2; piercing the straw through the pompoms was important to the ziplining activity, described later). Groups shared tacky glue.
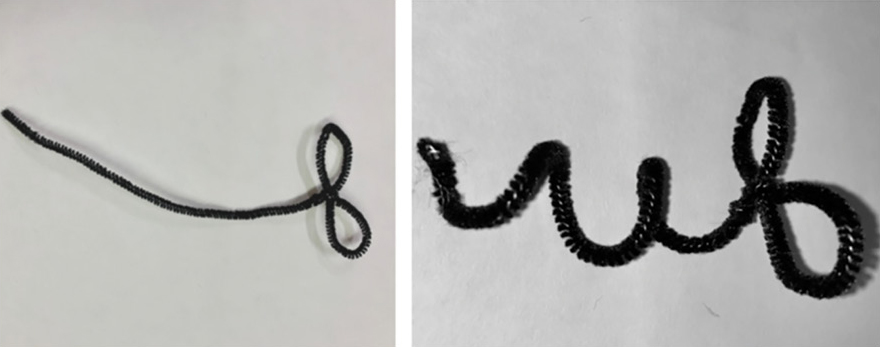
Pipe cleaner wings and stripes for students to add to their bee body.
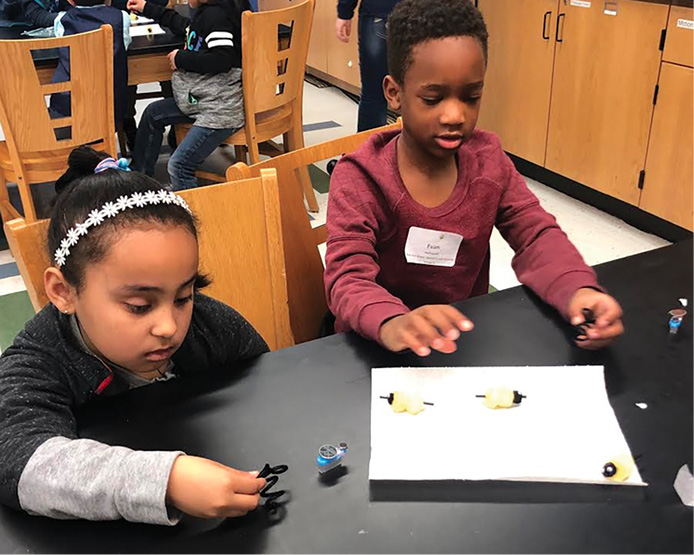
We reviewed the materials and informed students that they will need to be able explain how they will use these materials to create a moving brush-bot. We reviewed the safety considerations and other rules/expectations for the materials: pipe cleaner ends are sharp, and should be used with caution; only use materials as directed; do not touch the wire ends; do not disassemble the bee body (might be hard for the kids to get the poms back on the straw). First, our students added the bee’s stripes/wings (prefolded black pipe cleaner) then glued-on the googly-eyes to allow time for the glue to dry. Then, students planned how to build the brush-bots. We asked: Which of these materials could we use for the wings? (pre-shaped black pipe cleaner) Which part of the bee body should get the eyes? (small/black pom) Which material should we use to do that? (tacky glue) Do you think these googly eyes are a good representation of honey bee’s actual eyes? It was a challenge for some students to independently put the wings/stripes and eyes on the bee-body, so we circulated to help as needed. In our setting, there were three of us facilitating the activity and helping students. In a traditional school setting where a teacher doesn’t have assistants, they would need to allow for more time in order to complete the activity (e.g., one class period to build the bot and balance and explore circuit basics, and a a second class period to decorate and model the waggle dance).
Explain: Engineering a Brush-bot
The students were given two challenges to complete in sequence: (1) Make a brush-bot that moves and remains upright, and (2) Decorate a brush-bot to look like a honey bee (adapted from Monsanto 2017). Our essential question of “How do things move?” was still being addressed. Students first discussed as small groups what ideas they had for building the brush-bot. As we circulated to each group, we asked questions like: How will you know your brush bot is on? Is that an open or a closed circuit? What is the load? How will you assemble your brush bot? Where will the energy we need to make it move come from? Once groups of students were able to answer these types of questions, they starting building (challenge 1). Something we encouraged all students to do, as a check-point before moving on to the next challenge (adding the bee body), was to assess how well their bot moved. After all, if it didn’t move well now, how well would it move once we add the decorative bee body? This helped us continue to emphasize our essential question. Some bots didn’t seem to work due to the orientation of the battery. Our students discovered which battery orientation was optimal (bumpy/negative side down, smooth/positive side up) for creating a closed circuit (turned on and moving) and ultimately placed the black wire lead from the motor directly on the mounting tape (Figure 3), then placed the negative/bumpy side of the battery face-down and directly over the black wire lead on the mounting tape. We also had them leave the red wire lead loose to easily turn the circuit on and off by touching and removing the red wire lead to and from the smooth/positive side of the battery. Students experimented with placement of the battery and motor so the brush-bot was balanced and remained upright while moving. Our teaching team of three circled around and supported students who had difficulty assembling and balancing their bee bot; most students were able to do this independently, with minimal guidance.
Once all students had a moving brush-bot that remained upright, they were asked to explain the energy transfer and circuitry concepts we had covered; this was accomplished via think-pair-share in our setting, but teachers could have students create a diagram and accompany it with a written explanation as a summative assessment. A few pairs shared their explanations developed during the prior think-pair-share to the whole class. We noted explanations involving key concepts, such as: (1) where the energy came from (the battery) and (2) how that energy was transferred to the motor, allowing the bees to move. As we reviewed these student explanations, we acknowledged our essential question of “How do things move?” and also referred back to our circuit diagram on the board, which was introduced during the Explore phase.
We decorated our brush-bots by securing the pre-assembled bee body onto the toothbrush head (recall, the bee-body had pipe cleaner stripes/wings added and eyes glued on prior). The bee body was placed on top of the brush-bot’s motor and battery. We used one or two small, clear rubber bands placed between the yellow pompoms of the bee-body and around the brush bristles (Figure 4). Securing the bee to the brush bot required teacher assistance, as the second graders had a hard time stretching the rubber band over the bee body while holding the brush bot.
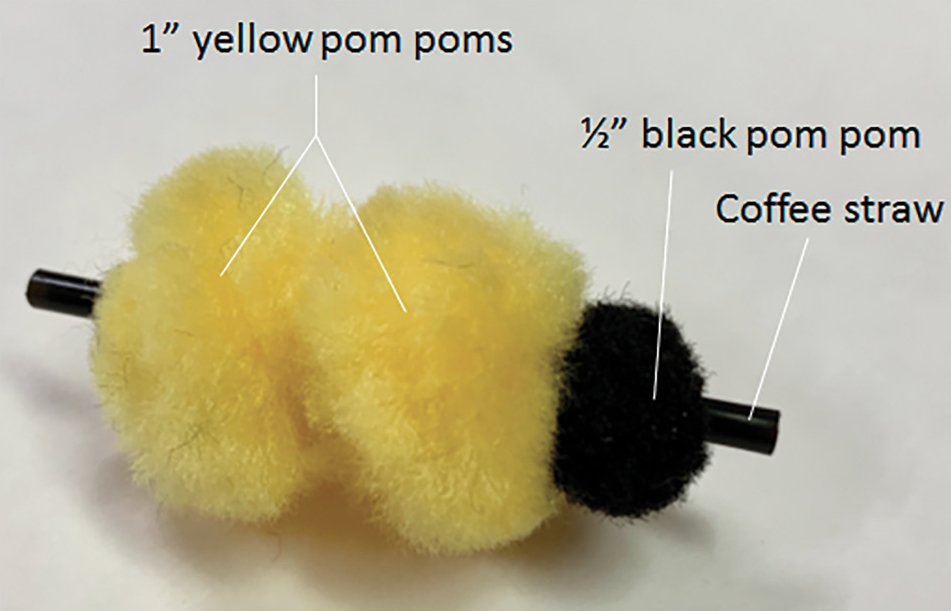
Bee body, pre-assembled for the students.
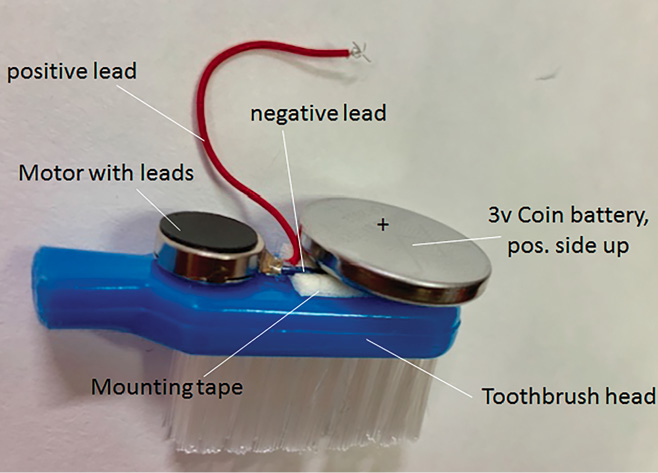
Placement of motor, black/negative lead, mounting tape and coin battery on toothbrush bristles.
Once the bee-body was secured, their honey bee model was complete and ready to move (Figure 5). Students closed their circuits by touching the loose red wire lead to the top surface (positive side) of the battery and enjoyed watching their bee-bots move. We had them keep the wire in contact with the positive surface of the battery by pushing it under the bee body. Some students needed to make subtle adjustments in order to keep their bots upright and moving, but all bots moved in a circle via energy transfer from battery to motor!
Elaborate: Our Bee-bots Do the Waggle Dance!
By now, our class was really buzzing. The kids loved seeing their bee-bots “dance!” To conserve battery power, the students made an open circuit (turned off the bot) by removing the contact between the battery and the motor’s red wire lead. We wrapped up essential question 1 (“How do things move?”) by reviewing all the prior activities and concepts. We introduced a second essential question for the remainder of our program: “How can we model the role that bees play in flower pollination?” We showed a video that illustrated the waggle dance (Smithsonian Magazine n.d.). We had the students analyze how well their brush-bots modeled the waggle dance. Teachers could take it further with older and more advanced students by analyzing how anatomically correct their honey bee models are, noting that models are intended to capture phenomena but often have limitations. Herein is another opportunity for a summative assessment such as having the students draw and label their model, write a comparison between their model and an actual honey bee, or write an explanation of the waggle dance and analyze how well their bee-bot modeled that phenomenon. Differentiation strategies could be addressed by tailoring the types of assessments to meet individual student’s needs.
As a finale, we wanted to give the students more context for what the waggle dance actually communicates to the other bees in the hive. When a scout bee locates a food source, it returns to the hive and uses the waggle dance to communicate to their hive mates where a flower patch is located; the hive mates then fly away from the hive, toward the flower patch located by the scout bee who did the waggle dance. To model this, we had five stations set up around the room, each with a bunch of artificial flowers connected to a long string of fishing line. In small groups (three or four students per group), one student demonstrated their bee-bot in action (closes the circuit to turn motor “on,” bee bot spins and models the waggle dance) and the remaining members of the group (bee bot “hive mates”) placed their bee-bot on the fishing line by threading it through the coffee straw pierced through the bee’s body (Figure 5). Each of the bees “flew” (via zipline) to the food source (artificial flowers at other end of fishing line). This modeled how one bee communicates to its hive mates the location of a food source and addressed our second essential question. Students took turns having their bee-bot do the waggle dance and having their bee-bots “fly” to the flowers. We used artificial flowers because we had some handy from other activities in our programs (examples included in budget, see Supplemental Resources). However, as an alternative to artificial flowers, teachers could have students draw a picture of a flower patch or create a flower patch using tissue paper and pipe-cleaners and have the zipline lead to whatever the students have created.

Placement of the rubber band to secure bee body to brush bot.
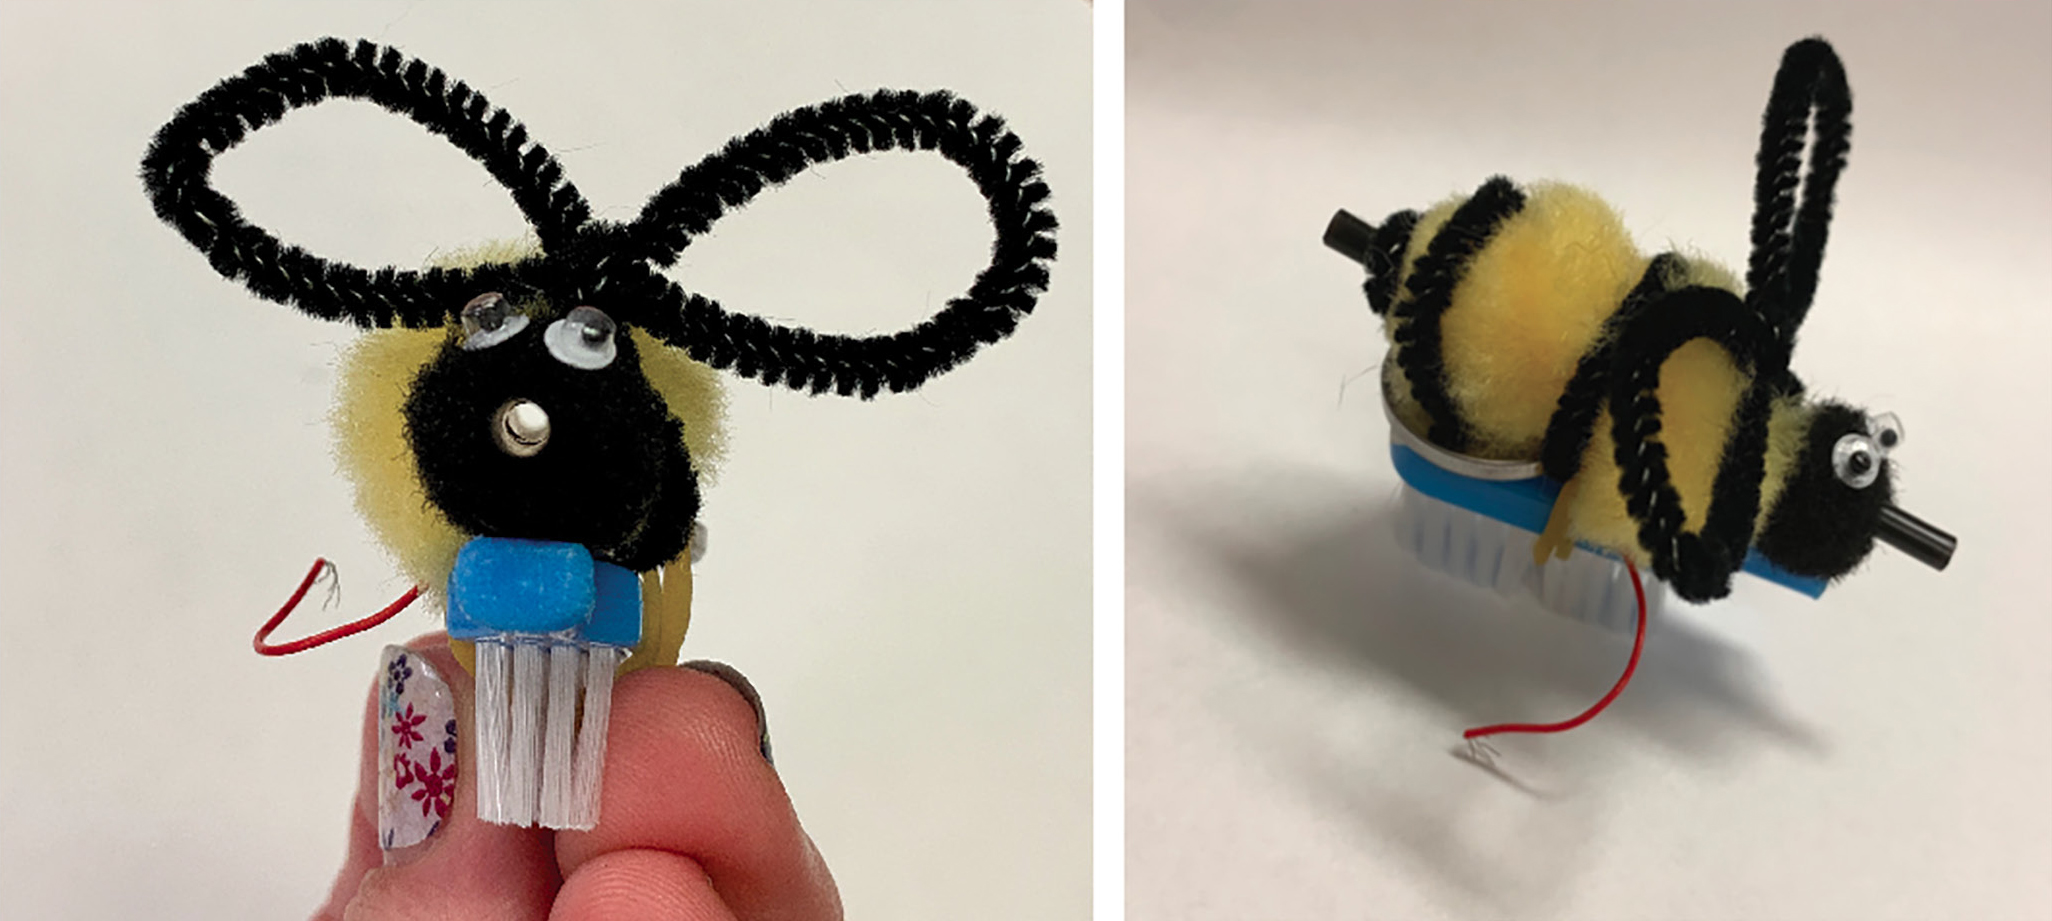
Finished bee bot; view of body pierced with coffee straw and side view.
While we were limited to conducting the activities within a 90-minute time frame, there are many interesting and exciting ways to continue exploring these topics and elaborating with students. For example, there is a great resource from Arizona State University (ASU) funded by the National Science Foundation called “The Way of the Waggle dance, version 1.2,” which could supplement student explorations of this topic (Askabiologist.asu.edu, n.d.). Another ASU “Ask a Biologist” resource called “Bee Bonanza” is a story/informational text about honey bees with great pictures and illustrations, as well as links to additional topics related to honey bees; the main story is also available in Spanish.
Evaluate: What Did We Learn?
Students learned about circuits and energy transfer while applying aspects of engineering through a series of fun, hands-on activities that model honey bee communication. Our second graders were very engaged and enthusiastic. In our enrichment programming, we don’t conduct summative assessments, as our primary goal is to spark interest, inspire, and expose kids to STEM in hands-on and fun ways. We do, however, use questioning and observation throughout our activities as regular formative assessments. Teachers could easily create summative assessments such as diagrams of circuits and bee-models for students to label, diagrams illustrating direction of energy flow, written assignments explaining or reflecting on their project, or a student page to have the design plan documented. In addition, a potential summative assessment could include a written explanation or creation of a poster, or doing an oral presentation about what comes next (e.g., this activity models the events leading up to pollination, so after the bees fly to and land on the flowers during the modeling activity, the fruit and seeds would form from the flowering plant). This could couple nicely with or be a lead-in to a flower/seed anatomy unit. There is also the potential to focus a writing piece or math activity (measuring distance, or time to get all the bees in a group to the flower patch, etc.) that relates to this STEM modeling activity; this is one way to try to integrate the experience across the curricula, allowing for more time to do the modeling activities during science class but then accomplishing some of the assessments during other classes, such as ELA.
Budget
It cost us approximately $2.25 per student for purchasing all materials for 200 participants (see Supplemental Resources). This budget includes some optional items, such as artificial flowers and googly eyes, which are cute but not required. Coffee straws can be gathered from or donated by local restaurants rather than being purchased (two bots were made per coffee straw). Also, to reduce overhead cost, you could ask for toothbrush donations from a local dentist office or store; another alternative is to have the students bring in a flat-bristle toothbrush. There are “toothbrush bot” kits available, but we found there was no cost benefit to getting the kits over gathering the materials independently.
Conclusion
This integrated approach provided multiple opportunities to explore, ask, and discover “How things move” and addressed “How we can model the role bees play in flower pollination.” We shared the important story of bee communication and how that relates to pollination and energy transfer using models and engineering via a fun, interdisciplinary, and hands-on approach. ●
Online Resources
Askabiologist.asu.edu: Bee Dance Game
Bee Bonanza. ASU - Ask A Biologist
Supplemental Resources
Download the materials list at https://bit.ly/3tD7mMx and Standards connections at https://bit.ly/3nn8UYV. Lesson plan and additional materials available at https://digitalcommons.imsa.edu/pfs_tr/27.
Christine Moskalik (cmoskalik@imsa.edu) is a curriculum and professional development specialist at the Illinois Mathematics and Science Academy in Aurora, Illinois.
Instructional Materials Makerspace STEM Technology Elementary