
Teacher's Toolkit
Kids Teaching Kids
Using summary boards to demonstrate learning through scientific communication

Communication is about sharing the exciting findings of science, increasing knowledge and understanding of a concept, and engaging with peers and other scientists. Students, like scientists, need to be able to communicate ideas and scientific reasoning to a broad audience. Using summary boards in class is one strategy that can help guide students through the communication process, increase student engagement, and foster conversation. A summary board is a large whiteboard (91 × 61 cm [36 × 24 in.]) or dry-erase board where students can demonstrate their learning. As students work in small, collaborative groups, summary boards can easily provide insight into students’ thinking when they discuss their work with a teacher.
Using summary boards for student explanations
Summary boards are a method used to assess student learning and to determine the depth of learning throughout the unit. They contain text, images, diagrams, or models that students draw. Summary boards can be used to have students present (visually and verbally) an answer to a science question and come to a consensus about the explanation of the correct answer. When used with lab investigations, summary boards allow students to explain the procedure, analyze their findings, and make connections to the Next Generation Science Standard (NGSS) standard. Used at the end of a unit (after students have completed many labs and activities), summary boards are a way to review, summarize, and present findings, and connect to a standard. Connecting to a standard and structuring the learning task helps to prepare students for future science experiences. In this article, we discuss how to use summary boards to review a unit’s lab activities.
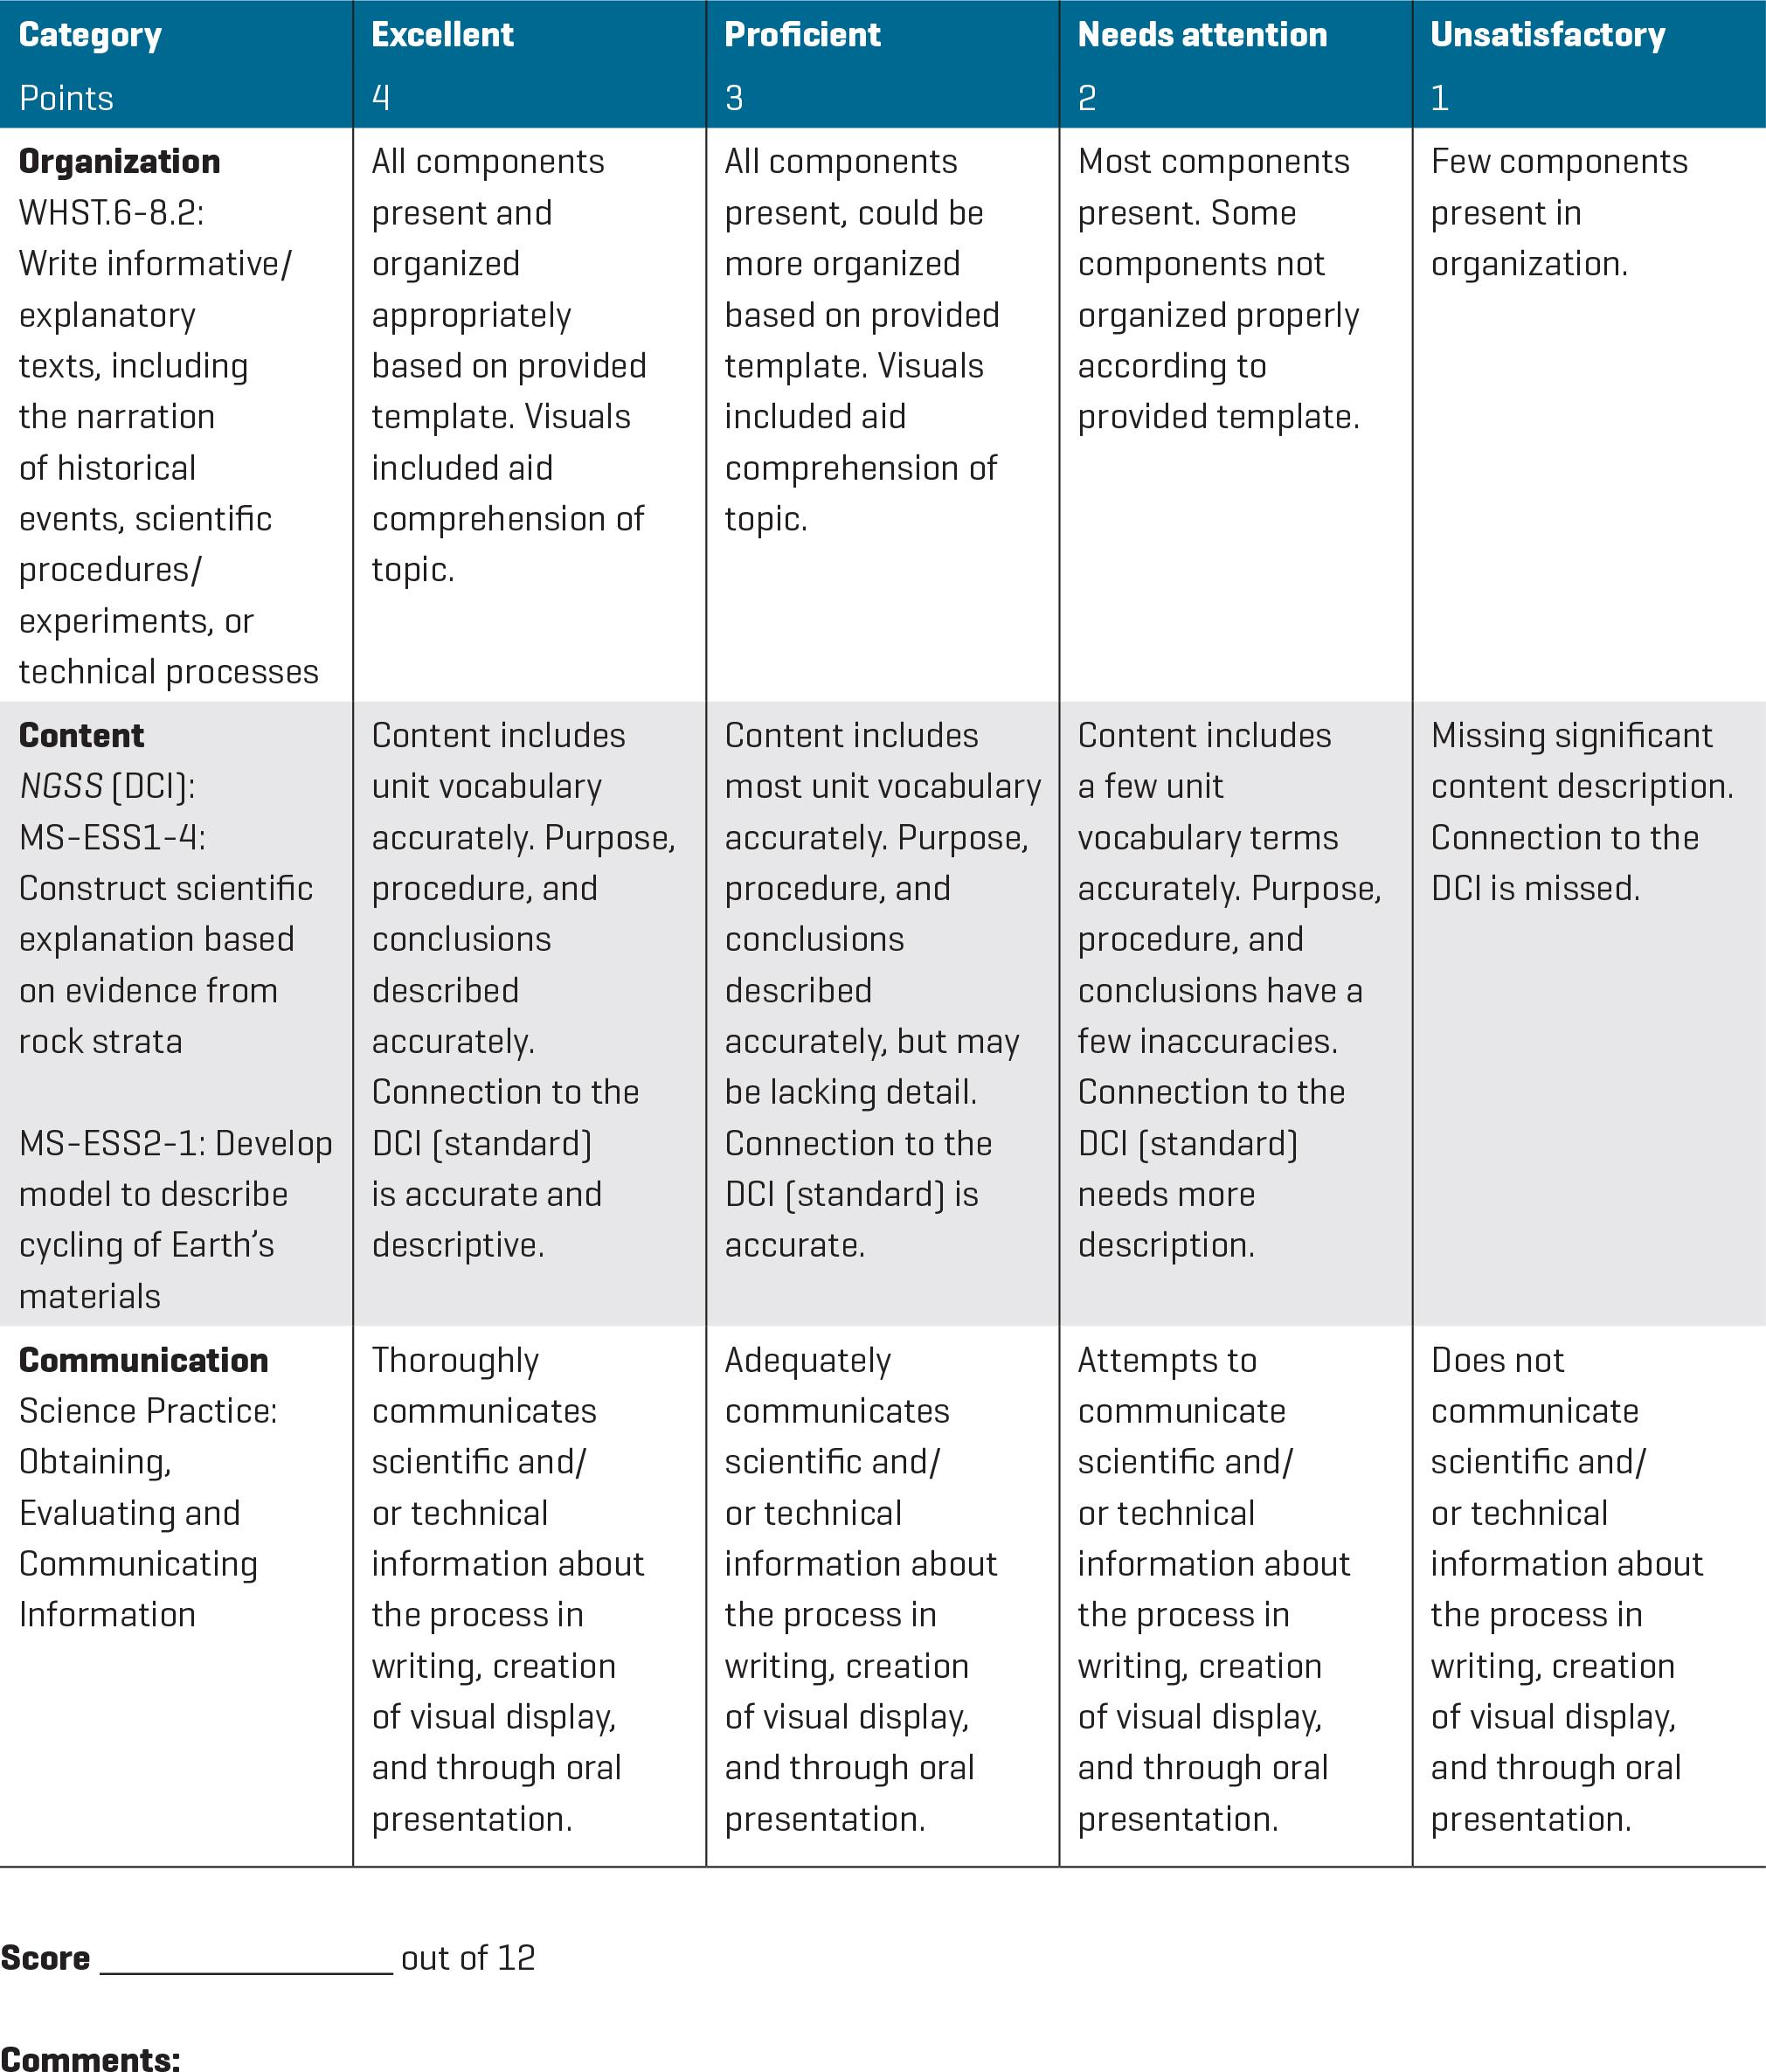
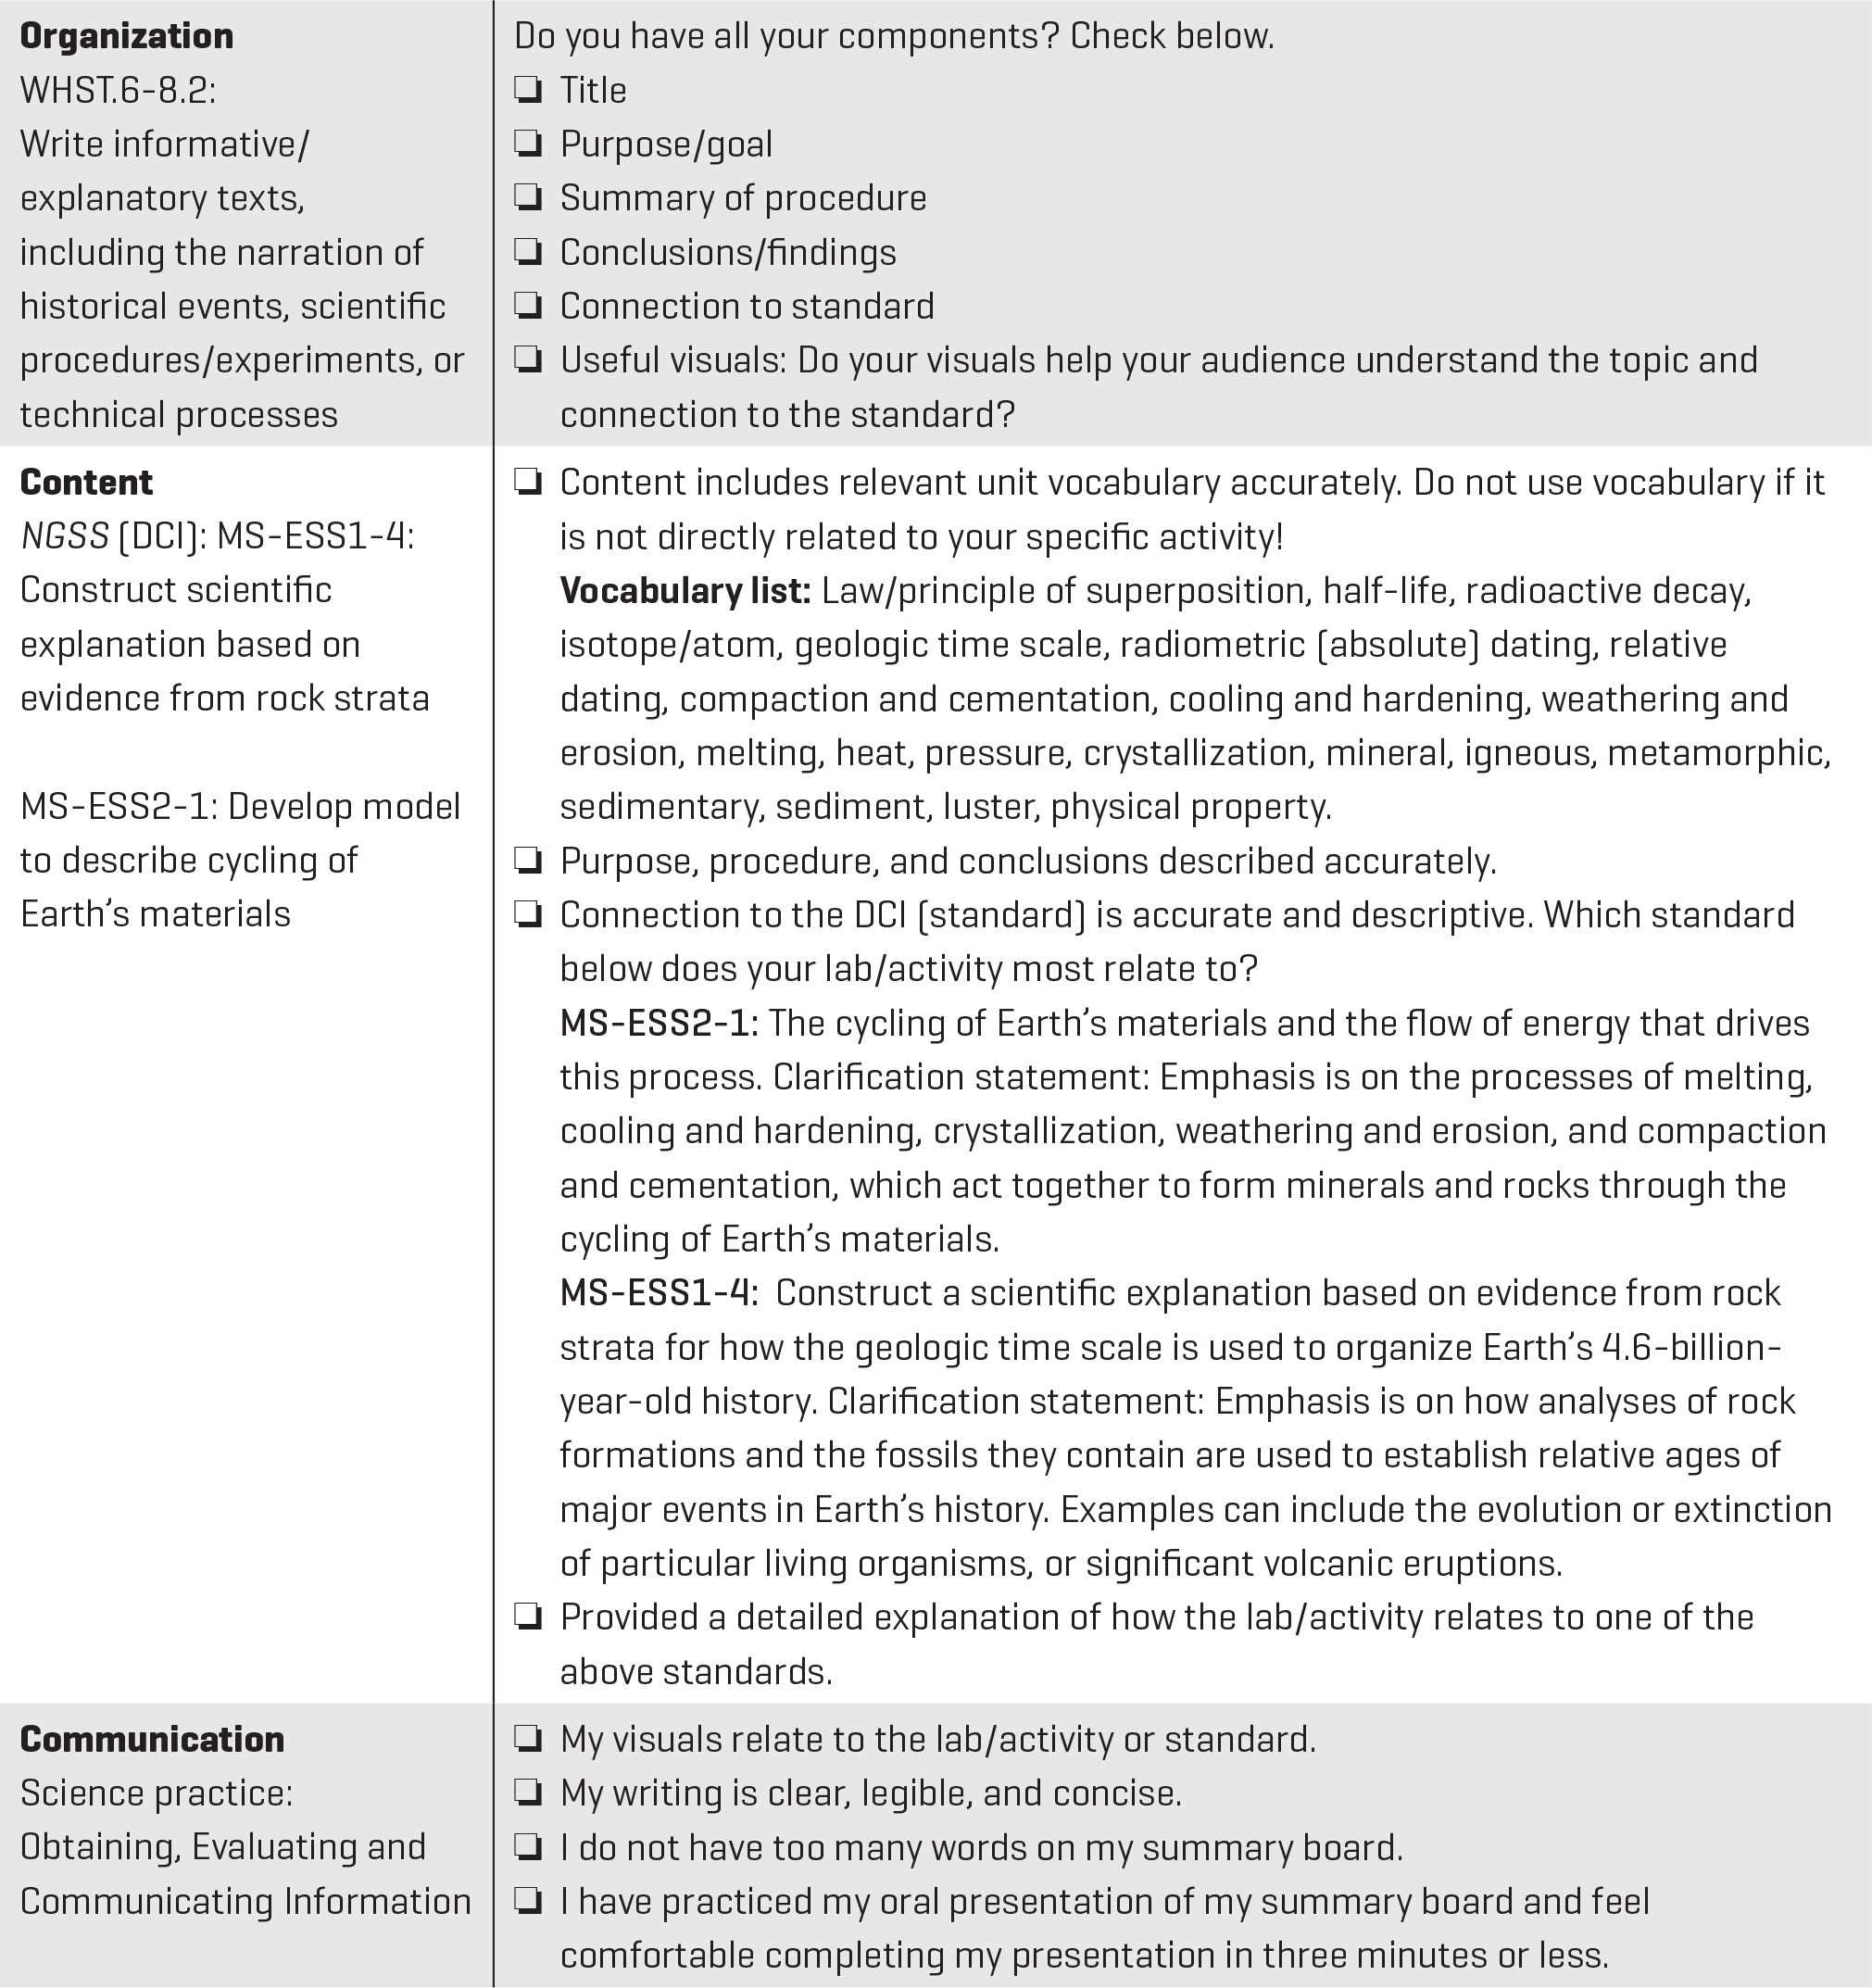
The first time students engage in this activity early in the school year, walk them through the process. Begin by demonstrating how to create a summary board, then move to a whole-class discussion that focuses on the positive aspects of the model board and areas for improvement, and ends with discussing how this approach helps to summarize classroom labs and activities. You can use a student-created sample from a previous lesson or year as a model. To create a model summary board, first begin by dividing the board into sections; this is not essential, but it will keep students organized. There are four main sections: purpose or goal of the lab, summary of the procedure, data or findings, and connection to the standard. Use one lab from the unit to develop a model summary board and write the lab title at the top of the board. Work as a class to show students how to complete each section. Include images, as they play an important part and tell the story. Finally, students should be guided by a rubric (Figure 1) and checklist (Figure 2). A rubric lists what needs to be included to receive a specific score and also gives students an opportunity to self-assess before submitting. A checklist is helpful because it is written in student-friendly language. The checklist includes: organization, content, and communication requirements (see Figure 2). A rubric or checklist can help students know the standards and vocabulary to include and helps them to stay organized.
Summary board rubric (teacher generated)
Summary board checklist by category (for students)
As a way to review topics, concepts, and vocabulary from your unit, develop a list of topics based on the labs and activities. After students see an example and participate in a discussion, have them choose their own summary board assignment related to a specific lab or activity from the unit. There may be some overlap, depending on the number of student groups, but peers can learn new or additional information during presentations. Generally, student groups have two or three students. Students may need some scaffolding to help them gather the needed information, so check in with each group and ask questions to determine their level of understanding. Some problems that may arise include using vocabulary incorrectly or inaccurately, or using incorrect data from a lab. Any gaps in understanding can be addressed during check-ins using guided questions. For example, ask the group of students: “Your findings show x, but your data shows y. Can you explain?”
Next, have students provide a rough draft on paper of their summary board design to be approved by the teacher before they create their board. The layout of the rough draft will be similar to their presentation summary board. This is a great way to quickly check for any missing components or provide suggestions for improvement. These steps help students develop confidence in order to be prepared to effectively communicate their work.
Evaluating summary boards
The summary board rubric (Figure 1) includes the process (what students need to do), content (what students understand), and performance (what students will communicate). Content includes the specific Disciplinary Core Ideas (DCIs) addressed in the unit. Assessing the DCIs will reveal student depth of understanding that correlate to the content. The process standard (WHST.6-8.2) is related to writing in the content area. Students are assessed on their ability to create, organize, and explain scientific informational texts related to the labs and content. A continuing initiative in our district is to increase student achievement in reading and writing. With consistent support in all content areas, this can be successful, especially when students read and write in science. Finally, the goal of student performance is for students to obtain, evaluate, and communicate scientific information clearly. Students are aware that they are being assessed on their ability to clearly communicate the main ideas and findings from a lab or activity. After presenting, if something does not seem clear or needs more explanation, a teacher or peer may ask clarifying questions to determine if the student group truly understood what they were presenting.
What makes a good summary board? Three parts: images, words, and feedback. First, students should use fewer words and more images because images play an important role in the discussion. An image can be a diagram, graph, chart, or model. Second, when scientists communicate, they use Tier 3 or domain-specific words, commonly defined as low-frequency, subject-specific words, such as cell division, conservation of energy, or igneous rock (Marzano and Pickering 2005). Add rigor to students’ work by encouraging them to use Tier 3 vocabulary on their summary board. To do this, guide students to circle any Tier 3 words (on their design draft) related to their topic such as igneous or crystallization. These are vocabulary words that could be used on the summary board and in the presentation. Tier 3 vocabulary words are specifically addressed through the rubric (Figure 1) and checklist (Figure 2), but depend on the unit content. Third, after the presentation, peers give feedback to the presenting group by writing on a peer feedback form. This includes providing two positive areas, identifies one area for improvement, and includes any questions they may have for the presenting group.
Managing the process
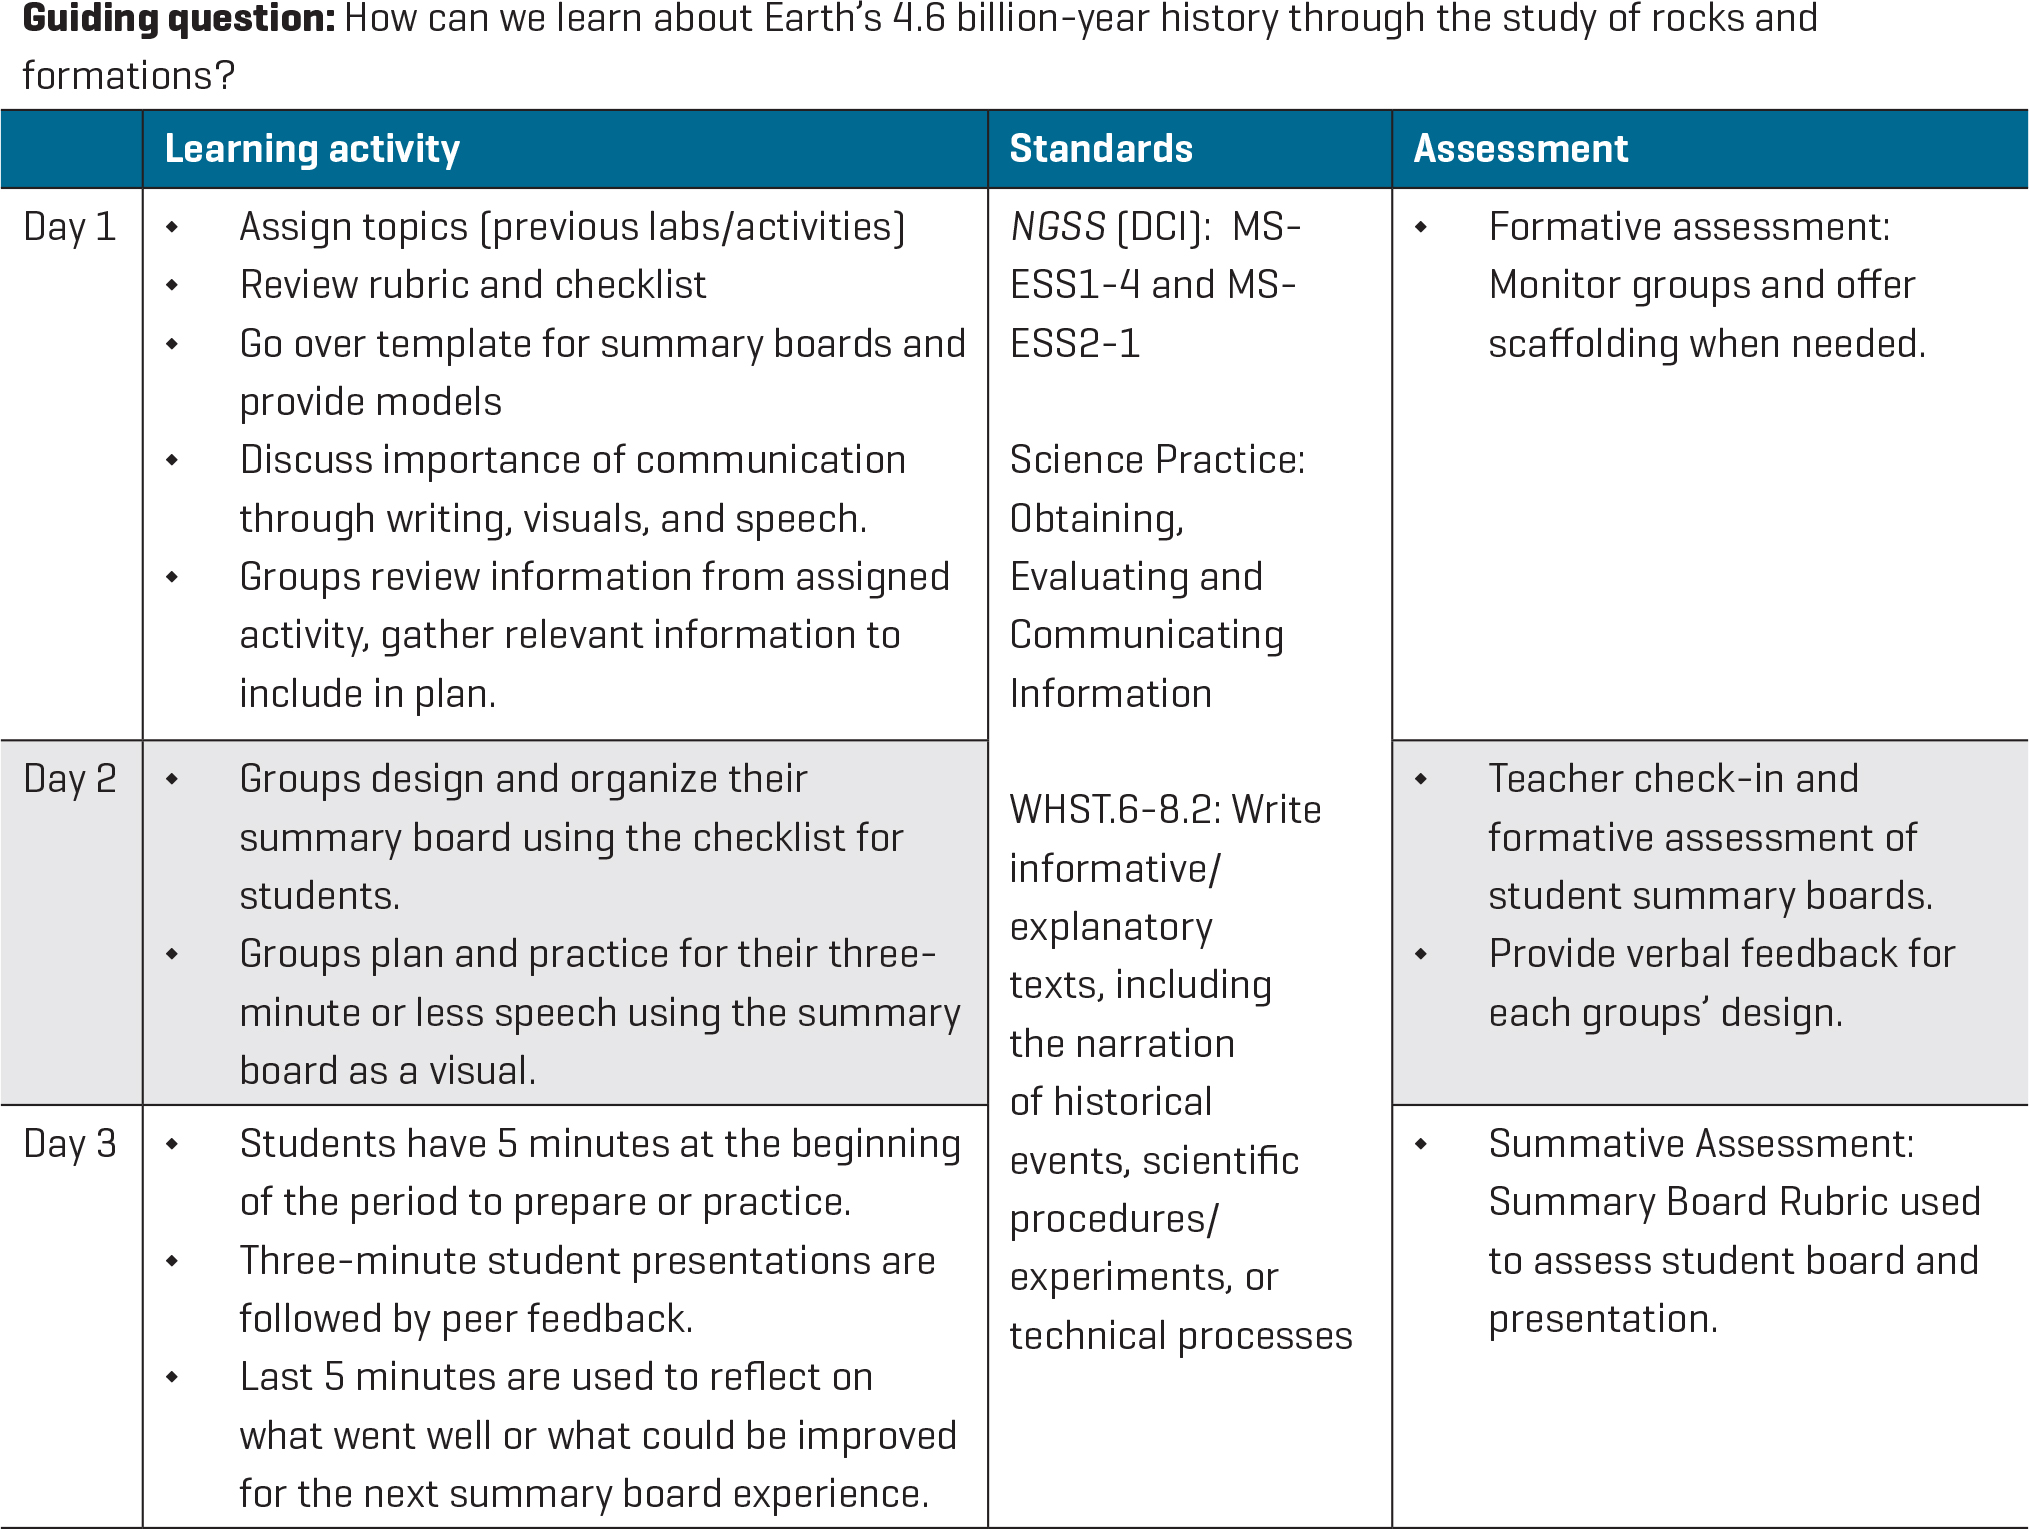
Students need three to four 40-minute class periods (Figure 3) to gather information, summarize their findings, create summary boards, prepare their elevator speech (a short description of a concept) and present. You can create student groups based on similar learning needs, or by grouping students with diverse abilities and characteristics. The optimum group size is two students which allows for collaboration but still challenges each student to show what they know. Classroom management will vary depending on your students, but remember to use a timer to help students stay on task. Offer praise during small- and whole-class discussions because this builds students’ confidence. Use nonverbal communication to redirect students and, if needed, write a small-group or whole-class contract to encourage collaboration. Assign roles to each group such as time manager, text recorder, and image maker. To differentiate, implement strategic grouping for students who might not have the handwriting or drawing skills necessary for the product. Another method is to have students print or digitally create images if necessary. You could also provide an extra resource such as the article that accompanied the lesson or allow students to access documents previously turned in. To recap: Day 1 is design and gather information; Day 2 is to finish the design and practice; Day 3 is create the board and present. To successfully use summary boards with multiple classes, provide a specific time frame for the class period. One suggestion is seven minutes for each group to draw and prepare their summary board, three minutes for one group to present, and one minute for feedback. Repeat presenting and feedback until all groups have communicated. Then, erase the boards and you are ready for the next class period!
Three-day lesson plans for summary boards
Money-saving tip: Consider purchasing white shower board from your local hardware store. A 244 cm × 123 cm (96 in. × 48 in.) board will create four summary boards. This inexpensive board (about $15) can be cut at the hardware store.
Conclusion
Students liked completing summary boards because they got a chance to create; they like working on the “big” space of a summary board; and they liked presenting because it felt like a performance.
During presentations, students get the opportunity to listen and learn from their peers. This process can help students form opinions based on evidence as they look at the experience through another lens. Summary boards allow students to summarize information, analyze data, and refresh their memory of the experience.
Teaching Strategies Middle School