
feature
Modeling Magnetism With the Floating Paper Clip
Supporting Diverse Learners With Visual and Linguistic Scaffolds
Science Scope—July/August 2021 (Volume 44, Issue 6)
By Sarah Braden, Lauren Barth-Cohen, Sara Gailey, and Tamara Young

CONTENT AREA Physical Science
GRADE LEVEL 6–8
BIG IDEA/UNIT Magnetic fields
ESSENTIAL PRE-EXISTING KNOWLEDGE None—background is built through the lesson
TIME REQUIRED 5.5 class periods (about 1 hour each)
COST Varies depending on materials available in the classroom
SAFETY Appropriate safety protocols should be followed for the use of nails, sewing needles, and magnets. Safety goggles are recommended for each of the stations.
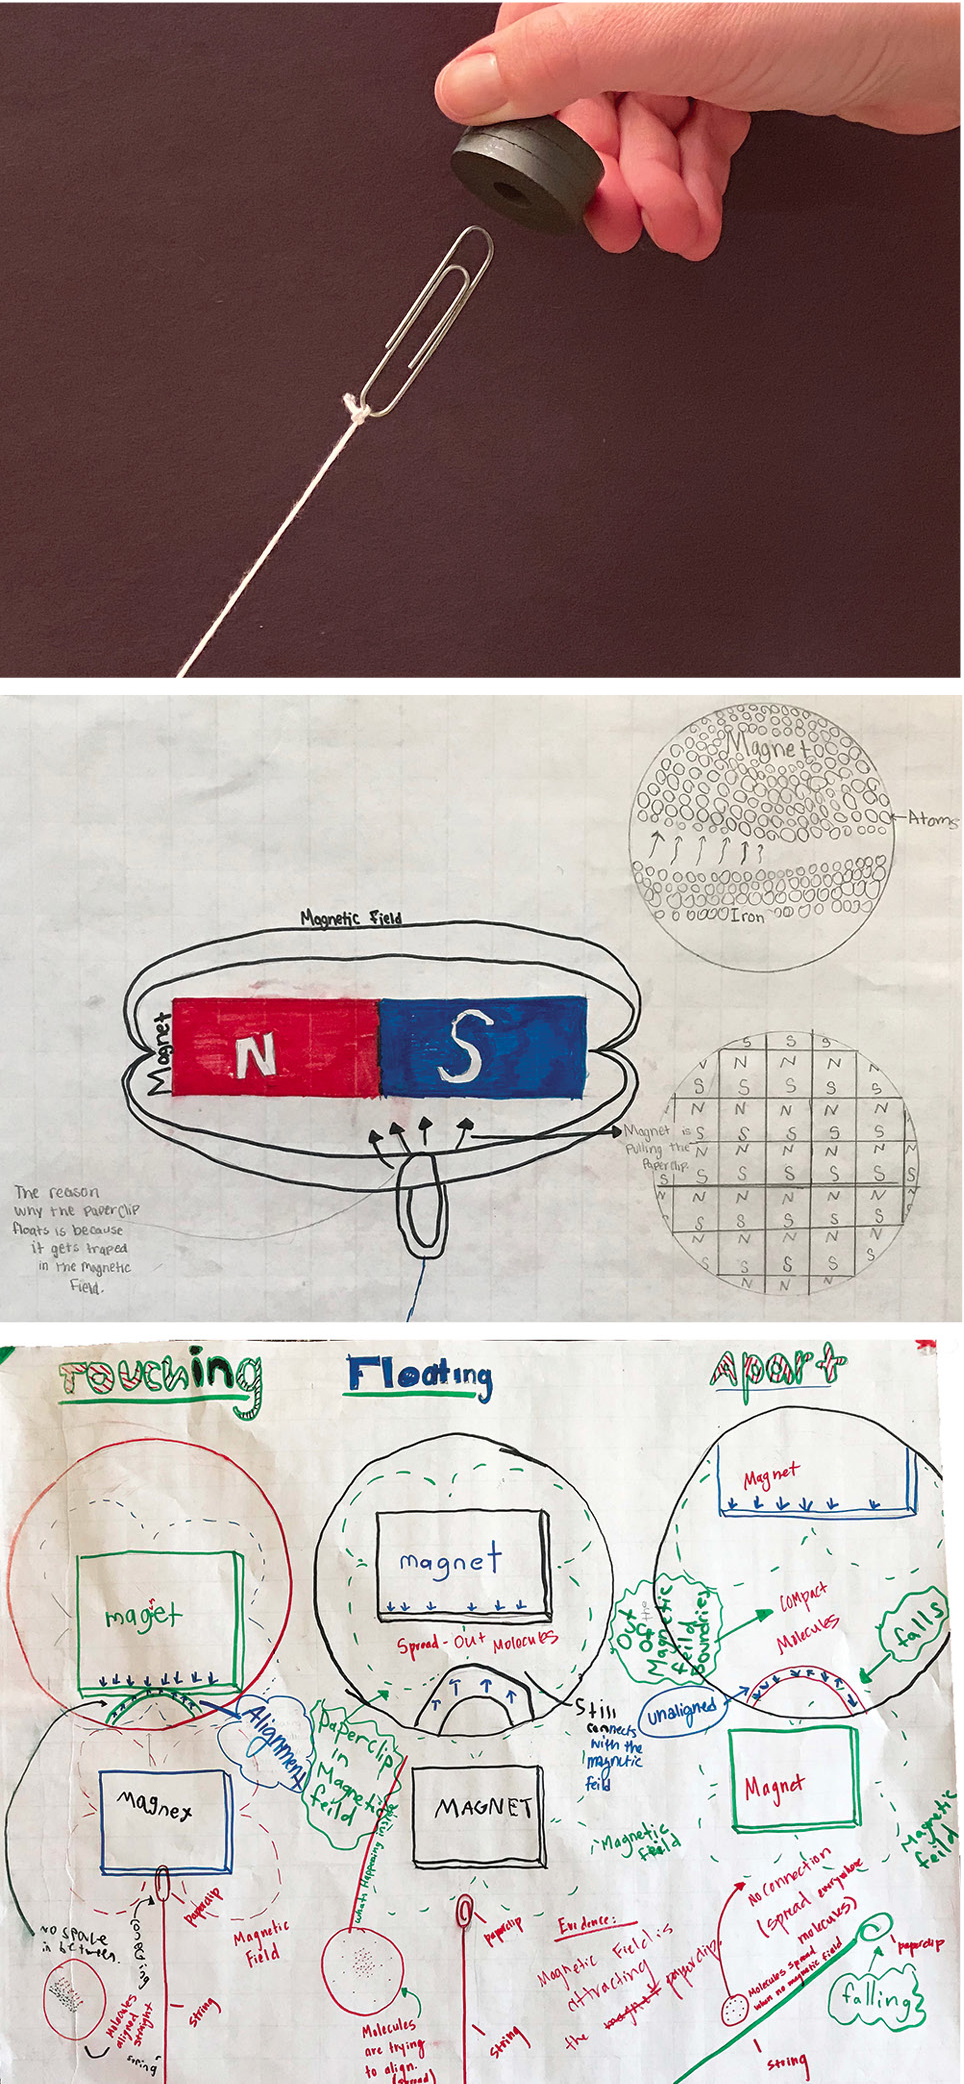
Scientific models are ubiquitous in STEM disciplines because they are the products of extended scientific reasoning and they offer explanatory power. However, when they are used in K–12 classrooms, students may be asked to recreate visual representations of ideas developed by scientists, as opposed to the students themselves engaging in the scientific thinking that generates the model. We share here an example of how to engage diverse middle grades students in the Next Generation Science Standards (NGSS; NGSS Lead States 2013) practice of modeling (see Supplemental Materials for the NGSS chart with connections to the standard MS-PS2-5). We offer a classroom-tested framework for how to scaffold instruction to build students’ scientific visual literacy and conversation skills through modeling magnetism in the phenomenon of the floating paper clip (see Figure 1).
Modeling instruction
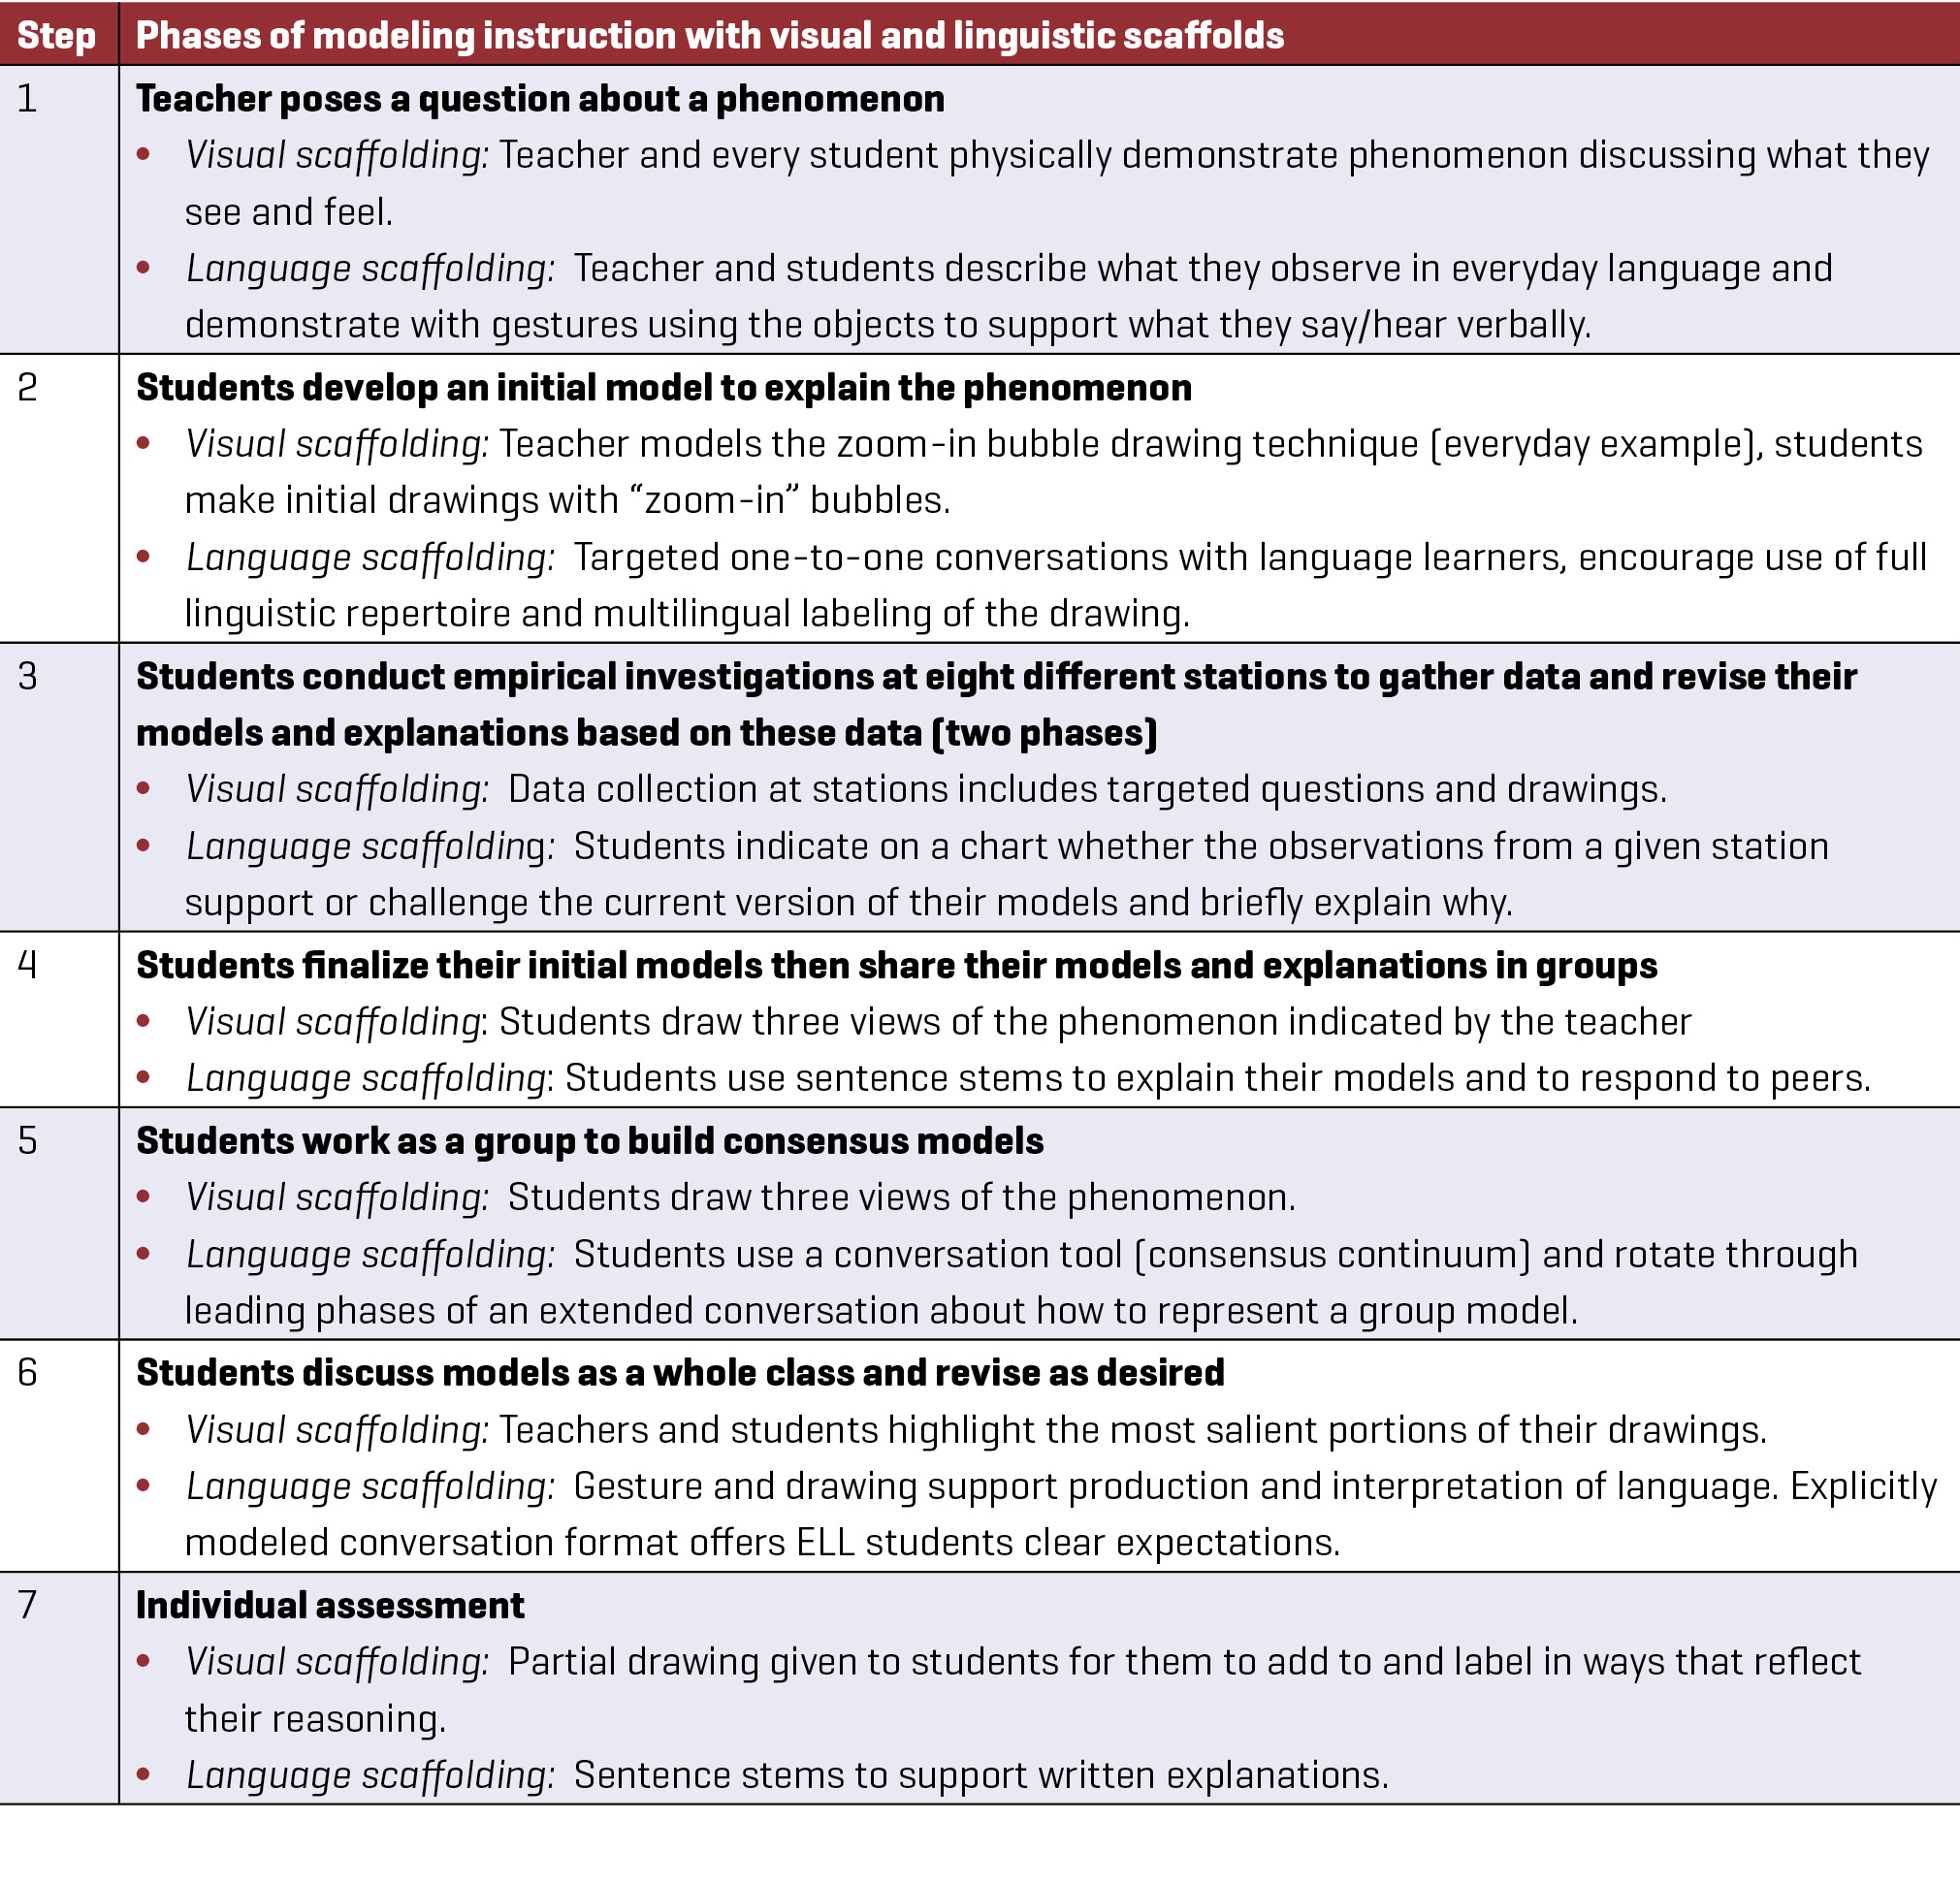
Central to helping students to develop models is the understanding that scientists develop models for explaining phenomena, not as representations of phenomena (Passmore, Schwarz, and Mankowski 2017). In this lesson, students develop a model to explain how magnetism works by hypothesizing about what is happening inside of a magnet and inside of a “floating” paper clip (see Figure 1). To enact modeling as a process of developing an explanation that attends to students’ needs for scaffolding to support their visual literacy and language development, we developed the framework and scaffolds outlined in Figure 2 (informed by Passmore, Schwarz, and Mankowski 2017; Kenyon, Schwarz, and Hug 2008). The framework specifically attends to visual and linguistic modes of communication because these modes are intrinsically part of scientific modeling.
Visual literacy and talking science with diverse students
Science education scholars have shown that scientific thinking involves integrating various modes of learning such as speaking, drawing, gesturing, and writing (Goodwin 1994; Lemke 2002). Yet, designing instruction that strategically integrates these modes can be challenging. In the context of modeling instruction, teachers must be ready to formatively assess learning through drawings, talk, manipulation of physical objects, and gestures. Visual literacy does not develop alone; rather it is integrated with these other modes. Designing instruction for this integration of modes creates both opportunities and challenges. An instructional opportunity for teachers of students labeled as English language learners (ELLs) and students who may struggle to express their thinking through language includes the ability to offer those learners additional modes of expression to support their interpretation and production of language.
Challenges related to equity include finding effective ways to scaffold students’ development and integration of visual and print literacy while also managing the social dynamics that impact the effectiveness of small-group work. While the consensus phase of modeling instruction (see Figure 2, Step 5) allows students to refine their thinking and engage in reasoning and communicative practices mirroring those of scientists, collaborative learning can also create spaces where inequitable hierarchies and predictable “science expert” students emerge. When this happens, female, Latinx, students of color, and students labeled as ELLs can be left out of important conversations (Braden 2019), thereby decreasing everyone’s learning opportunities (Oliveira et al. 2014). To overcome this challenge, this lesson embeds “talk moves” (Michaels and O’Connor 2012) into modeling instruction. Talk moves are phrases and sentence starters that engage students in scientific talk by structuring how they share, rephrase, challenge, or cite evidence for ideas and explanations (Michaels and O’Connor 2012). By combining best practices for modeling instruction, which includes a strategic approach to drawing and redrawing ideas, with language scaffolds we demonstrate how teachers might leverage visual literacy and talk moves to equitably engage students in the NGSS practice of modeling.
The instructional context
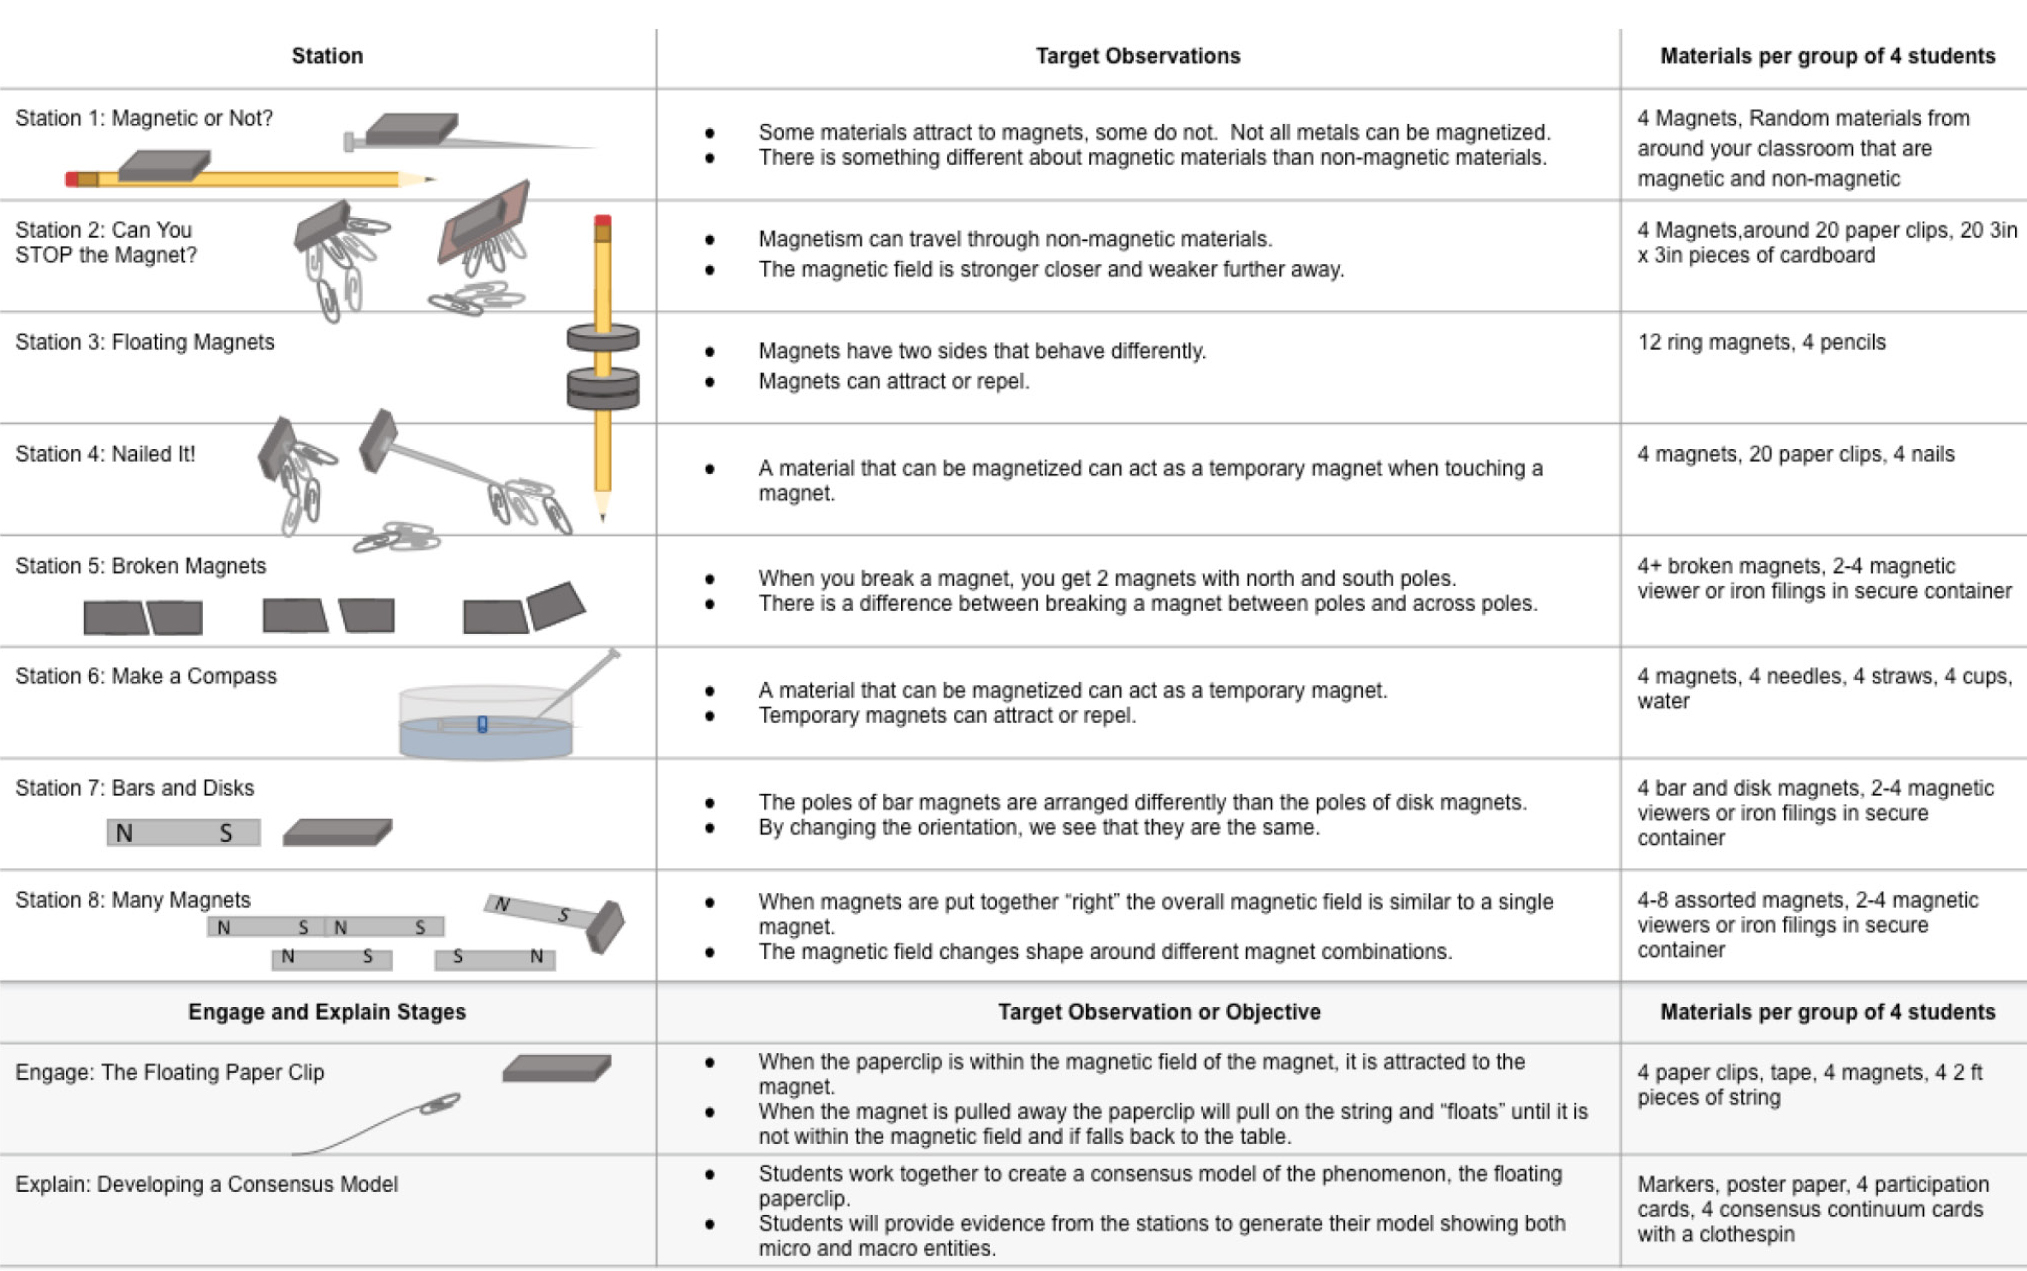
This lesson covers almost six hours of instruction and has been conducted in numerous diverse seventh-grade classrooms. The lesson is specifically designed to build the necessary background knowledge for success within the lesson. Teachers whose curriculums include magnetism are likely to have many of the necessary materials on hand; specialty items include iron filings and magnetic viewers. Magnetic viewers can be purchased premade or can be made by placing iron filings in a sealed clear plastic container (e.g., a petri dish). A detailed list of materials for each station, and the quantities required for four students per station, appear in Figure 3. Teachers may plan to have students rotate to different stations in their groups to maintain four students per station at a time, or to put the station materials on trays that can be rotated to groups by designated student assistants. Either way, the teacher should plan to signal when students will rotate stations in order to pace the lesson and sufficiently apportion materials.
Planning for student groups
In this lesson it is necessary to strategically construct groups to ensure that small-group dynamics support rather than prevent students from engaging in meaningful, equitable, and scientifically productive conversations. There is no single best approach for grouping multilingual students because of the superdiversity of this group of learners. Students labeled as ELL differ in cultures; national origins; time spent in the United States; languages spoken and proficiencies in non-English languages; and, of course, English language proficiency levels both composite and across modes (reading, writing, speaking, and listening). Teachers should consider their students’ backgrounds across these dimensions and use this information to maximize students’ opportunities to experience linguistic support in peer groups. For example, this may include pairing ELL students at the same English proficiency level together and offering leveled English language scaffolds, or pairing ELL students with English-proficient bilingual peers who have volunteered to work in another language.
Conducting the lesson
Engage (Figure 2, Steps 1 and 2, 20 minutes)
To begin the lesson, a paper clip, piece of tape, string, and a magnet are distributed to each student in the class, and the teacher reminds students of safety precautions. Precautions for this lesson include care when handling strong magnets, wearing safety goggles, and safe handling of sharp objects. Each student should work with their own materials to feel the pull of the magnet on the paper clip—a physical experience that supplies knowledge to support their drawing, writing, and talking about the phenomenon. The teacher demonstrates how to tie the string to the paper clip, tape the string to the desk, and make the paper clip “float” (see Figure 1). As the students experience the floating paper clip phenomenon, the teacher explains that the students are going to generate explanations for how this phenomenon works. Through drawing (with no written explanation required), students begin developing a model to explain how the magnet causes the paper clip to float. The teacher introduces the concept of a “zoom-in” bubble to represent “small things that cannot be seen with the eye” (micro-level entities), and students are encouraged to include one bubble along with labels in their drawings. To transition to the “Explore” stage, the teacher states that students will now have a chance to gather evidence, in the form of observations, to support and revise their models. Teachers may choose to hold a whole-class discussion at this time for the purpose of building a class list of initial ideas to revisit in the future. Teachers should not offer evaluative feedback at this time—the point of the lesson is for students to reason through the development of their own evidence-based model. Alternatively, teachers may focus the discussion on modeling or engaging in argument from evidence as relevant practices for this lesson, ideally making connections to recent lessons.
Explore (Figure 2, Step 3, 2 hours or 120 minutes)
At this time teachers should place students in groups of four following the grouping considerations outlined previously. Students remain in their same group for the Explore and Explain stages. In this phase of the lesson (Figure 2, Step 3), students collect data and revise their models in two rounds. Each round involves visiting four stations to make observations and then reviewing and if necessary revising their model to accommodate their new understandings of how magnetism works. Each of the eight unique stations (see Figure 3) was designed to allow students to notice a particular property of magnetism. Students spend anywhere from 10 to 20 minutes exploring each station drawing pictures, answering questions, and noting their own questions and observations in their science journals. The observations from each station serve as evidence for students to justify their thinking in their models. Teachers should be aware that students are likely to experience uncertainty in hypothesizing about what takes place at the micro-level based on their macro-level observations. In particular, we have observed students struggle with the dipole nature of micro-level entities, the behavior of these entities during temporary magnetism, and why a broken magnet physically fits back together but the two pieces nonetheless repel each other. To scaffold students’ thinking, the teacher should ask strategic questions to call students’ attention to various properties of magnetism from the stations (see Figure 3).
Explain (Figure 2, Steps 4 and 5, 2 hours or 120 minutes)
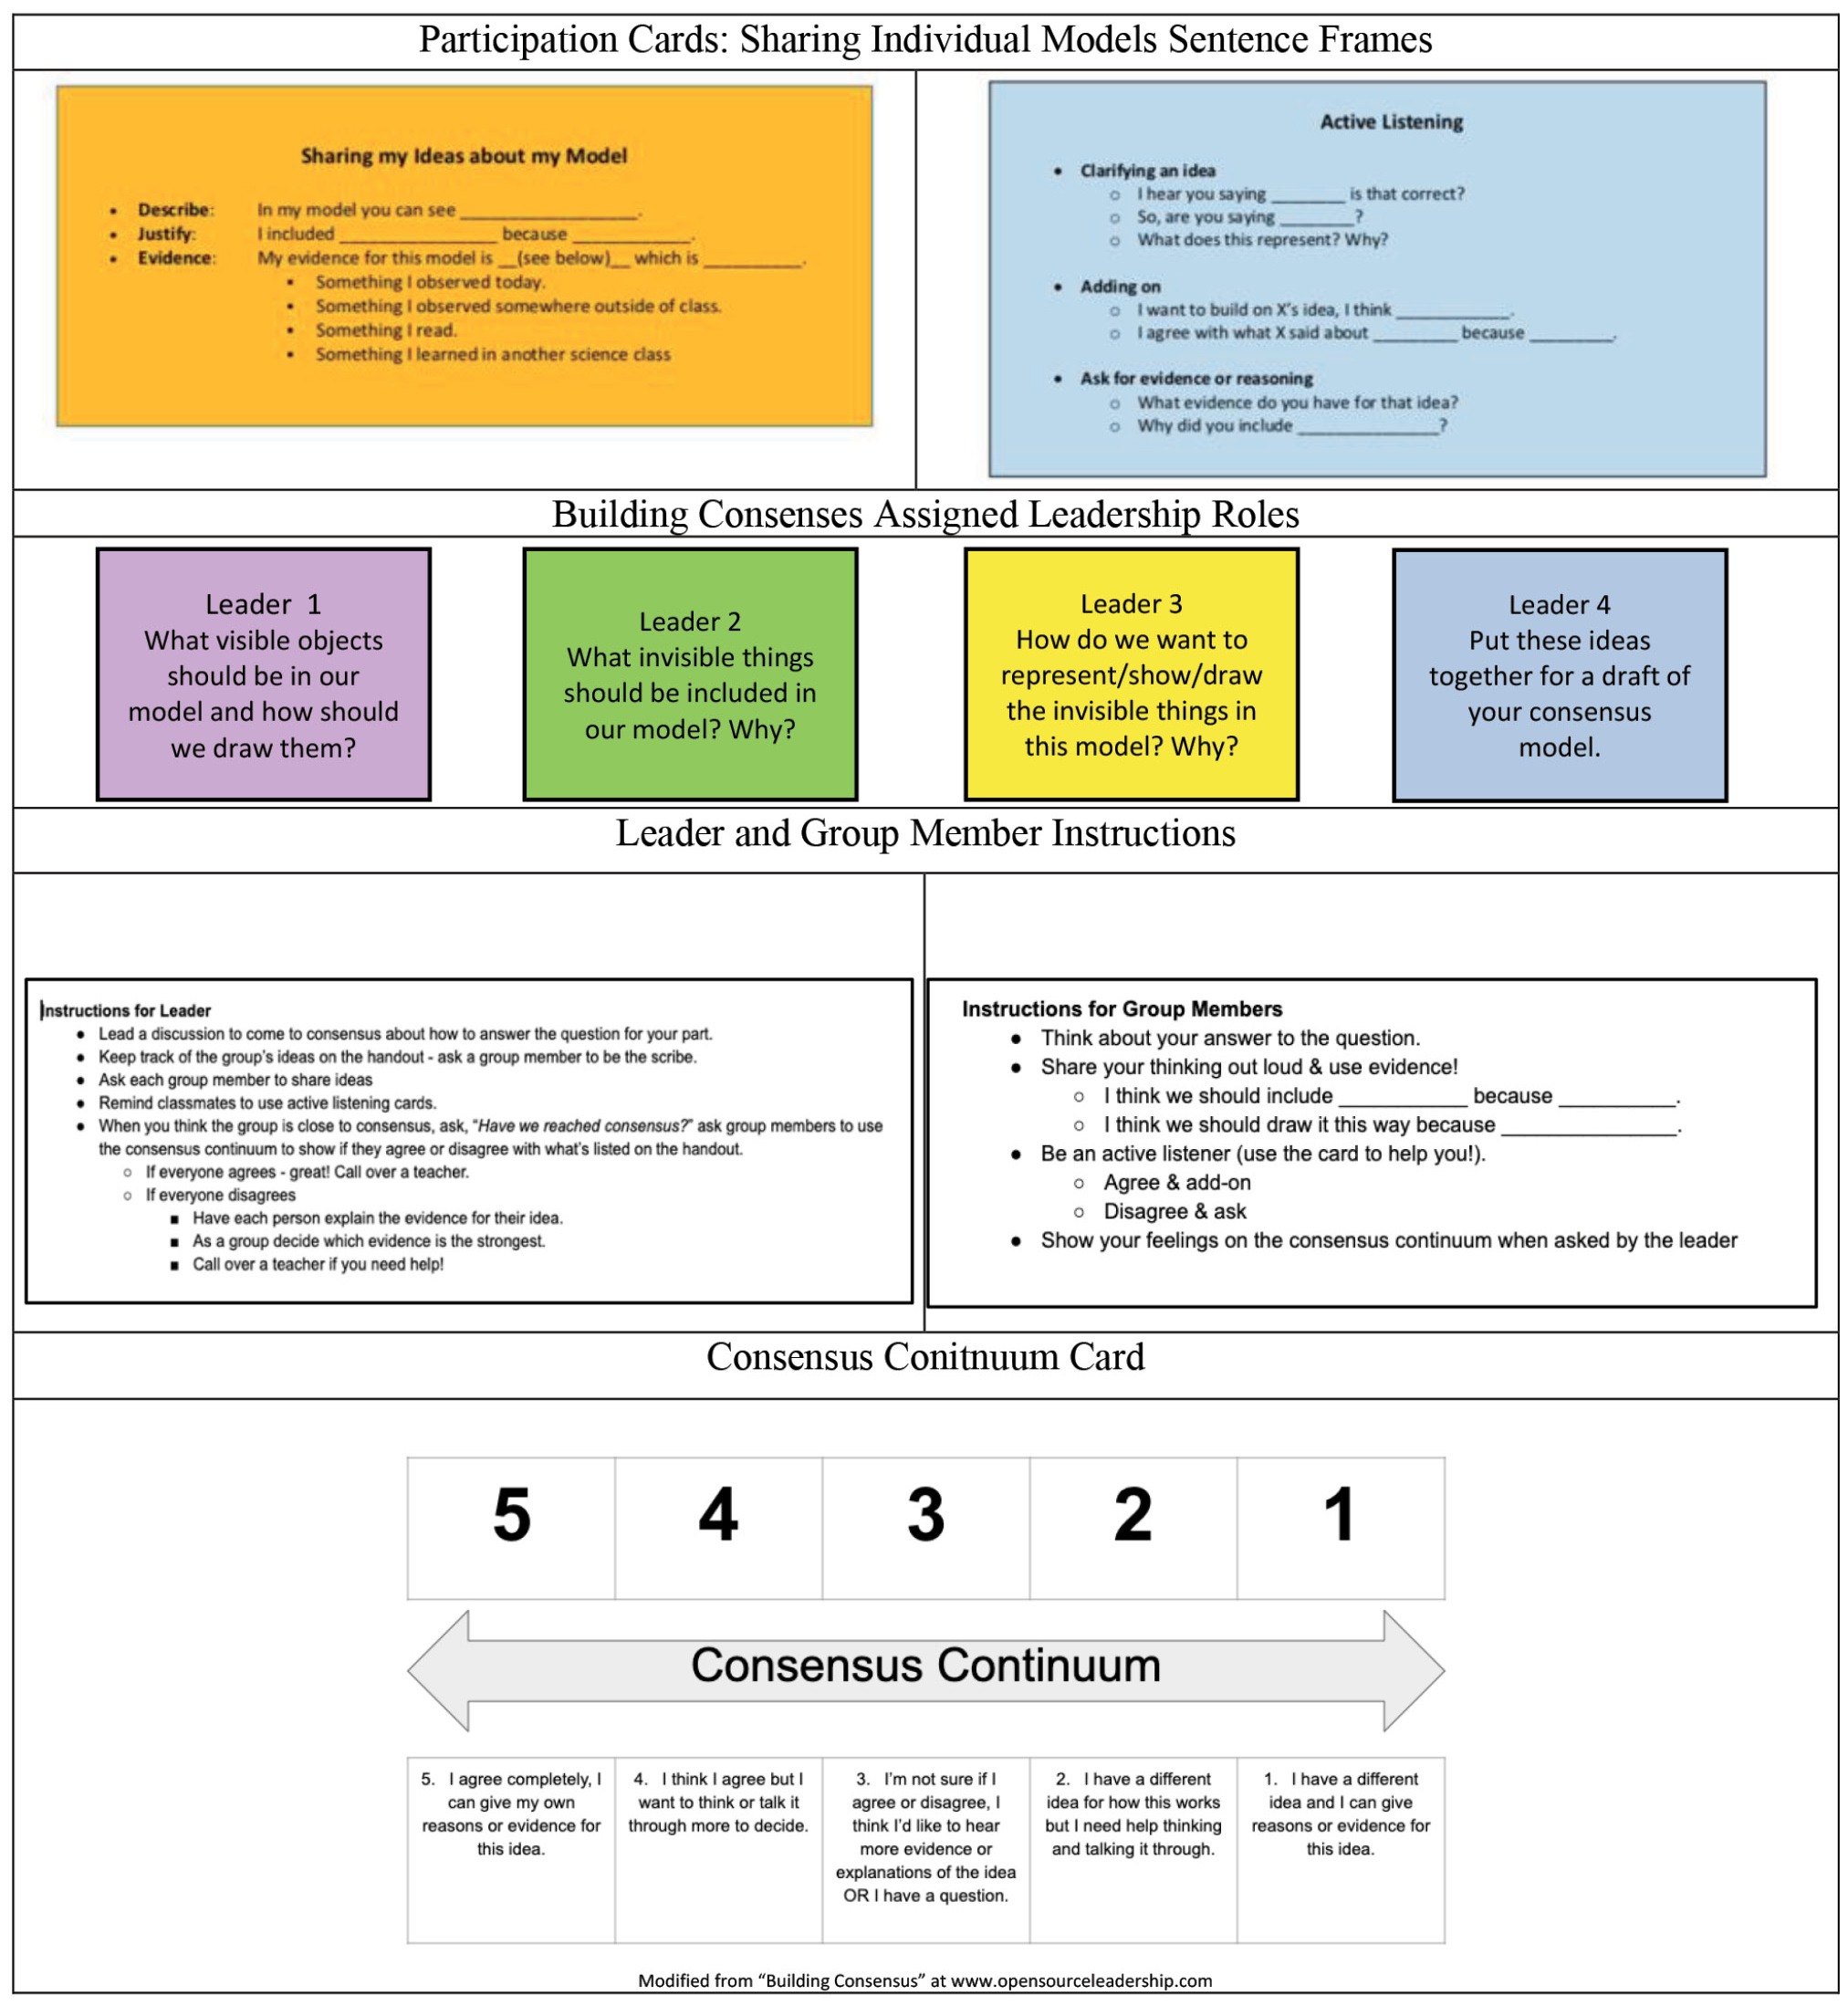
After viewing the stations, the students revisit their independently drawn models one additional time to organize their thoughts and make revisions. The students prepare to share their models and explanations with their peers using color-coded participation cards for the roles of “presenter” and “active listener” (see Figure 4). The sentence stems on the cards include prompts for describing and supplying evidence to support a model and question starters to help the listening students engage with the ideas of the presenter. Teachers should model how to use these cards in a whole-class discussion and clarify that students should focus on sharing observational evidence from the lesson to support their models. Evidence from secondary sources (e.g., a drawing seen in last year’s textbook) can be discussed as it relates to observational evidence in this lesson. After each group member shares their individual model, the group moves into the consensus-building phase.
Step 5 of instruction contains two key scaffolds to promote equitable and high-quality science conversations and leads the students through the process of developing and drawing a group model to represent the phenomenon: (1) a scaffolded consensus conversation with rotating leadership roles and (2) use of the consensus continuum (see Figure 4). In Step 5 the teacher explains that the students will work together to create a group model and that each student in the group will be the leader for a different step in preparing the group model (see Figure 4, Parts 1–4; color-coded for ease of role assignment). Our sequence for collective drawing has been refined over time to support students in synthesizing ideas and determining how best to represent those ideas visually. Students start by identifying “visible” entities to include in the model. Then students discuss how to represent “invisible things” in the model. Invisible things include magnetic field lines (macro-level) and molecular or atomic structures (micro-level). Additional conversation cards offer guidelines for students to navigate their roles as leaders and group members (see Figure 4). As indicated, the leader periodically checks in with the group using the consensus continuum, which is a laminated card held by each student with a clothespin for marking their stance on the continuum. Essentially, when there seems to be a point of agreement on how to represent a component of the group model, the leader asks the group, “Have we reached consensus?” Students then indicate their agreement or disagreement related to the given idea by marking their stance with the clothespin and enter into further discussion as needed to resolve differences. This tool helps to ensure that each student has a chance to participate in the conversation. The teacher circulates and listens closely to these conversations, intervening only as needed to help the students reach consensus. Teacher interventions may include asking students to restate, add on to, or provide evidence for their ideas. By Part 4, the students are ready to draw their group models and each group member is required to draw one component of the model.
Evaluate (Figure 2, Steps 6 and 7, 1 hour)
Once students complete their group models, the teacher selects groups to share their models in a whole-class discussion, aiming to share a diversity of models to deepen students’ thinking. Students should be asked to listen to each group’s presentation and then indicate by show of fingers if they: (1) agree completely and can cite evidence to support the model, (2) have a question about something they don’t understand, or (3) disagree with something and can cite evidence to support their counter claim. Teachers should post these ways to respond and model each one so that students understand the format of the conversation. The presenting group calls on their peers. It is helpful to have a set of the materials from the stations available to students during this conversation so that they can physically show evidence in addition to explaining it verbally. After a subset of groups present their models, the teacher may ask the students to get back into groups to determine if they want to revise their group models.
Step 7 is the final step for the lesson, and the teacher may use an individual assessment requiring students to apply their model for how magnetism works to a different magnetic phenomenon (see “grading rubric,” “individual assessment,” and “magnetism phenomenon explanation for individual assessment” in Supplemental Materials). The success of this lesson depends on the teacher’s ability to assess and respond to students’ thinking formatively as they work on their models independently and in groups, not only in a summative assessment. In any assessment the teacher should look for the following as evidence of scientific thinking:
- Micro-level entities present in the model (e.g., arrows, dots, small shapes; this requirement comes from direct instruction on using “zoom-in” bubbles and does not correlate with any one station).
- Arrangement of entities indicates some degree of polarity within magnetic materials and lack of polarity in nonmagnetic materials (e.g., arrows pointing in the same direction in a magnetized material and in all directions in a nonmagnetic object; stations 3, 5, 7, and 8 get at polarity; stations 1, 4, and 6 highlight differences between magnetic and nonmagnetic materials).
- Arrangements of entities indicate that the effects of magnetism can travel through space between objects that are not touching (stations 2, 3, and 6).
- Representation of field lines is present and accurate (not necessarily canonical; stations 5, 7, and 8).
- Verbal and written explanations mention observational evidence from the stations to justify thinking (sentence stems and teacher modeling and questioning facilitate this).
The drawings should represent deep evidence-based scientific thinking. If students’ models are inconsistent with canonical drawings and explanations (e.g., field lines in Figure 1C), the teacher may use additional experiences to challenge or refine students’ thinking. A teacher may choose to show students scientists’ drawings of how magnetism works. The conversation should focus on how students have creatively and accurately depicted many of the properties of magnetism shown in these images, and comparisons between student-generated and scientists’ drawn models should focus on evidence.
Tips for implementation
Templates that show the macro-level objects and have space for students to draw what they hypothesize is occurring at the micro level may be used to scaffold visual literacy. Templates can set up a number of “views” (arrangements of the macro-level objects) to draw students’ attention to thinking visually about various aspects of the phenomenon. Requiring students to include three views of the magnet and paper clip (see Figure 1C) in this lesson leads to important conversations about the temporary magnetism of the paper clip. Teachers should involve students in developing drawing templates as the decisions about what to include or exclude offer opportunities for scientific thinking. In addition, teachers who regularly use journaling in their instruction may choose to add additional writing scaffolds and practices to this lesson.
Elaborate
Teachers might consider including this lesson in a larger unit on the relationship between electricity and magnetism. Such a unit could include an engineering challenge related to designing renewable energy solutions for generating electricity to reduce greenhouse gas emissions (e.g., hydroelectric, wind) or designing and building simple motors. Combining this lesson with a larger exploration of magnetism and electricity would have the benefit of creating opportunities for students to further grapple with their models, observations, and explanations of magnetism and revisit more perplexing related phenomena such as temporary magnetism.
Applications to other lessons
The tools presented here for scaffolding the integration of visual literacy with other modes of science learning can be applied in other lessons:
- The framework offered in Figure 2 can be applied to modeling any phenomenon. Teachers will need to adapt the drawing prompts and the data collection phase (see Figure 2, Step 3) to relate to the new phenomenon.
- The language scaffolds (sentence frames and starters) can be used to guide students during whole-class and small-group discussions about any visual representation. Teachers may find the “Talk Science Primer” (Michaels and O’Connor 2012) to be a useful resource for identifying additional scaffolds for structuring science conversations.
- The consensus-building scaffolding (structured conversation and continuum) can be used in any small-group science conversations where students are asked to synthesize and grapple with each other’s ideas.
Conclusion
Modeling instruction enables teachers to cultivate and leverage students’ visual literacy to support all learners in thinking, drawing, and talking like scientists. While differentiating instruction for diverse students is often portrayed as an instructional challenge, the focus on scientific practices in the NGSS offers teachers a chance to reconceptualize diverse classrooms through an asset-oriented lens. By designing instruction that builds from students’ diverse skill sets as well as their science and language knowledge, we offer teachers and students new opportunities for science learning. •
Supplemental Materials
Connecting to the Next Generation Science Standards
Magnetism phenomenon explanation for individual assessment
Sarah Braden (sarah.braden@usu.edu) is an assistant professor and Sara Gailey is a doctoral student, both in the School of Teacher Education & Leadership at Utah State University in Logan. Lauren Barth-Cohen is an assistant professor in the Department of Educational Psychology and adjunct in Physics & Astronomy, and Tamara Young is a doctoral student in Physics & Astronomy, both at the University of Utah in Salt Lake City.
Literacy Physical Science Middle School