
Feature
After-School STEAM Club Connects Botany, Art, and Gaming
CONTENT AREA Botany
GRADE LEVEL 6–8
BIG IDEA/UNIT After-School STEAM Club
ESSENTIAL PRE-EXISTING KNOWLEDGE N/A
TIME REQUIRED 10 hours (i.e., 2 hours per week for 5 weeks)
COST $7/macroscope lens; $6/ Reach for the Sun Account (can be reused)
SAFETY Check with the school nurse to make sure none
of the students has severe allergies to pollen; students that do will need goggles.
This article details an exciting after-school program that encouraged students’ interest in science through the integration of flowers, art, and technology. The STEAM After-School Club was a collaborative effort between the Communities in Schools organization and local university science education faculty. Communities in Schools is a national organization whose mission is to connect community resources with schools and students that need them most. The organization aims to “empower success for all students by removing barriers for vulnerable students at risk of dropping out, keeping kids in schools and on the path to graduation by leveraging relationships and local resources to drive results.” One afternoon a week for 5 weeks after school, university faculty worked with approximately 15 middle school students as they explored how science understanding could be enhanced through art and technology. This project focused on the structures and functions of flowering plants. The after-school sessions followed a modified version of the 5E instructional model.
Engage
Students viewed a four-minute excerpt from “Wings of Life” to experience the phenomena of pollinators’ role in the process of seed production. The short excerpt is titled The Beauty of Pollination—Moving Art (Schwartzberg 2011). This video uses magnification and slow-motion footage to draw attention to beautiful details of pollination. After viewing the video, the students discussed what they noticed and what they wondered about. Students drew attention to their observation that many plants had similar structures that seemed to attract many different types of pollinators, including hummingbirds, butterflies, and even bats. This discussion allowed them to articulate their curiosity about the mechanics and purpose of pollination.
Explore
During the Explore phase, students worked in pairs to sketch, photograph, and dissect a flower. The flowers I chose for this activity were in the lily family due to their large, clearly visible, and easily accessible reproductive structures. Large lilies, such as the Asiatic Lily and the Stargazer Lily, are wonderful to use, but also rather pricey. If you choose to use a variety of large lilies for this investigation, be sure to let your florist know your intentions and that you would like the anther and stamen left intact. Many florists remove them to keep the flower fresh longer and because the orange pollen can stain clothing. I also used a smaller and less expensive variety of lily called Alstroemeria in this investigation. Alstroemeria are less dramatic, but still have the accessible characteristics of larger lilies. Some florists may also be willing to donate flowers that are past their prime for an educational cause.
Students were provided with pencils, colored pencils, and white paper. They were instructed to sketch their flowers as accurately as possible both before and during the dissection process. Close observation was required to sketch the flower and its reproductive structures.
As a way to help students understand the meaning of this task, I introduced them to the history of scientific illustration; the artistic and realistic representation of scientific specimens has been a critical component throughout the history of scientific study and discovery. Obviously, before the development of photography in the mid-1800s, illustration was the only way for scientists to visually convey their observations. However, even today, when the average secondary student has high definition photographic capabilities at their fingertips 24/7, the scientific illustration still serves an important purpose. Artists with scientific expertise are able to combine their technical and scientific expertise to create visual work that simply and accurately conveys scientific topics that might (1) be unobservable (e.g., a geologic cross-section, extinct organism, or phenomena that occur at scales so large or small that they cannot be clearly captured with photographic equipment), and/or (2) require complex language that would render the explanation inaccessible to the general public or a majority of learners. Yet another benefit to scientific illustration is that it can combine the common characteristics of a species into an exemplar of that organism and portray the species more accurately than any individual member of the species could by itself. Simply put, scientific illustration is art in the service of science. I showed students examples of botanical drawings I found using Google image search. I gave brief instruction on the characteristics of high-quality scientific illustration, for example: (1) scientific illustrations are flattened so there is no shadow that might distract the viewer from the important details of the specimen, (2) all necessary parts are drawn clearly and accurately to scale, and (3) all of the illustrated and identified parts are described in the legend. Finally, I shared information about actual living artists who are famous for their scientific illustrations (e.g., Wendy Hollender; see Hollender 2002).
The range in quality of student drawings varied, but students who were not normally engaged by science were quite engaged with the artistic exercise of drawing a flower from direct observation (see Figures 1 and 2). When I observed students having difficulty drawing the specimen, I asked them questions about specific details they noticed about the flower and suggested that they include those details in their drawing. Rather than thinking about the flower as a whole, I tried to help students see the flower as a collection—or system—of individual and detailed parts. Directing their attention to the details was usually enough to encourage reluctant artists.
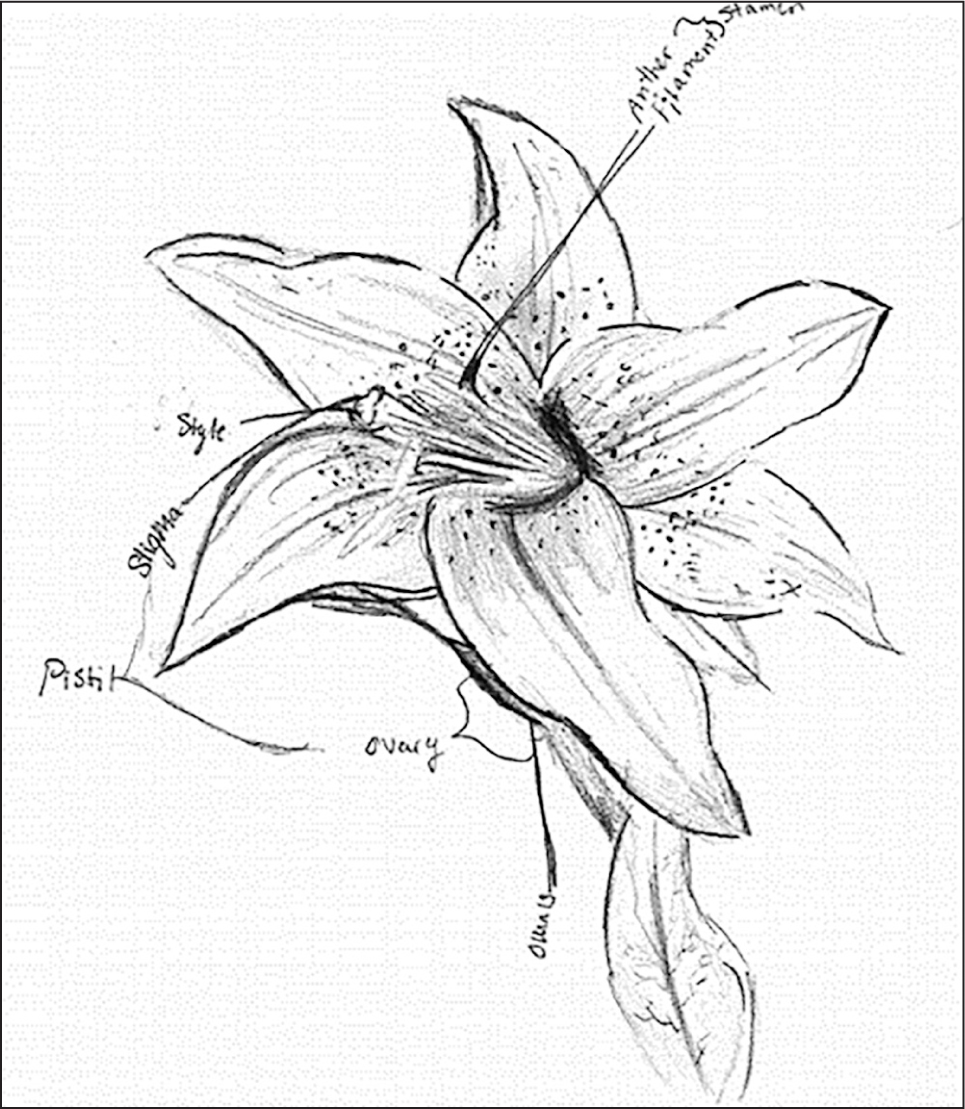
A scientific sketch of the lily by a student with considerable artistic experience and skill
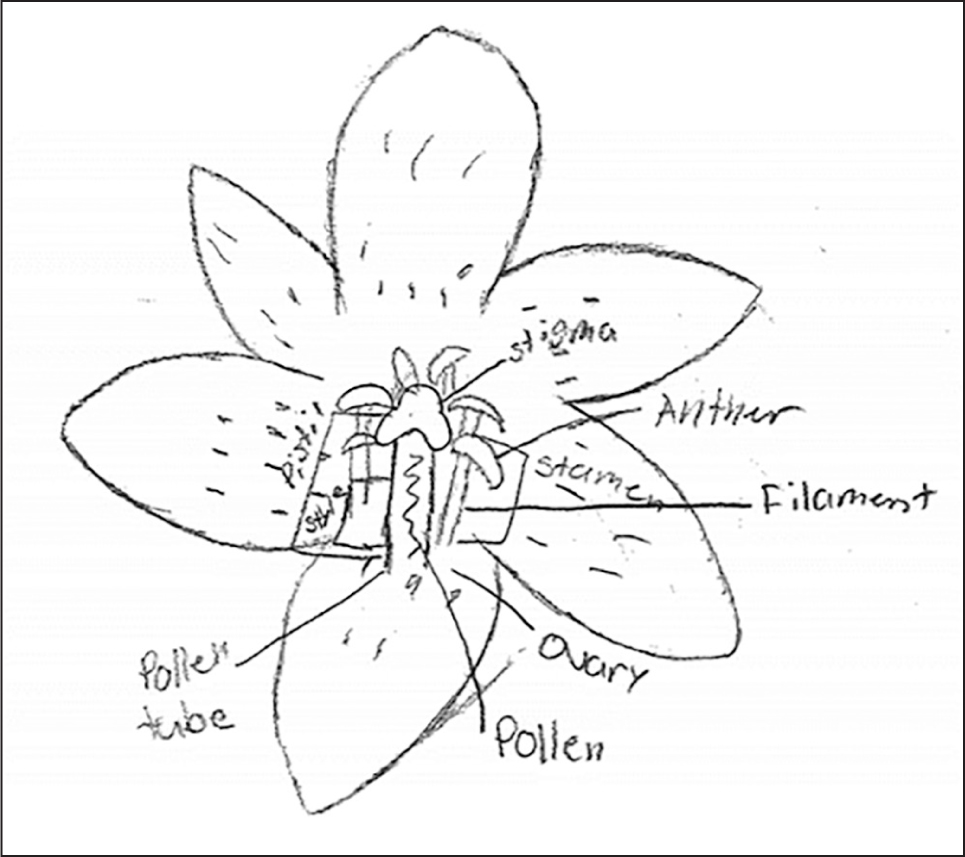
A scientific sketch of the lily by a student with typical artistic experience and skill.
After sketching their flower, pairs of students were given a second flower, a plastic knife, and a paper plate to put their dissected flower parts on. Scissors also work quite well for dissecting flowers without crushing the delicate tissue. This was a true inquiry-based exploration; I wanted the students to wonder about each part they discovered as they took their flower apart. When one student discovered the ovules, there was an excited exclamation and chatter around the room, and the rest of the students tried to find ovules in their own flower. This was the type of student-led excitement and engagement I was aiming for, and therefore I chose not to frontload the dissection with vocabulary or instructions. However, there are many great resources available for the proper way to dissect a flower. A video titled Flower Dissection—Reproduction in Flowering Plants provides detailed step-by-step instructions on how to dissect a lily very much like the ones we used in this activity (Science Sauce 2017).
In addition, every pair was given an iPad with a clip-on macroscopic lens attachment. The lenses allowed students to observe more closely the details of the flowers. They could also photograph the magnified details with the iPad. These lenses offer magnification around 10x and cost under $10 apiece (see Figure 3). The budding botanists took photos and magnified photos of their flowers through every step of the dissection process. They were able to easily see and document the details of all the reproductive parts of the flower, including the stigma with sticky substance, the anthers with pollen grains, and even the ovary with individual ovules.
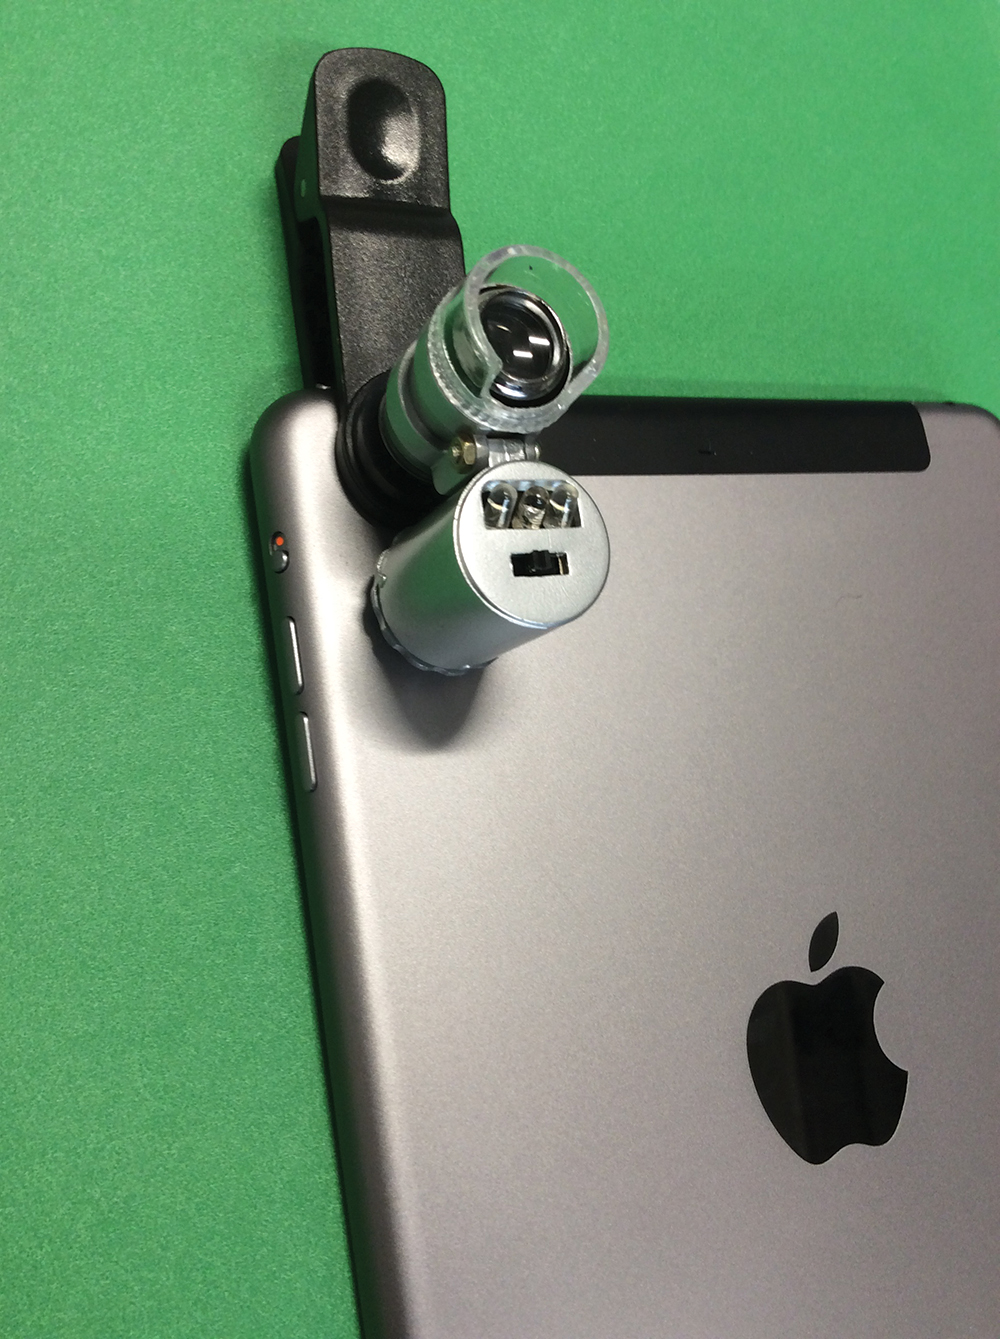
A 60x magnifying macroscope with LED light attached to a mini tablet
Explain
After students had completed the documentation of their lily dissections with both scientific illustrations and digital photographs, it was time for them to speculate on the purpose of all of those interesting structures. I projected volunteers’ photographs and illustrations onto the screen at the front of the room, and the students discussed their ideas and questions as a group. I used questioning techniques to spur their thinking, for example:
- What was interesting to you about the different parts or structures you noticed in the flower? Example response: “It was very interesting how the ovules were in neat rows at the base of the flower.”
- What ideas do you have about what the dark orange powdery substance/tiny green bubbles/clear sticky substance might be? Example response: “I think the sticky substance might be nectar.”
- What scientific reasons can you imagine for why flowers are so colorful and pretty? Example response: “The colorful flowers are probably attractive to pollinators like bees and butterflies. Maybe the bright colors get their attention.”
After the group discussion, we watched several short videos that identified each part of the flower and explained how flowering plants reproduce.
- Introduction to pollination.
This is a computer animation that very clearly shows how the structures of the lily flower function in the reproductive process (Neander 2012). This is how I introduced the vocabulary: I paused the video and had students label their scientific illustrations of the dissected lily.
- The Reproductive Cycle of Flowering Plants, an excerpt from The Amazing Lives of Plants (I started the video at 8:45 to view the section called “Pollination and Fertilization”) (Jensen 2003)
This is another computer animation that goes into even more detail about what happens inside the flower during reproduction. This may be most appropriate for advanced or very motivated learners because of the high level of scientific vocabulary and the detailed explanation of the microscopic fertilization process. Flower Pollination (Missouri Department of Conservation 2008).
This is a short live-action video that shows and explains how pollinators and flowers are interdependent. This video shows flowers and pollinators as students have likely seen them in their own neighborhoods and/or surrounding parklands.
One final resource that I introduced is an educational video game produced by Filament Games called Reach for the Sun (2019) (see Figure 4). Reach for the Sun is aligned with both the Common Core and the Next Generation Science Standards (NGSS Lead States 2013). The game’s objective is to take your plant all the way through the annual life cycle from seed germination, through flowering and pollination, and ultimately to dormancy as the season progresses to winter. Along the way, players must defend their plant against harmful insects while also attracting pollinators to their flowers. If players are successful at getting their plant to survive until the end of the year, they will have learned the chemical components and processes of photosynthesis, the way that seasons relate to plant life cycles, and a flowering plant’s reproductive process. Accounts cost $5.99 each and are reusable every year when you archive the class from the year before (e.g., for $150, a teacher can have 25 endlessly reusable accounts).
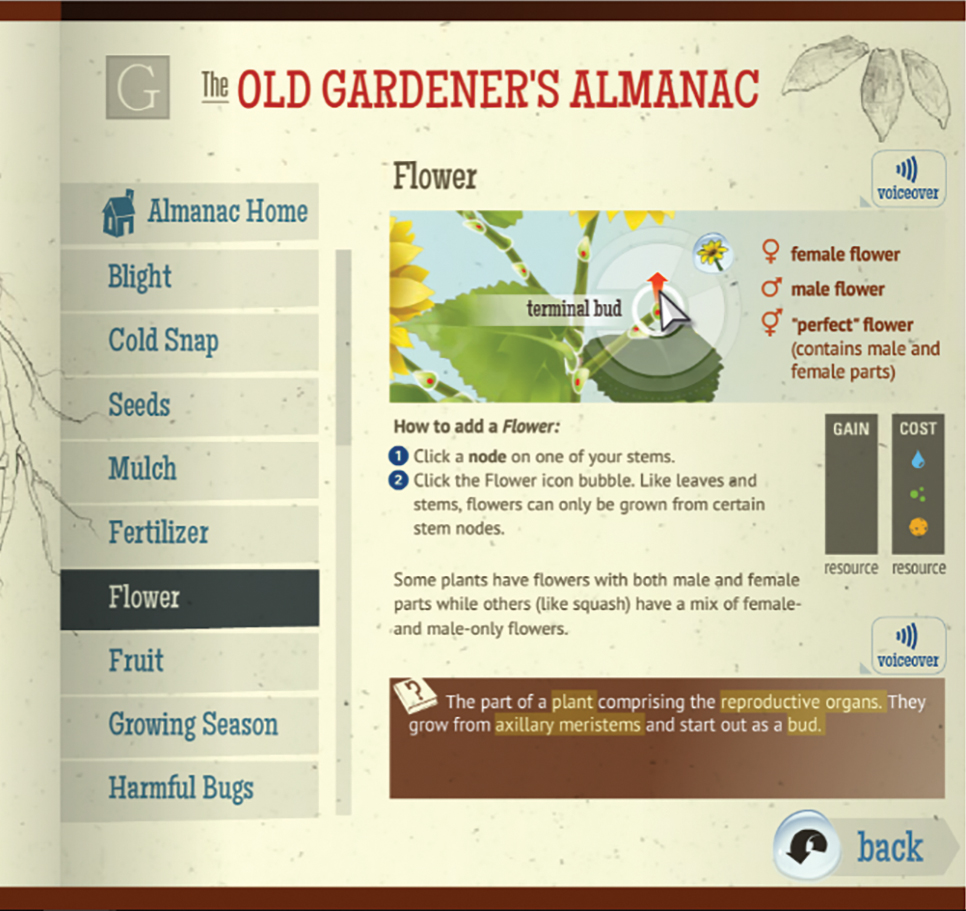
The Almanac in Reach for the Sun is a resource for players who are trying to learn how to keep their plant flowering long enough to reproduce.
Elaborate 1
When it was time to apply what they had learned in a new context, the STEAM club took a field trip to a local university botanical garden. There, pairs of students played a custom-built situated mobile game entitled The Greenhouse Game. The Greenhouse Game was created using ARIS, a free and open-source, location-based game development platform that comes out of Field Day Labs at the University of Wisconsin in Madison (2019). ARIS is an extremely flexible platform that is accessible to nonprogrammers. I have successfully worked with students as young as eighth grade to create simple location-based games. The Greenhouse Game is a mechanism for connecting and applying what the students have learned through sketching and labeling their flowers. The game was the opportunity for students to make claims about which flowers were most similar to the lily they had dissected earlier. To solve Quests, players were required to focus on the flowers’ structures and the functions of those structures, and also to provide evidence in the form of photographs with explanatory captions. Two example Quests are given below:
- Most Similar: Remembering the Asiatic Lily from our classroom exploration, try to recall the specific details about the flower: in particular, its external structures and their functions. As you explore the Greenhouses, try to identify a flower that is MOST like the Asiatic Lily. Using the NOTEBOOK, take a clear, close-up photo of the flower you choose, TAG it “Most Like Lily,” and then give (in text) at least three pieces of EVIDENCE supporting your CLAIM that the flower you chose is most like the Asiatic Lily (see Figure 5).
- Most Different: Now explore the Greenhouses in search of a flower that is LEAST like the Asiatic Lily. Again, document your find in the NOTEBOOK, TAG your note “Least Like Lily,” and provide at least three pieces of EVIDENCE to support your CLAIM that the flower you chose is least like the Asiatic Lily.
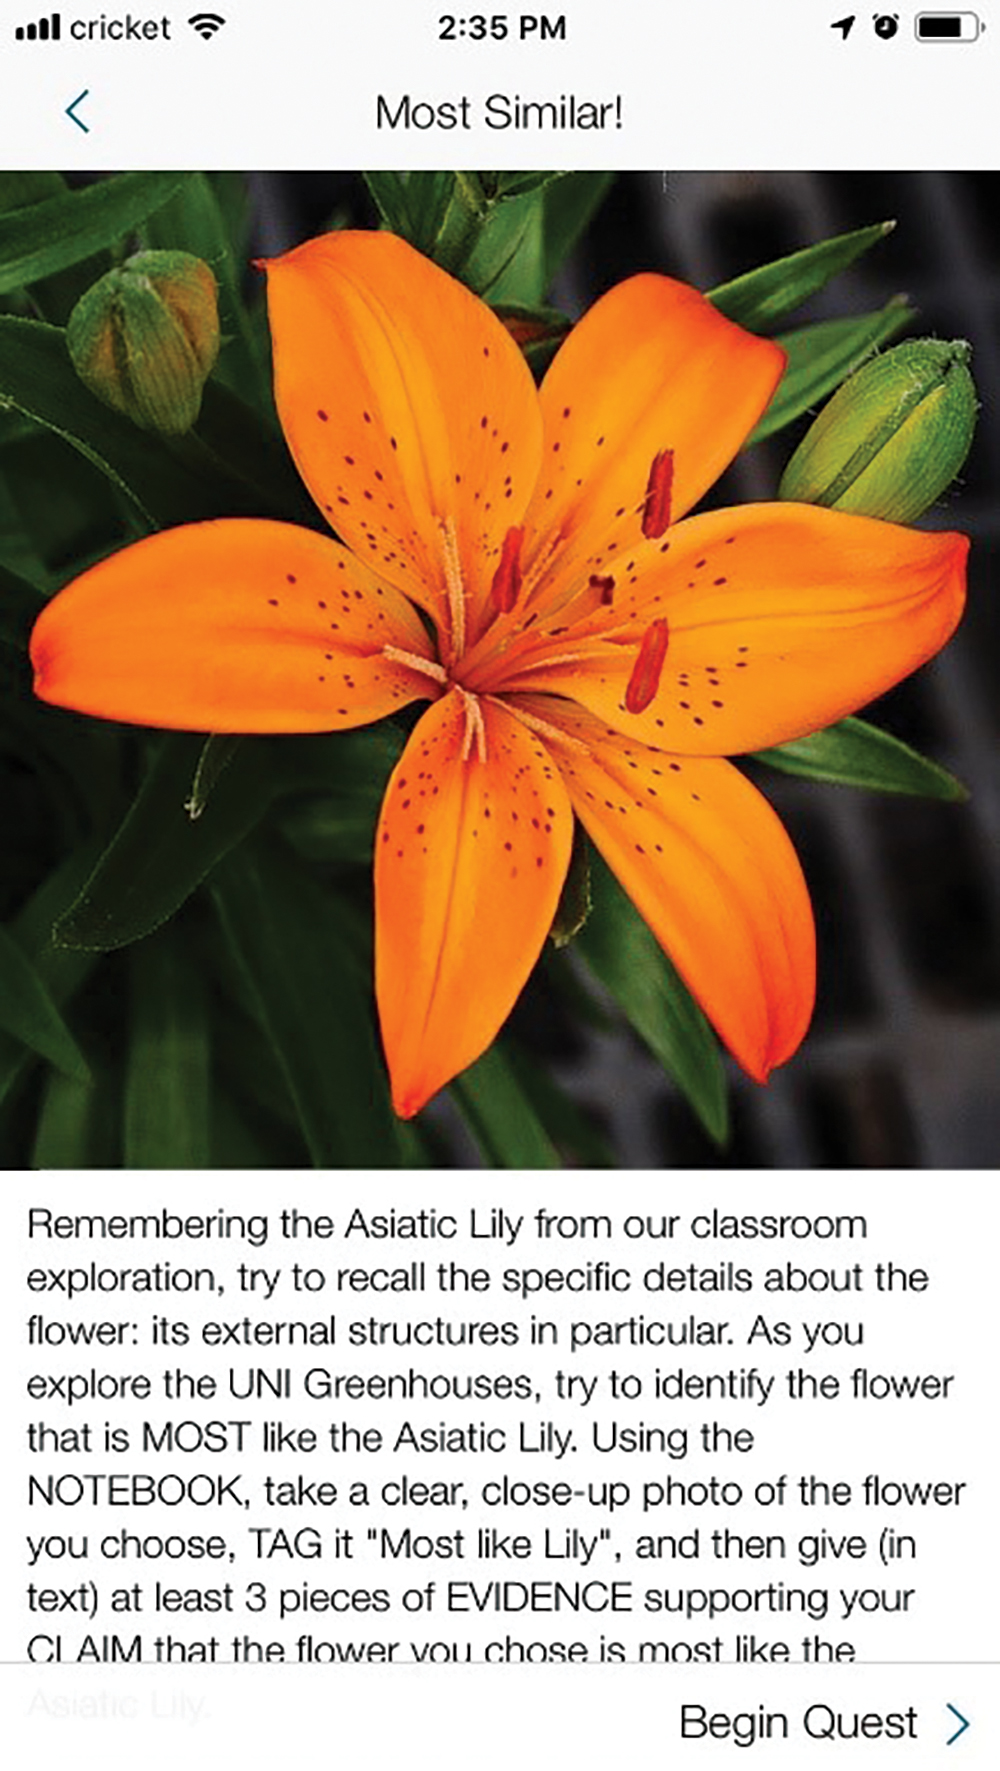
A screenshot from the Greenhouse Game depicting the “Most Similar” Quest.
The final Find Your Favorite Quest instructed players:
- After exploring the Greenhouse, choose your favorite flowering plant. Take several clear photographs of the flower and the plant. Take at least 3 very magnified photographs of specific parts of the plant you choose. You may use a macroscope. You will create a watercolor painting of this plant in the coming weeks.
When we returned to the school the following week, each student had access to the photos and media they had collected and created during gameplay at the Greenhouse. Those media served as the evidence for the final productive science discussion and the inspiration for the final activity as well as a way to connect the gameplay experience with the school-site experience.
Elaborate 2/Evaluate
When we returned to the school the following week, each team (a pair of students) shared their solutions to the Quests with the larger group. In-game photos and media were projected on the large screen and the students discussed the merits of the various solutions based on the evidence provided. Teams had chosen different flowers as “Most Similar” and “Most Different” from the lily. The teams presented their claims and used their photographic evidence to explain why they chose each specific flower as their favorite (see Figure 6). A healthy session of scientific argumentation ensued between teams trying to determine which flowers were truly the most similar to and most different from the lily. The arguments were focused on the similarities and differences between flowers’ reproductive structures with the same function.
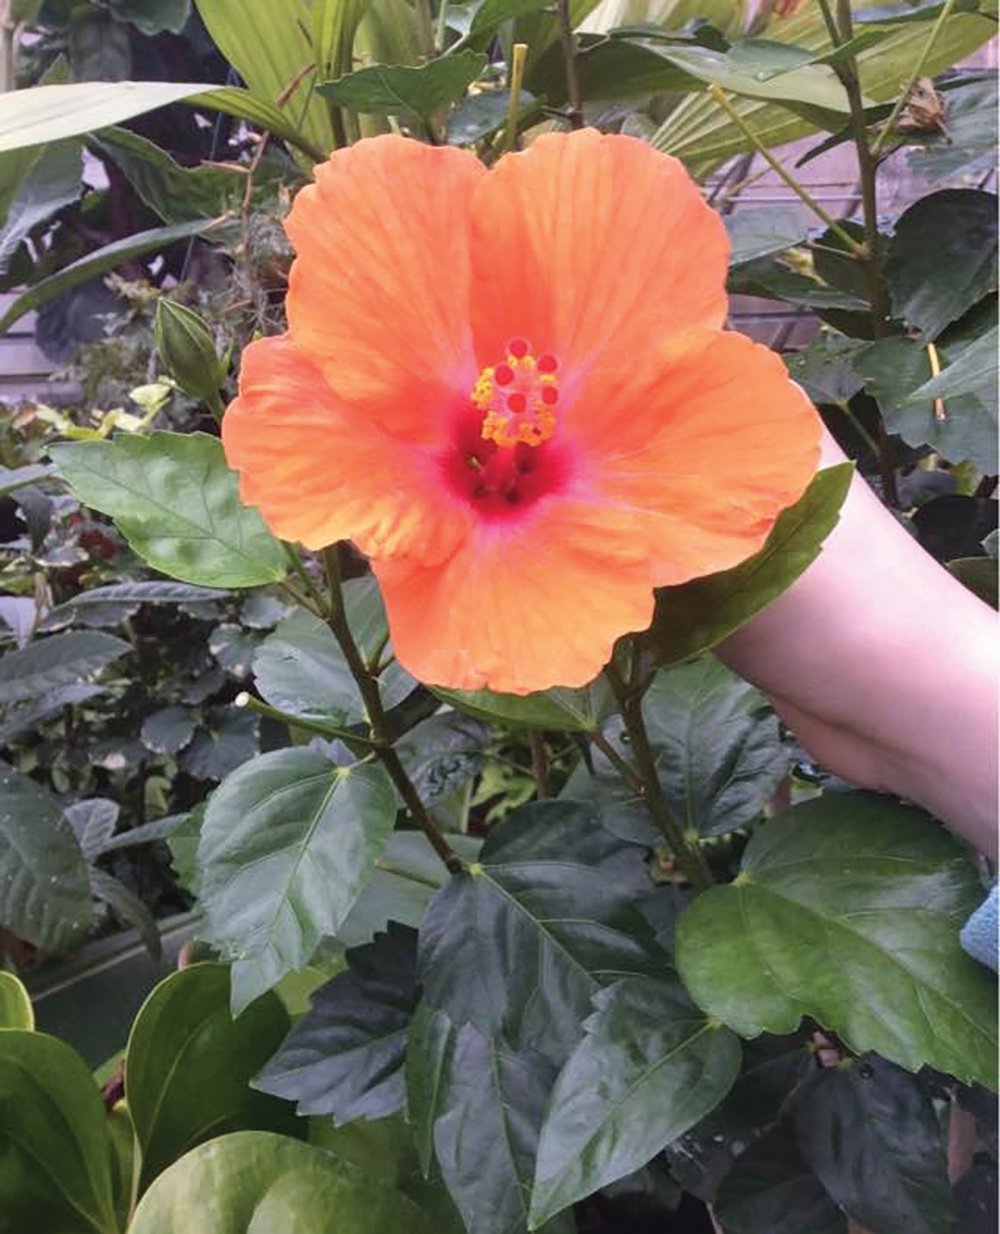
An example of a photo taken by a player in the Greenhouse Game in fulfillment of the “Find Your Favorite” Quest.
To prepare students for the final watercolor painting activity after the group discussion, I showcased impressionistic examples of botanical art created by female artist Georgia O’Keefe. In contrast to the scientific illustrations they had previously created, O’Keefe’s work is more impressionistic. By projecting O’Keefe’s paintings on the large screen, I gave students the opportunity to see how one artist perceived and portrayed the natural beauty of flowers. I encouraged them to portray the natural beauty of their own “favorite flower” through creative interpretation of the flower they photographed. The students were given brief instructions on wet-on-dry watercolor painting techniques and how to paint from the photographs they took at the Greenhouse. The wet-on-dry technique allows for more precision, and students were invited to use more water with the paint if they wanted the colors to fade together more. I also explained that adding black paint to a color would create a darker shade and adding white paint to a color would result in a lighter tint. Paintings were required to include a magnified focus on three important structures of their favorite flower, fill the entire paper, and not have any unpainted white space on the paper. Each student was provided a 12 × 12-inch sheet of watercolor paper; daubs of three colors of paint of their choosing; plus a daub of black and white paint, a paintbrush, and a cup of water. This final exercise allowed the students to express their individuality and creativity while observing their own highly detailed and high-resolution photographs of their favorite flower (see Figure 7).
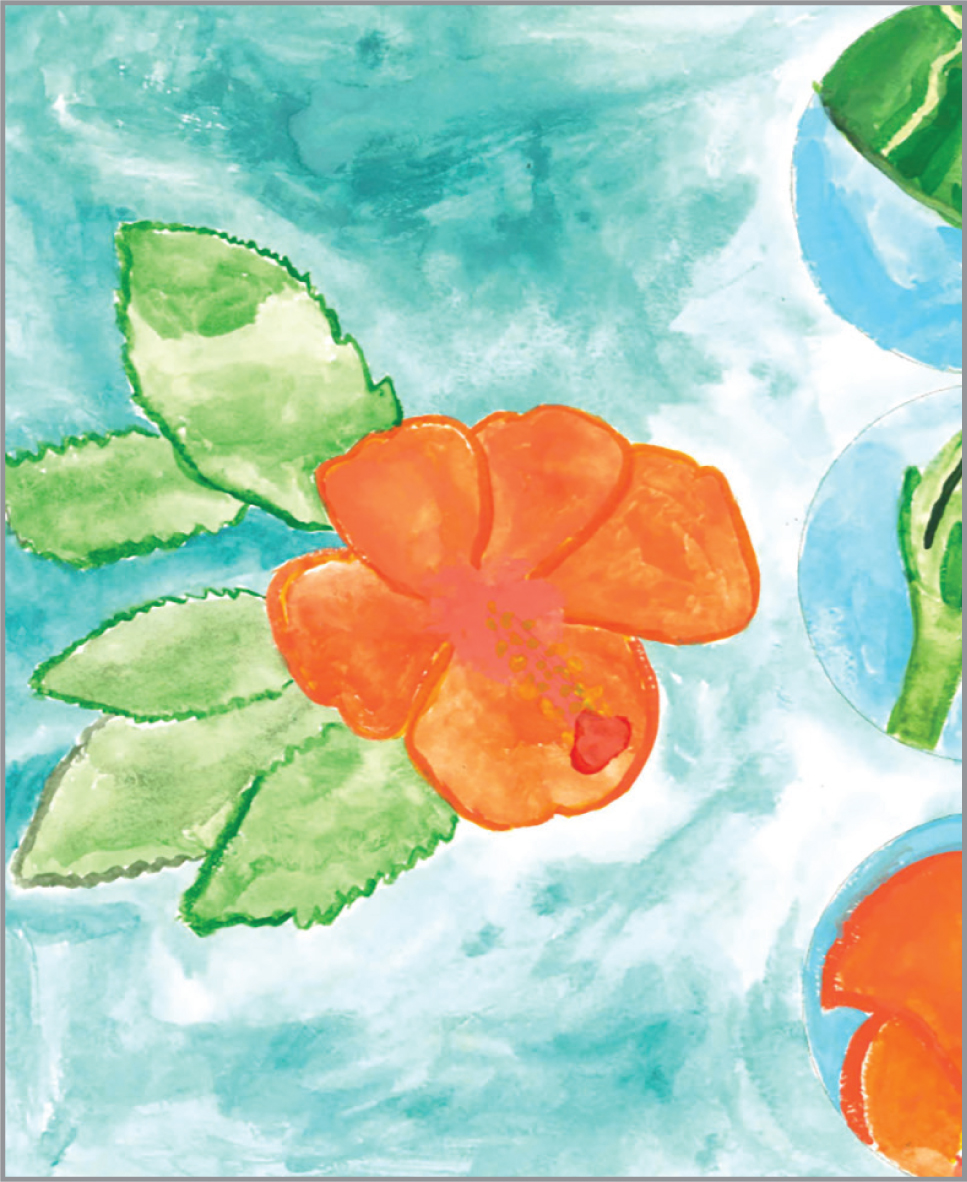
A wet-on-dry watercolor painting done of one player’s “favorite flower,” the hibiscus.
Although it was not necessary to evaluate their work, if I had been teaching these activities as part of a normal classroom experience, I would have had the students label each part of their painting with the proper name of each structure and a description of its function. Another option would be to have students create a digital poster, slideshow, or video in which they point to the specific structures in their favorite flower photo and record their own audio explaining the reproductive function of each structure of the flower in the photo and how the flower’s structure helps it to survive and reproduce. A rubric would be the ideal choice for both providing guidance to the students about the requirements and scoring the final project.
Through the integration of hand-created visual arts and digital gaming technology, this after-school club successfully engaged middle school students with botany concepts. Integrating science, art, and technology not only provided students an opportunity to look more closely at the details of the way the natural world works, but also allowed them to visually express how much more beautiful the world is when you understand how it works.
Connecting to the Next Generation Science Standards (NGSS Lead States 2013)
- The chart below makes one set of connections between the instruction outlined in this article and the NGSS. Other valid connections are likely; however, space restrictions prevent us from listing all possibilities.
- The materials, lessons, and activities outlined in the article are just one step toward reaching the performance expectation listed below.
Standard
MS-LS1 From Molecules to Organisms: Structures and Processes
www.nextgenscience.org/dci-arrangement/ms-ls1-molecules-organisms-structures-and-processes
Performance Expectation
MS-LS1-4. Use argument based on empirical evidence and scientific reasoning to support an explanation for how characteristic animal behaviors and specialized plant structures affect the probability of successful reproduction of animals and plants respectively.
| Connecting to the Next Generation Science Standards | ||||||||||||||
|---|---|---|---|---|---|---|---|---|---|---|---|---|---|---|
|
Dana L. Atwood-Blaine (dana.atwood-blaine@uni.edu) is the Jacobson Elementary Science Fellow and an assistant professor in the Department of Curriculum and Instruction at the University of Northern Iowa in Cedar Falls, Iowa.
5E Biology Life Science STEM Middle School