
feature
Fire!
CONTENT AREA Physical Science
GRADE LEVEL 6–8
BIG IDEA/UNIT Matter and its interactions
ESSENTIAL PRE-EXISTING KNOWLEDGE Some knowledge of flammable properties of matter and the fire triangle is helpful
TIME REQUIRED 1 week or longer with elaboration
COST Approximately $10 per group investigation kit
SAFETY See italicized safety notes throughout article.
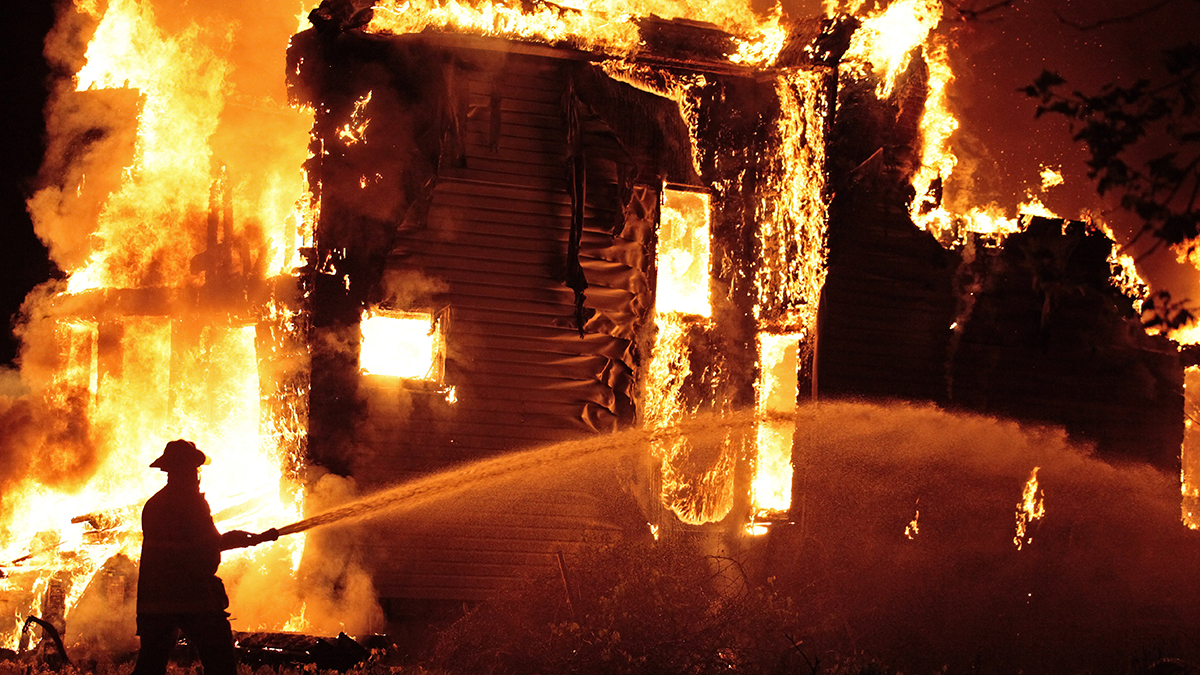
There’s been a fire! According to latest reports published by the U.S. Fire Administration, 2019 saw more than 1,291,500 fires, resulting in a financial loss approximating $14.8 billion dollars (U.S. Fire Administration [USFA] 2022). Every year when my middle school students hear these statistics, many have experiences to share, ask lots of questions, and express a general curiosity about fire. Their responses are always a perfect setup to fuel an instructional sequence on the science of fire.
In this article, I present a multilayered learning cycle where students use observational data and a fire forensics case study based out of research by UL Research Institute to drive learning about fire science explicitly connected to:
- the role of different properties of matter on its ability to ignite and flame spread (MS-PS1-1, MS-PS1-2, MS-PS1-4, MS-PS1-5)
- methods of firefighting based on the type of matter burned that can also be applied in their own lives to keep friends and family safe (MS-PS1-4)
This learning cycle is sequenced in phases (see Supplemental Materials) and is typically completed over six 50-minute class periods but can take more time depending on the decisions associated with the elaboration phase. This learning cycle also creates the unique opportunity of bringing in local fire professionals to support students as they safely plan and carry out fire-related investigations. For more than five years, fire professionals from Cobb County Fire Department (Georgia) have engaged with students in their investigations, overseen their safety, and shared career experiences. Their role(s) in this learning cycle are critical for safe student experiences in small-group investigations and additionally highlighted. While I realize this is a unique setup, it is my hope that by sharing our experiences, you may be inspired to find the potential for your own unique version of this in your school community.
I. Engage (ask questions, think-pair-share, 20–30 minutes)
After sharing the USFA statistics (referenced previously) with students, I often transition to a closer look at who and what is represented in the data using the infographic published annually by FEMA and USFA (see below). I allow time for students to individually analyze the data in the infographic and then jot down a few questions that come to mind on sticky notes. Students then share their questions at their tables. As they share, they are responsible for sorting the questions and arranging similar questions together, as well as categorizing the questions as either those that can be answered through research (such as in the library) and those that have potential for hands-on experimental investigation.
As a final catalyst to engage students, I next show students the (free) introduction video that is part of Xplorlabs (see Fire Forensics in Online Resources). It is based on the work of the UL Fire Safety Research Institute. After watching, I emphasize to students that firefighters and arson investigators come onto fire scenes once damage has already occurred. To start discussion, I re-emphasize a quote from the video, saying something like, “Reading a burn scene is like starting a book by reading the last chapter.”
I project the burned kitchen scene (see photograph of kitchen fire scene in Supplemental Materials) on the classroom screen and provide time for students to generate and sort their additional questions. Groups share out their compiled questions, with emphasis on active listening and responding collaboratively as each group shares. For example, let’s say multiple groups asked, “Why does the soot on the wall seem to be darker at the bottom and then lighter as it moves up the wall?” After the first group shares this question, then the following group would respond with something collaborative, such as, “We had one of the same questions as the other group, so we are also curious about the soot. We think we can probably do an investigation to help us figure that one out. We were also wondering why the bottom of the cabinets did not seem to burn much?”
As students share, their sticky notes are posted on the class’s driving questions board. I make it explicit to students that I will “review their questions tonight as my homework to make a decision about our first investigation.” After years of using this strategy, I can now anticipate the questions students will ask. Often, they include:
- What started the fire? What put out the fire?
- Why didn’t everything burn in the kitchen?
- Why doesn’t water work on a grease fire?
Knowing to anticipate these typical questions allows me to preplan for how to create a context for learning. Throughout the remainder of the learning cycle, these questions are explicitly referenced, revised, and improved. They are adapted to include new questions that arise and maintain the central role of focusing our class’s investigations.
II. Pre-evaluate (develop and use a model, small group, 20–30 minutes)
Everyday experiences with candles, bonfires, and brush burns means that students have prior knowledge of fire. I activate their prior knowledge by asking groups of three to four students to collaboratively develop and use an initial model to show their current thinking about fire. Group roles and responsibilities are also established at this time. These roles include the director of documents (checks that everyone in the group is recording plans and outcomes accurately, keeps/organizes notebooks), spokesperson (speaks to the whole group about their small group ideas), lead investigator (checks that ideas for investigation follow safety guidelines and sets up investigations accordingly), and project manager (monitors access to activities to ensure everyone has a voice, monitors time on various tasks to ensure timely completion). Depending on the needs of the students, I will either allow students to make choices about which role they would like to fulfill, or I may intervene with their decisions to encourage students to work on specific skills.
The students work on a large, sticky chart paper with a black marker. The spokesperson is responsible for recording everyone’s thinking in the model. This task challenges many students, as they fear not knowing enough to draw, or don’t know how to draw a flame, and so forth. I encourage students to simply try, and remind them it is an initial model. I suggest they consider labels and ask leading questions such as, “What kind of stuff do you think is in the smoke? How could you draw what you’re thinking? What would the carbon dioxide look like? Is it moving? How could you show this?” I emphasize that accuracy is not the focus at this point in the learning cycle. The project manager must also ensure that every group member’s voice (thinking) is represented in the initial model. It is more important for all students to make their thinking visible (see Figure 1).
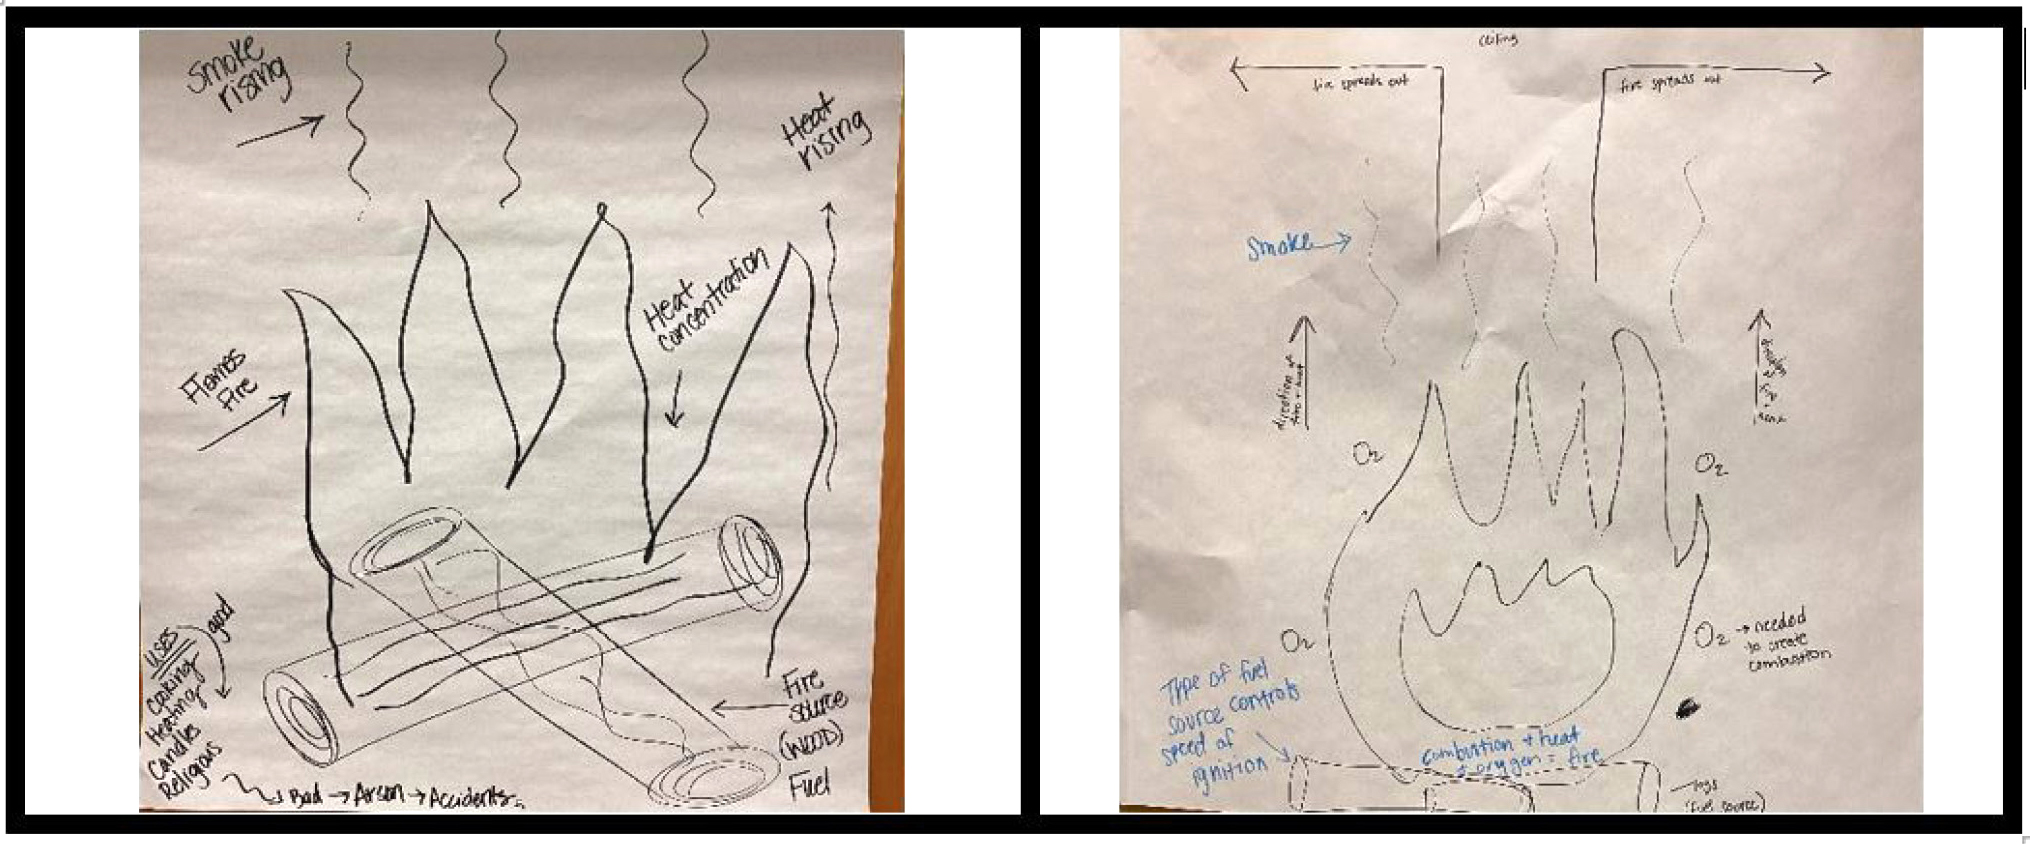
Student samples of initial (left) and revised (right) fire models.
I have found that this formative preassessment strategy allows students to transition from everyday conversations of fire (e.g., it’s hot, there’s an orange flame) to a more scientific way of explaining the phenomena of fire (e.g., there needs to be fuel, there needs to be enough oxygen). Seeing how students are currently thinking through these models is imperative for making instructional decisions to meet their content-based needs as it relates to the specific types of matter that serve as fuel for fire, kinetic theory of particles (how particles interact when thermal energy is added or removed), reactants necessary for chemical reaction (combustion) to occur, and conservation of matter and energy as particles combust.
III. Explore/Explain (plan/carry out investigation with firefighters, small group, 30-45 minutes)
Safety note: Safety is of utmost importance in this investigation. Proper ventilation and use of fire-retardant surfaces are necessary. Students must wear indirectly vented chemical splash safety goggles, meeting the ANSI/ISEA Z87.1 D3 standard. This eye protection needs to be properly fitted and worn during setup, investigation, and takedown segments of the activity. In addition, make sure hair is pulled back and secure, and roll up long, loose sleeves.
Also use caution when working with candles, which can cause skin burns. Be sure that the long reach lighter and candle are completely extinguished when finished with the investigation. Eating any food is prohibited in the lab, given the risk of cross-contamination. Finally, make sure there is a readily available A-B-C type fire extinguisher and a training operator at the lab site during the investigations involving active flames.
If your space does not support these safety measures, then please consider teacher-led demonstrations in a laboratory fume hood and/or use of online or prerecorded videos (see link to prerecorded videos under Online Resources).
Students begin their work with firefighters focused on figuring out what makes something ignite and predicting potential flame behavior. Students first sort through various objects found in a kitchen, separating those they think are flammable and those they think are not. Objects include an assortment of real possible fuels mirroring interior of a house. Following are some examples:
- sawdust
- noncoated, noncolored craft stick
- block of wood (4” × 4” section, approximately)
- steel wire screen (3” × 3” section, approximately)
- 15 cm lengths of copper wire
- glass jar
- ceramic tile
- metal/nonflammable pie pan (noncoated, nonplastic, nonpaper)
- assortment of food items (e.g., chocolate rectangle, potato chip, marshmallow)
Safety note: Do not use powders, fine grains, or fine crystals. Size of assorted food items needs to be carefully supervised. Do not exceed 1 chip, 1 mini-marshmallow, etc.
Students record their predictions in their notebooks, and then discuss with their firefighter the safest way to observe whether and how the objects catch on fire (ignition and flame). The lead investigator will take the lead in setting up the investigations to be carried out, while the director of documents will support the group with an accurate record in their notebooks of the plan (and eventual outcomes). Once the firefighter approves the testing plan and safety measures are in place, students work with firefighters to observe what happens when thermal energy is added to each testable object using a candle (see Figure 2). Safety note: A candle is used as a sustained source of heat throughout this investigation. This candle is placed in a flame-retardant aluminum pan filled with water. Firefighters keep a long reach lighter to re-ignite the candle as needed.
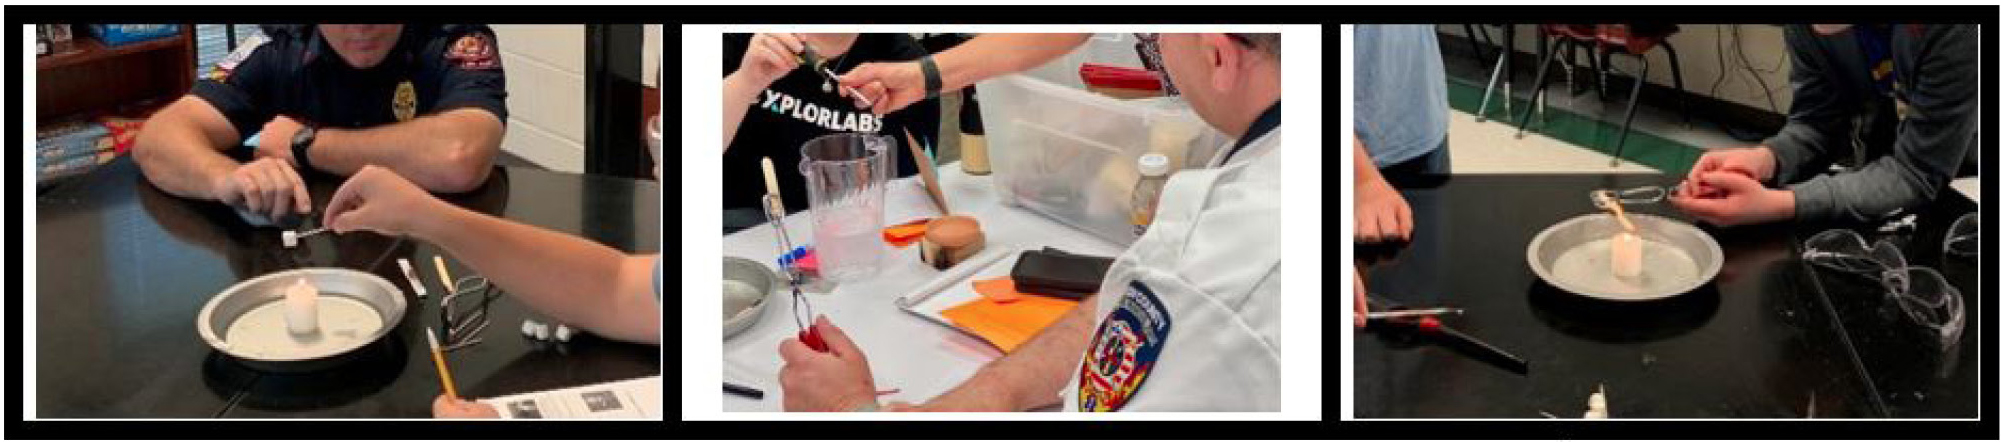
Student groups and firefighters investigating properties of matter.
As I monitor student progress in this investigation, I tend to ask questions to the small groups that guide students toward collecting the needed data. Example questions are outlined below:
- time for ignition: How long did it take to catch on fire? Was that more or less time than the ….?
- flame behavior: How did the time for the sawdust compare to the craft stick? What did the flame of the sawdust look like (in contrast to the craft stick)?
- color of flame: What color was the flame at first? Did it change colors?
- soot pattern: Was there any soot on the craft stick? How was it the same (or different) from the block of wood?
- color of smoke: Was the smoke the same color close to the flame as it was far away? Did all wood samples have the same color of smoke?
- change(s) in odor: Do all objects release the same odor? What do you think contributes to the different odors?
Once students complete their investigation, it is time for collective sense making. This is provided through class discussion. Before I facilitate discussion, I provide time for the group spokesperson to practice different ideas to be articulated to the larger whole group. I ask questions to encourage students to think about any patterns in their observations that emerged. Firefighters are always brought into the conversation and encouraged to contribute with their experiences that parallel what students observed.
- Did anyone notice a pattern about the properties of things that would melt or changes phases versus those that would ignite and flame?
- Did anyone notice a pattern about the properties of things that did not seem to respond at all?
- Did anyone notice anything when you tried to observe different sizes of the same kind of matter (e.g., mini versus jumbo marshmallow)?
- Did anyone notice a pattern about the ignition of the samples when you adjusted the position (e.g., vertical versus horizontal)?
- Did anyone notice a pattern about what would put out (extinguish) the fire?
- What do you think this means is a factor of ignition and/or flammability?
- How do your observations help you understand something about what you observed in the kitchen scene?
As students share their group thinking, I listen for students’ fire (matter and energy conservation) reasoning, including their explanations of how and why some things seemed to take longer to ignite, how and why some types of matter did not seem to respond to the added thermal energy, and their connections to what they observed in the kitchen scene. For example, I listen for whether students explain their observations of ignition rate accurately in terms of the ratio of surface area to mass or if they explain it inaccurately with reference to “density.” If explanations are accurate, I encourage students to draw a visual that shows their thinking for everyone to see. If explanations are inaccurate, then I use the opportunity to accurately teach physical properties of surface area, mass, and density. I use some of their materials to re-emphasize that the density of objects remains constant when the material is the same (e.g., sawdust, craft stick, block of wood) and thus challenge their thinking about density as a factor in what was observed.
After class discussion, students take time to individually formalize their thinking in notebooks. Two specific strategies are integrated for sense-making. As evidenced from the previous questions, I integrate the crosscutting concept of patterns to support the way students analyze and interpret the collected data. I will sometimes provide a graphic organizer like the one shown in Figure 3. This graphic is a free resource I found through The Wonder of Science (see link in Online Resources) where many supports from the Next Generation Science Standards (NGSS Lead States 2013) have been created and made available for free download as a PDF or Google Draw document. I also use interactive science notebooks with my students. If I see a need for providing a language bank, then I will create that bank with the student as part of a one to one conversation that I facilitate as I am walking around. Because responses are organized on the left side (see Figure 4), we will often create that language bank on the right side for them to pull from as they are thinking through their current explanations.
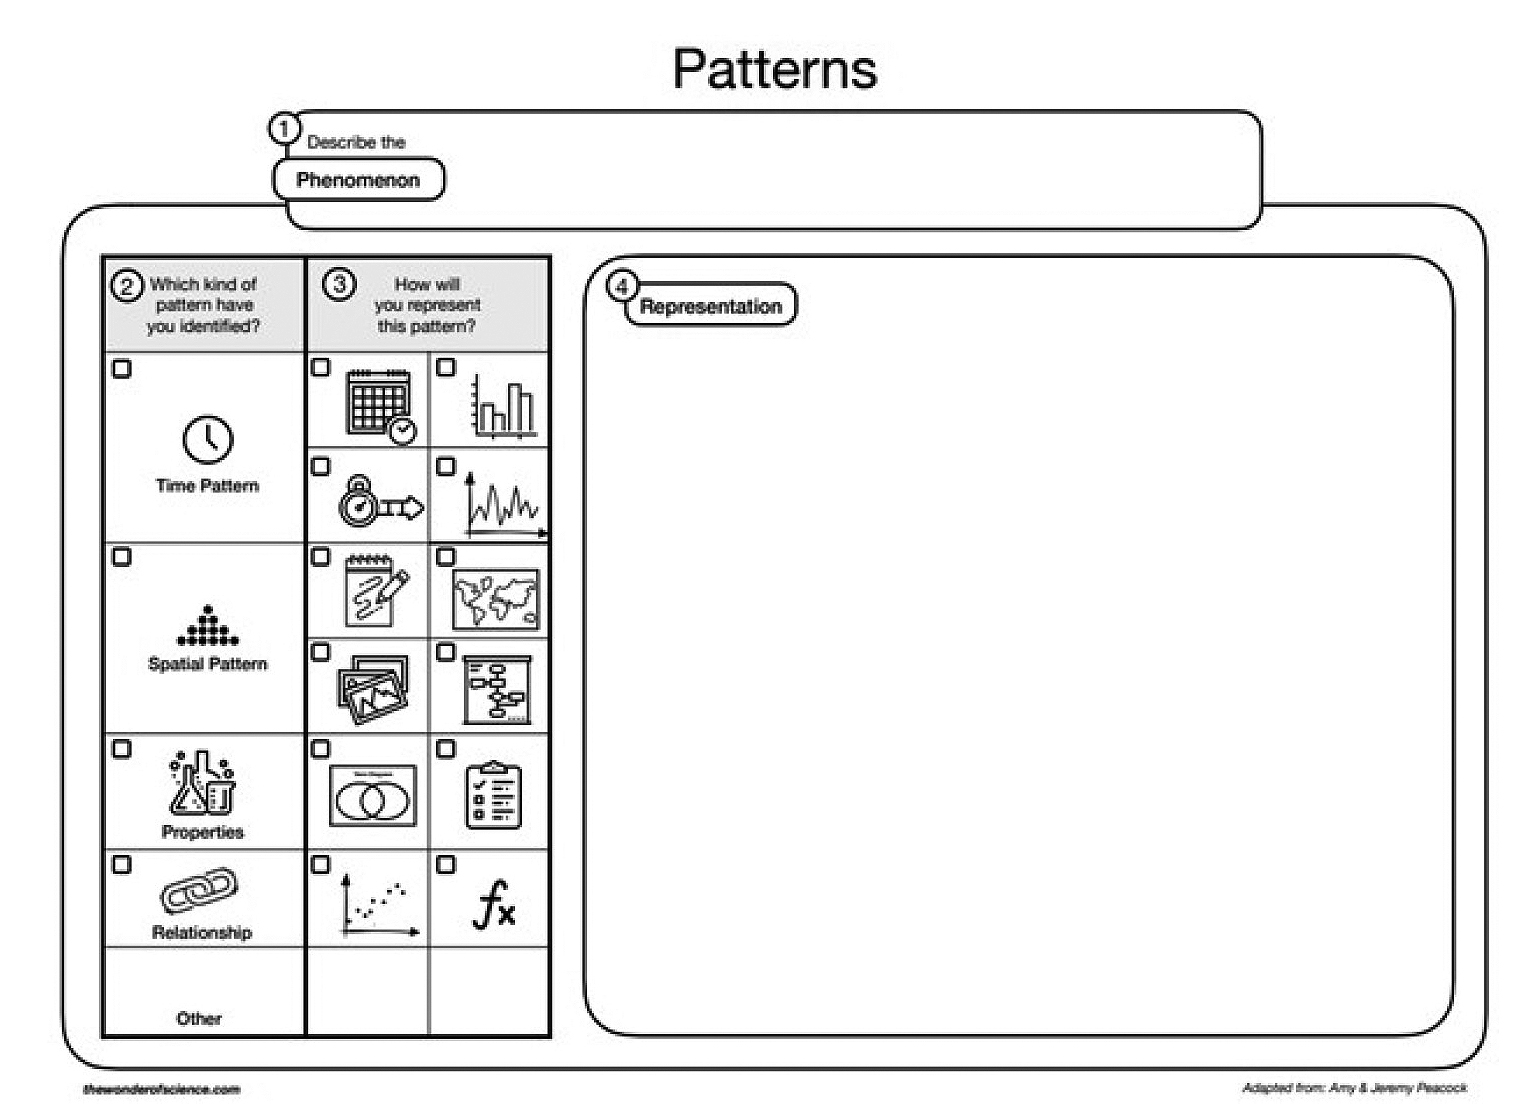
Student support for sense making using crosscutting concept lens: patterns.
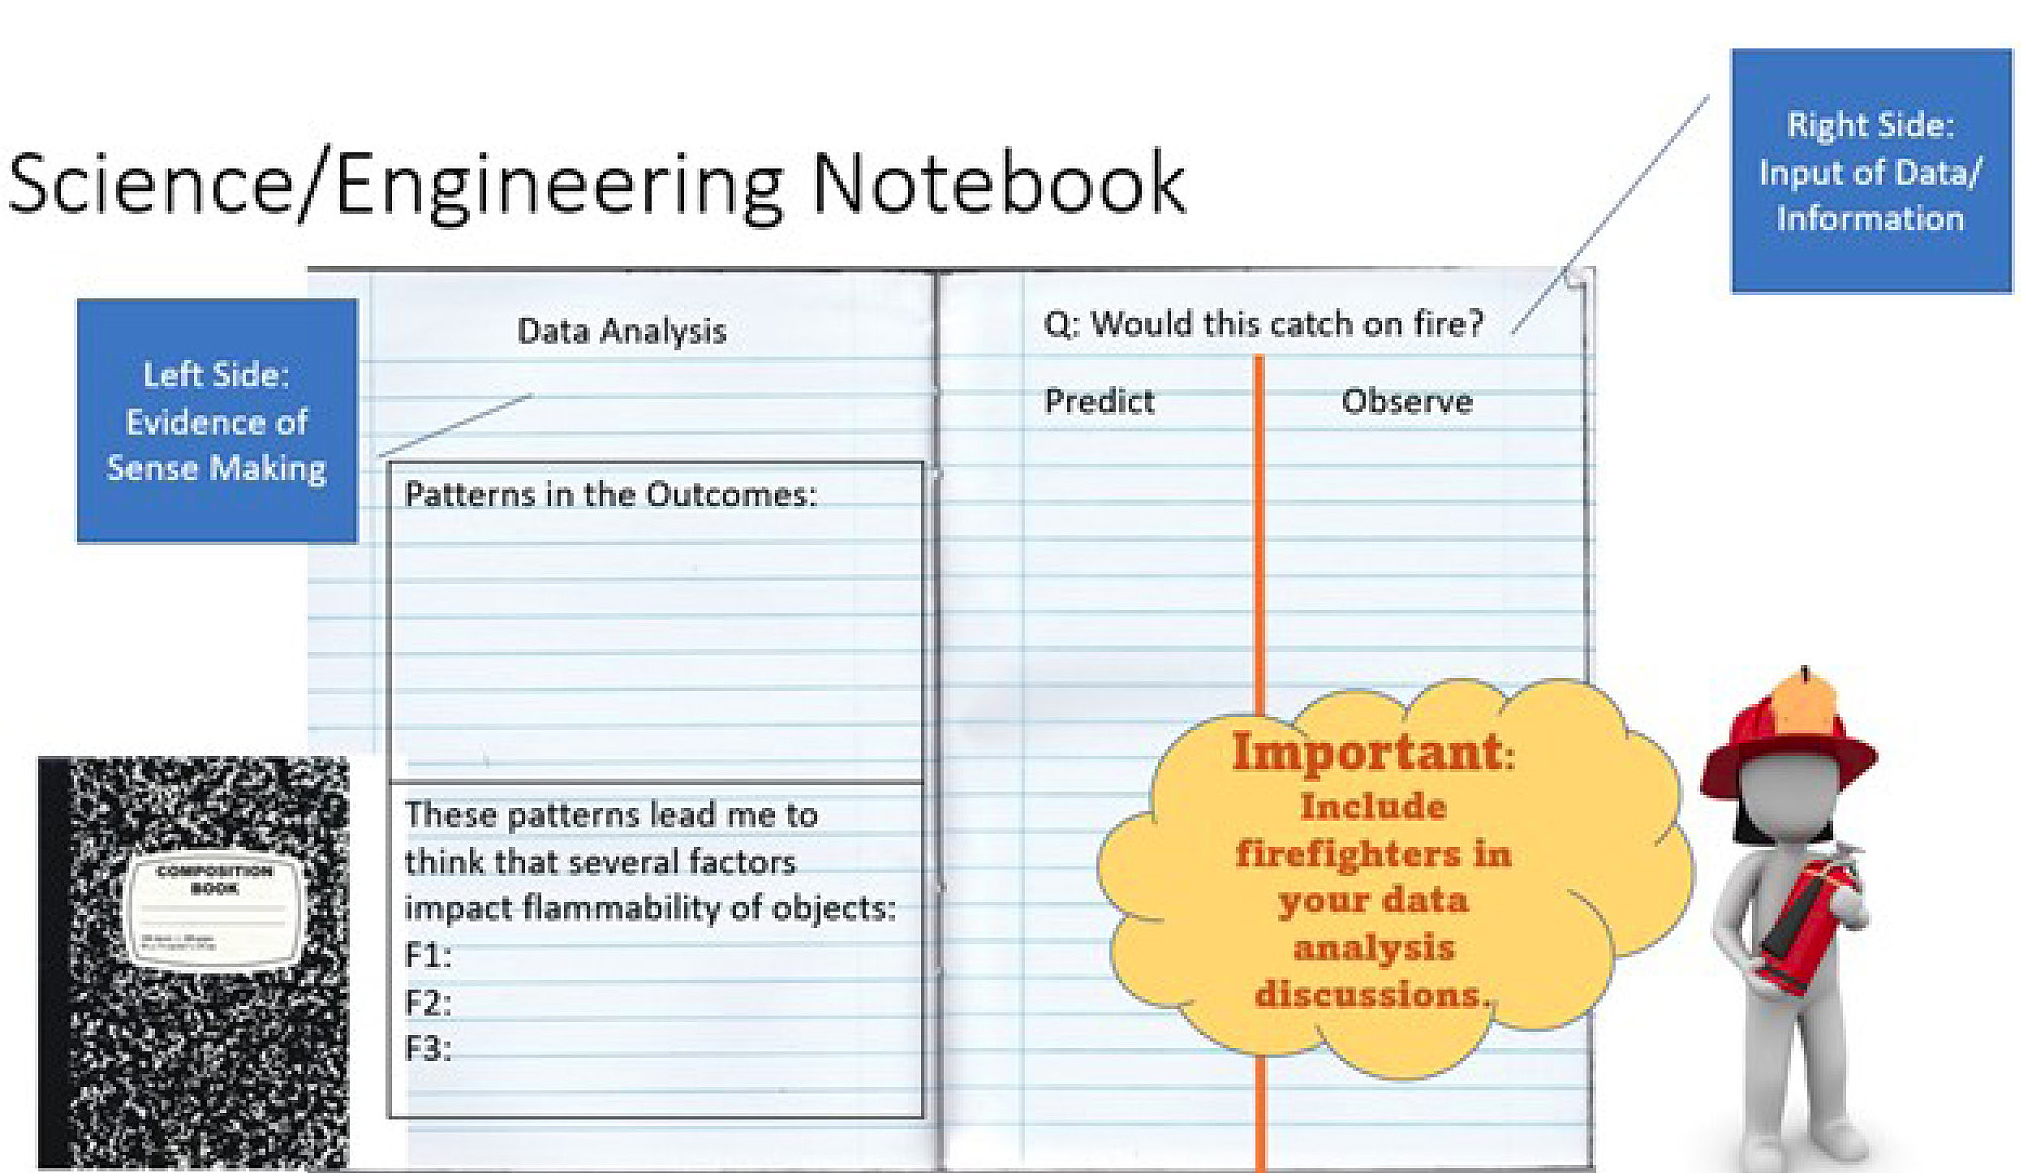
Student guide for interactive science notebook (Investigation 1).
IV. Re-evaluate (revise model, small group, 10–20 minutes)
After planning and carrying out the first investigation, students revisit their initial models of fire. This time, the group spokesperson uses a blue marker to add details that reflect the group’s new understanding of fire dynamics (see Figure 1). Changing the color of the marker means new understandings are easily identified. At this time, I am listening to the group’s conversations and checking on the quality of the added details. Specifically, I listen and look for whether students add:
- different sources of fuel at the particle level
- accurate particle motion of fuel, smoke
- wavy arrows to show transfer of thermal energy at different points in the fire
- labels for the different forms of energy involved before and after ignition
To summarize this portion of the learning cycle, students post their revised models along the class walls and then reflect on their progress toward answering some of their driving questions. At this point in the learning cycle, most students can articulate several reasons for why everything in the kitchen did not burn. I am specifically listening for student thinking that relates to the Fire Triangle, the relationship between heat, fuel, and oxygen that governs every fire. Often, they articulate one or more of the following:
- There was not enough heat.
- There was not enough fuel.
- The position of the cabinets made it harder for the particles to ignite.
- The things with smaller surface areas were easier to ignite, but they burned quickly.
It is important for the next set of investigations to provide concrete experiences that support accurate conceptualization of the fire triangle and the role of chemical reactions (combustion) to complete the fire tetrahedron. The fire tetrahedron model purposefully includes the chemical reaction that occurs between fuel, heat, and oxygen that comprise the familiar fire triangle. It is important to move students into thinking about this fourth component of fire—chemical reactions—as it creates an opportunity to provide instruction on the core ideas of MS-PS1-2 and MS-PS1-4.
V. Explore/Explain (online Xplorlabs fire lab, individual, 45–50 minutes)
At this point of the instructional sequence students now have some idea about properties of matter that impact ignition. This creates perfect timing to delve into specifics of the online fire forensics case created by the UL Research Institutes in collaboration with the UL Fire Safety Research Institute (see link to Fire Forensics in Online Resources). The Xplorlabs module allows students to self-pace through an Investigators Academy, Live Burns, and a Guided Investigation to begin figuring out some answers to student questions like What started the fire? What put out the fire? I encourage students to work through as much of the module as possible and record any new information they think will prove helpful in better explaining answers to their questions as well as any new questions that arise based on anything that seemed confusing to them. Students close this class session by sharing out new understandings and new questions they want added to the driving question board.
VI. Explore/Explain (plan/carry out investigation with firefighters, small group, 30-45 minutes)
Safety note: As stated earlier, safety is of the utmost importance in this investigation. See the safety notes found under heading III. Explore/Explain.
This phase is generally carried out on the fourth day of the lesson sequence (see Supplemental Materials). Students excitedly resume their work with the firefighters to plan an investigation that allows them to observe the effects of limiting one leg of the fire triangle. Driving questions for these investigations originate from questions students asked. For example, “What started the fire?” “What put out the fire?” Since the fire triangle is a representation of the three factors of matter and energy necessary to ignite and sustain a fire, one question I usually pose to students in discussion leading up to the investigation is “What happens when you limit one leg of the fire triangle?” Then, to move students toward the necessary depth of the core idea, I also usually pose the question “Is that really all it takes for fire, or is there more to it?” I am intentional with this questioning since the fire tetrahedron represents the additional input of combustion, or chain of chemical reactions, which is also necessary for fire to sustain.
These principles of fire science are at the core for student sense-making; therefore, the materials are carefully scripted in this investigation to generate shared experiences:
- long-reach lighter for the firefighter
- candle
- metal cooking tongs with insulated ends
- flat-head screwdriver
- steel screen (3” × 3” section, approximately)
- pitcher of ice water
- clear glass jar
- square of uncoated aluminum foil (8” × 8” section, approximately)
There are many ways students and firefighters can observe the effects of limiting a leg of the fire triangle with the provided materials. While the lead investigator in the group will follow through with most of the setup, as you can imagine, it is the firefighters that have most of the ideas for how students should carry out their investigations. As before, firefighters influence the plan for making these observations, maintain possession of the long-reach lighter during the investigation, and add to student conversation by making connections to their experiences and firefighting tactics. I have observed firefighters carry out the following with students:
- Place a glass jar over the candle to limit oxygen.
- Hold a cold flat-head screwdriver close to the flame to transfer thermal energy away from the wick.
- Use tongs (with insulated ends) to hold an aluminum screen over the flame to separate the fuel from the source of thermal energy. Then ignite (light) the smoke that moves through the screen with their long-reach lighter.
The myriad approaches that students and firefighters share provide an experience that validates our truth that different scientific approaches can achieve the same desired outcomes, thereby adding to the depth with which we understand the world around us. Of utmost significance, the experiments do not need to be completely identical to achieve this goal. No matter the approach, students record their observations in their interactive science notebooks with support from their group’s lead investigator and my guidance (see Figure 5) and then begin to make sense of how their observations help them answer the driving investigation question(s).
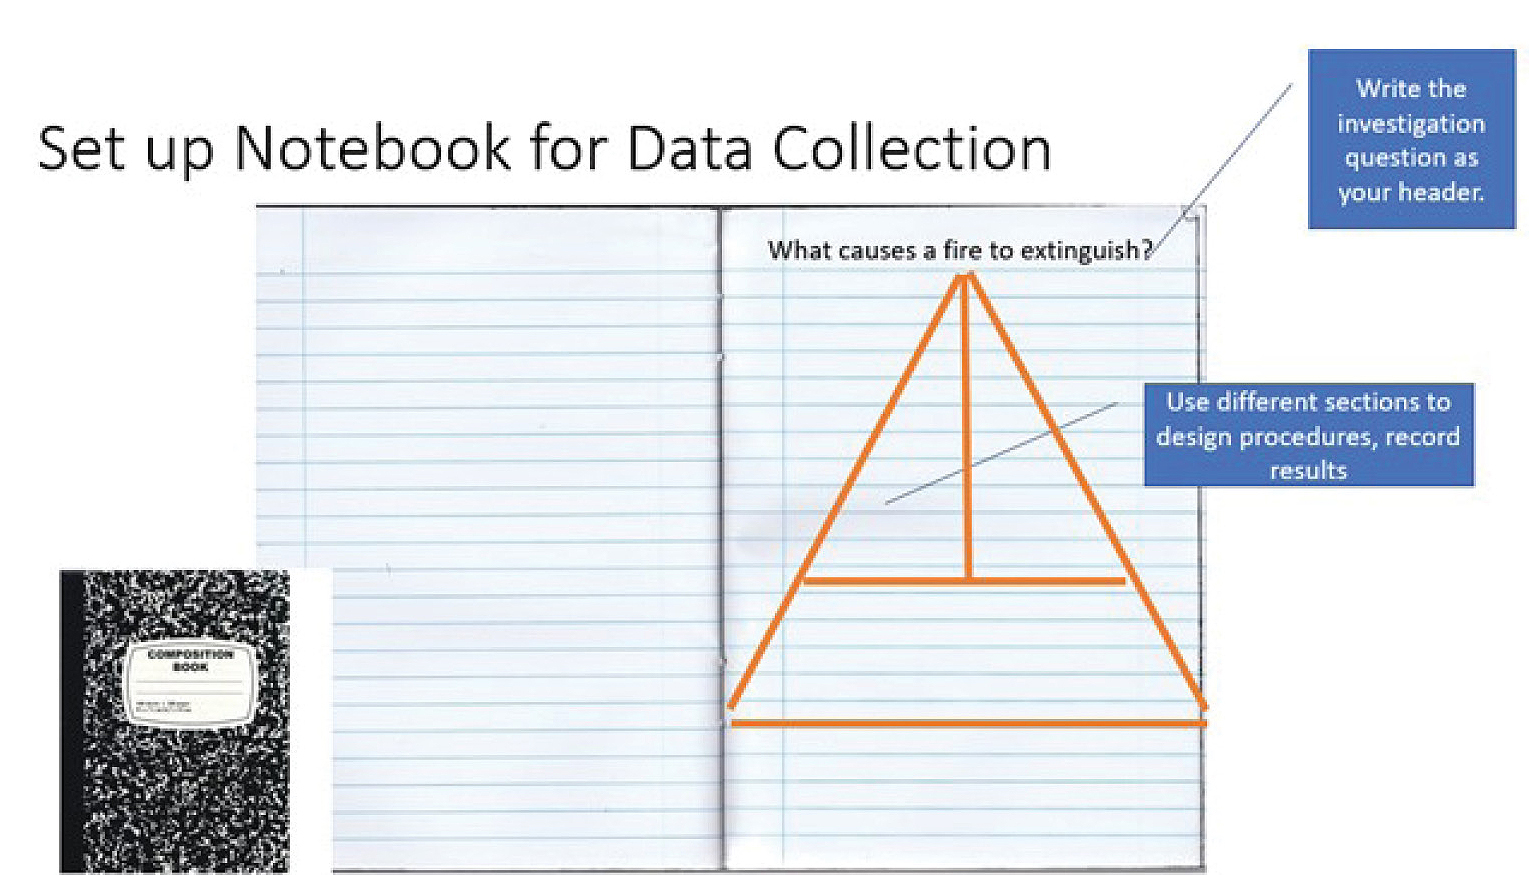
Student guide for interactive notebook setup (Investigation 2).
I guide students in their sense-making by asking questions like:
- How did your team validate what happens when_____?
- How was this same idea validated a different way by a different group?
- What effect did removing_____have on the flame?
- How do firefighters remove_____from a fire?
- What aspect of the fire triangle was most difficult to observe? Why?
- If the fire triangle references the three necessary components of matter and energy needed for a flame, then what do you infer is added to the explanation provided by the fire tetrahedron model?
- Based on our observations in this investigation, what can we claim about the fire triangle and its effect on the ability of an object to ignite and/or flame?
- What is our evidence for these claims?
- How does the evidence connect to the claim?
- Why is this important for fire investigators to understand?
- What new questions do you have about fire, fire behavior, and flammability of objects?
As evidenced from the previous questions, I integrate the crosscutting concept of cause and effect to support the way students analyze and interpret the collected data. As before, time is provided for student to individually formalize their thinking in notebooks, and then revisit their models of fire for the last time. During this time the project manager and the director of documents will support group members in making their thinking visible. This repetition of sensemaking strategies (providing lens of thinking via cross cutting concept and notebooking) supports high-level cognitive demand, which is critical for establishing routines of healthy productive struggle.
VII. Evaluate
Part 1 (revise model, small group,
As one last interaction with firefighters in their small group, students conclude the fourth class session by co-revising the visual model to represent the interactions of matter and energy that results in a fire. At this time, all students in the group work with the firefighters to complete their model as accurately and detailed as possible using a red marker. A checklist of suggestions is projected on the classroom screen to guide the small-group conversation (see Figure 6).
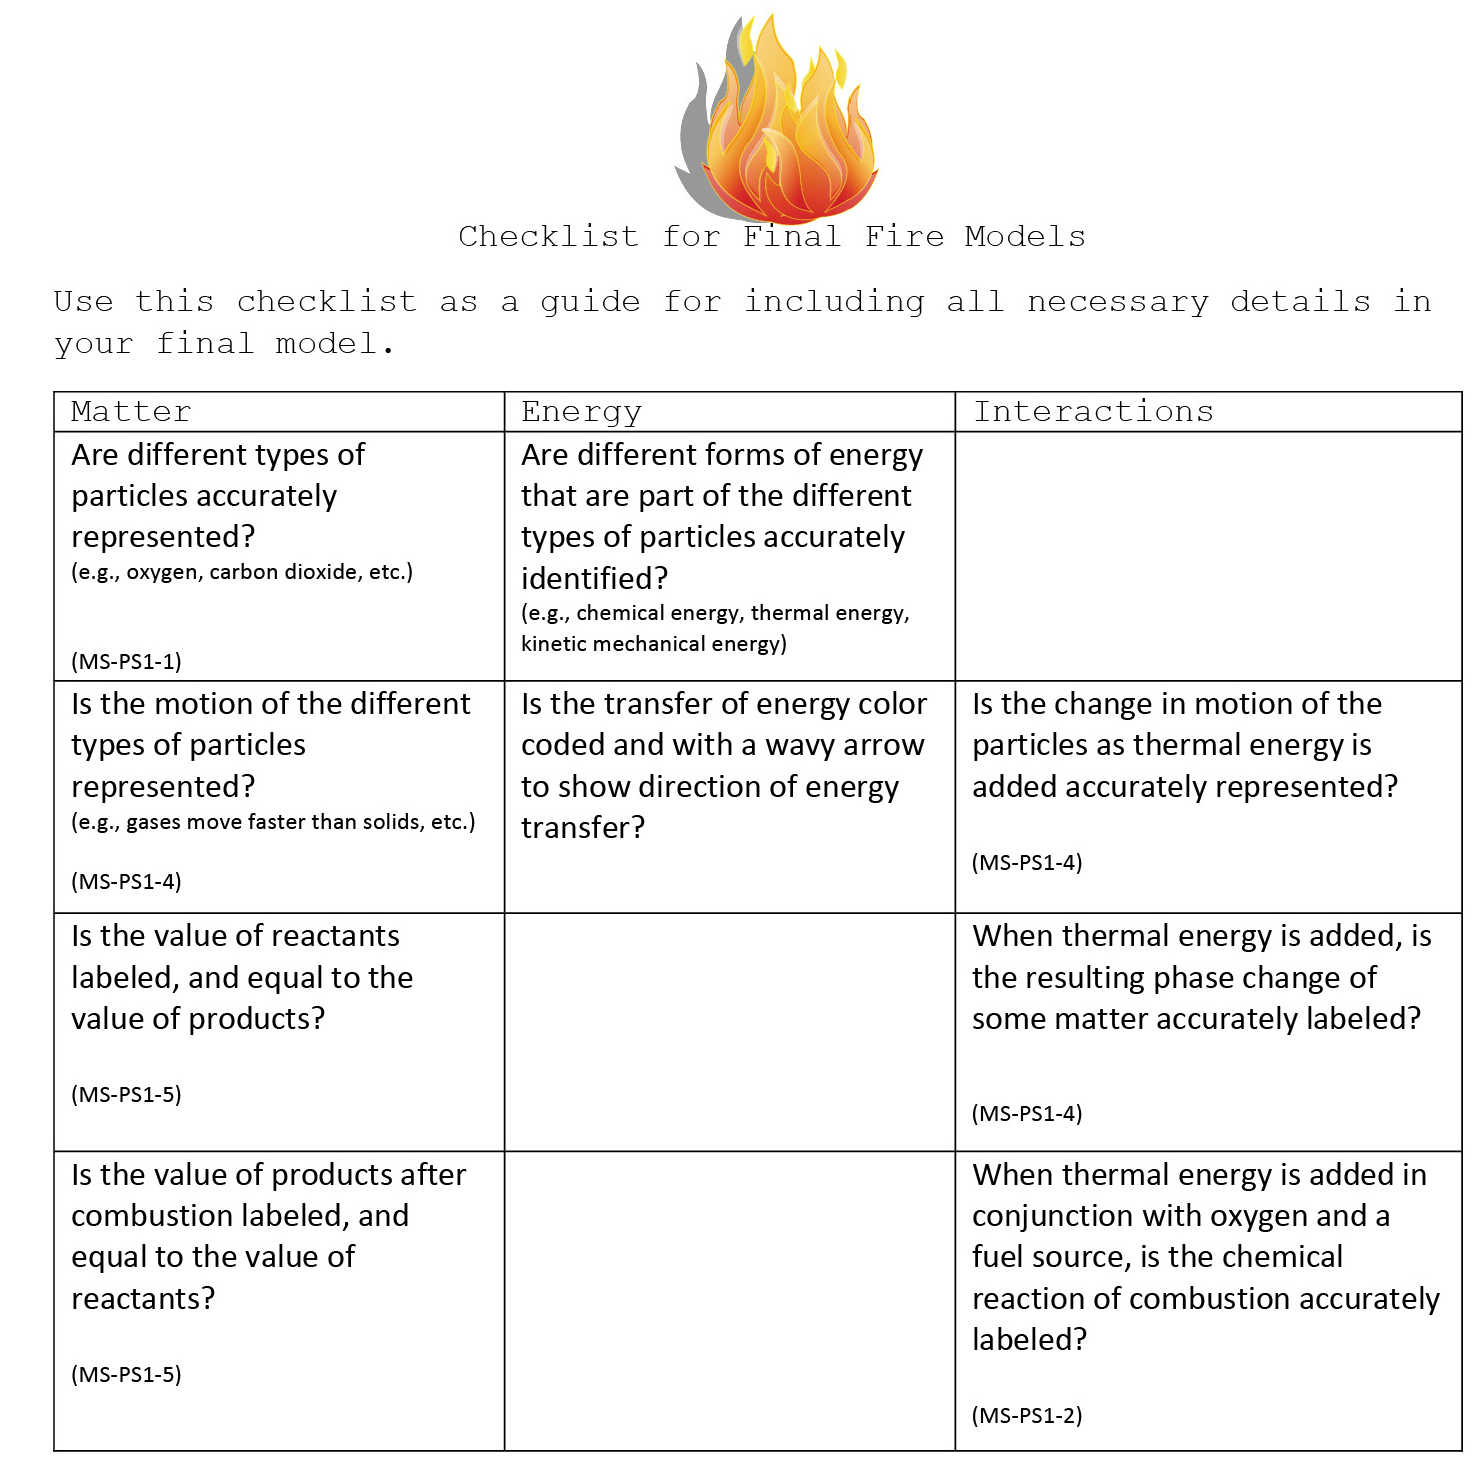
Checklist for final fire models.
Part 2 (organize ideas in graphic, individually, 10–20 minutes)
On returning to the next class, students are charged with individually using all ideas represented in their group model to construct an explanation of the interactions of matter and energy that result in fire. A graphic organizer found at The Wonder of Science (see link in Online Resources) is provided to support students in their explanation. Figure 7 shows a possible student sample.

Possible student answers on crosscutting concept (matter and energy) graphic organizer.
As I monitor student progress on the graphic organizer, I am looking for the completeness with which they are recording what has been learned. I often find the need for direct instruction about chemical equations (see Supplemental Materials) as another model to represent the interactions of matter and energy that occur in the fire phenomena. The intensity of this direct instruction can vary each year based on the student needs. There have been some instances where most students were experiencing unproductive struggle, and thus I added to my instructional sequence a different explore/explain phase using cutout particle models modified from the chemical reaction student activity found at the ACS’s Middle School Chemistry website (see link in Online Resources). These types of instructional decisions must be made in the moments that I am monitoring students’ progress and accuracy when working through the graphic organizer.
Part 3 (online Xplorlabs solo investigation of fire forensics case, individual, 30–40 minutes)
At this point in the learning cycle students return to the scene of the kitchen fire (see link in Supplemental Materials). Students apply everything learned by accepting the challenge to figure out the source of the kitchen fire, collect evidence to add to their investigator’s notebook, and submit a claim to the Xplorlabs platform. There are several advantages to the Xplorlabs platform that has made it a worthwhile case to use in my classroom over the years. First, students are not required to log in (no identifiable individual student data is saved). Second, the interactive component of the kitchen fire scene is engaging for the students. They like to move around the kitchen scene, find the platform intuitive, and stay focused on the challenge throughout the class session.
Since teacher access to students’ claim is not accessible through the Xplorlabs platform, I make explicit to students that their submission is like a rough draft in our writing process. It is expected for students to submit a final claim, or arson report (see Figure 8). When students are reporting their claims, I closely monitor for accuracy and seek space for support. For example, if language acquisition is preventing effective communication, then I will again work with the student one to one to create a language bank of options to use in their report.
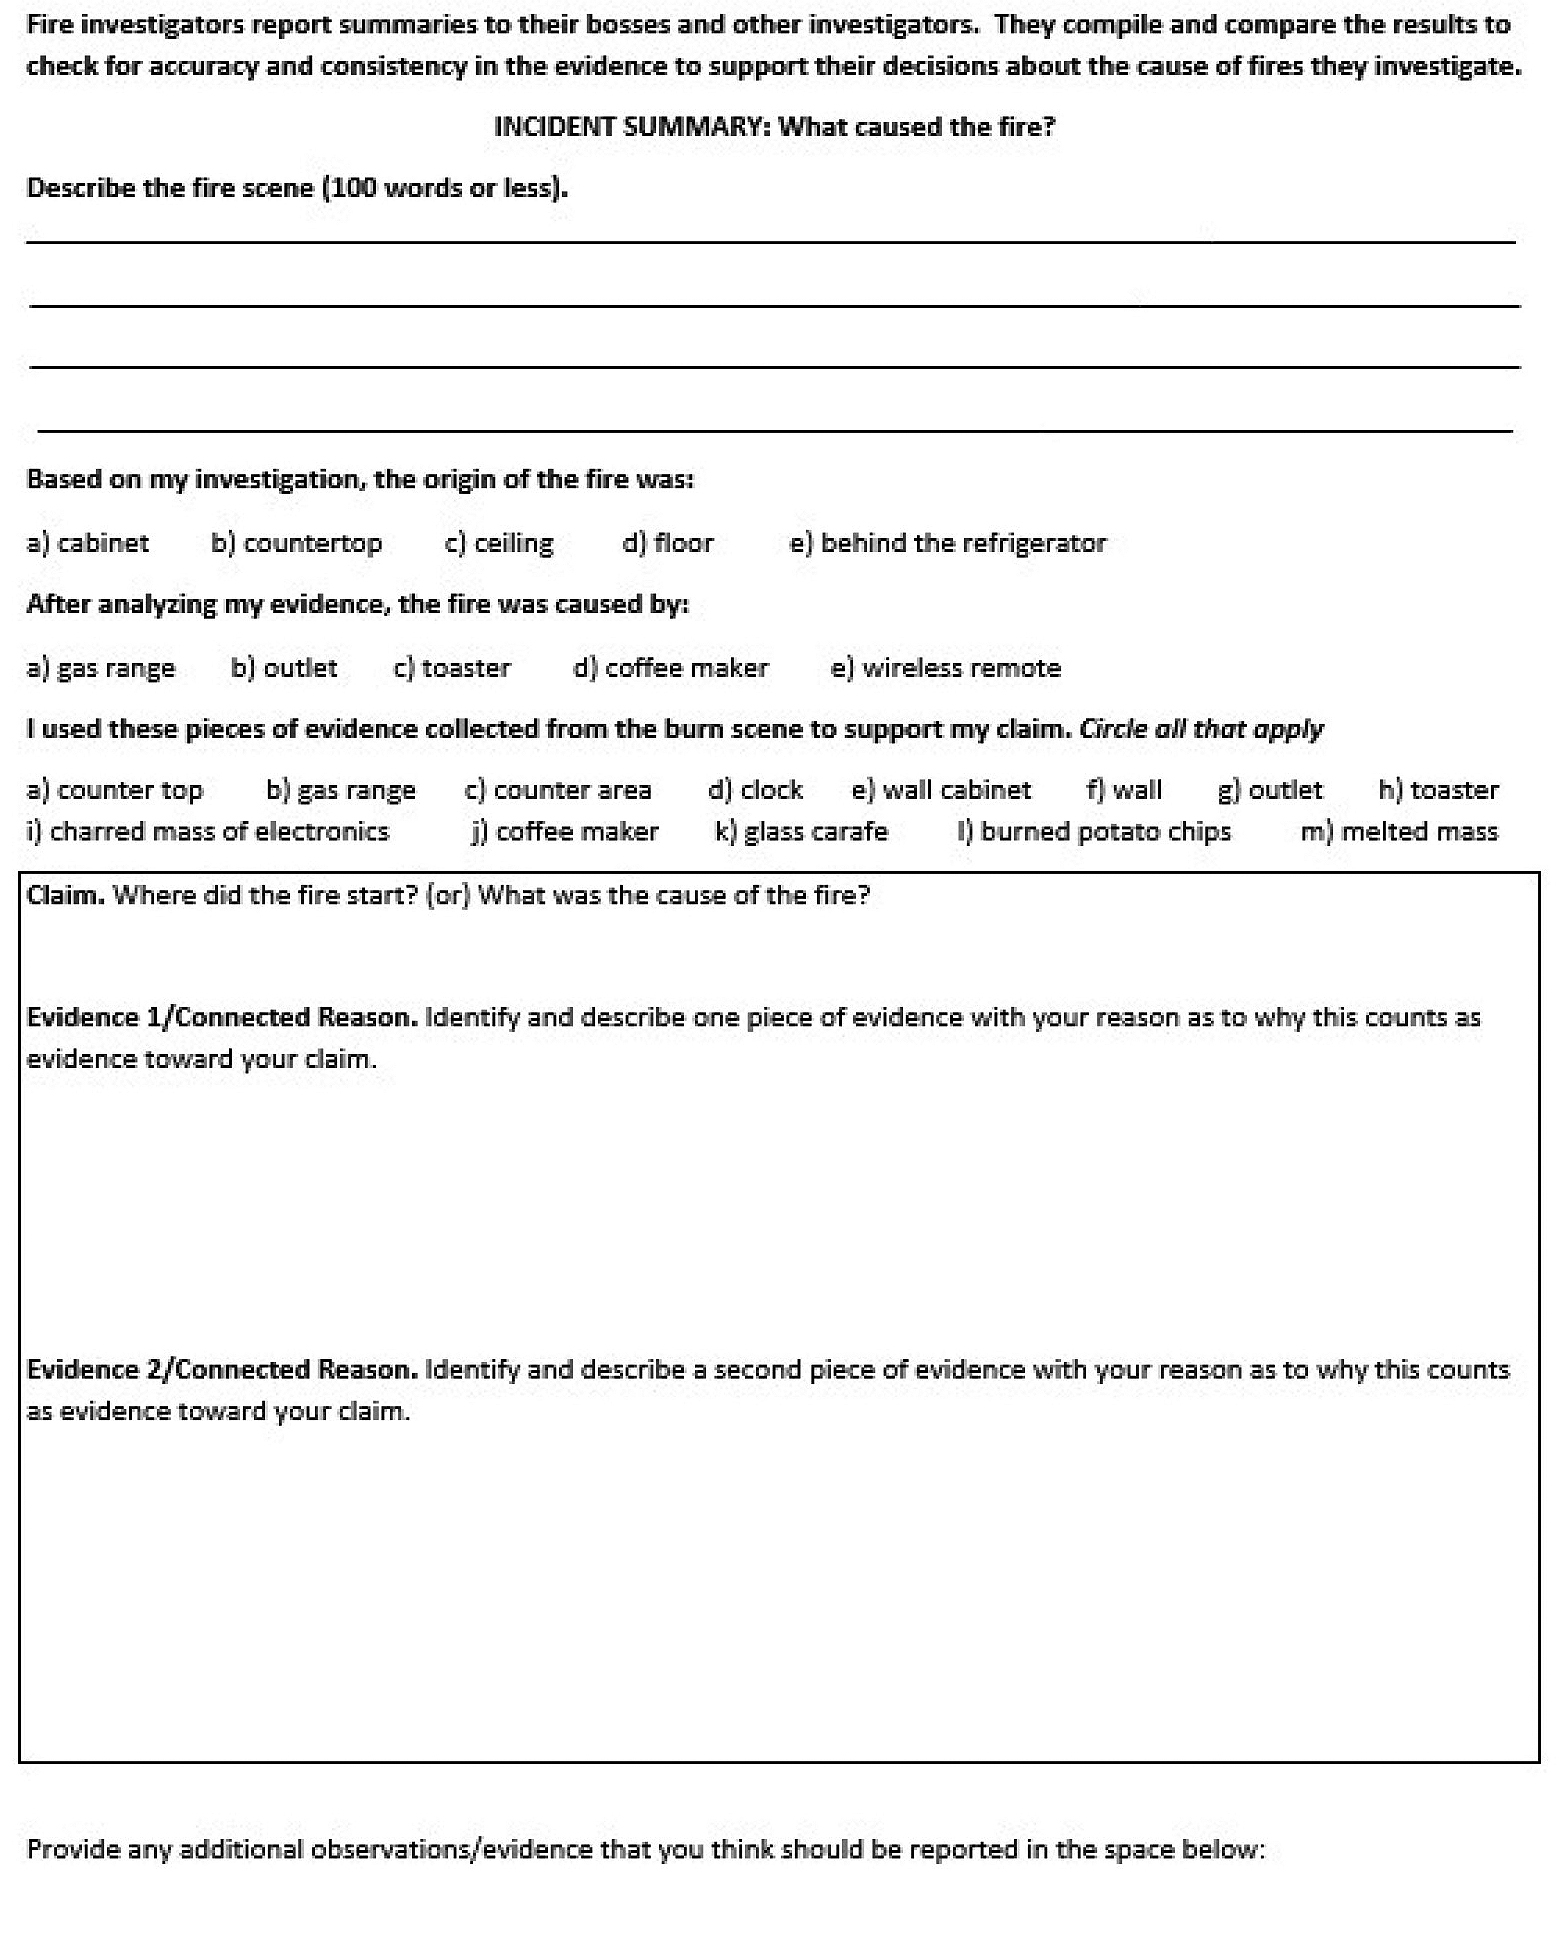
Student structure for incident report.
VIII. Elaboration (anchor assignment, individual, unspecified timeframe)
During a final, whole-group conversation, students share their thoughts on the source of the kitchen fire. We discuss the role of an arson investigator and all the other people who are impacted when a fire occurs. We revisit the initial data used to initiate the learning cycle and share how what they learned can help them prevent fires and be safer citizens in general. As transition, I guide students to think about their questions from the driving question board that have been answered and consider those that still need to be answered. Those that have not been answered become an option for an individualized, interest-based anchor assignment (an assignment to be completed when all other work is finished).
Next steps
Year after year, the consistent motivation and excitement of students during this learning cycle layered with the positive interactions with firefighters makes for a powerful set of student experiences. However, additional options for the elaboration phase of this learning cycle are boundless. Areas of research sponsored by the Fire Safety Research Institute (FSRI) are a great starting point for considering what opportunity to provide students. “Close Before You Doze” (see link in Online Resources), impact of ventilation on fire patterns, and the effect of the type of material in furniture and building materials on fire behavior are just a few of the options highlighted by FSRI (see link in Online Resources). My challenge in this upcoming school year is to execute an engineering learning cycle about one of these areas of research as the elaboration phase.
Acknowledgments
I wish to thank all those who helped make these experiences possible for my students: UL’s FSRI research teams; the fire professionals who helped; Allison Carter, the Cobb County Safety Village Director; Captain Sean Gray of Cobb County Fire Department; and Dr. Sally Creel, STEM and Innovation Supervisor for Cobb County School District.
Online Resources
ACS Middle School Chemistry student activity—https://bit.ly/40Kl9Se
Close Before You Doze—https://closeyourdoor.org/
Fire forensics: Claims and evidence—https://xplorlabs.org/module/fire-forensics/
Fire risk in 2019—https://bit.ly/40H3bAg
Fire Safety Research Institute (FSRI)—https://fsri.org/research
LabXchange—https://bit.ly/3llSTFu
Prerecorded videos on experiment—https://ulxplorlabs.org/experiments/
Wonder of Science—https://thewonderofscience.com/graphics
Supplemental Materials
Photograph of kitchen fire scene used in Xplorlabs—https://bit.ly/3I8Xcff
Direct instruction about chemical equations—https://bit.ly/41dC5Bd
Sequenced phases of learning cycle—https://bit.ly/411nIiZ
Connecting to the Next Generation Science Standards—https://bit.ly/3lGL65m
Amy Gilbert (amy.gilbert@cobbk12.org, agilbert76@yahoo.com) is a middle school science teacher in Cobb County Schools in Smyrna, Georgia.