
feature
Launching Inquiry Into Motion
Using Launch-Explore-Summarize to Explore Energy and Motion
Science Scope—November/December 2021 (Volume 45, Issue 2)
By Jesse Wilcox, Cat Lucht, Katie Murano, Erin McBroom, and Jerrid Kruse
CONTENT AREA Physical Science
GRADE LEVEL 6–8
BIG IDEA/UNIT Newton’s first law, conservation of energy, mass and motion
ESSENTIAL PRE-EXISTING KNOWLEDGE Basic understanding of forces
TIME REQUIRED 3–4 class periods
COST $70 (one-time cost)
SAFETY Students should wear safety glasses.
Teaching science through inquiry requires teachers to structure the learning environment without overly structuring students’ thinking (Wilcox, Kruse, and Clough 2015). One way teachers can effectively structure the learning environment for inquiry is to use instructional models such as the learning cycle (Atkin and Karplus 1962), 5E (Bybee 2015), or Launch-Explore-Summarize (Lappan et al. 2006). In this article, we used a Launch-Explore-Summarize instructional model that was first used in mathematics, but has since been adapted for science (e.g., Isabelle 2007). In the Launch phase, teachers often help set the context for the lesson and access students’ prior knowledge through thought-provoking questions. In the Explore phase, students explore the phenomena and seek to answer the questions posed in the Launch phase. In the Summarize phase, teachers ask questions and guide students to summarize the activity and make sense of the science content. This article describes using Launch-Explore-Summarize to help students develop accurate ideas about kinetic energy, mass, and Newton’s first law through inquiry (MS-PS3-5; and partially addressing MS-PS2-2). To accomplish this, we have students launch a foam disk on the ground from a wooden launcher and a rubber band (see Figure 1). Because students are unlikely to discover complex science ideas without help from a teacher, this article describes a series of four Launch-Explore-Summarize sequences that progressively move from more structured to less structured and from simpler to more complex ideas.
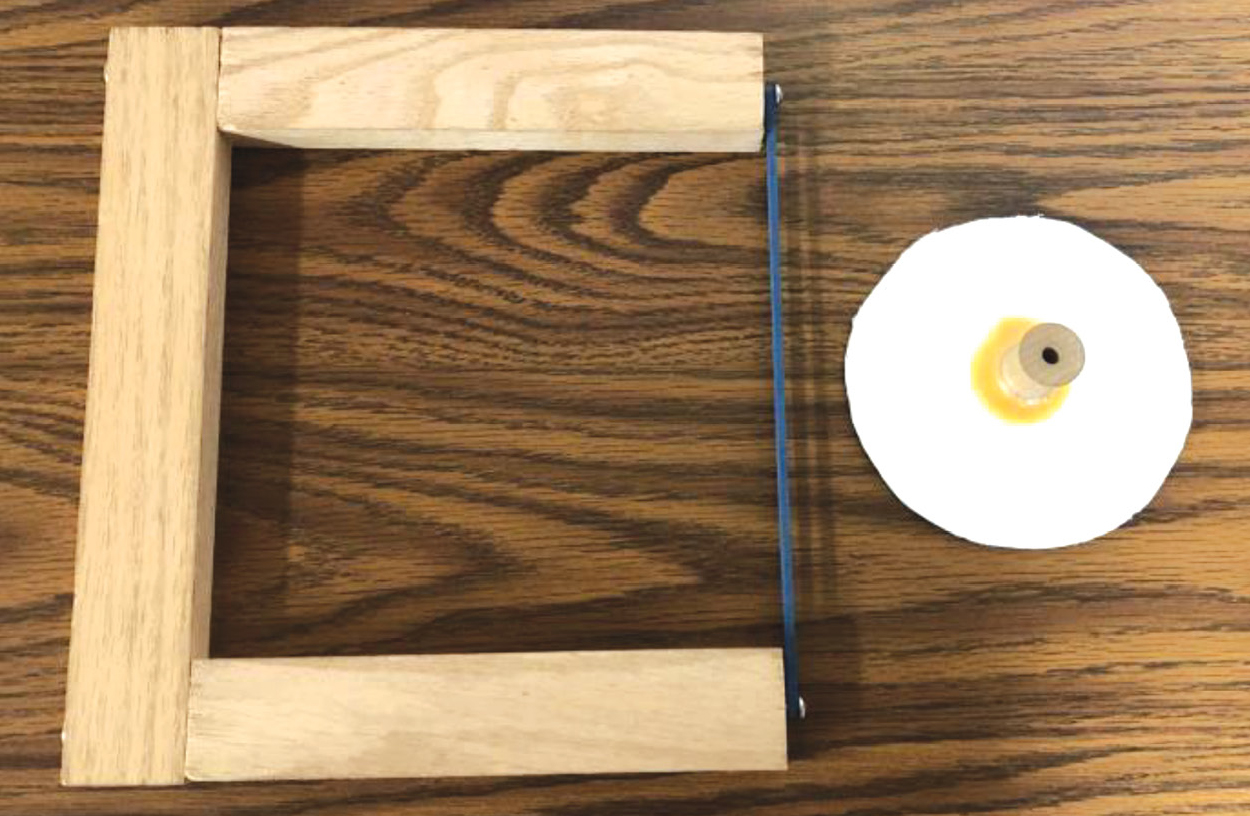
Launcher and foam disk.
Day 1—Amount of energy and distance of the disk (50 minutes)
Launch: Starting the activity
The goal of our first activity is to help students systematically investigate how the amount of energy transferred into an object relates to the distance it travels. We start the lesson by showing students the disk and the launcher (see Figure 2 for list of materials and directions on how to make the launchers). We launch the disk across a table a few times and ask students what they notice. When some students say that the disk does not always travel the same distance and others speculate about the role of the launcher and rubber band, we ask our driving question: “How could we investigate the relationship between the distance the disk travels and how far the rubber band is pulled back?” Our students often speculate that the farther you pull back the rubber band, the farther the disk will travel. Yet, we want students to systematically test their ideas. To support students in designing their investigation we ask, “If you wanted to know how the distance of the disk relates to how far you pull back the rubber band, what would you have to measure?” As students discuss the question in small groups, we sometimes have to differentiate in order to guide students to realize they have to measure both how far they pull the disk back and how far the disk launches forward.
Instructions for making the disks and the launcher.
Materials
- Foam core board
- X-Acto knife
- One CD or DVD
- Marker
- Wood glue
- 0.75 in X 1.5 in X 3 ft lumber ($50)
- Masking tape
- Saw
- Drill
- Sandpaper
- Wood spool
- 2.5 in. wood screws
- 3/4 or 1 in. roundhead phillips wood screws
- Oversized rubber bands
Making the disks (one per student recommended)
- Trace circles onto the foam core board using the CD or the DVD. Also, trace the inner circle.
- Cut the outer circles out with a X-Acto knife.
- Using wood glue, glue the wood spools to the disks where you marked the inner circle.
Making the launchers (one launcher per pair of students recommended)
- Cut the lumber 7.5 in. long for the sides and 10 in. long for the base.
- Tape the three pieces of wood together using masking tape.
- Drill pilot holes using a drill bit. Use the 2.5 in. wood screws to attach the base (10 in.) piece to the sides (7.5 in.).
- Drill pilot holes using a drill bit. Screw in the roundhead screws partially into the ends of the short pieces of wood.
- Attach an oversized rubber band.
Additionally, to get students to consider how many distances they need to test, we ask, “Why do we need to pull the disk back different amounts when we test this?” Students mention that trying different distances can help us better test the driving question. We discuss how these different distances can help us find a pattern. We then give students a launcher and a ruler and ask them to think about how far back they should pull the disk and at what distances. This discussion leads us to guide the students to consider pulling the disk back a short distance (e.g., 4 cm), a medium distance (e.g., 8 cm), and a large distance (e.g., 12 cm) using a ruler to guide them. While the exact number of centimeters students come up with doesn’t matter, we encourage students to not pull the disk back too far and to have a consistent interval between the numbers.
To help students further refine their investigation, we ask students why it is important to test each distance more than once. Students often say things like, “It helps ensure it’s right” and “If we do it more than once, we can see if we get similar numbers every time.” We push students’ thinking forward by asking, “How can multiple trials help us reduce the impact of errors?” Students often note that they could make small errors (e.g., not pulling the disk back the same over time), and multiple trials can help ensure they reduce the effect of the errors. Sometimes we use this as an opportunity to introduce students to the value of averaging their trials, but most often we write three distances the disk traveled on the board all with the same length of initial rubber band stretch (e.g., 5 m, 5.5 m, 1 m) and ask, “What can you say about these three data points?” Students easily recognize that the 1 m trial must have had a problem so we ask, “What should we do next?” Students typically say that we should redo that test. This sometimes leads to a discussion about the role of consistency and expectation in science and, at the very least, helps students recognize the role patterns play in data collection as well as data interpretation.
We help students design a data table that has the distance the disk is pulled back, the trials, and the distance the disk traveled. Once students agree on the table, we break students into groups of two. We have found that groups of two ensured that all students mentally engage with the task, as one student shoots the disk and the other records the information. Alternatively, groups of four could be used to reduce the number of launchers needed, and each member could be assigned a role such as launcher, stage crew, recorder, and mathematician/reporter.
Regardless of group distribution, before leaving the classroom, we ask, “We are going to use these launchers in the hallway, how should we act when we are out there?” Students often mention they should keep their voices down, be respectful of other groups, and not goof around. Along with discussing management, we need to remind students of safety rules: Always wear safety glasses while launching the disks, do not shoot disks or rubber bands at each other, and do not throw the disks. Once we have addressed the management and safety issues, we direct students to where they will be shooting their disks and have students line up to get a launcher, masking tape, pens, disk, ruler, and meterstick and then go into the hallway.
Explore: Students launching the disks
As students are launching the disks, we walk around and monitor their progress, ask scaffolding questions where necessary, and ensure students are on track. We also ensure that students are wearing their safety glasses and are following the other management and safety rules. Often, we ask questions about how they could measure more efficiently such as: “What could you do to keep from having to measure the whole distance every time you shoot the disk?” Students often figure out they could make marks with the masking tape and pen. Other questions we might ask to help differentiate and support each group include:
- What are we trying to test?
- What should we write down?
- Why do you think we need to write down both how far we pull the disk back and how far the disk travels?
- What patterns are you noticing?
- Where is the energy stored? Where is it transferred?
Shooting the disks usually takes around 10 or 15 minutes to complete. Because some groups are done before others, we often ask groups that are finished to measure a different distance.
Summarize: Making sense of how far the disks travel
Once students are finished, we bring them back to the classroom and discuss their findings. We help students think about energy transfer by drawing a picture on the board (see Figure 3). We ask, “What can you tell me about the movement of the disk when I pull the disk back and hold it?” Students note that the rubber band or disk have energy, but neither are moving. Building on this we ask, “What is the source of this stored energy?” Students easily recognize the energy is in the rubber band’s stretch, so we explain this stored energy is elastic energy and ask, “How does the energy transfer, or move when I let go?” Students typically explain that the energy is transferred to the disk, which causes the disk’s motion.
This macro-observation is important, but we want students to dissect this a bit more so we draw another disk next to it and explain this disk represents the moment when we let go. Students note the disk is now moving, but we push them to use energy by asking, “What has happened to the original elastic energy?” Students say that the energy used to get the disk moving is gone. We then ask, “Where has it gone?” With this question we see some “aha” moments as students realize the energy from the elastic band is not the energy of motion. We explain that this energy of motion is called kinetic energy.
Next, we draw one more disk on the board to represent when the disk stops. We ask students, “How much kinetic energy does the disk have when it stops?” Our students often say things like, “It’s not moving, so it doesn’t have kinetic energy.” To help our students understand the energy was transferred, we ask, “What causes the disk to stop moving?” When students recognize that the rubbing of the disk on the floor causes the stopping, we introduce the word friction and ask, “How do you think the friction between the disk and the floor causes energy to transfer?” Sometimes we have to scaffold a bit by asking, “What do you hear or see?” When students say they can hear the disk scratching, we note that sound is a type of energy and that the scratching is causing a very small amount of heat energy to be transferred as well. To illustrate, we have students rub their hands together and feel the heat pass between their hands. We then ask, “How would you summarize where the kinetic energy goes as the disk travels?” Students often say it rubs on the floor causing sound and heat.
Finally, we draw two more pictures on the board that represent the different distances students pulled back the disk (see Figure 3). We ask, “Which disk has the most kinetic energy when the rubber band is released?” Students quickly point to the disk pulled back farther. We ask students for their data and put the average distance the disk travels for each distance it’s pulled back (e.g., 4 cm, 8 cm, 12 cm). We push students thinking further by asking, “Why does the disk that has more kinetic energy travel farther?” If students need more help, we ask, “Why would the disk with more energy take more time to stop?”
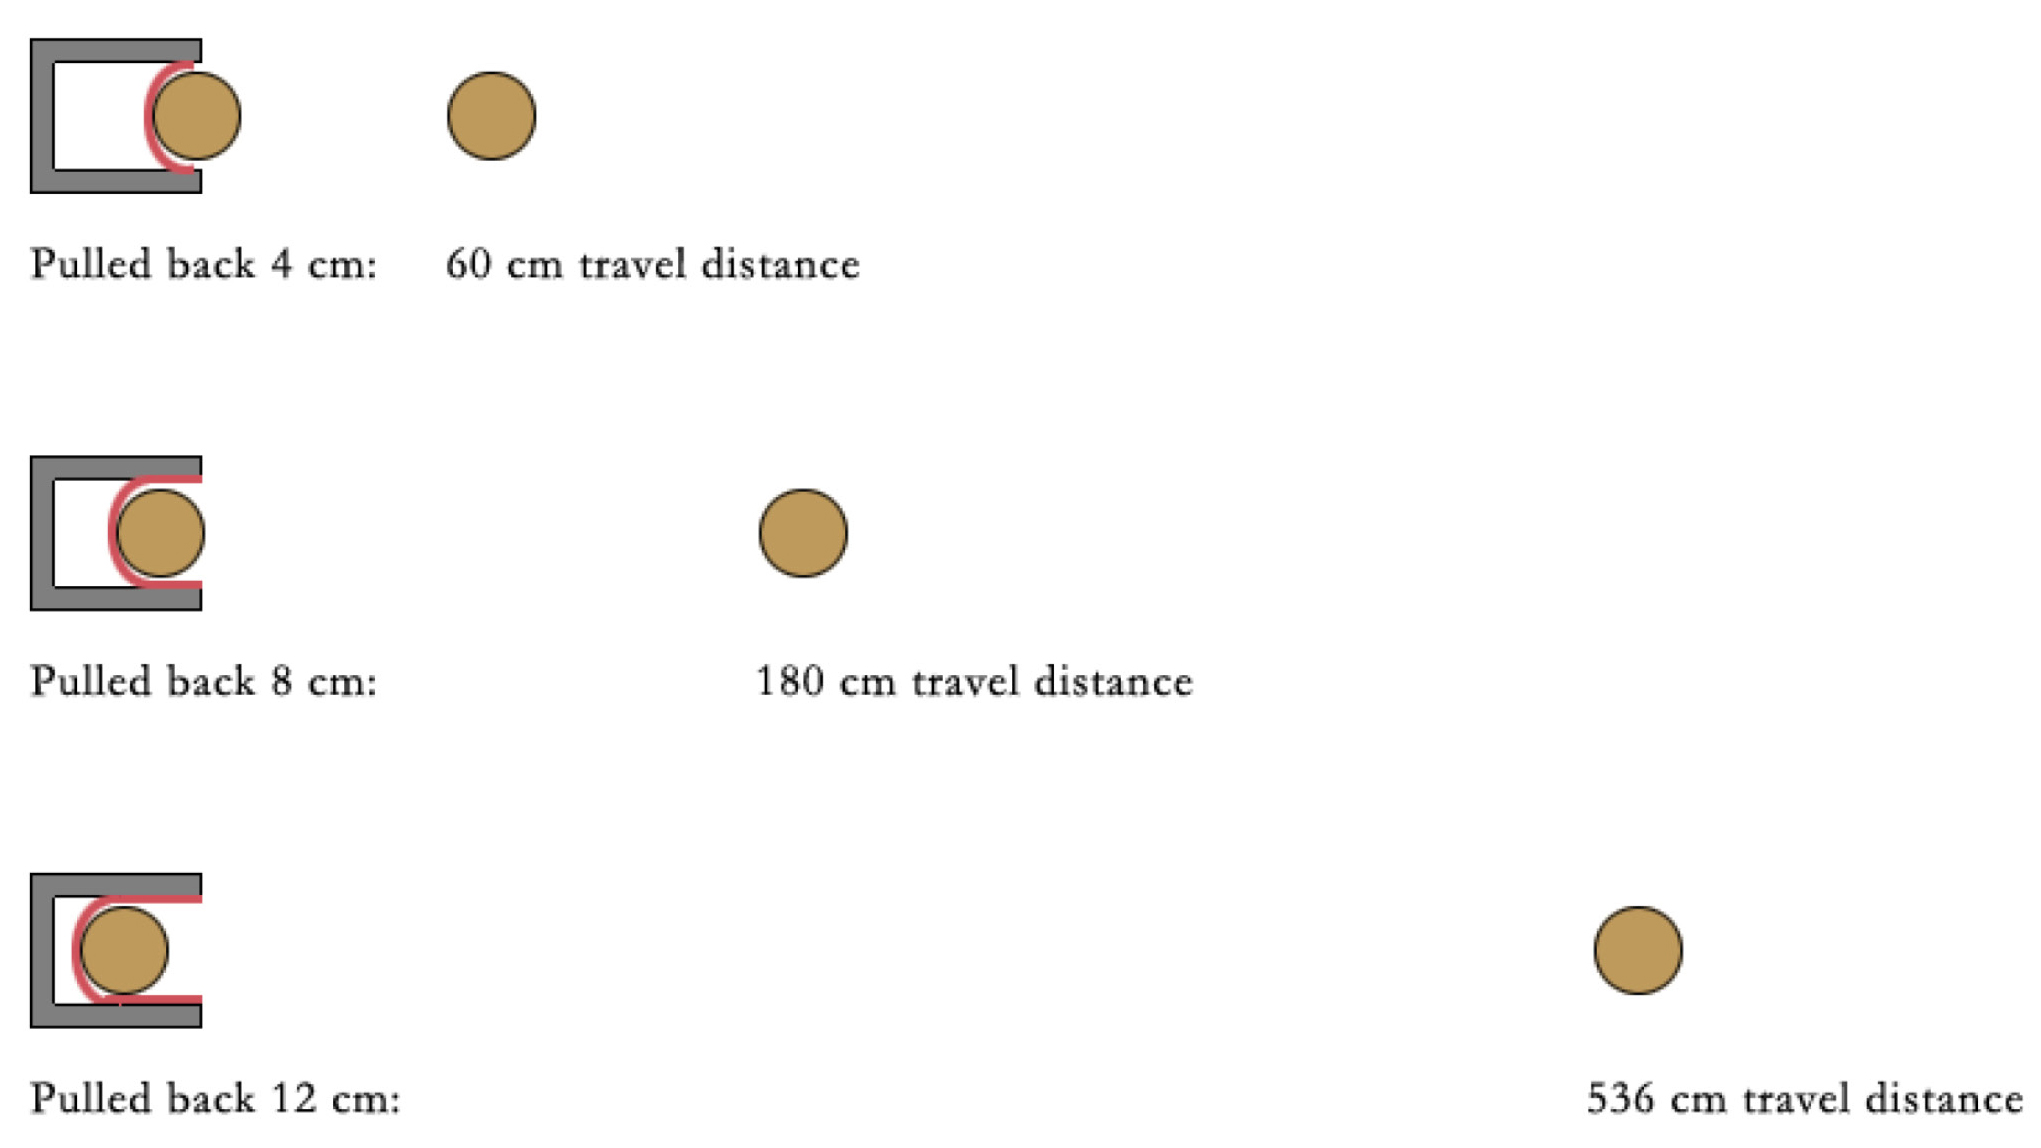
Drawings of disk for different distances pulled back.
Students realize it takes longer for the disk with more energy to transfer its energy to its surroundings and therefore it goes farther. The exploration and discussion help our students get a hands-on, fun approach to seeing the effects of friction and kinetic energy.
Day 2—Newton’s first law (50 minutes)
Launch and Explore: Launching the disks on different surfaces
On Day 2, we begin the lesson by asking students how they could get the disk to travel farther or not as far without changing how far they pull the disk back (8 cm each time). We give students about two minutes to discuss ideas with a partner. Afterward, we ask students to share their thinking. Students come up with a number of ideas. We ask questions such as, “What could we do that would change the amount of friction?” and “Which of these would be easiest to accomplish?” to help them narrow their ideas. Students typically decide to launch the disk on the carpet or use felt paper to make the disk not travel as far and to put wax paper either on the bottom of the disk or launch the disk on a rolled-out piece of wax paper (1–2 m) to make the disk travel farther. While we let students test out different surfaces, we walk around while students explore and ensure students are still following safety guidelines (e.g., safety goggles, properly launching disks). We tell students they can use any of the materials available in the room, but must seek permission first. In many of our classrooms we have a Makerspace setup, and students are familiar with the types of materials we have available. When we have the permission conversation, we ask students questions to get them to carefully consider the amounts of materials they should use.
Summarize: Connecting different surfaces to Newton’s first law
As a class, we get students engaged in discussion by asking, “What happened when we changed the surface?” Students note, “The disk was able to travel a lot farther on a smooth surface” and “The carpet creates more friction.” We then push students’ thinking by asking, “Since we pulled the rubber band back the same distance for each trial, why would the starting kinetic energy be the same?” Students often note, “We gave it the same energy, but it went farther because of less friction.” To help students explain this in more detail, we make another drawing (see Figure 4). For the first two scenarios, we draw the rubber band at 100% elastic energy and 100% kinetic energy. We then draw where the disks stop and ask, “How much kinetic energy does the disk have at these points?” Because we often use pie charts to talk about energy (see Carman and Kruse 2021), students quickly note it doesn’t have any because the disks stopped. We then ask students to discuss where we should draw each picture (control and wax paper) where the disk has 50% of its kinetic energy left and 50% has been transferred. After some discussion, students decide it should be drawn halfway in between where the disk started and where it stopped.
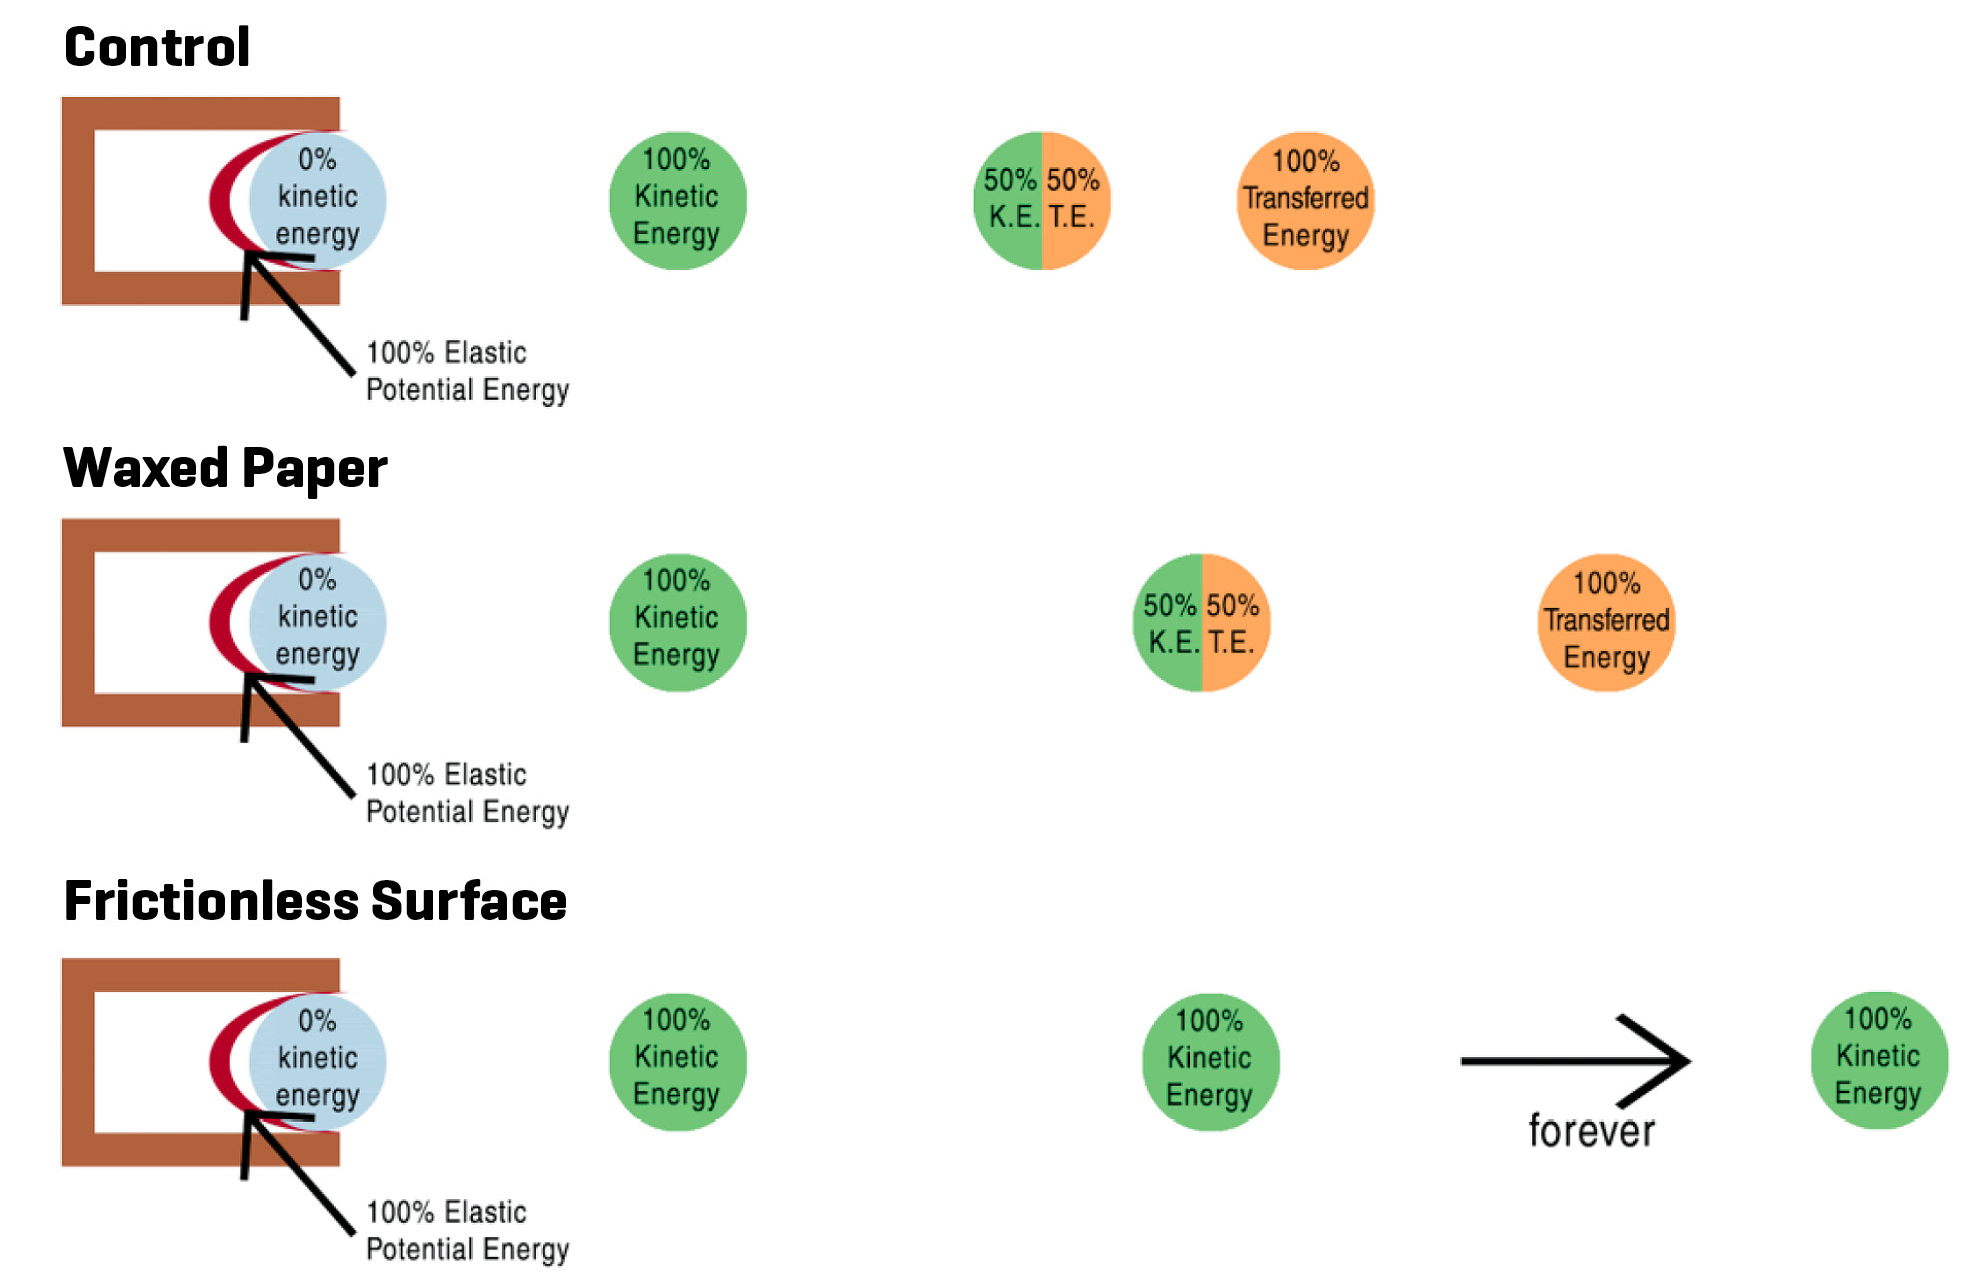
Drawings of disk: control, wax paper, and no friction.
To help students deeply understand Newton’s first law, we can ask them if they have ever played air hockey. We can briefly show a YouTube video of two people playing air hockey and point out how the puck moves easily across the table when the air is on. We ask students, “What happens to the puck when the air is on?” Students realize the air reduces the friction between the table and the puck. At this point, we can go back to our disk diagrams and draw a third frame and disk system. We ask, “Assuming there are no other forces, what would happen if we could make the surface so smooth there is zero friction?” We help students conclude that the disk would still have 100% kinetic energy regardless of where it was on our drawing. Without friction, there is no energy transferred. We then ask, “If no energy is transferred, when would the disk stop?” Students realize, “It would go on forever!” We then tell students that this is the main idea behind Newton’s first law of motion.
Day 3—Relationship between mass and motion (50 minutes)
Launch and Explore: Introducing and testing additional mass
To introduce the relationship between mass and motion, we hold up a washer and ask, “What would happen if we added mass to the disks?” Some of our students think the disk will go farther and some think it won’t go as far. We have students brainstorm how they would test this out, and we remind them that only one variable should be changed at a time so the surface and the distance (8 cm) the rubber band is pulled back shouldn’t change. We discuss how students will keep track of changes in the mass. Most of the time, students decide to use relative masses (5 washers vs. 10 washers), but occasionally groups will suggest massing the disk with washers on a scale. We can remind students of the management and safety guidelines and also add that the washers should not be thrown. At this point, we can hand out washers and masking tape. Students then test out their ideas as we can walk around the room and prompt each student’s thinking.
Summarize: Connecting mass to motion
After our students have experimented for a few minutes and determined the extra mass’s effect, we ask students to explain what happened. Students quickly note, the more mass that is added, the shorter distance the disk travels. We then ask, “What would we have to do to get the disks of different masses to go the same distance?” Students note we would have to pull the disk with more mass back farther to transfer more energy to it. Frequently, we demonstrate this for students, but students could work to investigate how far they would have to pull the disk with more mass back to achieve the same distance as the control disk. Regardless, we have students work in groups of four to create a claim about the relationship between mass, force, and distance. Students often come up with accurate ideas about this. For example, one group wrote, “If you add more mass, you have to add more force to get it to go the same distance as the control.” We then formatively assess students by relating mass and distance to a car and a semi. We ask, “If a car and a semi both ran out of gas and we pushed both of them, why is the car easier to move?” Students note the car weighs a lot less. “If we add more mass, what does that mean about the amount of force we would need to move it?” Students often note the more mass we have, the greater force we would need to cause the same change in motion.
Days 4 and 5—Students investigate their own questions
Launch and Explore: Developing questions and investigations (50 minutes)
At the beginning of Day 4, we tell students they are going to work in groups of two to develop their own questions related to the activities we’ve done with the disks that they will then test. We give them about 10 minutes to come up with ideas and we walk around the room and scaffold where necessary. As we look over students’ emerging ideas, we work to guide students to help them develop testable questions and ensure the ideas are safe. Then, we give students an additional 10–15 minutes to select and refine a question, develop a bulleted tentative procedure, and write how they will practice proper safety procedures. We walk around, listen to students’ ideas, and pose questions when necessary to scaffold them. Finally, when students are ready, they bring their research question, procedure, and safety considerations to us to be approved. We are primarily looking to see the following: The research question is testable, it can be tested in about 30–40 minutes, we have the materials needed, and they’ve considered proper safety measures (e.g., safety glasses, launching projectiles away from people). Students then have the rest of the class period and the beginning of the next class period to test their ideas. Some of the students’ ideas often include:
- How far does a ball travel compared with a disk when the force and mass of both are equal?
- What is the speed of the disk when we pull back the disk different distances?
- What happens to the direction of the disk when it’s hit with a meterstick while moving?
- How far does the disk travel with different amounts of elastic energy (more rubber bands)?
- What is the best amount of mass to get the disk to travel farthest?
Summarize: Finishing tests and presenting findings (50 minutes)
Students begin Day 5 finishing their tests from the day before and discussing their findings (usually 10–15 minutes); we then ask them to return to their seats and we introduce the next phase. We tell students they are going to present their findings on 2 ft. by 2 ft. white boards to other groups in two minutes or less. We ask students what types of things they should consider when preparing their presentations. Students often point out that they should have the research question, a graph or table, and explain what they think the findings mean. We also ensure students address how their investigation relates to kinetic energy, mass, and/or Newton’s first law. After we come to an agreement on what the presentation should entail, we describe how students will present using a gallery walk. As students are in groups of two, one partner stays with the white board and presents while the other partner listens to other presentations. After about three to four rounds, the partners switch. We usually schedule 10–15 minutes for each round (20–30 total) to ensure each student gets a chance to present multiple times and visit multiple groups.
Assessing students’ understanding
We use an energy transfer assessment (see Supplemental Materials) to gauge how well our students are understanding how kinetic energy, friction, and mass relate to Newton’s first law. We have students apply what they have learned about the disks to bowling. It is important to note that we try to help students make connections between our lab activities and the real world through the assessment. While this assessment could be used as either formative or summative, when we summatively assess students, we use a standards-based grading (SBG) approach similar to Wilcox (2011). We start by identifying a learning target and assessing students’ understanding based on an SBG grading rubric (see Supplemental Materials). While a number of approaches to SBG exist, we have found the following principles of SBG useful in guiding our thinking:
- Grades should be a reflection of what students know and can do. Grades based on effort, attendance, behaviors, or time should be avoided or limited (e.g., formative assessments, late points, extra credit, dispositions; Wormeli 2018).
- The learning shouldn’t end with the assessment. Students should have more than one opportunity to demonstrate their understanding (Wilcox 2011).
- Assessments should target various levels of Bloom’s taxonomy (Clarke et al. 2006). This benefits students because many more students have an opportunity to show some success and the higher-level questions push students to use what they have learned in new ways. Teachers also benefit by gaining a deeper understanding of what students know and can do.
- Assessments should guide our instruction and differentiation practices (Clymer and Wiliam 2006/2007).
- Teachers should strive to provide ongoing feedback that is specific, timely, and focused on growth (Edgerly, Wilcox, and Easter 2018).
Conclusion
Inquiry experiences can be described on a continuum from more guided to more open (see Figure 5). Scaffolding students along that continuum throughout a unit and throughout the school can encourage students to deeply engage with science and engineering practices and disciplinary core ideas. Specifically, we have found the Launch-Explore-Summarize instructional model to be an effective approach to teaching science through inquiry. It is particularly effective when used in a progression to help build students’ knowledge over time and increase their autonomy. We have included where we believe each Launch-Explore-Summarize sequence fits on the inquiry continuum (see Figure 5). •
SUPPLEMENTAL MATERIALS

Launch-Explore-Summarize (LES) sequences and the inquiry continuum (adapted from Bell, Smetana, and Binns 2005 and Martin-Hansen 2002).
Confirmation Labs: These labs often consist of results that are already known and/or where the procedures are often described step-by-step. Teachers should minimize the frequency of labs, unless safety issues are significant, because they do not tend to promote deep thinking (Clark, Clough, and Berg 2000).
Guided Inquiry: Students often investigate a teacher-presented question, but students make decisions on how to collect data and are guided to interpret those data.
Open Inquiry: Students design the question and conduct an investigation with the teacher facilitating and scaffolding.
Discovery Learning: Students are in control of every aspect of the investigation and construct their own understanding.. While this is the most like what scientists do, research has pointed out discovery learning may not result in deep learning (e.g., Mayer 2004; Minner, Levy, and Century 2010) due to lack of developmental readiness, background knowledge, and time. Therefore, discovery learning should be used with caution.
Jesse Wilcox (jesse.wilcox@uni.edu) is an assistant professor of biology and science education at the University of Northern Iowa in Cedar Falls, Iowa. Cat Lucht and Katie Murano are students at Simpson College in Indianola, Iowa. Erin McBroom is a teacher at Pleasantville Junior High School in Pleasantville, Iowa. Jerrid Kruse is a professor of science education at Drake University in Des Moines, Iowa.
NGSS Physical Science Physics Middle School