
Making in the Middle
The SDM Finger
By SARA BERNDT, MAXWELL HERMAN, CONOR WALSH, AND DONAL HOLLAND
Exploring makerspaces, engineering, and more
The Next Generation Science Standards (NGSS) call for the incorporation of engineering design into grades K–12, anticipating that early exposure will “help students see how science and engineering are instrumental in addressing major challenges that confront society today” (NRC 2012). Early exposure to engineering design activities in K–12 classrooms aids students in forming an understanding of what is required in engineering problems, and influences realistic perceptions of the field that can help young people prepare for future careers (Katehi, Pearson, and Feder 2009).
In this article, we describe an engineering design–focused workshop aimed at students age 10–14 that took place over two three-hour sessions. Students used easily accessible materials and open-access designs to build a soft robotic component and, later, combined their components to create a testing model. Soft robotics is especially well-suited to classroom use because of its hands-on nature and use of inexpensive fabrication methods. Engineering design lessons that focus on soft robotics can be a vehicle for further student-led engineering activities.
This article focuses on an activity in which students fabricated robotic components that we call Shape Deposition Manufacturing (SDM) Fingers. We initially ran this activity as part of a weeklong summer program at the Harvard Ed Portal in Allston, Massachusetts. Based on the experience of students and educators in this workshop, we subsequently refined the lesson and have made it freely available online (see Resources).
Background
Soft robotics is a subset of robotics focused on creating electromechanical components and systems using compliant materials, such as rubbers or fabrics that are able to stretch, bend, or deform when external forces are applied. Using soft materials to make robots has many advantages, including safety, because soft materials can be much less harmful for human–robot interactions than traditional rigid components. The compliant nature of soft robotic components allows interaction with their environment in a dynamic and adaptable way; for example, such materials can often change their shape in response to the environment.
Soft robots can be made with very simple materials such as fabrics, balloons, and tape. Many robotics workshops for younger students focus on computer programming and electronic engineering, which can be an effective way to attract some students to engineering, but risks alienating learners who have more interest in and aptitude for physical design. By emphasizing hands-on design-and-build exercises, soft robotics activities may attract a broader range of students to engineering overall. In addition, students interested in societally beneficial endeavors may enjoy the corobotic focus of soft robotics (Bruning et al. 2011; Terry, Briggs, and Rivale 2011). Corobotics, or human–robot collaboration, refers to one of the hallmarks of soft robotics: the ability for robots to interact with humans safely and collaboratively, rather than replacing humans.
As such, soft robotics can appeal to young students who are interested in applications for medical devices, companion robots, and underwater robotics for scientific research (Milgram 2011; Scott and White 2013).
The Soft Robotics Toolkit
The ongoing integration of engineering design into curriculum standards has led to an increase in demand for teaching materials, but educators are often left on their own to implement new classroom activities (Brophy et al. 2008). To supplement this need, the Soft Robotics Toolkit website (see Resources) includes the recently launched Resources for Educators section (see Online Supplemental Materials for screenshot). This section of the website is devoted to downloadable engineering activity plans. These plans were developed to enable a broader range of students and educators to have access to engineering resources by focusing on activities that lower the barrier of entry for those starting out in engineering design.
Each downloadable folder contains a number of essentials to aid teachers conducting the activities. An illustrated student guide detailing the steps of construction is accompanied by worksheets to record students’ hypotheses and reflections throughout the process. A teacher’s version of the guide, answer keys to accompany student worksheets, lists of materials, and spreadsheets to calculate material costs per student are also included to support educators in bringing the activity into classrooms.
The teachers’ materials were created to be adaptable to a variety of environments, including classrooms and afterschool robotics clubs, for educators with minimal prior experience in running hands-on engineering design lessons.
In our work with students at both K–12 and undergraduate levels, we have found that a necessary precursor to having students design their own soft robotic components is for them to get experience with fabricating and testing predesigned components, as this helps establish an understanding of relevant design principles.
The student guides describe step-by-step processes for creating and experimenting with soft robotic components using simple engineering concepts, and call for easily acquired materials such as cardboard and tape. The guides also consist primarily of illustrations rather than written instructions. This may prove helpful for English language learners, but some students may require additional assistance to fully participate in the activity. Students with an individualized education program or limited motor control may benefit from additional support to complete the activity.
SDM Finger activity
The SDM Finger activity guides students through the fabrication of an individual robotic component: a compliant structure designed to mimic the form and movement of a finger. The simple, fingerlike structure is created using shape deposition manufacturing, a technique in which components are both fabricated and assembled in a single process (Bailey et al. 2000).
When multiple fingers are added together in an array, the resulting device is termed a gripper. This acts as the hand of the robot and can be used for grasping and handling objects. Soft finger grippers are able to bend and flex easily to conform to the object they are trying to hold, which leads to lower contact forces and a gentler grasp. Many rigid grippers require objects to be placed perfectly in a certain orientation for grasping, but soft grippers’ compliant nature allows them to grasp objects with irregular shapes whose orientation is unknown (Dollar and Howe 2006).
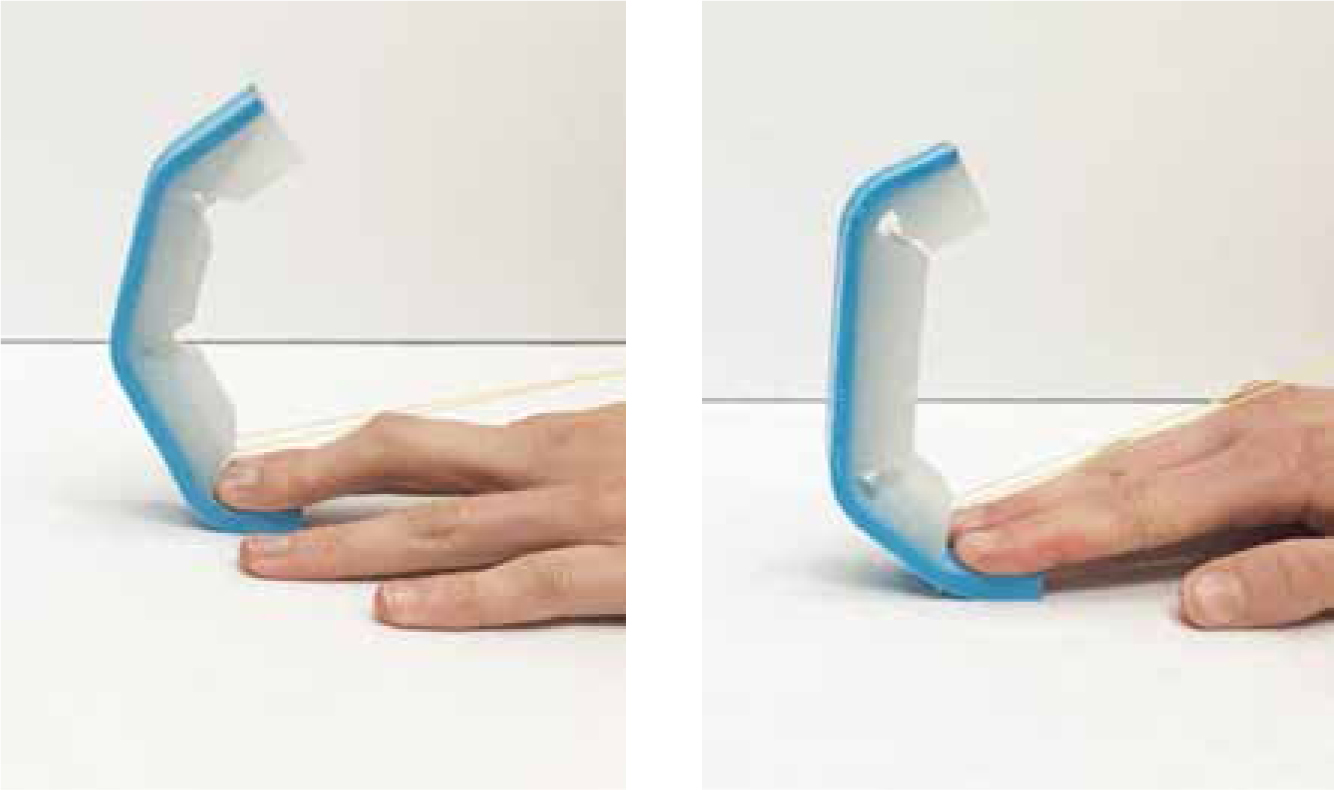
Students begin with an object, either assigned or self-selected, and create a gripper to hold that object. The design of the gripper can then be improved through testing and refinement, thereby allowing students to experience design as practiced by engineers. The fingers are actuated by pulling on a single string that is fed through tubes embedded in the silicone. When pulled, the string takes on the role of the tendons of the finger and makes the silicone structure curl inward. After students fabricate the fingers, multiple fingers are combined to create a gripper testing model whose performance in grasping various objects is assessed. This testing model aligns to the NGSS on engineering design (see standards alignment on p. 20), and encourages students to ask, imagine, plan, create, test, and improve within a design task. In doing so, students experience every stage of the design process and learn the essentials for tackling future challenges.
Engage (Session 1)
Before beginning the activity, students are given a brief introduction to soft robotics, relevant terminology, and potential applications. This introduction includes examples of soft robotic uses, as well as an overview of the materials and components used during the activity, so students can understand and discuss using correct terminology. Providing relatable examples of soft robots allows students to form connections and interest in their task. For example, most students may not be familiar with this relatively new field of robotics, but many will have heard of Disney’s animated movie Big Hero Six and its soft inflatable robot, Baymax. Students may not realize this is an example of soft robotics, but by relating soft robotics to something they are familiar with, teachers can give students a better context for understanding.
Explore and Explain (Session 1)
After the introduction to soft robotics, students individually complete the “Before You Build” section of their worksheets (see Online Supplemental Materials). This set of questions asks students to form a hypothesis for the device’s movements and sketch out the motion they anticipate it may make (see Figure 1).
Making hypotheses for how the device may perform is crucial before fabricating the device. Asking students to explain their reasoning gets them thinking about design principles and modes of operation. For example, if a student predicts that the finger will simply slide across the table when the strings are pulled, he or she should back this up with evidence from the structure of the finger or the forces involved. Conversely, if a student predicts that the finger will curl up like a human finger, he or she might describe the thinner portions of the structure as weak points that may bend when force from the string is applied. By answering the questions, students may also begin to see these inquiries as questions to be asked of themselves, as is required of scientists, designers, and engineers.
Once students complete the preactivity materials, they can start building the fingers according to the illustrated guides. Students should wear safety goggles during all construction steps. Figure 2 shows the materials students will use to construct the soft fingers.

Students first build the mold, a structure that will hold the silicone and allow it to form the desired shape. Students use cardboard, scissors, tape, and hot glue to form the body of the mold. Students must be advised on proper safe usage of hot glue guns, including to never touch the tip where the glue comes out and to never leave a plugged-in hot glue gun lying on the table or unattended. When constructing the mold, it is important to check for potential leakage points where two cardboard pieces may not have been glued together tightly enough. Any gaps should be filled in with extra hot glue. Plastic tubing is then suspended within the mold; this will later be used as a pathway for the thread that acts as the finger’s “tendon” (see Online Supplemental Materials for diagram).
Details about required materials are included in the downloadable activity folder, which features a document of vendor information, a price-per-student calculator, and specifications for each material. The silicones used in the activity are nontoxic, and the documentation provided by the manufacturer lists the personal protective equipment required. A properly ventilated room is suggested, as well as vinyl gloves and smocks to protect against spills.
After the molds are constructed, the first layer of the silicone (Dragon Skin 30 from Smooth-On, Inc.) can be mixed and poured into the mold. Dragon Skin 30 is a two-part silicone, which starts as two different liquids that, when mixed, will begin to set into a solid material. The resulting silicone has a Shore A hardness of 30, meaning it is slightly harder than a rubber band (Short A hardness of 20) and softer than a pencil eraser (Short A hardness of 40). This material is used to create the pads of the fingers and will be the part of the finger touching any object grasped, so a softer silicone is used.
The silicone will cure—become solid—in about four hours; however, this can be accelerated by heating the mixture. Placing the molds in a dedicated toaster oven at 70°C (158°F) cuts the curing time to just 15 minutes. The curing process will not produce any strong odors or residues, but if cured at too high a temperature for too long, the hot glue bonds of the mold may melt. The silicone can be tested by lightly tapping it with a craft stick; if it is still very soft or wet, it needs more time in the oven.
Although the activity is presented here as taking place over two three-hour sessions, it is of course possible to break the activity into multiple shorter sessions. If a teacher wishes to do this, we recommend that the curing stages be used as a natural time to end a given session.
The “While Curing, Part 1” section of the worksheet (see Online Supplemental Materials) can be completed while the first layer of silicone cures in an oven and serves as a reflection regarding the use of the device.
Asking students to imagine potential uses allows connections to be made between robotics and real-world design needs. Introducing students to a hypothetical “user” is an important factor in engineering design, as engineers must identify the needs of users to define design constraints, considerations, and parameters. Students are also asked to imagine features that could be added to the device to create better robotic solutions.
After the first batch of silicone is fully cured, the second layer (Smooth-Sil 950 from Smooth-On, Inc.) can be mixed and poured into the mold to complete the final layer. Smooth-Sil 950 is more rigid than Dragon Skin 30, with a Shore A hardness of 50. This silicone is used to create the solid structure of the finger, so a harder and more durable silicone is used. This layer can be left to cure at room temperature overnight or can be cured in the oven for 15 minutes. At this stage, a second set of questions from the worksheet is administered (see Online Supplemental Materials), prompting students to predict differences in the materials’ properties (e.g., flexibility or stretch) and explain what effect these differences might have (e.g., stability or comfort).
Explore and explain (Session 2)
The activity can be adapted to address other science topics. For example, asking students to explore the material properties of the silicones can align the activity to other disciplinary core ideas (DCIs) such as MS-PS1-2. This DCI states students should “analyze and interpret data on the properties of substances before and after the substances interact to determine if a chemical reaction has occurred” (NGSS Lead States 2013).
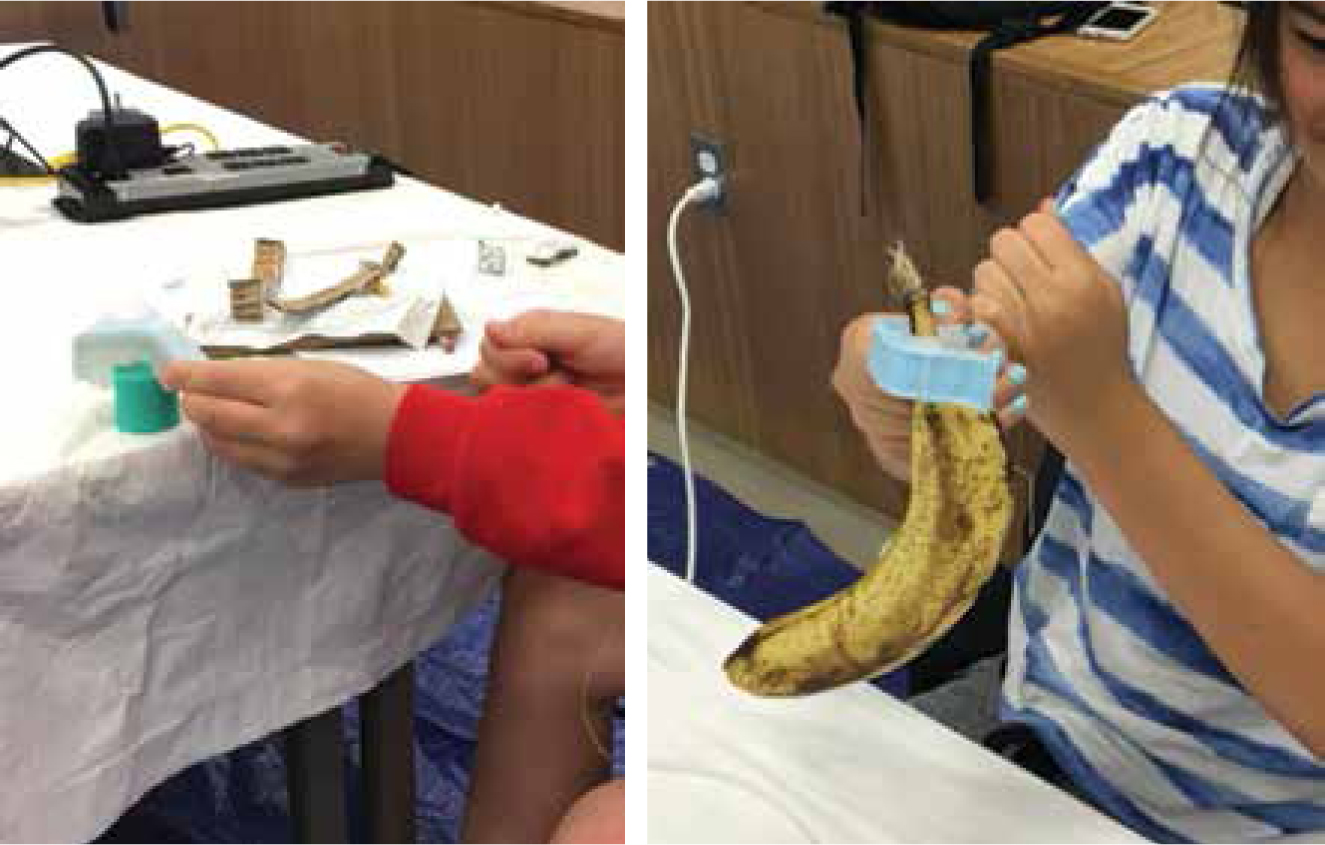
Session 2 of the workshop begins with students finishing their fingers by removing them from the cardboard molds and lacing the cord through the pathways created by the tubing. Students are encouraged to experiment with physical uses for the fingers. Students are often quick to use the finger like an extra appendage, picking up various objects around them such as pencils, erasers, and even their snacks (Figure 3).
Elaborate (Session 2)
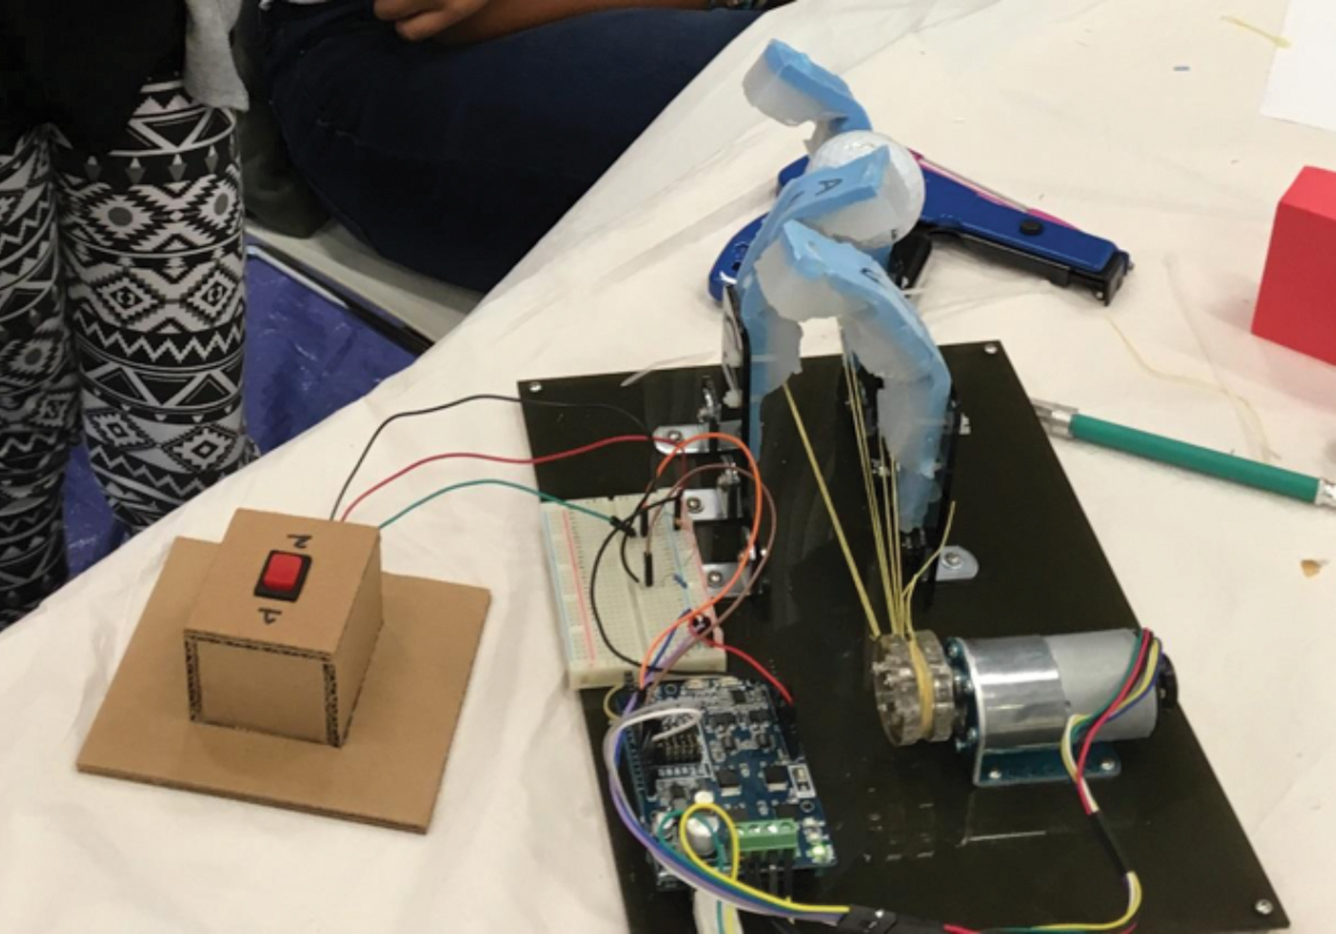
After sufficiently testing the abilities of the single fingers, students form teams to create and test the grippers. The documentation for one particular gripper is included on the Soft Robotics Toolkit website. The activity plan includes additional options for electronic or manual grippers to suit any classroom (Figure 4). The electronic version was used within the workshop and is created by combining multiple students’ fingers in a simple base and connecting the strings to a motor that can wind and unwind to close the fingers and control the gripper. Students who chose similar finger geometries should be grouped together so that the groups can compare how the different finger shapes lead to different performances in grasping. In the workshop, students recorded distinguishing features about each object, including weight, size, shape, and surface characteristics, to understand the factors that can affect a gripper’s performance.
Evaluate (Session 2)
To evaluate performance within this activity, students should be asked to explain their reasoning for each design they present, using evidence from the activity. Ideal responses would demonstrate an understanding that the shape of the fingers, their position within the base, and the number of fingers within the array can each have varying effects on the gripper’s ability.
The teacher should emphasize that systematic testing of a design is an important component of the engineering process. After students understand how to test a soft robotic device’s performance, a positive outcome would be that they can anticipate ways to improve the performance if the process were repeated.
Reflections
Mistakes in fabrication of the SDM Finger are to be expected, especially with students who are new to hands-on construction techniques. However, mistakes are not necessarily a negative outcome. These should be taken as learning experiences and are especially important to help students understand that engineering is not about building perfect devices the first time, but about iteration, with lessons learned informing subsequent iterations. Solving problems that may arise is an important part of the process.
During our implementation of this workshop, many students accidentally blocked the tubing in their mold with silicone or created a kink in the tubing instead of a gentle bend. This can be salvaged by cutting away the silicone near the tip of the finger to expose the tube and removing the kinked section. We also noted that some students had a hard time cutting the cardboard pieces out of the template, as it was too thick. Younger students may need these pieces to be precut.
The silicones used in this workshop, Dragon Skin 30 and Smooth-Sil 950, take time to cure, even with an oven to accelerate the process. Other, more quickly curing silicones can be substituted to reduce the overall time of the activity while still producing a working SDM Finger. For example, the Body Double Fast Set silicone from Smooth-On, Inc., will cure in just seven minutes without an oven, compared to 15 minutes when using an oven for Dragon Skin 30.
Conclusion
Using soft robotics activities developed for classroom use, such as the SDM Finger activity presented here, can serve as effective and engaging engineering lessons for students. Based on our experiences in previous education and outreach efforts, we observed that these materials can effectively engage and excite students and have the potential to interest students in participating in engineering activities in the future.
The SDM Finger activity yields a testing model that aligns to the NGSS standards for engineering design. This activity can help students build engineering knowledge that can later serve a basis for more student-led design activities, including designing their own soft robotic devices.
Connecting to the Next Generation Science Standards (NGSS Lead States 2013)
- The chart below makes one set of connections between the instruction outlined in this article and the <i>NGSS</i>. Other valid connections are likely; however, space restrictions prevent us from listing all possibilities.
- The materials, lessons, and activities outlined in the article are just one step toward reaching the performance expectation listed below.
Standard
MS-ETS1 Engineering Design
www.nextgenscience.org/dci-arrangement/ms-ets1-engineering-design
Performance Expectation
MS-ETS1-4. Develop a model to generate data for iterative testing and modification of a proposed object, tool, or process such that an optimal design can be achieved.