
A Water Wheel Challenge!
Learning about energy conversion through engineering design
Whether playing on a jungle gym, puttering around the backyard with a garden hose, or hiking by rivers and observing nature, children see the effects of energy and interact with the associated forces along with the matter around them. Interactions with forces and energy can range from a toddler dropping toys repeatedly for someone else to pick up to a group of fifth graders playing soccer at recess. In addition, students may have observed the power of water to move physical objects by seeing news footage of rising floodwaters, experimenting with a garden hose, or spending a day at the beach. Teachers can leverage these informal life experiences to create formal inquiries for students and make connections to the concepts of contact forces, energy transfer, and the conservation of energy. All of these concepts can be applied to harnessing energy from natural systems, in particular flowing water, in order to solve modern engineering problems. A Framework for K–12 Science Education (NRC 2012) and the resulting Next Generation Science Standards (NGSS) (NGSS Lead States 2013) have captured big ideas of science and engineering in the crosscutting concepts (CCC). Energy and matter is one of these central themes in science and engineering education.
Engineering education provides a way to explore real-world math and science projects while learning the processes of engineering. Engineering education in K–12 has been shown to improve student achievement in mathematics and science, awareness of the diverse backgrounds of engineers, ability to participate in the Engineering Design Process (EDP), and technological literacy (Stohlmann, Moore, and Roehrig 2012). Additionally, participating in the EDP has been shown to increase critical thinking and awareness of the constructed world around students by placing them as the director of their learning about solution development for modern problems (DiFrancesca, Lee, and McIntyre 2014). Engineering design is part of this structured lesson to help students understand the complexities of energy transfer in the design and use of a water wheel. Students serve as lead designers of their water wheels and work with clients (teachers or community members) to define the engineering problem; prepare potential design solutions; discover the use of motion and stored energy in real-world problem scenarios; and build, test, and redesign a functional prototype to create the “best” solution to their designed problem statement.
This three-hour lesson (which fits within the 3–5 grade NGSS ETS standard) allows students to explore the conversion between stored and motion energy while working in a team to design and build an interactive water wheel that lifts the most weight. The learning objectives associated with this lesson are:
- Students will design, build, and refine prototypes to explore the conversion between stored and motion energy.
- Students will collect qualitative and quantitative data to make claims about the effectiveness of their water wheel designs.
- Students will engage in the engineering design process to solve the design challenge.
- Students will use mathematics to compute the cost of materials while keeping a running budget of initial cost compared to final cost after final iteration. Additionally, students will compare initial height of washers raised to final height of washers raised in centimeters while at the same time calculating the mass of the washers lifted while building and improving the water wheel.
A note on safety: This lesson introduces few external hazards for students but does incorporate simple laboratory equipment (e.g., ruler, scissors, weights) that requires the use of safety goggles.
Engage
We begin with a scenario of a problem in which there is a need to lift a specific amount of weight to a certain height with limited resources and no electric power. A possible scenario could be, “I live in a two-story cabin in the woods and there is no electricity. However, there is a large stream of water that is very near to my cabin. I have a large piece of furniture that is very heavy that I need to add to the second story balcony. The furniture is too large and too heavy for me to carry up the stairs. How can I use the natural environment to construct a mechanism that will lift the furniture up to the second floor? Can we create a prototype of a mechanism that can accomplish this task for me?”
To help students visualize the problem, we show 10 seconds of a video (see Internet Resources) depicting a two- story log cabin by a river. Teachers should ask the students to think about what resources are available in the environment and what mechanism we could build to help us lift a heavy piece of furniture. In small groups of three to four students, have them brainstorm and record their ideas on a piece of paper or small whiteboard. After students have brainstormed ideas, have each group share their ideas. Teachers should not be discouraged if their students do not make the connection between the energy of moving water and the energy needed to lift furniture. Depending on students’ prior experiences, they may or may not be familiar with a water wheel. Teachers can ask students how the river can help with lifting the furniture. If students are still struggling with this question, engage them in a short demonstration. For example, dirt or sand can be placed at the top of a paint roller tray. Pouring a cup of water down the tray, the teacher can focus the students’ attention on the power of water to move solids by asking questions such as: What is happening to the dirt, and what is moving the dirt? As students’ initial conceptual understanding of the problem develops from the video and teacher demonstration, the teacher, while acknowledging all student ideas, will explain that they will build a water wheel to lift the heavy furniture. Two different videos of a water wheel (see Internet Resources) are shown with the following questions:
- What is a water wheel?
- What does a water wheel look like?
- What are some purposes of water wheels?
At this point in the lesson, we are gathering information about students’ prior knowledge with water wheels, and it is not necessary that they understand any specific purpose of a water wheel.
Explore
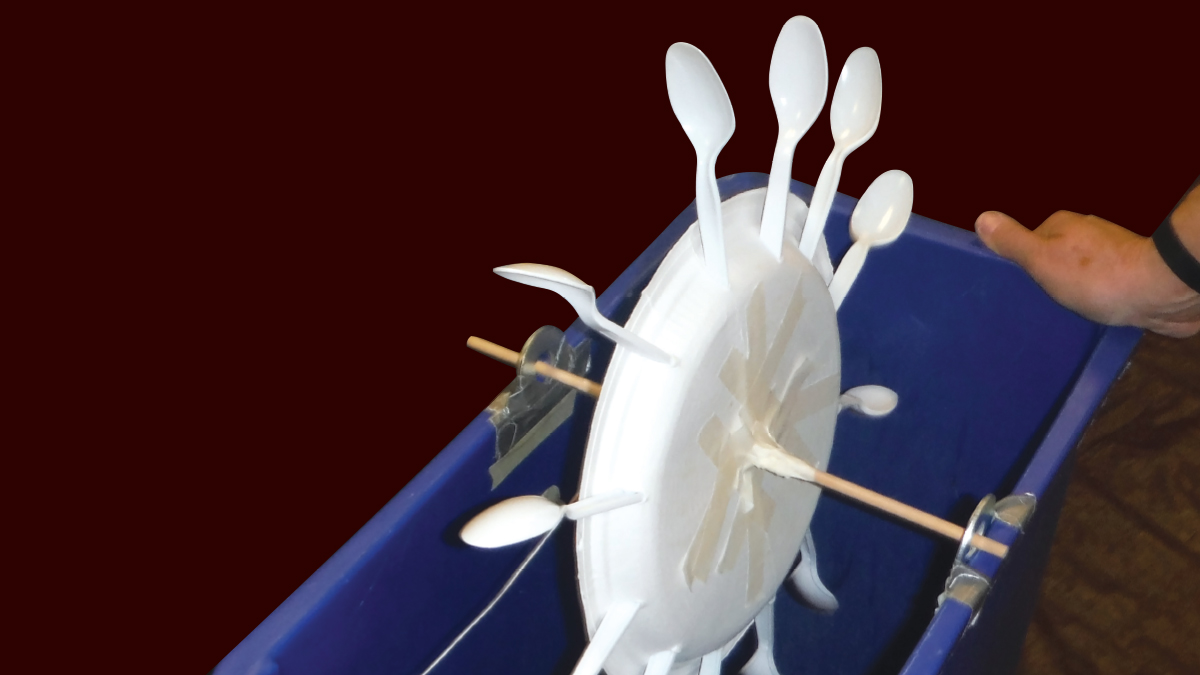
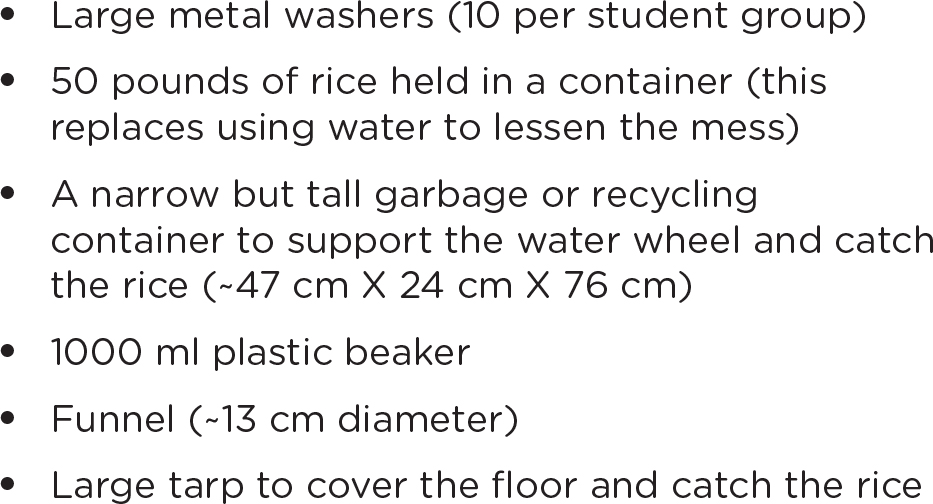
For the engineering design challenge, students will design and build a small water wheel that provides enough energy to lift a predetermined weight as high as possible. As with any design challenge, there are constraints: (a) the water wheel must be built using only the materials provided (Figure 1, p. 47), (b) the water wheel must lift 10 metal washers as high as possible using only 2,000 ml of rice, and (c) the construction of the water wheel must stay within a given budget (Table 1). Define the engineering design constraints by explaining to students that each water wheel needs to attach to a wooden dowel (usually the wooden dowel goes through the middle of the water wheel); the wooden dowel and water wheel will attach to the inside of a container; and a string will connect a cup of 10 metal washers to the wooden dowel (students will need to decide how to accomplish this) so that when the rice is poured over the water wheel it causes the wheel to turn and the string to wind around the dowel (or another part of the water wheel), lifting the cup of washers.
Materials list.
| Table 1 | ||||||||||||||||||||||||||||
|---|---|---|---|---|---|---|---|---|---|---|---|---|---|---|---|---|---|---|---|---|---|---|---|---|---|---|---|---|
|
||||||||||||||||||||||||||||
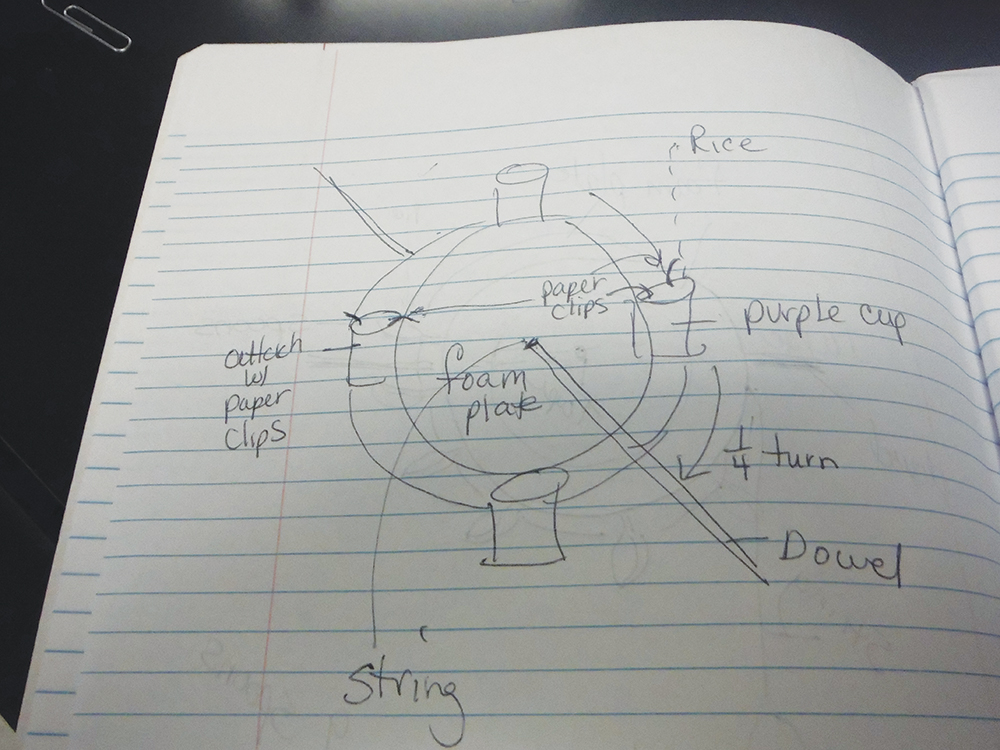
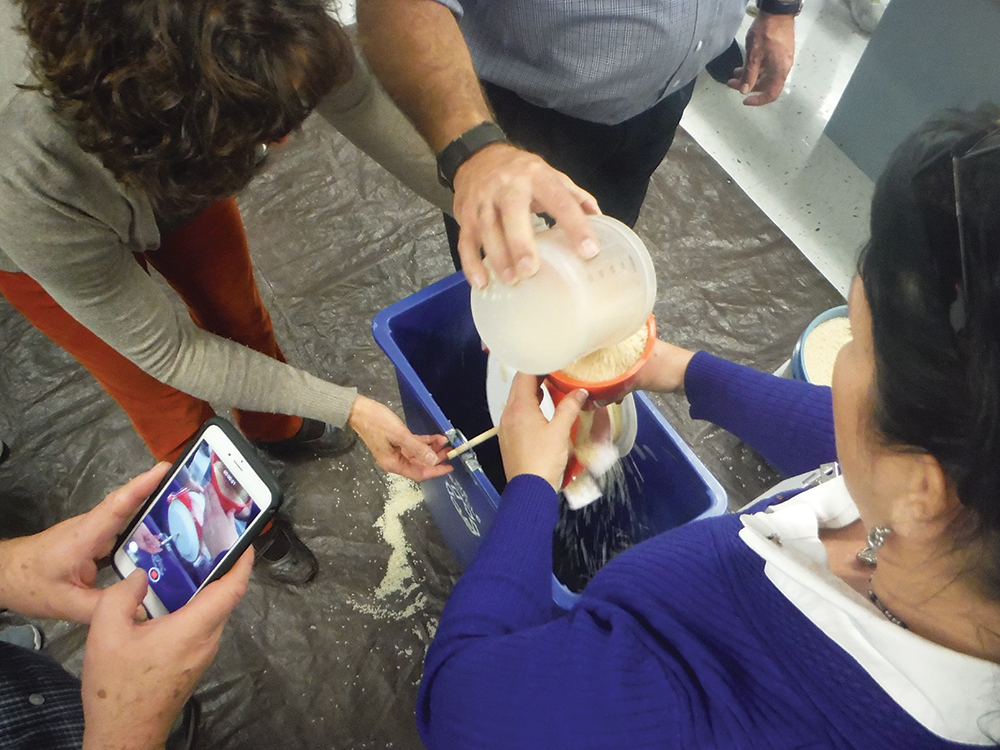
Students typically have questions such as: What types of materials can we use, how much can we use, how do you put it together, how does the funnel work, and how do I attach the weights? To better scaffold this for students, teachers should show an incomplete prototype with the wooden dowel through a paper plate and the string attached to both the wooden dowel and the weights. Two tips that should be shared with students are: make sure the string holding the washers reaches all the way to the bottom of the container that will hold the water wheel, and make sure that your water wheel is not too large for the container. Afterward, place students into small groups of 3–4 and, in order to allow them to gather information that may affect their design ideas, give them 15 minutes to examine the materials that can be used to build their water wheels, explore the container that will hold their water wheels, and practice pouring 2,000 ml of rice through the funnel. Then, give students 10 minutes to individually sketch their designs (see Figure 2), encouraging them to be as detailed as possible. If students struggle with their design decisions, focus them on the needed components of their water wheel, asking questions such as, what material will you use for your wheel and what material(s) will catch the rice to make the wheel spin? For the next 15 minutes, students should share their design ideas with their groups and, as a group, decide on one design to build. Before they can begin building their designs, students need to gain approval from the teacher (i.e., the project manager) by presenting a justification of the design choice with drawings, budget, and written description. Some students may focus on the performance of the water wheel and justify their design choices by how much rice the wheel will capture. For example, they may say that red solo cups are big and strong so they will make the wheel turn better. Other students may focus on cost and may say that plastic spoons will make the wheel turn fast enough but are less money. At this point, the students will have 45 minutes to build and conduct an initial test of their water wheels. It is best to test the water wheels as a class and encourage students to make observations as each wheel is tested. Typically, student designs will not work as initially planned due to poor contact of the rice with the water wheel, the cup with the washers gaining additional weight due to collection of the rice, or other design flaws. Students should measure the height that their cup of washers rose to, and we encourage teachers to use a smartphone to record a slow- motion video of the water wheel so that students can more easily see where improvements can be made.
Explain
During the initial testing, carefully constructed questions can help students begin to make meaning about the relationship between energy transfer and their engineering design. The teacher should focus student attention on the parts of the system where energy transfer occurs: 2,000 ml of rice suspended, the pouring of the rice, the collision of the rice with the water wheel, the spinning of the water wheel and connected dowel, the rising of the weight, and the final resting height of the weight. For example, a teacher may ask a student group: Why is your wheel turning, but the weight is not raising?
After completing the initial testing, begin a discussion about stored energy, motion energy, and energy transfer in basic terms. To begin this discussion, refer back to the original scenario about a house in the woods. Ask students what scientific concept would help explain how the furniture is lifted. Students may or may not identify energy as the concept, but teachers should introduce the idea that energy is the needed input to any system where motion is needed for the solution. Help students see the connection between the source of energy in the water wheel videos shown in the engage phase, the beginning scenario of a house in the woods, and their own water wheel. After defining stored and motion energy, have students, working in their design groups, complete the stored and motion energy worksheet while referring to their initial designs (see NSTA Connection).
Once the teacher completes the discussion of energy transfer, each group of students will then have the opportunity to report to the class, using both quantitative (how high the washers were lifted) and qualitative (video analysis and materials/design failure points) evidence collected on the efficacy of the design. Students should use this evidence to support their claims on what worked and did not work for their water wheel design. Each group should also elaborate on their design choices and its relationship to stored and motion energy. Further, students should share some of their ideas for improving the functionality of the water wheel.
To develop this presentation, students will have to evaluate how effectively their design solution solved the problem of lifting the weights using their collected data. Often students will focus on the overall success or failure of their design without considering how different elements of the design worked. As such, teachers should ask students why their device failed or underperformed expectations while taking particular notice to help guide students to points of successful and unsuccessful design. Common design limitations include not covering the lifting bucket, which causes the bucket to fill with rice and limits the flow of energy through the system. Additionally, connecting to the dowel rod often is a bigger challenge than students realize. Pointing out a need to redesign this component while highlighting the ability of their wheel to successfully receive energy from the falling rice can support student development as engineering designers. This line of questioning helps students break their systems into subcomponents and focus on redesigning elements rather than starting from scratch on their redesign phase.
Elaborate
According to the EDP, student groups should now modify their original design to improve their water wheel. First, they need to sketch their modifications and include any budget modifications to the initial design. The student groups should again gain approval from the project manager through delivery of an amended justification that utilizes data from their first test. Students then build their modified water wheel, test, and evaluate their final design.
Evaluate
Formative assessment opportunities exist throughout each phase of this lesson. During the engage portion, we informally assess students’ prior knowledge and understandings when they converse with students about their initial ideas on how to use the natural environment to construct a mechanism that will lift the heavy furniture. During the explore phase, we question students about their design choices, which gives insight into students’ thinking about the transfer between stored and motion energy. Continue to elicit student ideas during the class discussion on stored and motion energy and energy transfer and take note of how students’ conceptions are being modified throughout the activity, especially when students make claims about the efficacy of their design using quantitative and qualitative evidence. Finally, we gauge student understanding by observing students as they undertake the redesign process during the elaboration phase and questioning the reasoning for their redesign decisions. Focused discussion on the improvements allows for interactive discourse that leads to insights of why certain improvements were made to the water wheels and if the desired result was met.
Summative Assessment
In recent iterations of this activity, the summative assessment has been the construction of a brochure that students make to highlight their water wheel design (pictures, drawings, and descriptions), the efficiency of the design (in terms of the height of the mass lifted), and the cost of the water wheel. Students use the data and communicate this evidence in terms of a rationale, claim, and argument, as to why their water wheel is the best design for the price offered. This summative assessment incorporates evidence, claims, and argumentation as a non-fiction writing component. The students then share their brochures with the class as a formal presentation. The development of the brochure has been conducted in the English Language Arts (ELA) block of time allowing for integration of the project across traditional curricular subjects.
Conclusion
During this lesson, students employ the engineering design process to design, build, test, and improve upon a rice powered water wheel. Along the way, they use math to calculate cost and take measurements and learn the scientific concepts of stored energy, motion energy, and energy transfer. Students participating in the Water Wheel Challenge are consistently impressed by their final designs. One student mentioned that “I never thought that we would get this to work after such a bad first design, but hey look—we made it all the way to the top when we fixed the problems.” Another group reported that they thought their first design was “the bomb,” but after seeing what other groups did they were able to increase the efficiency of the design and make it even better. These comments along with the feeling of accomplishment of improving a design allows for children to understand the power of the Engineering Design Process in solving a problem that used specific criteria and constraints into a successful design.