
Middle School | Daily Do
Why Does the Ice Melt Faster?
Crosscutting Concepts Disciplinary Core Ideas Is Lesson Plan NGSS Physical Science Science and Engineering Practices Three-Dimensional Learning Middle School Grades 6-8
Sensemaking Checklist


Welcome to NSTA's Daily Do
Teachers and families across the country are facing a new reality of providing opportunities for students to do science through distance and home learning. The Daily Do is one of the ways NSTA is supporting teachers and families with this endeavor. Each weekday, NSTA will share a sensemaking task teachers and families can use to engage their students in authentic, relevant science learning. We encourage families to make time for family science learning (science is a social process!) and are dedicated to helping students and their families find balance between learning science and the day-to-day responsibilities they have to stay healthy and safe.
Interested in learning about other ways NSTA is supporting teachers and families? Visit the NSTA homepage.
What Is Sensemaking?
Sensemaking is actively trying to figure out how the world works (science) or how to design solutions to problems (engineering). Students do science and engineering through the science and engineering practices. Engaging in these practices necessitates that students be part of a learning community to be able to share ideas, evaluate competing ideas, give and receive critique, and reach consensus. Whether this community of learners is made up of classmates or family members, students and adults build and refine science and engineering knowledge together.
Introduction
We've probably all experienced the phenomenon of stepping from a carpeted floor to a bare floor and noticing our feet feel colder. (If you haven't noticed, give it a try!) Did you ever wonder how two floors in the same home (on the same level or story) could feel like they were at two different temperatures?
Today’s task, Why does the ice melt faster?, provides an opportunity for students and their families to notice and wonder about a related phenomenon: ice cubes melting at different rates on two different household objects from the same room in the house. Students engage in science and engineering practices to make sense of science ideas about energy—namely, energy is spontaneously transferred from hotter objects to colder ones, and when two objects interact, energy can be transferred from one object to another through collisions (even when those objects are molecules).
Daily Do Playlist: Transfer of Thermal Energy (Heat)
Why Does the Ice Melt Faster? is a stand-alone task. However, it can be taught as part of an instructional sequence in which students coherently build science ideas about water's ability to absorb, store, and release large amounts of energy.
Presentation of Phenomenon (What Am I Exploring Today?)
Guidance. Students will observe the phenomenon through the Amazing Ice Melting Blocks video (see above). An ice cube is placed on each of two blocks that appear to be similar, and students observe what happens throughout the time-lapse video. The goal is for students to generate questions that can be investigated with materials found at home. Using evidence from data collected in those investigations, students develop a model to explain their observations of the ice on each of two blocks.
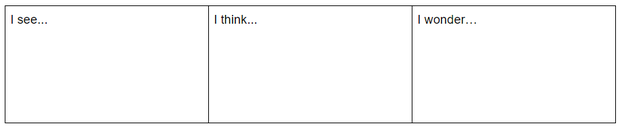
Presenting the Phenomenon. Ask students to watch the video and complete a see-think-wonder chart, as shown below. Students should record observations (“I see…”), possible explanations of the phenomenon (“I think…”), and questions they would like to investigate (“I wonder…”). It may be helpful to watch the video multiple times and to revisit the see-think-wonder chart. Students can print the See-Think-Wonder table or record their ideas on blank paper using the table below as a guide.
You can use the following questions to prompt students’ thinking as they experience the phenomenon through the video.
-
How is the ice changing over time? How are the blocks changing over time?
-
How might you quantify your observation(s)?
-
What is the same about the blocks? Do you notice any differences between the blocks?
-
What might be causing the changes you observe? Why do you say so?
-
What are you wondering about the ice? The blocks? The surroundings?
Investigative Questions (What Questions Do I Have About What I Just Saw?)
Guidance. It is important to allow students time for thinking. Many students have ideas and questions, but need time to formulate their idea or question into words. Some students may also benefit from writing things down first before they share. As adults, we may be tempted to give students the questions we feel might be important to explore; however, we need to refrain from this and allow our students to practice asking their own questions.
Investigative questions are common questions kids may ask after they are introduced to the phenomena. Although questions may vary, many students will be curious about the ice melts at different rates on the two blocks, even though they appear to made of the same material.
Common questions
- Are the ice cubes the same?
- Are the ice cubes made out of water?
- Is one of the blocks heated? (Is one block hotter than the other?)
- Are the blocks the same? (Are they made of the same type of material?)
After all the questions have been asked, we want to prompt our students to express their own ideas about how to figure out the answers to their questions. Ask them, "What could we do to figure out some things about why one ice cube melted faster than the other?"
Common responses
- Google what the blocks and/or "ice” cubes are made of.
- Measure the temperature of the blocks before you put ice on them.
- Measure how fast the blocks’ temperatures change.
- Measure the temperature of the ice cubes before you put them on the blocks.
You might say, “Many of us are wondering what the temperature of the blocks are before you put the ice on them. Does it make sense to investigate this first?”
Investigation 1: Melting Ice in the Kitchen
Guidance. In the absence of melting blocks, students will use household materials to help them figure out why the ice melts faster on one block than the other. Listed below are two groups of common kitchen objects. Before guiding students to select one object from each group, ask them to consider what the objects within each group have in common and what the differences are between the two groups.
Materials
Group A object (one from the following list)
- metal* pot, pan, cookie sheet, or mixing bowl (copper, cast iron, aluminum, or steel)
- metal sink
- aluminum foil
*copper, cast iron, aluminum, or steel (includes nonstick-coated cookware)
Group B object (one from the following list)
- glass or ceramic pot, pan, cookie sheet, or mixing bowl
- plastic or wood cutting board
- plastic, glass, or ceramic plate
- oven mitt
- cardboard (pizza box, cereal box, etc.)
- wax or parchment paper
two ice cubes of similar size and shape
towel or paper towels
thermometer, optional (infrared, [aquarium] liquid crystal strip, or meat thermometer)
Procedure.
Share these procedures with your students.
- Select one object from Group A and one object from Group B.
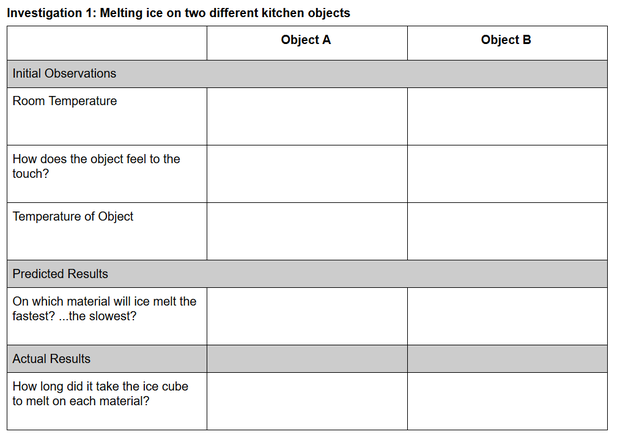
- Print the Investigation 1: Melting ice on two different kitchen objects data table, or copy the table below onto blank paper. Include the names of the objects you selected from Group A and B.
- If you have a thermometer, record the room (air) temperature.
- Touch each object and record how they feel. How do the objects feel temperature-wise compared to each other? How do they feel compared to the temperature of the room?
- (a) If you have a thermometer, record the surface temperature of each object. If you only have a meat thermometer, place the tip in direct contact with the surface of the object and record the temperature. What do you notice about the temperature of the objects compared to how they felt to the touch? (b) If you don’t have a thermometer, think logically about the temperature of each object. Assuming they have been stored in the open or in a kitchen cabinet, how should their temperatures compare to room temperature? Is there any reason for them to have different temperatures?
- Make a prediction about what will happen when you place an ice cube on each object (simultaneously).
- Select two ice cubes as close as possible to the same size and shape.
- Place one ice cube on each object and start a timer/record your starting time.
- Observe the ice cubes and record how long it takes each ice cube to melt and anything else you noticed as the ice cubes melted.
Making Sense of the Investigation. Use the following prompts to help students make sense of the investigation.
-
What patterns did you observe? (Ice seems to melt faster on metal objects than on nonmetal objects; ice seems to melt faster on objects that felt “cooler” to the touch; the starting temperatures of the objects were the same, etc.)
-
How do these patterns compare to your predictions?
-
How do these patterns help you explain why the ice melts faster on some objects than on others?
-
What do you think might be happening at the microscopic level that would help you explain the patterns you observed?
You can find additional prompts in STEM Teaching Tools Practice Brief 41: Prompts for Integrating Crosscutting Concepts Into Assessment and Instruction.
Developing an Initial Model (Why Does Ice Melt Faster on Some Surfaces Than Others?)
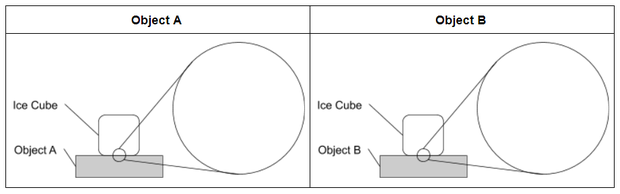
Ask students to think about what causes ice to melt and why it might melt faster on some materials than others. Then ask them to develop an initial model to explain why the ice melted faster on one object than on another object. Share the model scaffold with students, or ask them to refer to the scaffold pictured below and draw their initial models on blank paper.
Consider using the following guidance to support students in developing an initial model to explain their observations in Investigation 1.
- Your model should show all the parts of the system. The template shows the object and the ice cube. Are there any other components you need to include?
- Your model should also show how the parts of the system interact. Think about these questions.
- What is changing?
- How is energy moving?
- How is each part of the system affecting other parts of the system?
- Your model also needs to show what is happening at the microscopic level that helps you explain your observations. Use the “zoom-in circles” to show particles that make up the materials that are too small to see.
You might choose to put students into small groups and share their models. Ask students to note similarities and differences among their models. Give students an opportunity to revise or add to their models. Then tell them to save their models/put them away until later. Remind students that their models don't need to be perfect: They will have a chance to revise them after collecting additional evidence.
Say to students, “We noticed the blocks’ temperatures were the same at the start of the investigation. Based on our models, most of us are wondering why the blocks’ temperatures changed at different rates. Does it make sense to investigate this question next?”
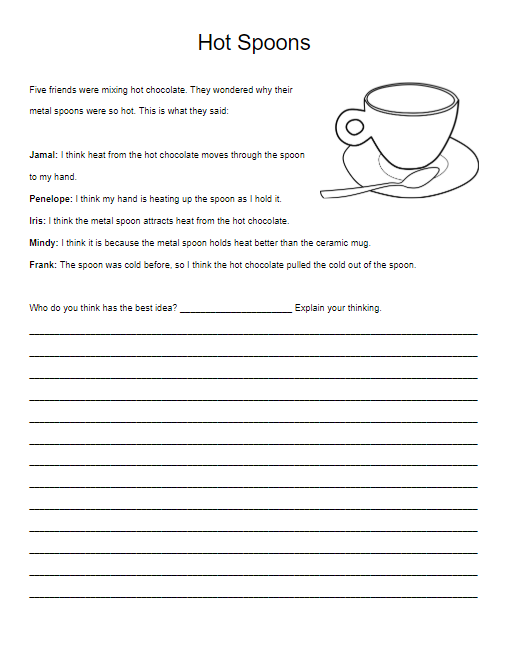
Investigation 2: Hot Spoons
Guidance. Investigation 1 allowed students to experience and explore the ice melting phenomenon firsthand. Investigation 2 engages students with an investigative phenomenon that will help them make sense of the transfer of thermal energy (heat). Students will investigate the phenomenon of placing two spoons, one metal and one nonmetal, into a mug of hot water. You can prompt students’ thinking about heat by using the Hot Spoons formative assessment probe. This probe is based on the Cold Spoons probe from Uncovering Student Ideas in Physical Science, Volume 3 and on the Hot Spoons task from Predict, Observe, Explain: Activities Enhancing Scientific Understanding.
You can learn more about using formative assessment probes by reading the Why Is My Shadow Always Changing? Daily Do.
Materials
-
Water
-
Microwave-safe mug
-
Microwave (Alternatively, you can use a kettle or small pot to heat water on a stove, or use an electric kettle.)
-
Metal spoon
-
Plastic or wooden spoon
-
Optional—Thermometer. A meat thermometer or a surface thermometer would work equally well for this investigation. And again, don’t worry if you don’t have any thermometer.
Safety Note: Students will be working with hot water. Adult supervision and careful handling should be employed to reduce the risk of burns.
Share the Hot Spoons probe with your students. Read through the probe with students, or give them time to read through it. Ask students to choose the student whose answer they think best explains why the metal spoon gets hot when placed in hot chocolate. Ask students to record their answer and explain their thinking. Students might use words, pictures, and/or symbols. Prompt students to clarify their thinking, but be careful not to reveal the explanation at this point. You might ask students to turn to a partner and share their ideas.
Tell students, “We are going to try this out, but with a twist. We are going to observe what happens when both a metal and nonmetal spoon are placed in hot water. What do you think will happen to the spoons when they are placed in the hot water?” Have students share their predictions with a partner.
Procedure
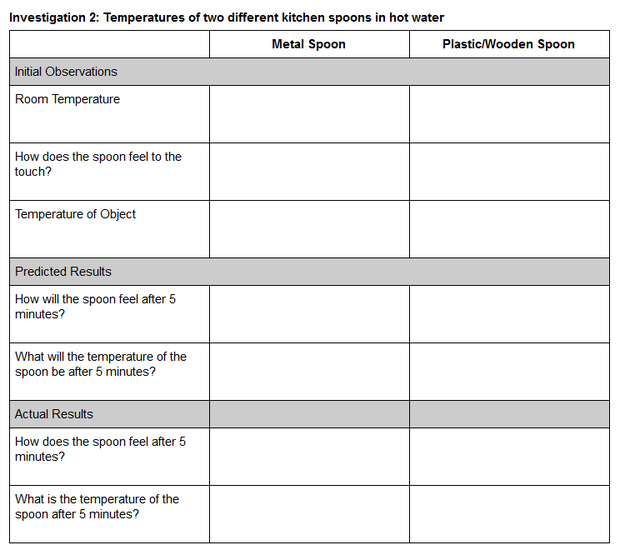
- Gather the materials and share the Investigation 2: Temperature of two different kitchen spoons in hot water data table with students.
- As students make their initial observations, you will need to call their attention to one of the surprising aspects of this phenomenon. Students should have noticed that metal objects consistently feel “cooler” than nonmetal objects like the plastic/wooden spoon. If you are using a thermometer, then now is a good time to call students’ attention to the fact that the room temperature and the temperature of both spoons are all the same. Prompt students to think about why the metal spoon feels cooler if it actually is the same temperature as the plastic/wooden spoon. If you do not have a thermometer, then you will need to guide students to think through the scenario logically. You might use the following script. Let’s think about the temperature of the spoons. What is the temperature in this room? Let’s look at our thermostat. It says the room is 72 degrees. Where have the spoons been? Has either of the spoons been heated or cooled? So what must be the temperature of both spoons?
- Ask students to record their initial observations and predictions.
- If you have a microwave available, then microwave 6 ounces of water in a microwave-safe mug for 90 seconds. Use extreme caution in handling the mug of hot water.
- Have students place the two spoons into the hot water and let them sit for 5 minutes.
- Tell students to record their final observations after 5 minutes.
Figure 4
Making Sense of the Investigation
Use the following prompts to help students make sense of the investigation:
- Did your prediction match your results?
-
What patterns do you observe in the data from both investigations? (Both objects had the same starting temperature, but one felt colder than the other; the objects that felt cold had/caused the biggest changes—fast melting ice cube/highest temperature change)
-
Why do you think the metal spoon warmed up faster than the plastic/wooden spoon? What might be happening at the microscopic level that helps us explain this?
-
How does this help us understand the ice melting investigation? How does the energy flow in this investigation compare to the energy flow in Investigation 1?
Revisit the Hot Spoons probe. Give students time to reread and respond to the probe. Then have students share their responses and thinking. At this point, you want to encourage students to use evidence from the investigation to justify their explanations. If a student is committed to an explanation other than Jamal’s, then press them to revisit the evidence from the investigation.
Teacher background. The best answer is Jamal’s: “I think heat from the hot chocolate moves through the spoon to my hand.” (It is thermal energy that is transferred from the spoon to Jamal's hand. Heat is the transfer of thermal energy, in this case by conduction.) The second law of thermodynamics puts constraints on how energy flows in a system. Warmer objects transfer energy to cooler objects, not the other way around. Thermal energy from the hot chocolate heats the metal spoon, which is a good conductor, and the energy is then transferred from the spoon to Jamal’s hand. The energy gained from the hot chocolate caused the particles in the spoon to move faster. This energy is then transferred from the spoon to Jamal’s hand as these faster-moving particles collide with the slower-moving particles in his hand. The other answers express common misconceptions about thermal energy and its movement.
Obtaining and Making Sense of Scientific Information (What Is Heat?)
Guidance. Now that students have had some direct experiences and have begun to wrestle with ideas about thermal energy and temperature, you will want to support them in obtaining and making sense of some scientific information. To fully model and explain the ice melting phenomenon, students need to be able to answer the following questions:
-
What makes something hot or cold?
-
How do things get warmer or cooler?
To help them answer these questions, engage students in the PBS Learning Media Thermal Energy Transfer interactive module.
You can use the discussion questions from the lesson to help students summarize the new information they obtain from the lesson.
-
Can you explain why you feel warm when you are standing near a campfire?
-
Why does a carpeted floor feel warmer to bare feet than tile or wood, even though all surfaces are the same temperature?
-
What information would you need to predict whether transfer of thermal energy would occur when two objects or materials interact?
-
What would happen if a person wearing a heavy winter jacket were to place a thermometer inside the jacket next to his or her skin? What would happen if we took the same jacket, after it had been hanging in a closet, and placed a thermometer inside?
Students can learn more by exploring the animations and student reading from the Middle School Chemistry Lesson 2.1 on Heat, Temperature, and Conduction. Students who want to explore these concepts more deeply can conduct online research on the thermal conductivity of common materials.
Revising and Applying the Model (Why Does Ice Melt Faster on Some Surfaces Than Others?)
Guidance. Now you will want to help students transfer their learning from the investigations and interactive lesson so they can revise their model of the ice melting phenomenon. You might have students use the following questions to organize their ideas from the investigations and interactive lesson:
- What did we do?
- What did we learn?
- How does this help us explain why ice melts faster on some surfaces than others?
Now prompt students to revisit their models for the ice melting phenomenon. Say, "Think about what causes ice to melt and why it might melt faster on some materials than others. For each object you tested in Investigation 1, revise your initial model to explain why the ice melted faster or slower on that object. Use the zoom-in circles to show what might be happening at the microscopic level that can help you explain your observations. Be sure that you are incorporating ideas from Investigation 2 and from the interactive lesson. You can make changes on your original model or begin a new model.”
Revisit the original phenomenon by watching this extended Ice Melting Blocks video. In addition to the original phenomenon, this video shows the initial temperature of the blocks and shows how the blocks interact with heat-sensitive liquid crystal sheets. Students can use this additional evidence to support their explanations. Have students use their models to explain why the ice melts faster on one block than the other, and have them infer the type of material for each block.
Teacher background. You can find an explanation of the ice melting blocks in the Flinn ChemFax Lesson Plan: Ice Melting Blocks.
NSTA Collection of Resources for Today's Daily Do
NSTA has created a Why does the ice melt faster? collection of resources to support teachers and families using this task. If you're an NSTA member, you can add this collection to your library by clicking Add to My Library, located near the top of the page (at right in the blue box).
Check Out Previous Daily Dos From NSTA
The NSTA Daily Do is an open educational resource (OER) and can be used by educators and families providing students distance and home science learning. Access the entire collection of NSTA Daily Dos.