
Methods and strategies
Mapping Students’ Engineering Processes with Design Zones
Science and Children—January/February 2021 (Volume 58, Issue 3)
By Nicole Batrouny, Kristen Wendell, Chelsea Andrews, and Tejaswini Dalvi
The engineering design process (EDP) can be a wonderful tool to nurture creative problem-solving abilities, prepare students to tackle problems with intentional planning, and encourage learning from failures. Many lesson plans and instructional strategies are guided by the EDP (Hill Cunningham, Mott, and Hunt 2018). Visual representations of the EDP often show a set of actions arranged in a cycle. For example, many of you are probably familiar with the Engineering is Elementary graphical aid that shows five labeled steps, “Ask, imagine, plan, create, improve” (Museum of Science, Boston 2020). Many resources like this say that the EDP is flexible and repeatable. Still, it is tempting to imagine the steps of the cycle as tasks for students to check off. However, real engineering design is much messier!
Studies of professional engineering designers show that they move fluidly between defining the problem and refining a solution. Additionally, every engineering team has their own process that suits their particular design task (e.g., Atman et al. 2007; Vinck et al. 2003). It is challenging to imagine what this non-stepwise, individualized design process might look like in a classroom. In this article, we present our way of thinking about the engineering design process and illustrate it through an example of student work. We developed our model, called “Design Zones,” through our experience working with teachers and students and by studying research on design.
Explaining the model
The Design Zones model (Figure 1) has four zones: Ideation, Creation, Evaluation, and Decision. These zones are like the major stages of other popular design process representations. However, in our model, each zone contains many related activities. Instead of trying to simplify the process into concrete steps, we use this model to make room for any number of ideating, creating, evaluating, or deciding activities that students might need to do.
Figure 1, our representation of the Design Zones model, has three main features: the four zones, an overlay of example design activities, and a spiraling path through the zones. The four zones are represented by a blended color wheel. This blending captures how activities may not fit neatly into one zone or another. An overlay of example design activities comprises a list that is in no way exhaustive! The different design activities may be built into the structure of the class or may come up as students work through a design project. Last, there is the spiraling path through the zones, narrowing toward the center, where the final design lives. Generally, the beginning of the design process is a time for having big ideas, asking broad questions, creating low-fidelity prototypes, testing sub-systems and failing, and deciding on a general approach to the problem. Closer to the end, ideation, creation, evaluation, and decision are focused, specific, and informed by previous experience. Different student groups, working in the same classroom with the same instructions, may follow different courses through the zones on their way to a final prototype. In the Design Zones view, the “engineering design process” is whatever path students take through the zones, as long as they are making progress exploring a design problem and participating in engineering practices. With these three features, the model makes it easier to capture the broad range of design activities and variations in sequences that students need to solve different design problems.
As an example, we used the Design Zones model to look at the engineering design process of Selena, Nina, and Lola as they designed, built, and iterated on a prototype for a piece of accessible playground equipment (Figure 2). Over the course of 10 sessions (Table 1), the team successfully negotiated design ideas, made iterations on their prototype, incorporated ideas about balanced forces into their design, and communicated their process to classroom visitors. In both the classroom and in interviews after the unit, the students demonstrated their pride in their prototype and showed identification with identities as scientists or engineers. We used the Design Zones model to track their path as designers during this challenge and to unpack all the engineering activities they carried out to turn their idea into a functioning prototype.
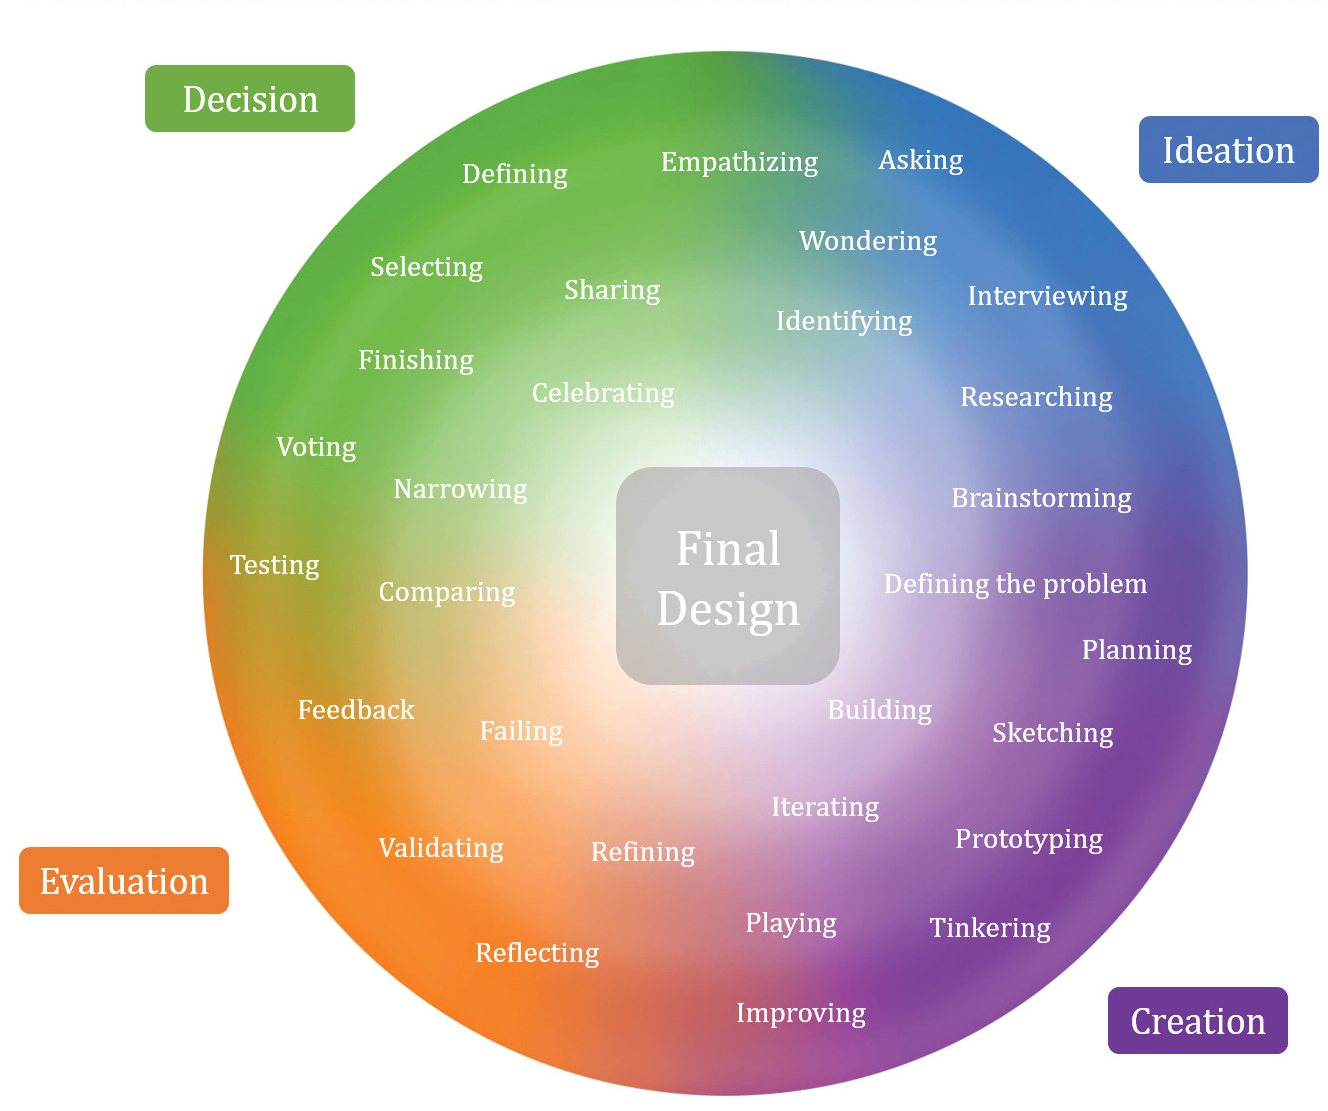
The Design Zones model.
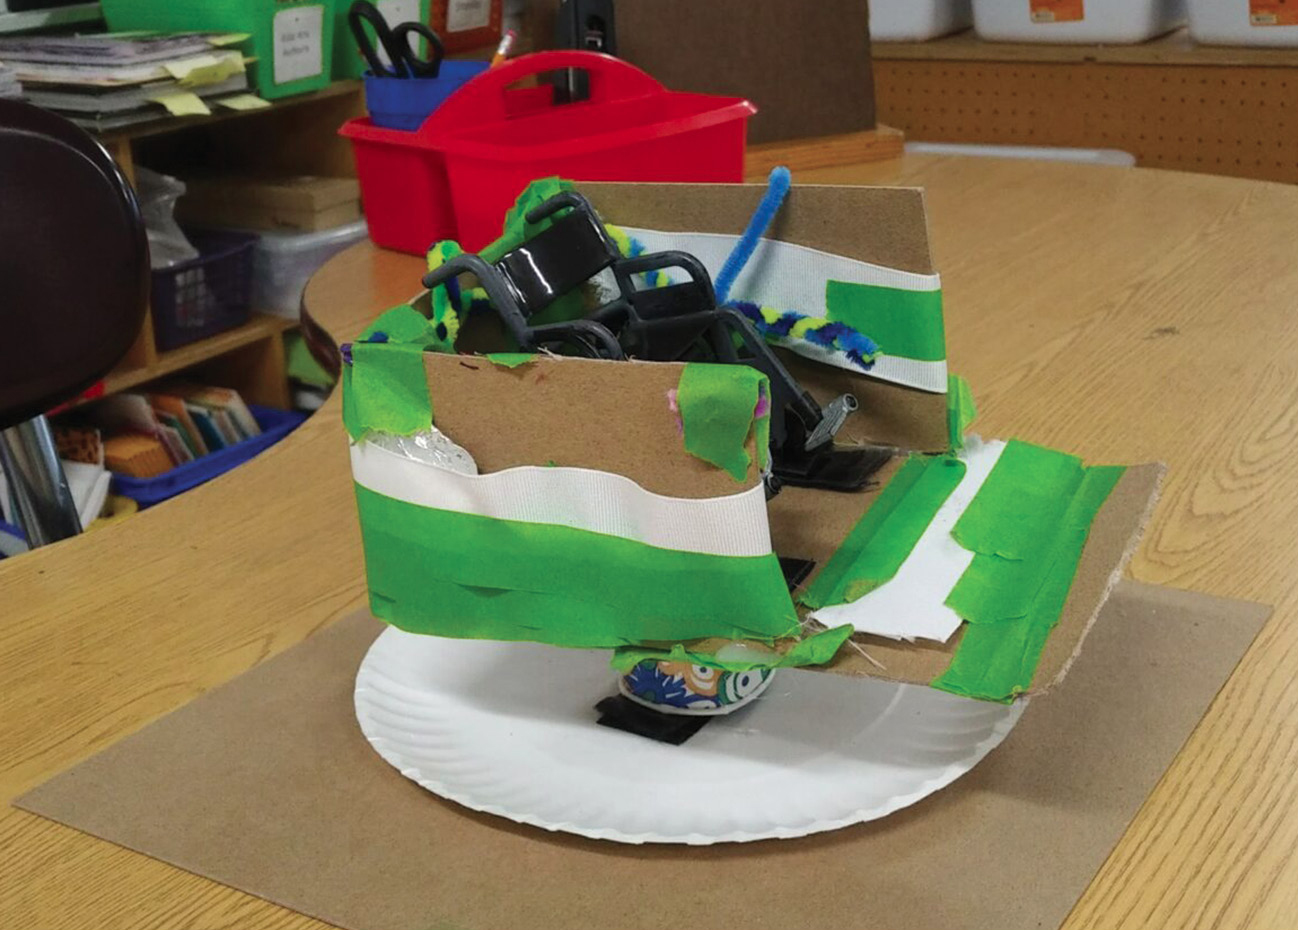
Students’ prototype. Photo courtesy of the authors.
Charting a Course Through the Zones
Selena, Nina, and Lola moved effortlessly between the design zones as they worked from the initial idea of a “spinny thing” to the final prototype shown in Figure 2. To capture this movement, we looked at video records of the classroom and identified the design actions taken by the group, shown as dots in Figure 3. You can think of Figure 3 as the Design Zones model unraveled, showing the students’ progress over time. We can see that their work to solve the engineering design problem did not follow a smooth, step-by-step flow around a single design cycle. Instead of always moving from one step to the next, the group made progress on their design solution with fluid shifts between Design Zones. They moved to each zone as needed to generate and explore the specific ideas they had for solving this particular problem. Through the process, they figured out how to create a structure that was stable under the weight of a model wheelchair, able to spin, and would provide a fun experience for children both in and out of wheelchairs.
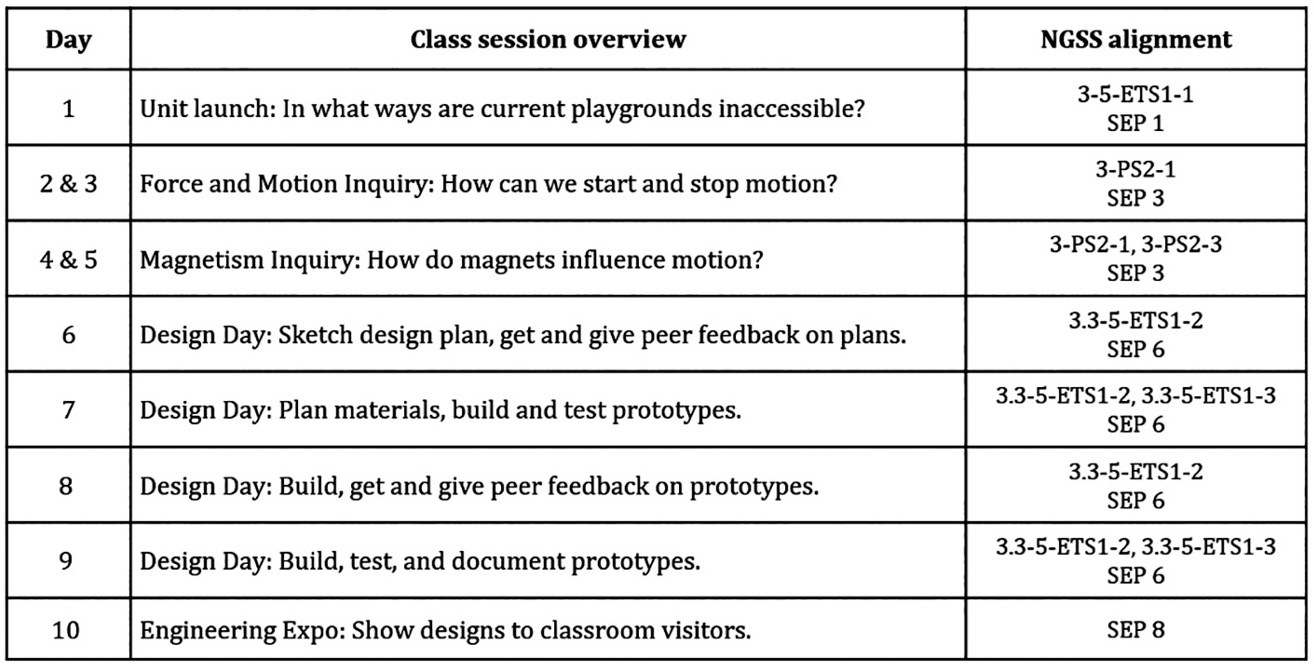
Class sessions.
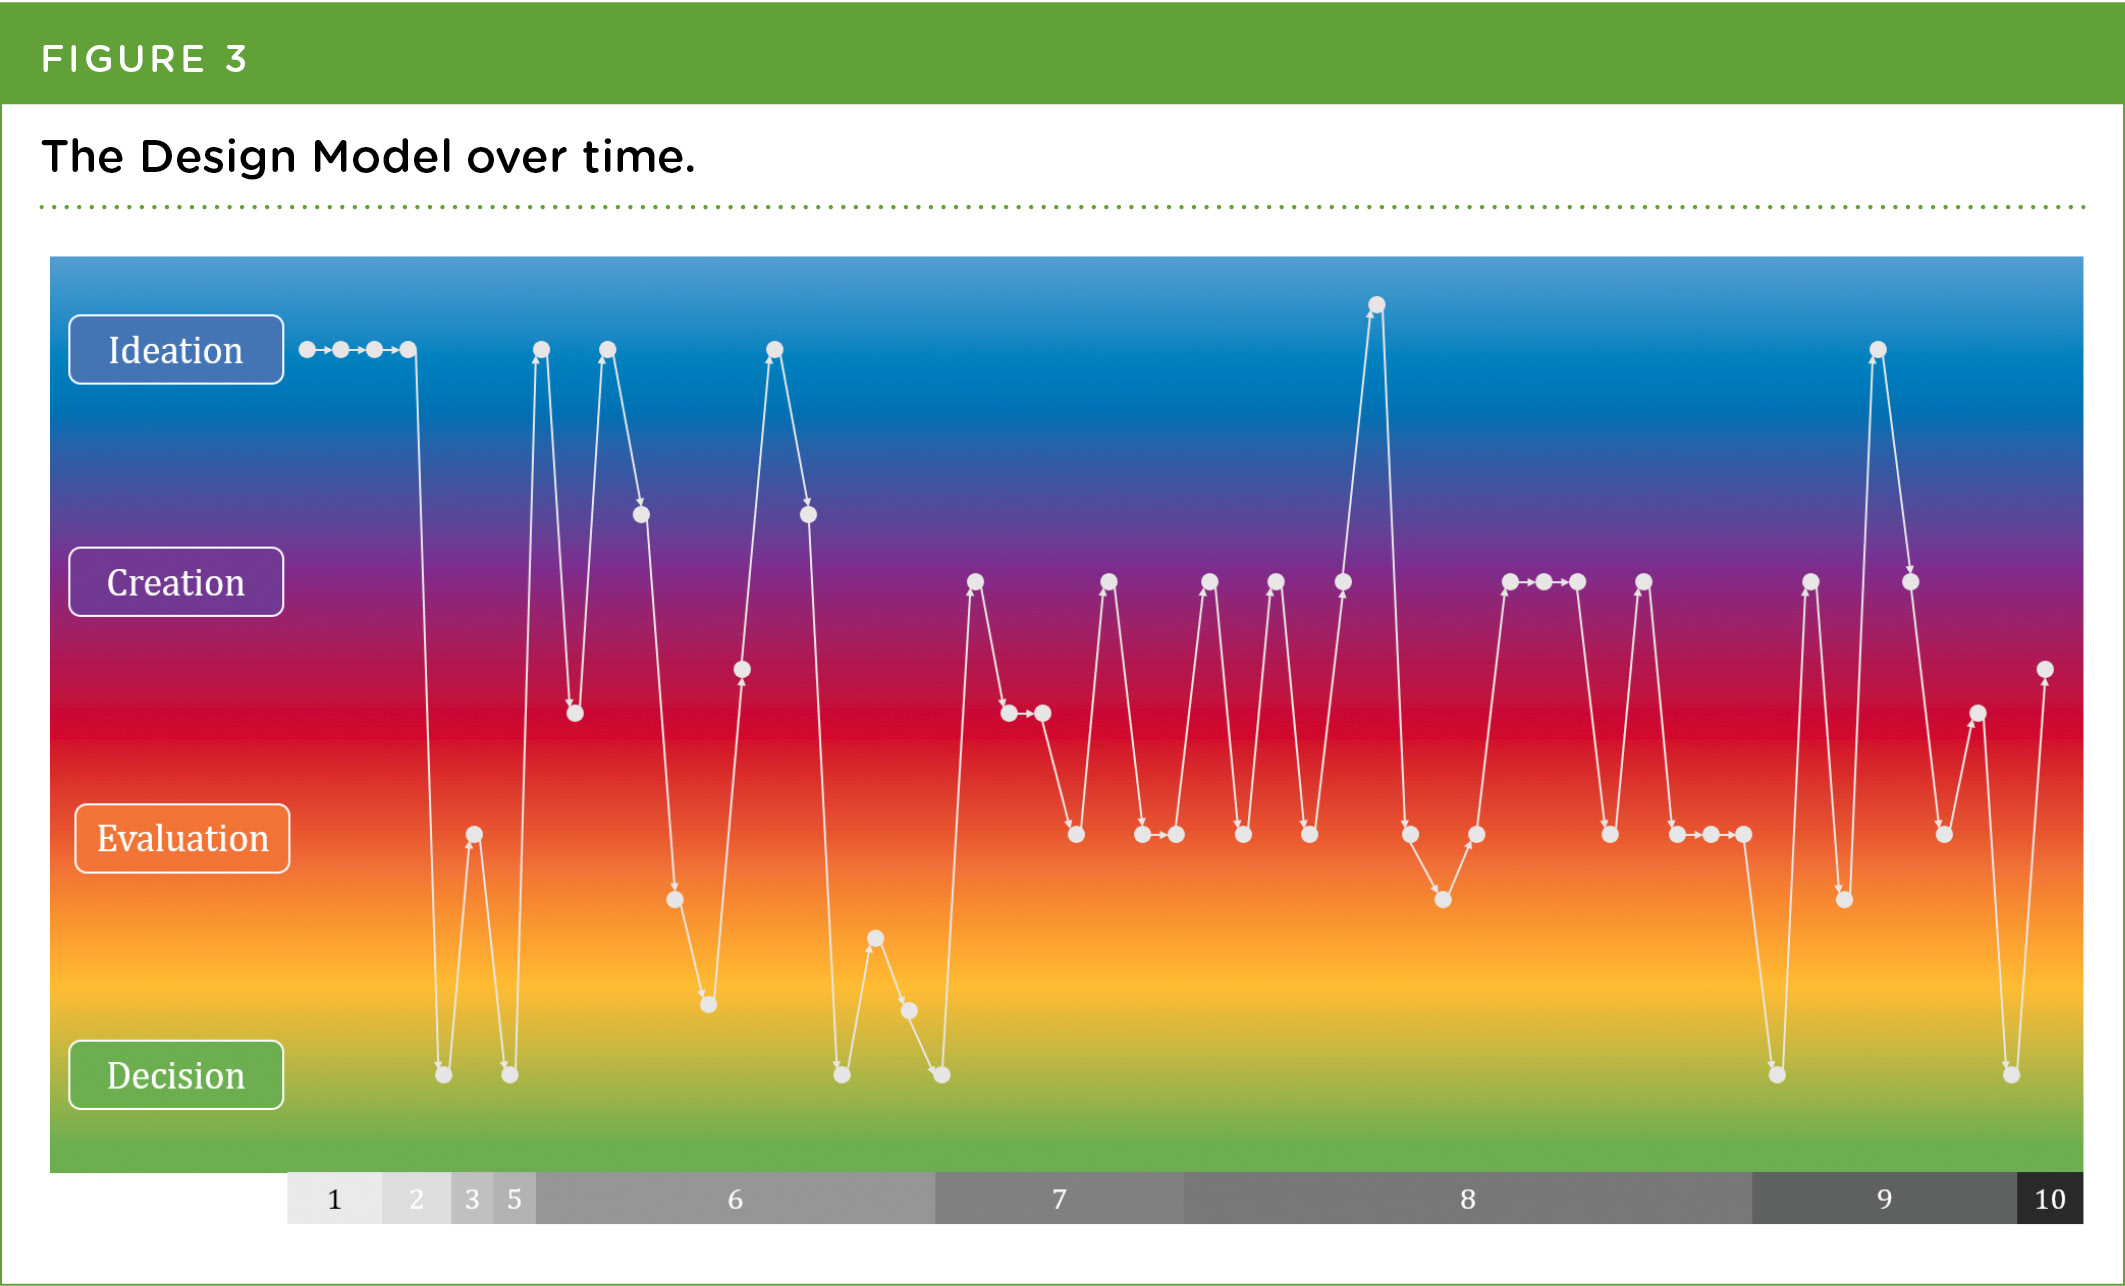
The Design Model over time.
In the next two sections, we dive into two episodes that highlight different features of the Design Zones model. First, we will describe a moment where Selena, Nina, and Lola narrowed their scope from a major question about their design approach to a specific question about fastening their design. This episode demonstrates the tendency for design work to converge on a final design. Next, we will describe a period where the girls engaged in rapid cycles of iteration. They bounced between creating and evaluating, without visiting the ideation or decision zones. We hope these episodes can paint a picture of the type of work elementary students may engage in during the engineering design process.
Narrowing the Scope of Design Work
To show this episode of narrowing, let’s zoom in on a small subset of the design activities carried out by Selena, Nina, and Lola on Day 6, shown in Figure 4. This series of activities is unique because it demonstrates a sort of waterfall through the four zones (points 1–4), then bumps back up to Creation (5) and Ideation (6). At point 1, in the Ideation zone, the students were talking about ideas, sharing their broad plans with a facilitator in the classroom. The facilitator asked, “What are you thinking of making?” and Nina replied, “We’re thinking of a spinny thing that goes around, and, what I was thinking, was there was a cup and then a stick goes in it, and then out of foam we make like a box and then a cup goes on top of that so it stays. And then we cut out an opening and then foam goes up so they can go up and then spin.”
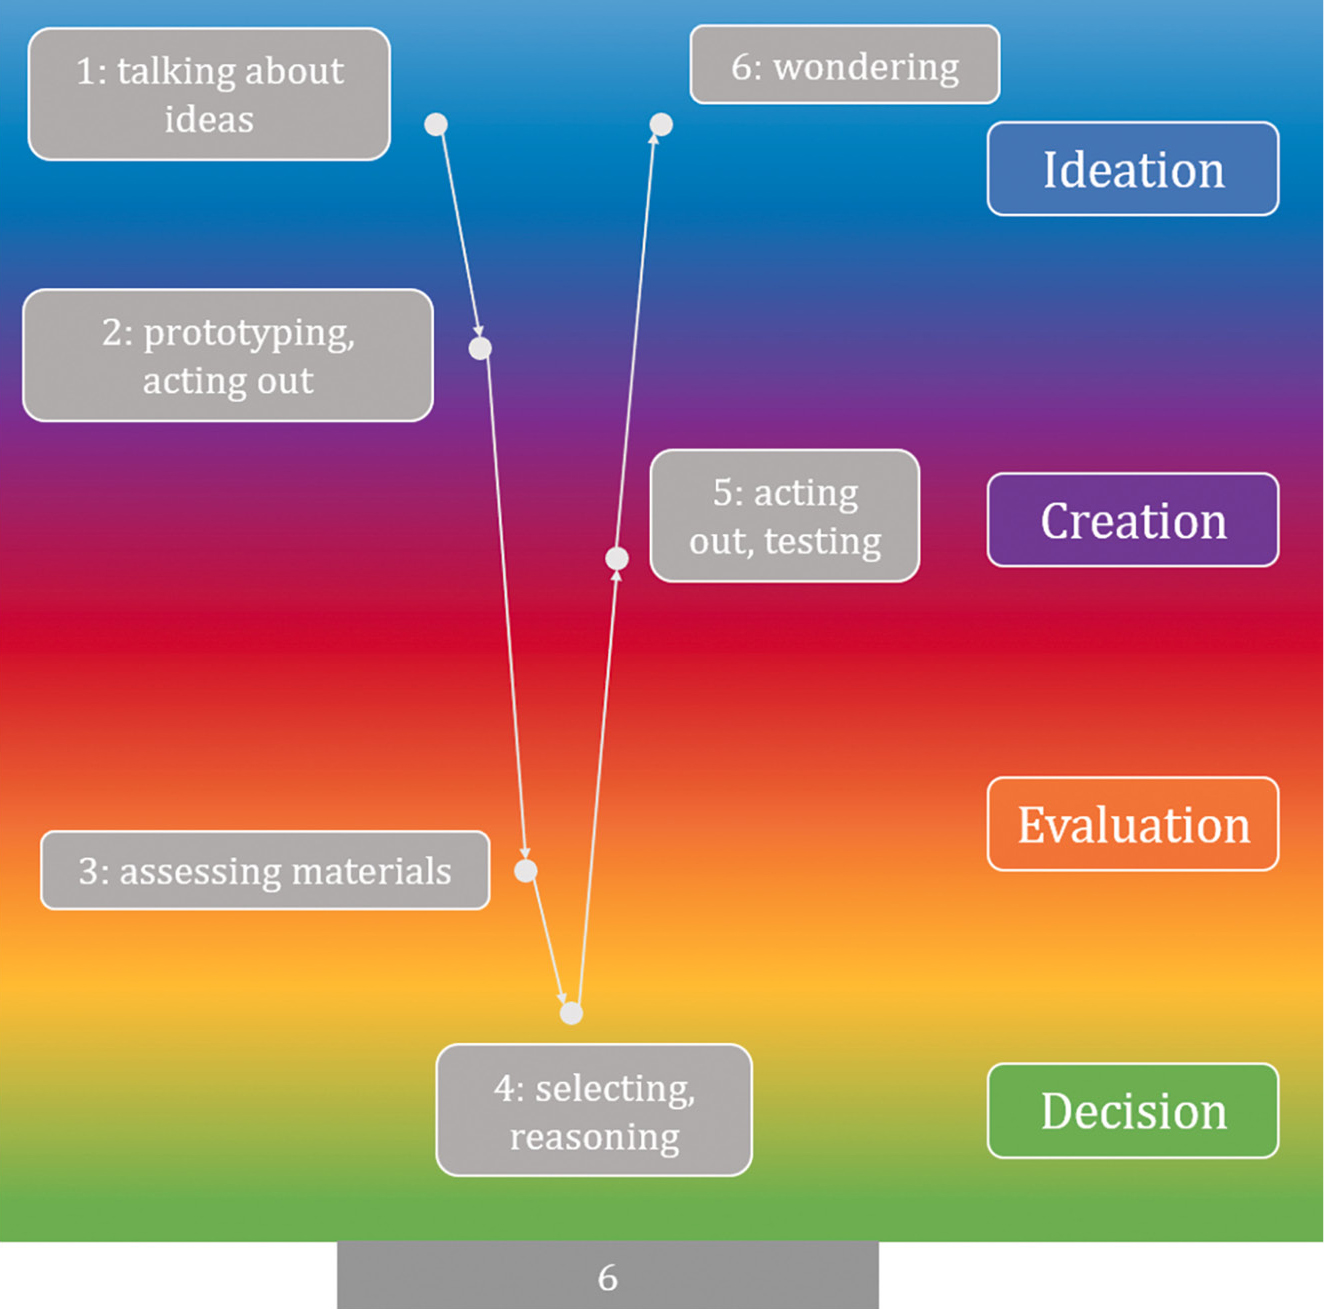
Movement through the zones.
At point 2, the group entered the Creation zone. They prototyped their idea by arranging the materials and acting out how someone in a wheelchair would use the equipment. They then moved to the materials table and engaged in Evaluation. They assessed materials (point 3), ruling out foil because it can “break really easily.” They returned to their workstation and Nina asked, “So we think we want to do my idea?,” moving the team into the Decision zone. Lola responded, “Yeah it’s like way better because [gesturing] the cup is right here, the box, foam going up [gesturing a ramp] then it just spins around!” Lola and Nina together explained the design to Selena, acting out and testing the idea using the wheelchair (point 5). At point 6, Lola brought the team back to Ideation, but at a different scale, asking “How are we gonna keep it together?” This is a different, more specific sort of question than others they had been asking so far. By asking this, Lola moved the team back to Ideation and narrowed the scope of their design process, moving them closer to their final design.
Completing Small Cycles of Iteration
On days 7, 8, and 9 of the unit, the students were given a majority of the class time to build, test, and iterate on their playground equipment prototype. When we zoom in on these days, as shown in Figure 5, we see the students leveraging this time and freedom to bounce back and forth between Creation and Evaluation.
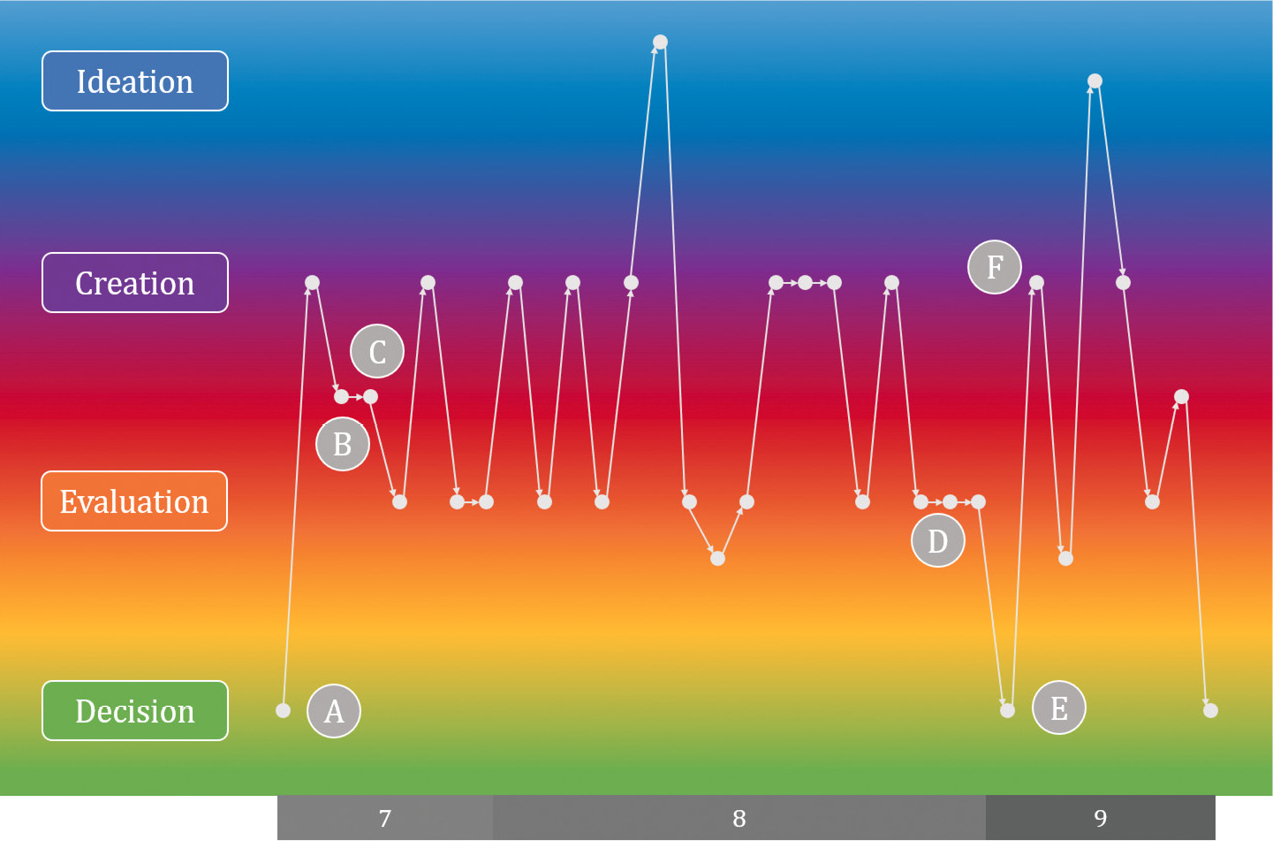
Iteration cycles.
Day 7 kicked off by selecting one of two sketches they had created on Day 6 (point A). With the decision made, the team entered a period of rapid iteration, revising their design plan as quickly as they could build and test it. The next two points, B and C, fall between Creation and Evaluation. Nina began building, first trying to attach a paper cup to the base as planned. She soon realized her plan for attachment would not work, revising it on the fly (point B). Similarly, after nearly completing the planned foam box, she started over, realizing the box would be too big for the base (point C). At these points, Nina simultaneously built the prototype and revised her design plan. The Design Zones model allowed us to capture this fusion of activities, which we placed between Creation and Evaluation.
As they continued in their cycles of iteration, Selena, Nina, and Lola found many ways to test their design. They put the wheelchair into the box to make sure it would fit, held the box upside down to make sure the wheelchair would stay in, and acted out how a person in a wheelchair would enter and exit the equipment. In addition to these very physical tests of their prototype, the students also engaged in peer-feedback sessions (Day 8) and had time to reflect with the whole class by sharing something that challenged them and something they were proud of at the end of each design day. These different activities—some instigated by the instructor and others occurring naturally during small-group work—all worked toward the goal of Evaluation.
On Day 9, the students worked through a particularly difficult challenge: balancing their equipment while it spun. In the middle of the class period on Day 9, the group felt done; they had built and decorated their equipment, and had tested to make sure it could spin. The teacher stopped the class and asked everyone to document a test of their equipment. Nina, Selena, and Lola moved into a series of Evaluation activities (D). They took a video of their prototype and began answering questions about their video. They hit a wall after the second question, “What was the test result?” Nina and Lola considered the test a complete success because the equipment spun. Operating on this assumption, they couldn’t answer the last question, “Any ideas why?” It was only when, after some prompting from a facilitator in the classroom, Selena pointed out that the box was tilting while it spun. The facilitator helped them incorporate both of these truths into their answer, typing “It worked but it didn’t. It spins but it’s tilted.” With this view, they were able to evaluate why the box tilted, typing “It’s because there’s no weight at the back.” Now they had a new challenge and had decided how to address it (point E). The group was able to jump into action, building counterweights and testing them rapidly to strike the right balance (point F).
What the Model Can Do
The Design Zones model is not intended to be an instructional design model like 5E, nor is it intended to act as a graphical aid for students. Instead, you can think about the Design Zones model as a tool for you, the teacher, to think about all the ways in which students’ actions and interactions during an engineering design challenge embody the science and engineering practices. The Design Zones model helps us see the sophisticated ways in which students work through design challenges. It can help us recognize student engagement in a more complex engineering design process. Our case study provides a glimpse into elementary students’ fluid, non-linear design processes. Selena, Nina, and Lola created a stable structure that was able to spin and provide a fun experience for children both in and out of wheelchairs. They also followed an independent design process and engaged productively in engineering. The Design Zones model provides a way of looking at the complexity of this endeavor and honoring Selena, Nina, and Lola’s hard work.
Acknowledgment
We thank Eileen Barry for her support with development and piloting this Accessible Playground Design unit. We are deeply grateful to the participating teachers and students for sharing their time and ideas with us. This study was supported by the National Science Foundation ITEST program (grant number 1657218).
Nicole Batrouny (Nicole.batrouny@tufts.edu) is a PhD candidate at Tufts University in Medford, Massachusetts. Chelsea Andrews (Chelsea.andrews@tufts.edu) is a post-doctoral researcher at Tufts University. Kristen Wendell (Kristen.wendell@tufts.edu) is an associate professor at Tufts University. Tejaswini Dalvi (tejaswini.dalvi@umb.edu) is an assistant professor at the University of Massachusetts, Boston.
We thank Eileen Barry for her support with the development and piloting of this Accessible Playground Design unit. We are deeply grateful to the participating teachers and students for sharing their time and ideas with us. This study was supported by the National Science Foundation ITEST program (grant number 1657218). We acknowledge the editors and reviewers at Science and Children for their thoughtful feedback and local artist Courtney Almeida for her creation of the Design Zones visual aid.