
feature
Sliding and Colliding Into Physics
Examining force and motion with kindergarteners
Science and Children—May/June 2022 (Volume 59, Issue 5)
By Pamela Lottero-Perdue, Kathryn Blaney, and Cody Sandifer
Kindergarteners are natural experimental physicists! They engage with the relationship between force and motion every day in informal ways as they play. They push and pull on toys and other objects, causing them to go from rest to motion or motion to rest, or to move in a different direction.
The Next Generation Science Standards (NGSS) encourages educators to help kindergarteners formalize a big idea in physics: A push or pull can cause an object to begin moving, speed up, slow down, stop, or change the direction it is going (NGSS Lead States 2013). In this article, we share an exciting, classroom-tested interactive 45-minute 5E lesson that helps kindergarteners begin to investigate this big idea using simple materials. After our literacy-based engagement, students explored, explained, and extended their learning with respect to objects that slide and collide. We describe each of these lesson components and our evaluation and conclude with tips for teaching motion and force in the kindergarten classroom.
Engagement
Our engagement began with an interactive read-aloud of an excerpt from Oscar and the Cricket (Waring 2009, pp. 1–13). This read-aloud supported speaking and listening standards related to Comprehension and Collaboration within the Common Core State Standards in English Language Arts (NGAC and CCSSO 2010). In the book, Oscar the cat is encouraged by his friend, a cricket, to push a ball. The ball starts to roll on a smooth pathway and then is stopped by a tree branch. Oscar pulls the branch aside and gives the ball another push. As she read aloud, Ms. Blaney emphasized words such as push and pull, and paused to ask questions such as “Why did the ball stop?”
As the story continues, the ball rolls toward a tree. Ms. Blaney asked students to predict: What do you think is going to happen? Students suggested many ideas, including that the ball might stop or bounce off the tree. Ms. Blaney shared that they would find out what happened later, but that they first needed to explore for themselves more about pushes and how they can affect how things move.
Exploration
Ms. Lottero-Perdue explained to the students that, like Oscar, they would be pushing objects to see how they moved. To begin, she placed two objects on the linoleum floor for all students to see: (1) A plastic hockey puck, typically used in physical education activities, and (2) a small plastic chip about the size of a half-dollar, which we called a disc. (The materials list for this lesson can be found in Figure 1.) The puck and disc were on the floor, sitting still. Ms. Lottero-Perdue asked the students: Why aren’t they moving? They responded that we had to make them move somehow. She asked them how we could make them move. Example responses included: blow them with a fan, hit them with a stick, and kick them with your feet.
Materials list.
Book (Engagement and Extension)
Oscar and the Cricket by Greg Waring (2009)
Plastic Hockey Pucks (Exploration and Extension)
- These are hollow, hard-plastic (not rubber) hockey pucks like those used in physical education classes.
- One puck needed for the teacher at the beginning of the Exploration; otherwise, these are used during the Extension.
- Quantity: 1 for the teacher; 1 for each team (use pairs or teams of three for the lesson)
- Available from Nasco in packs of six as “Lightweight Hockey Puck Set” ($11).
Small Plastic Discs (Exploration and Extension)
We call these “discs,” but they are also called “chips.”
- Quantity: 1 for the teacher; 1 for each team
Where to purchase:
- We used the chips that come in the game Combo King by Gamewright. Each game has 36 discs. Combo King is available from online and game/toy stores for about $10.
- Poker chips may also be purchased for this purpose. Chips should be thick enough (about 3 mm) so as to not get stuck under the edge of the block (Challenge 3) during the collision. Poker chips are available from online and game/toy stores for about $10–15 for a set of 100.
Challenge Sheets 1 and 2 (Exploration) and 3 (Extension)
- Quantity: 1 each for the teacher; 1 each for each team
- Available as a free download on NSTA website (see link at end of article)
Tips:
- Print in color.
- Laminate the sheets so that they can be used multiple times
- Use masking tape to tape the corners (or minimally, the bottom edge) to the floor or desks.
Blocks (Extension)
- Size: At least 14 cm long. We used 3.5 cm × 7 cm ×1 4 cm or 3.5 cm × 7 cm × 28 cm blocks.
- Quantity: 1 each for the teacher; 1 each for each team
- Available in many early childhood classrooms as parts of wooden block sets.
Green and Red Circles (Extension)
- These are circles cut from green and red construction paper. Cut them to be approximately 15 cm in diameter.
- Tip: Red could be cut into an octagonal shape to represent a stop sign (consistent with the challenge sheets.)
- Quantity: 1 each for the teacher; 1 each for each team
Ms. Lottero-Perdue pushed and released the hockey puck, letting it slide across the floor, and asked: Did I leave my hand on the hockey puck all the way across the floor? This elicited a “no!” from the students. She explained that just like she did, the students would use a “quick push,” meaning that hands would not be on the disc for long. To show students how to do a quick push, Ms. Lottero-Perdue had them hold up their index and middle fingers of their writing hand, “gluing” those fingers together. She demonstrated how to place two fingers on the top of the disc to give a quick push to slide the disc forward.
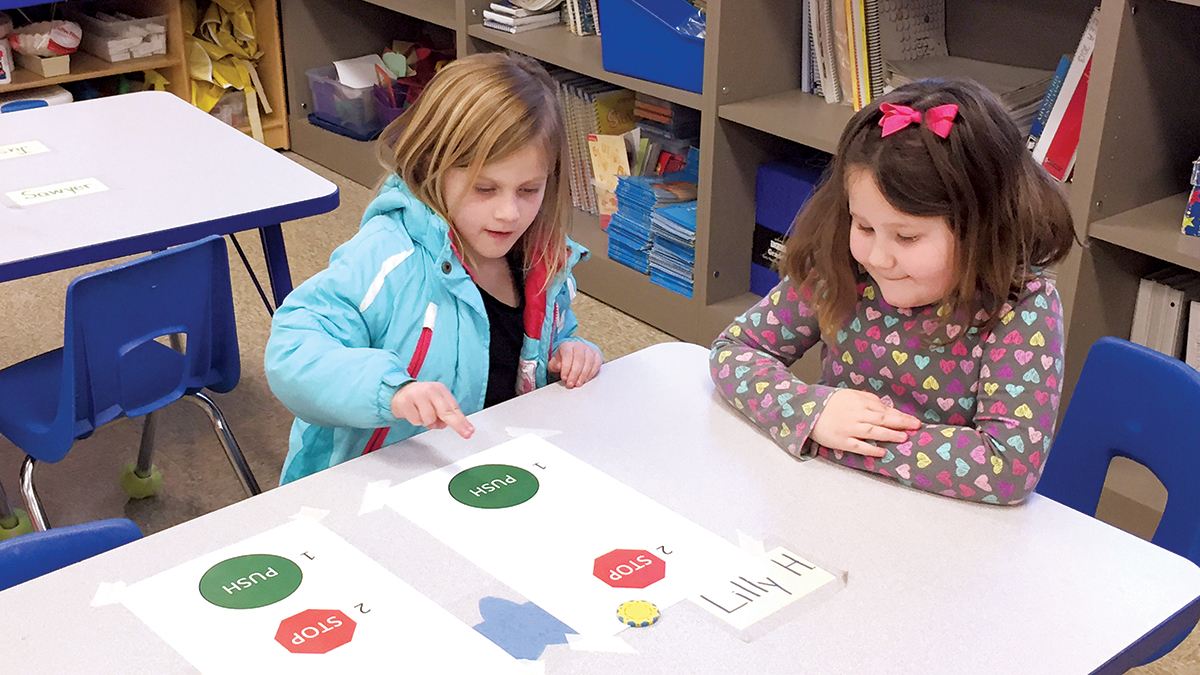
Next, Ms. Lottero-Perdue presented Challenge 1 to the students. She placed the Challenge 1 sheet on the linoleum floor, with corners taped to keep the sheet flat. (This and other Challenge sheets are available for download; see Supplemental Resources.) The objective, she explained, was to place the disc in the green “PUSH” circle, give it a quick two-finger push, and try to get it to stop in the STOP sign. Ms. Lottero-Perdue told the students that she would try the challenge first. She gave the disc a quick push, intentionally pushing too hard and bypassing the STOP sign by a great distance. She asked if she had succeeded, to which the students replied, “no!” She asked what to do next, and they replied, “try again”—an oft-used mantra in their classroom.
Instead of Ms. Lottero-Perdue trying again, she sent teams of students to their own stations, each of which was set up with Challenge 1 taped to the smooth floor or a tabletop (Figure 2). (We recommend that teams have two or three students each.) Safety note: Share with students that they should be careful when walking so as not to trip over Challenge stations on the floor, and that discs are for sliding only—not to be put in mouths or thrown. Students took turns in their teams trying the challenge, engaging them in the “carrying out” part of the NGSS practice Planning and Carrying Out Investigations. Discs often went too far or not far enough, and students would try again. Within a few minutes, all students had successfully completed Challenge 1. Many students suggested that this challenge was easy, and they were ready for a harder challenge.
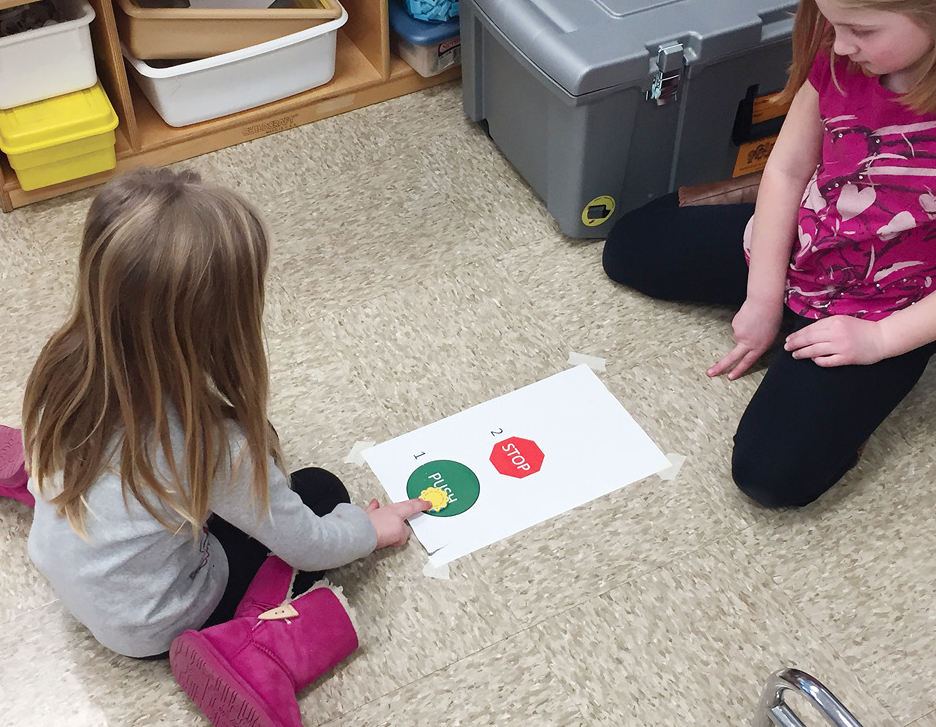
Challenge 1.
The Challenge 2 sheet was then given to each team. The challenge was the same except for one difference: in Challenge 2, the STOP sign was a greater distance away. Again, students took turns in their groups to try and try again to meet the challenge. Once every student in each group had successfully completed the challenge, the children were ready to discuss their findings.
Explanation
For the explanation part of this lesson, Ms. Blaney brought the children to the carpet. The Challenge 1 and 2 sheets were posted next to Ms. Blaney for reference. She asked students: “Did you have to push the disc differently for Challenge 1 and Challenge 2?” The students responded that they did, and Ms. Blaney asked: “How did you push the disc differently for Challenge 2 than for Challenge 1?” Initially, some students said that they had to push the disc “faster” for Challenge 2. Indeed, the resulting speed was faster for Challenge 2, but what Ms. Blaney was looking for was a description of the push itself and so she emphasized the use of “harder” or “stronger” language to describe the Challenge 2 push. Mrs. Blaney then asked the students: “How do you know that Challenge 2 was a harder push?” She was asking for evidence. Students responded that they felt that they had to push harder, and that they needed a stronger push to travel the longer distance.
This process of sharing their findings supported speaking and listening standards with regard to the Presentation of Knowledge and Ideas (NGAC and CCSSO 2010). It also supported the NGSS Practice of Engaging in Argument from Evidence and addressed performance expectation K-PS2-1 and DCI PS2.A, given that students made evidence-based claims regarding the relationship between push strength (force) and how far the disc moved (motion).
Extension
To extend students’ learning, Ms. Blaney went back to the part in Oscar and the Cricket where the ball approached the tree. She reminded students about their previous predictions and asked for any others. She then turned the page, which revealed what actually occurred (pp. 14–15): the ball bounced off of the tree, heading in a new direction. This was a literacy-based method of introducing the NGSS crosscutting concept Cause and Effect with respect to collisions, which students were ready to explore in the third and final challenge of the day.
Ms. Blaney placed the Challenge 3 sheet on the floor, using masking tape to tape down a wooden block as indicated near the word BOUNCE (Figure 3). Ms. Lottero-Perdue asked the class: What parts of this sheet are the same as the other challenges? The students shared that the green PUSH circle and red STOP sign were still there. We then asked: What was different? They said that there was another word (BOUNCE), and that there was a block. Ms. Lottero-Perdue then explained that just like before, students would push the disc in the green PUSH circle using a quick two-finger push, but that the disc would need to bounce off of the block before sliding to the STOP sign. We repeated together as a class: “1 - PUSH, 2 - BOUNCE, 3 - STOP!”
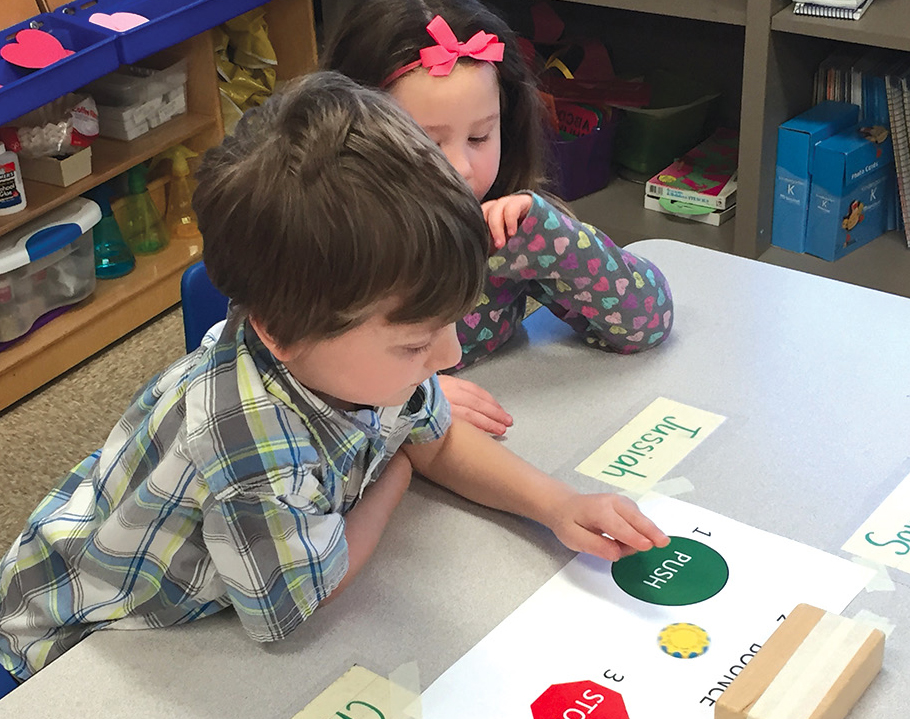
Challenge 3. Photos courtesy of the authors.
Students returned to their stations to try Challenge 3. This was indeed a bit trickier for the students who had to push just hard enough and at the correct angle for the disc to come to rest on the STOP sign. After five minutes, nearly all of the students were able to meet the challenge at least once. Only one student experienced significant frustration with the task; this student did not seem to understand the need to push at an angle toward the block, even with prompting from Ms. Blaney. Our suggestion for cases when a student experiences frustration is to return to the challenge during indoor recess or center time, giving the student more time and less pressure to try it out!
Ms. Blaney led a brief carpet discussion so that students could reflect upon Challenge 3. She asked: “How did you have to push the disc in order for it to stop at the red STOP sign?” This was a difficult question for the students, so Ms. Blaney asked the students a series of simpler questions. Students answered these questions by showing the direction of push or movement with their fingers on the Challenge 3 sheet she had posted near the discussion area (Figure 4). She asked students to show how they pushed the disc in the green PUSH circle. Ms. Blaney then asked: “What direction was the disc moving after you pushed it?” She then asked: “What direction was the disc moving after it bounced off of the block?” Yet again, they showed her. Finally, she asked: “What caused the disc to change directions?” The students identified the block as what caused the disc to move in a different direction (DCI PS2.B Types of Interactions).
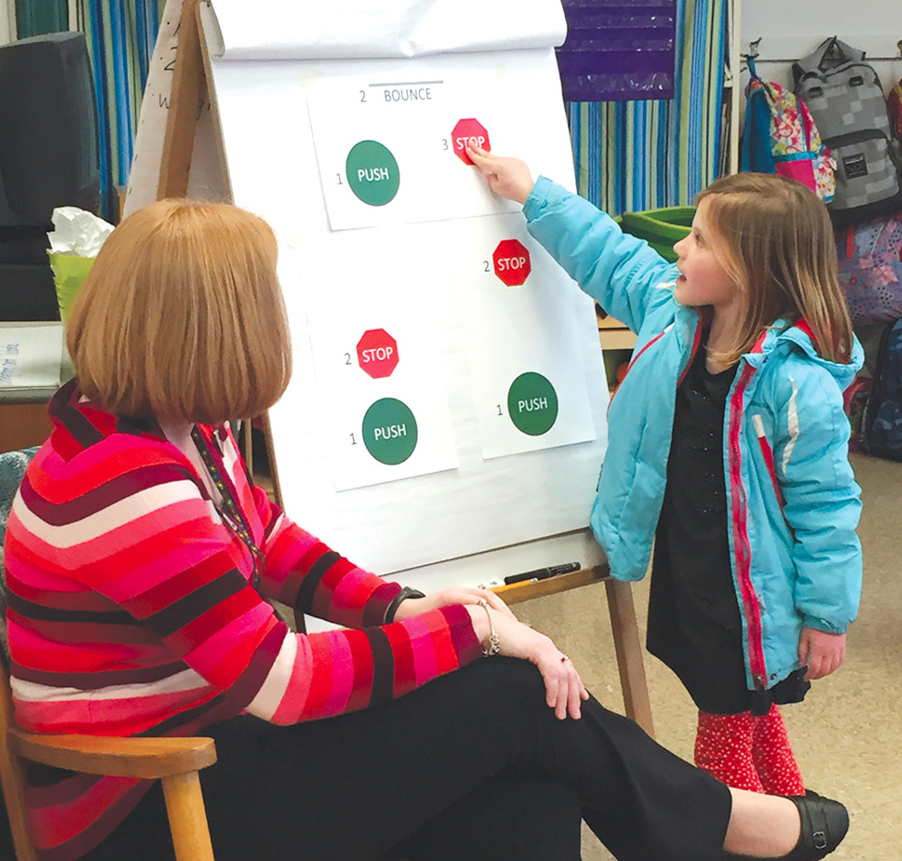
Discussing the Extension activity.
At the end of the lesson we encouraged the students to conduct their own larger-scale version of this investigation. We located each team on the floor in front of a wall or bookshelf. We provided each team with a standard gymnasium hockey puck and green and red circles (one each) cut from construction paper. We asked the students in each team to take turns and challenge one another. The method:
One team member would place the green and red circles on the floor near the wall or bookshelf.
The other would place the puck beside the green circle (the starting point) and try to briefly push the puck so that it bounced off of the wall or bookshelf and stopped at the red circle (touching an edge or overlapping part of the circle) (Figure 5).
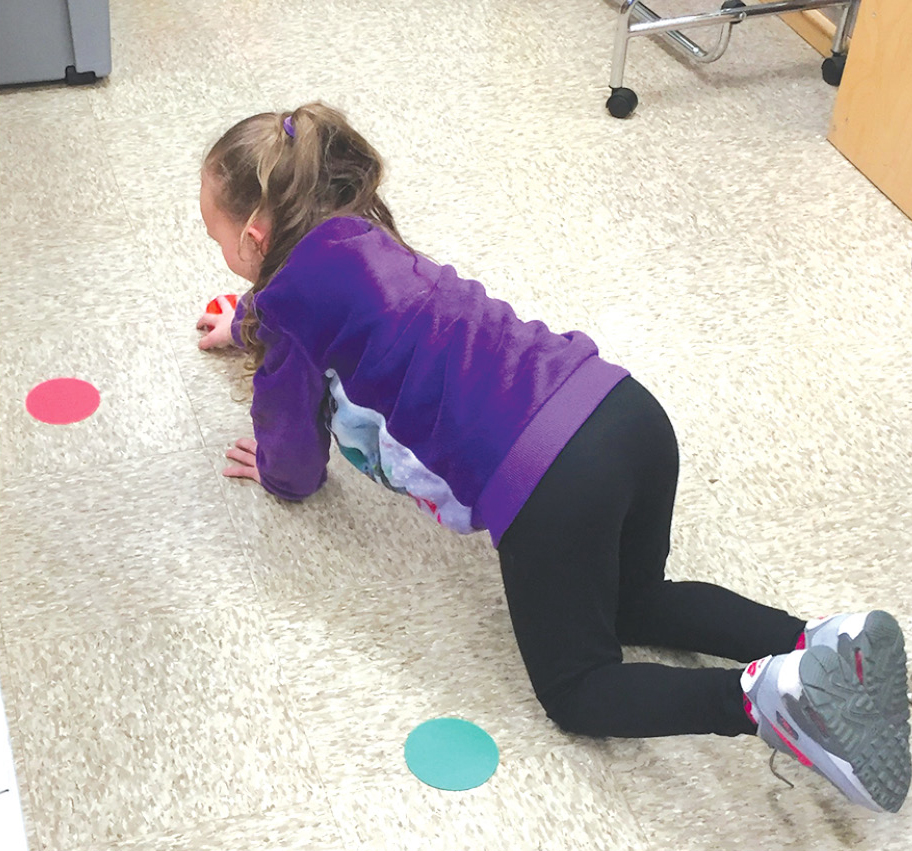
Floor challenge.
In this manner the students were able to decide themselves where to put the green and red circles for their challenges, enabling students to engage in the “planning” portion of Planning and Carrying Out Investigations. Making the puck stop at the red circle was somewhat difficult for students, but they seemed to enjoy this new, larger scale kinesthetic challenge.
Evaluation
Throughout the lesson, we employed informal formative assessment strategies to monitor students’ participation and understanding throughout the lesson. We also utilized performance-based assessments to assess student learning (Flynn 2008). We wanted to see that students were able to complete Challenges 1 and 2 (all students met this goal) and that they were able to direct the disc in such a way as to accomplish Challenge 3. All but one student met this goal. Students often needed several tries to successfully complete the challenges, having the disc stop on at least part of the red STOP sign (or having the puck stop at the red circle). Additionally, we listened to and evaluated the claims that students made and the evidence they used to support those claims as they participated in and reflected upon the challenges. See the Supplemental Resources section for a link to our Challenge Performance and Claims-Evidence-Reasoning rubric.
Concluding Thoughts and Next Steps
This 5E lesson was an engaging way for the kindergarteners in Ms. Blaney’s class to learn foundational concepts in physics with respect to force, motion, and collisions. We used age-appropriate terms like push, pull, move, and bounce because our emphasis was on concept development more so than vocabulary. If desired, teachers can introduce more formal words like force to refer to pushes and pulls as part of a concluding discussion. For more on our instructional choices and the physics incorporated into the lesson, see the Sidebar: Physics Connections.
The students actively listened and contributed during the read aloud, eagerly tried and tried again to successfully overcome each of the challenges, and readily shared their ideas with their teammates, the teachers, and the entire class. And while this lesson can be a taught as a stand-alone physics experience, it can also be taught as a part of a mini-unit on physics and engineering. In our case, after this lesson, the kindergarteners applied their physics learning toward two engineering design challenges related to collisions and inertia (Lottero-Perdue et al. 2017). These engineering challenges directly address performance expectation K-PS2-2 “Analyze data to determine if a design solution works as intended to change the speed or direction of an object with a push or a pull” (NGSS Lead States 2013). We also recommend continuing the extension in a center, allowing students to try and try again to push the puck toward a wall or shelf, change directions, and then come to rest close to the red circle. However you choose to implement and follow up this lesson, we hope that your students enjoy the experience as much as ours did! ●
Supplemental Resources
Download resources at https://bit.ly/3vJoemV
Physics Connections
Sliding, Not Rolling in Our Experiments: We read about a rolling ball in Oscar and the Cricket to engage student thinking, but did not want students to experiment with rolling objects. Why?
- Rolling objects can present logistical challenges:
- Many floors and tables are not perfectly level, causing rolling objects to veer off in unexpected and undesirable directions.
- Rolling objects tend to travel for long distances on smooth surfaces, making it difficult to have it stop in a particular place. [Safety note: This can also present a safety hazard!]
- Rolling objects can present conceptual difficulties:
- It can be challenging to explain at a kindergarten level why rolling objects slow down and stop on a smooth floor. Rather than get into these technical explanations (e.g., dirt and dust, internal friction in a toy car, the fact that rolling objects change shape when they roll), we avoid rolling objects in favor of sliding objects when investigating force and motion.
Friction as a Force: Although we did not focus on this concept during our lesson, students may be curious about why a sliding object slows down and stops on a smooth floor.
- If students ask, it is appropriate to share that this is caused by the object rubbing against the floor as it slides.
- This rubbing is called “friction,” but the word friction is not necessary to teach at the kindergarten level.
Using a Quick Push. We taught the students a quick, two-finger push in our disc experiments to:
- Create a uniform method for the children to push on the disc.
- Reinforce the idea that objects do not need to have a force (or a hand) “stuck to them” in order for them to keep moving. The force only exists during the quick push, and it disappears once the student stops pushing.
Pushes From Inanimate Objects. Kindergarteners readily understand that people and animals can push on things, but it is difficult for them to understand that inanimate objects (like trees or blocks) can apply a force to another object.
- A goal was to have students understand that the tree or block changed the direction of the ball or disc, respectively; children did not have difficulty with this idea. This idea is appropriate for kindergarten.
- We intentionally did not introduce the idea that the tree or block applied a force during the ball/puck bounce, as this is a concept that can be developed in later grades.
Pamela Lottero-Perdue (plottero@towson.edu) and Cody Sandifer (csandifer@towson.edu) are professors of science education in the Department of Physics, Astronomy, & Geosciences at Towson University in Towson, Maryland. Kathryn Blaney (kathryn.blaney@hcps.org) is a kindergarten teacher at Darlington Elementary School in Darlington, Maryland.
Instructional Materials Physical Science Physics Teaching Strategies Early Childhood Grade K