
feature
River’s Edge Construction
Third-grade students engineer solutions to prevent local flooding
Science and Children—May/June 2023 (Volume 60, Issue 5)
By Tyneezha Harris, Min Jung Lee, Kristie Gutierrez, and Jennifer Kidd

Flooding disrupts buildings, towns, and peoples’ lives all over the world. To help students understand that engineers design and build objects to solve societal problems like flooding, we designed a lesson for third-grade students that included an engineering design challenge where they became local environmental civil engineers. They built a model that included a river, a house, and uniquely designed flood mitigation structures. The criteria for the engineering design challenge were that their flood mitigation structure should be able to withstand two cups of “floodwater,” and that the house must remain on the ground as not to impede the neighbor’s river views, nor defy the local historical housing code. The constraints were that students must stay within their $10,000 budget set by the homeowners, and they can only use the materials from “Harris Supply Company” (i.e., the teacher!). Students took on the role of environmental civil engineers by using the engineering design process to create a working flood prevention system model.
This article outlines the key components of the River’s Edge Construction lesson plan. An explanation of how the lesson was delivered is presented alongside suggestions for implementation by K–6 teachers. The integration of scientific literacy is discussed first, followed by a discussion of each of the 5Es (Bybee et al. 2006). A timeframe for distributing the lesson phases is given; however, the activities included in this plan (see Supplementary Resources for specific lesson materials), should be modified to meet the needs and interest of students, and to align with allotted instructional time and objectives.
Engage: Where Does Flooding Happen?
Day 1: Group Discussion
We began the lesson by introducing flooding events in the students’ local community via the River’s Edge Construction presentation (see Supplementary Resources). Students were encouraged to think about their experiences with flooding while watching the video. As the lesson was taught in southeastern Virginia (VA), the two videos (see Online Resources) shared with students captured various flooding incidents in Norfolk, VA. The National Oceanic and Atmospheric Administration (NOAA) indicates that the Hampton Roads region (which includes Norfolk) is experiencing the highest rates of sea level rise on the eastern coast of the United States, second only to New Orleans (NOAA 2016).
After sharing the videos, we introduced a KWL chart to formatively monitor students’ understanding throughout the lesson (see Supplementary Resources). In the chart, students were asked to share their experiences with flooding and what they know about flooding (K). They also shared what they would like to learn about flooding (W). More detailed guiding questions are listed in Table 1. Coming back as a whole group, the class reviewed their responses and discussed their personal experiences with flooding in their local communities and their reactions to the videos.
Explore: How Am I Affected by Flooding?
Day 2: Sea Level Rise in Norfolk, Virginia
To help students explore how much their community is affected by flooding, we prepared computers for each student to use the Digital Coast Sea Level Rise Simulator by NOAA (Figure 1). In this simulation, students can change the water level, view the water vulnerability, and observe the high tide flooding. First, students were asked to locate their school by typing in the address or zip code in the simulator. As a whole class, students observed the water vulnerability and the high tide flooding of their school area by changing the water level. Following the initial exploration, students picked a local landmark nearby their school or home and hypothesized what they think would happen in the area around the landmark if there were a change in water level. Then, students observed the water vulnerability and the high tide flooding in their area by changing the water level in the simulation. Finally, students were asked to think of how they would prevent flooding in their area based on the local scenario in the simulation. As students create a hypothesis on what will happen to their local area and suggest ways to prevent flooding based on evidence found in the Digital Coast Sea Level Simulator, they engage in an argument with evidence, data, and a model. Students should be encouraged to share personal experiences of flooding in their communities and the structures that they notice around town to help mitigate high waters. In the Norfolk community, for example, many roads in impacted communities become impassible during a heavy rainfall or storm surge from a hurricane. Students may talk about family or friends wading through or kayaking down flooded streets until the water levels return to normal!
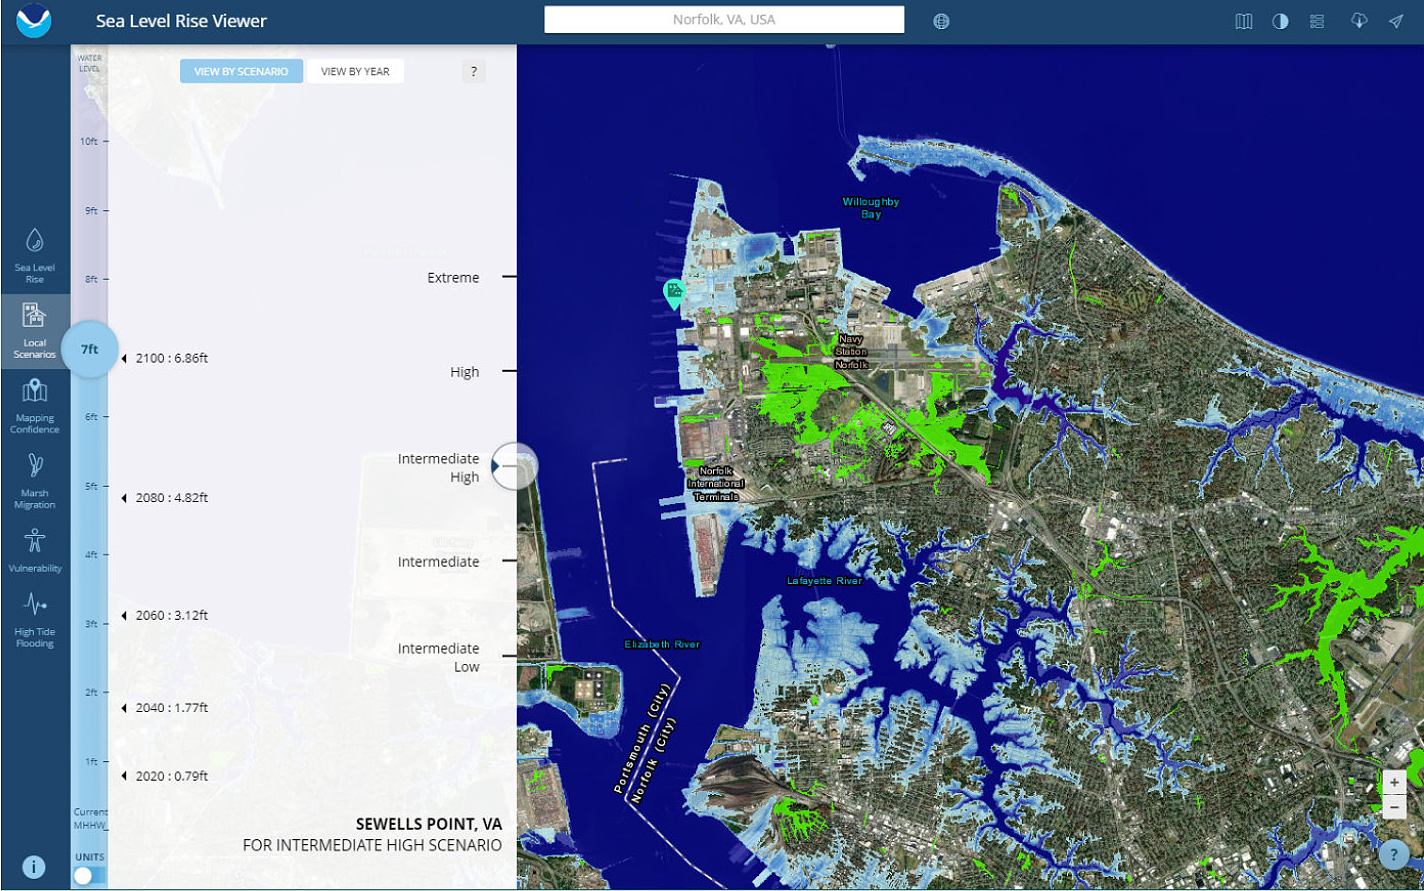
Digital coast sea level rise simulator by NOAA.
Explain: What Is Flooding?
Day 2: Learning About Flooding
To remind students about the impact of flooding and to help them better understand its causes, we viewed an illustrated video (see Online Resources). After the video, students reflected on what they learned about flooding through the simulation and videos. During this reflection, students were asked to share their understanding of the new vocabulary, such as erosion, flash flooding, mitigation, and sedimentation, which were also shared on a word wall (see Supplementary Resources). In the Norfolk area, there are various reasons why local flooding is occurring—sea level rise, tidal and storm surges (caused by tropical storms/hurricanes or nor-easters), erosion, and land subsidence at the mouth of the Chesapeake Bay. No matter where this lesson is taught, it will be important for teachers to learn more about flooding causes and events in their local community prior to teaching this portion of the lesson. It is important to note that climate scientists predict that sea levels will continue to rise for the foreseeable future, and that the severity of coastal storms, including hurricanes and nor’easters, will increase. Thus, the flooding challenges that our region has are not unique to this area. To wrap up what the students learned about flooding, we returned to the KWL chart that was begun on Day 1. The students were first asked to write their own definitions of key flooding vocabulary (i.e., the terms listed in Figure 2). After comparing their definitions with a peer and then discussing as a class, the students finish the last section of the KWL chart—what they have learned (L) section—by summarizing the lesson’s main concepts using the core vocabulary regarding flooding.
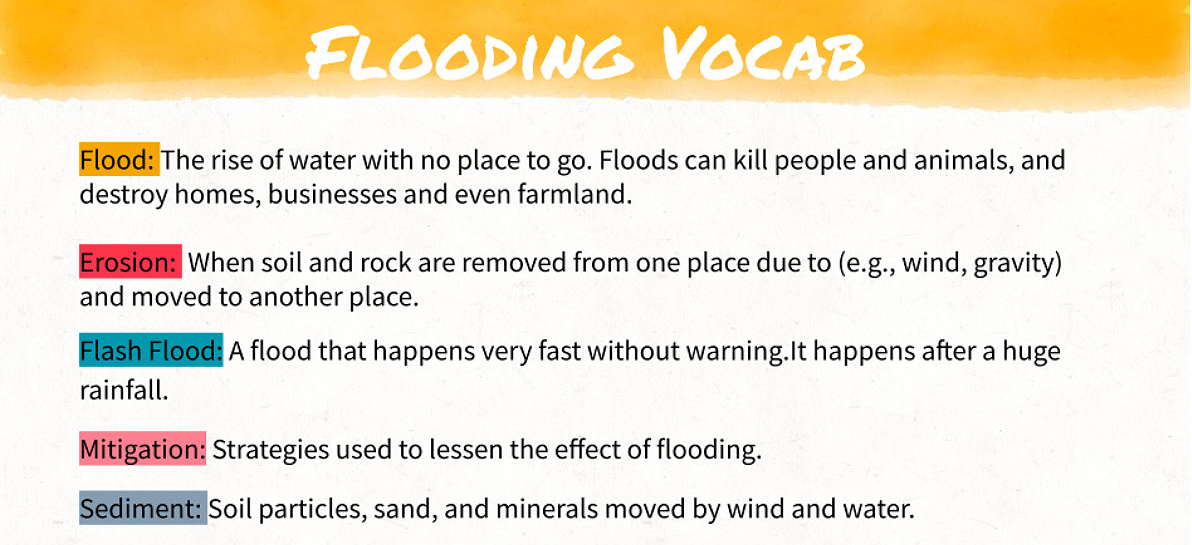
Sample vocabulary.
Elaborate: How Can I Prevent Flooding?
Days 3 and 4: The Engineering Design Challenge
To prepare students to be engineers for the engineering design challenge, we watched two videos from Crash Course Kids (see Online Resources) and discussed what engineering is, important questions that engineers ask and solve, different fields of engineering, and how engineers work (i.e., engineering design process).
With their “engineer hat on,” students were introduced to the engineering design challenge. They are engineers at a large construction company based out of New York City that has been called to Norfolk to build a home along the Elizabeth River. However, one big problem in Norfolk, they were told, is that much of the land along the local waterways are at, or below, sea level. Since Norfolk is along the eastern coastline of the United States, the people of Norfolk experience frequent flash flooding and larger flooding events as a result of thunderstorms, tropical storms, and hurricanes. The construction company must incorporate a flooding prevention system so that the home doesn’t flood. For this build to be a success, the flooding prevention system—including the house—needs to withstand a substantial flood, represented in the simulation by the rapid introduction of 2 cups of water, as shown in the first two images of Figure 3. Also, the house cannot be built on stilts because it will block the neighbors’ views of the river and it is against the local building code for the historical area. The primary constraint of this challenge is that the company must stay within the homeowners’ $10,000 budget. After the design challenge was presented, students were invited to share any flood prevention systems they may have seen in their neighborhoods. Some structures common for flooding mitigation in Norfolk include the utilization of floodwalls, beach and riverbank replenishment projects, and the use of stilts on houses near the coastline.
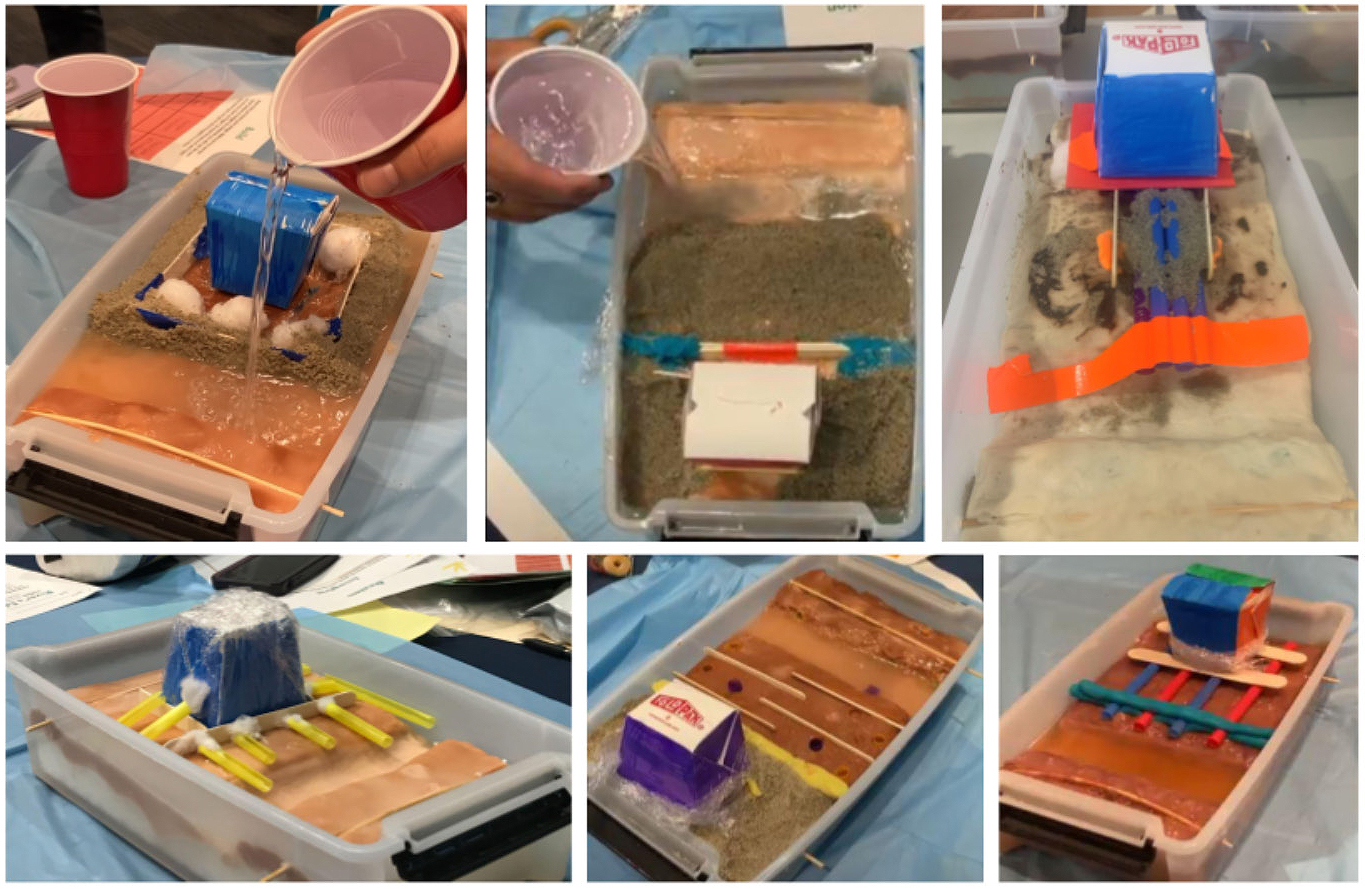
Examples of students’ flooding mitigation solutions.
Students were grouped in teams of three or four. Each group was given a River’s Edge Construction Worksheet (see Supplementary Resources). Teachers also provided each group with a model of the landform on which students would build their homes and flooding prevention system. The model consisted of a foam base covered by a layer of modeling clay. A channel approximately 2 inches wide was cut into the foam and filled with water to represent the river. A small take-out box colored with markers was used to represent the house. As each group completed their worksheet, students visited Harris Supply Company (a stand set up in the classroom with a variety of construction materials, e.g., sand, craft sticks, etc.) with their provided $10,000 store debit card (a plastic laminated card) to buy supplies based on their planned budget list (Figure 4). At the time of the students’ visit to the “store,” the teacher or assistant should ensure that the groups do not go over budget and probe students to explain how their prevention system will work to prevent the house from flooding. This is important to help students apply their understanding of flood mitigation strategies and knowledge of the material properties to their design choices. It also gives students a chance to practice using their new vocabulary.

Budgeting section of construction worksheet.
Using their purchased supplies, each group of students built a house with a flooding prevention system within the flooding simulation model. Before students start building, the teacher should remind students of the safety precautions for handling the sharp materials, such as wooden sticks, scissors, and for handling liquid (i.e., water). Once they were done building, each team was directed to test their flood prevention system at the front of the class by pouring two cups of water into their simulation model and checking to see if their house flooded. This allowed all students to learn from the failures and successes of each team’s model. As many teams may fail at this point, the teacher should use this as a teachable moment to talk with students about ways in which engineers learn through the initial failure of their designs. This may be a place in the lesson where the teacher could bring in a relevant biography of how a practicing engineer in our history failed initially but went on to create something amazing (e.g., the Wright Brothers (airplanes/flight), Lonnie Johnson (Super Soaker/Nerf Gun).
Students were able to tell if water reached their house when the two cups of water were poured into the “river” because a noticeable water level line would appear on the outside surfaces of the house which were “painted” with washable markers. If their house flooded, the system did not work, and they needed to go back to the drawing board and redesign the flooding mitigation structures around their house. To help students redesign their flood prevention structures, we introduced structural mitigation strategies that included floodwalls, stilts (as a potential strategy for other, non-historical areas), levees, canals, and floodgates (Figure 5). Upon seeing these pictures, students were asked to explain how these strategies might work to prevent flooding. We clarified students’ understanding as needed. This provided another opportunity for students to practice using their newly acquired vocabulary. With a better understanding of different flood prevention systems, students improved their flooding simulation model and retested. It is possible that some teams will have a successful design on their first attempt. In this case, the teacher can challenge them to redesign their structure so that it can withstand a larger, 500-year flood (e.g., 2 or more cups of additional flood water).
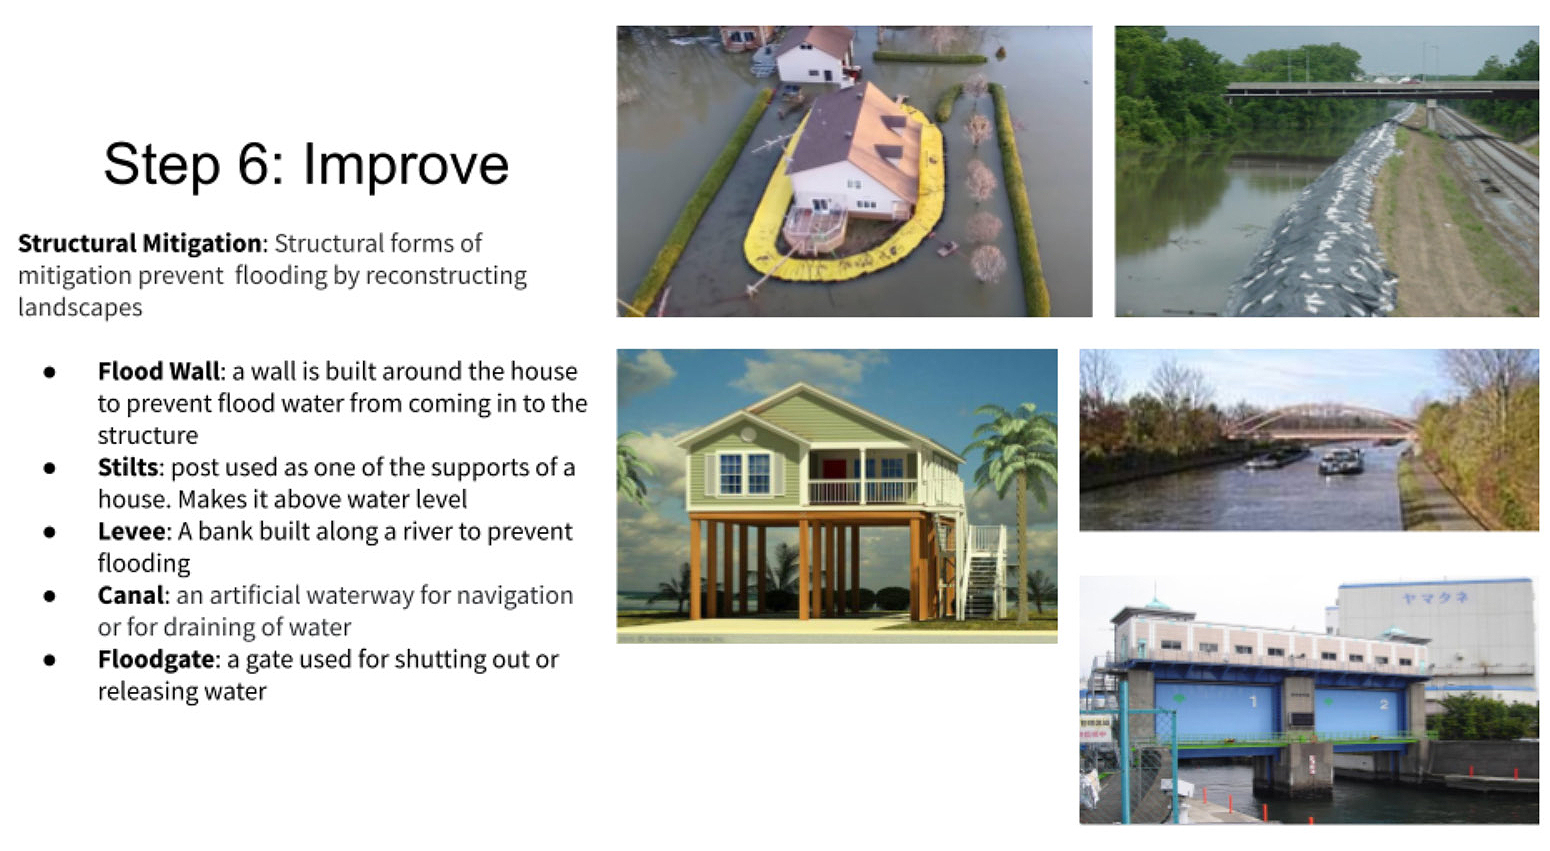
Structural mitigation strategies introduced for improving prevention system.
While engineering mitigation structures, various materials (e.g., foam sheets, craft sticks) were used to try to block the flow of water onto the riverbank. Other teams chose to use a stilt-like structure made of popsicle sticks or straws to move their houses vertically out of the flood zone, while others attempted to add a waterproof barrier (using plastic wrap) to protect their house from flood waters.
Evaluate: Flooding!
Day 4: Presenting the Houses and their Flooding Mitigation Structures
On the last day of the lesson, each team was asked to produce a short video explaining their flooding prevention system. In this presentation, students recorded themselves elaborating on the goal of their design, what materials they included and why, how the prevention system worked, the success of their system model, and how they made improvements to it. Students were asked to use the scientific knowledge and core vocabulary they learned from previous lessons. Creating videos provides students with an authentic literacy experience—constructing and supporting their claim of a solution to the problem, criteria, and constraints—tied to their engineering challenge. Engineers must present and defend their designs to clients. The students were expected to do the same. They used scientific reasoning to defend their design decisions. In addition to producing an authentic artifact that mirrors the practice of professional engineers, the videos provided students with extended thinking time to process their newly acquired vocabulary. Whereas a class discussion requires students to respond quickly to a prompt, preparing a script allows students time to think and to construct sentences that incorporate new terminology without the pressure of a waiting teacher and peers.
We evaluated each group’s design and video presentation and the team that best aligned with the award criteria described below won the following awards: People’s Choice for Best Engineering Solution for Flooding (students and/or expert(s) vote on their choice for best design for both function and aesthetics), Most Cost-Effective Engineering Solution for Flooding (team that built the cheapest model that fully met the criteria/challenge), and Record Breaking Solution for Flooding (team whose structure was able to go above and beyond the required minimum amount of water input and survived the highest floodwaters) (see Supplementary Resources for award templates).
Final Thoughts
This engineering lesson allows students to connect engineering with their everyday lives by designing and building a model for flood-prevention. Moreover, students can actively practice scientific literacy skills throughout the lesson by sharing their personal experience with flooding, using the vocabulary learned from the lesson, identifying issues in their community, and expressing their solution to a problem using the engineering design process. The integration of engineering and the emphasis on scientific literacy in this lesson helps students develop a deeper understanding of flooding and the strategies utilized around the world to mitigate this common natural disaster.
Supplemental Materials
Download additional materials at https://bit.ly/3N6BxZb.
Online Resources
Crash Course Kids: The Engineering Process https://youtu.be/fxJWin195kU
Crash Course Kids: What’s an Engineer? https://youtu.be/owHF9iLyxic
Engineering News-Record: Rising Challenge: Norfolk, VA https://youtu.be/Jd5_dUVYwdo
Historic Flooding of Norfolk, Va - November 12, 2009 https://youtu.be/CvUS1B5nSwE
Learning Junction: Flooding Explanation-Learn about Floods-Video for kids https://youtu.be/udRNUBHbE0o
National Oceanic and Atmospheric Administration: Sea Level Rise Viewer https://coast.noaa.gov/digitalcoast/tools/slr.html
Norfolk Flooding https://youtu.be/JA3_A16RPiI
Severe Weather 101- Flood Basics. NOAA National Severe Storms Laboratory www.nssl.noaa.gov/education/svrwx101/floods/
Tyneezha Harris (tharr013@odu.edu) is an elementary educator in Fredericksburg City Public Schools in Fredericksburg, Virginia. Min Jung Lee is a postdoctoral researcher, Kristie Gutierrez is an assistant professor of science education, and Jennifer Kidd is a master lecturer, all at Old Dominion University in Norfolk, Virginia.
Climate Change Climate Science Environmental Science Phenomena Elementary