
feature
What Do You Notice?
Fourth-grade students explore how to prevent flooding with landscape engineering.
Science and Children—May/June 2023 (Volume 60, Issue 5)
By Heidi Masters, Sydney Jares, Alyah Tesch, and Emma Kleindl

All over the United States, communities experience natural hazards, from extreme drought to severe flooding (Wehner et al. 2017). We were invited to teach a fourth-grade class about how to reduce the impact of flooding. To address this anchoring phenomenon (Lee 2020), we developed four lessons (45 minutes each) using the Universal Design for Learning (UDL) framework (CAST 2018) and several standards. Fourth graders were introduced to the phenomenon using developmentally appropriate pictures of flooding in our area and the following problem statement: Your city is experiencing heavy rain and the Mississippi River is rising. Flooding is expected in most areas of the city. You are tasked with finding a solution to reduce the impact of flooding on your Lego house (4-ESS3-2). To find a solution to this problem, the students investigated different materials and landforms.
Lesson 1: Reaction of Materials to Water
To optimize relevance and authenticity and activate prior knowledge (CAST 2018), students analyzed and interpreted two developmentally appropriate flooding pictures and responded to the question: What do you notice about these pictures? Many of the students noticed “flooding.” We also wanted them to compare the impervious and pervious surfaces; therefore, we probed the students’ thinking further by asking: How are different surfaces responding to the flooding? A student stated, “The grass is not holding water like the street and sidewalk.” We explained to the students that they soon would be working as engineers to find a solution to reduce the impact of flooding on a Lego house. Their first task, as a scientist, was to figure out the answer to the following investigable question: How do different materials react to water?
While the students were exploring, we encouraged sensemaking by asking: What do you think is going to happen when you apply water to that material? What do you notice is similar about the materials that are absorbing water? The goal of these questions was to determine if students were starting to notice a relationship between material properties (i.e., structure) and their reaction to water (i.e., function). For example, one student noticed the wood tongue depressor was treated, therefore it repelled the water.
To help students make sense of the data (analyze and interpret), we represented the students’ findings on a whole-class data chart to highlight patterns between material properties (i.e., structure) and how they reacted to water (i.e., function). Students discussed the data in small groups and shared with the whole class properties of materials that absorb vs. repel water. We were thrilled to hear that students were noticing materials with “no holes/space,” such as aluminum foil, repel water, and materials with “holes/space,” such as sponges, absorb water. We concluded this discussion by constructing a scientific explanation with the students using the Claim, Evidence, and Reasoning (CER) framework (CAST 2018; Zembal-Saul, McNeill, and Hershberger 2012). Collaboratively the students claimed, “Materials absorb or repel water.” Students supported this claim with evidence by sharing materials that absorbed and repelled water. Our reasoning was materials properties (i.e., structure) influence how they react to water (i.e., function).
To conclude this lesson, we formatively assessed the students by having them apply what they learned to the flooding scenario from the beginning of the lesson. We asked the students to write or audio/video record their response to the following question (CAST 2018): To reduce the impact of flooding, what types of materials would you use and why? Students responded with a variety of perspectives such as, “I think materials that absorb water would help get rid of the water because they would allow the water to sink into the ground.” Another response was, “I think materials that repel water would be good because they would keep the water out.” Both responses allowed us to document the students’ abilities to use their knowledge of how materials react to water to explain how they could help reduce the impact of flooding.
Lesson 2: Slopes, Hills, and Trenches
Lesson two began by activating the students’ prior knowledge about the problem and what materials could be used to reduce the impact of flooding (CAST 2018). While students were sharing, we listened for whether the students knew flooding was the problem and that certain material properties (i.e., structure: holes/no holes) could be used to repel or absorb water (i.e., function). We then informed the students they would be exploring another technique that could be used to reduce the impact of flooding. Our investigable question was: What changes can be made to ground to reduce the impact of flooding? Students were asked to share their initial ideas, one being, “We could create a hill.”
To investigate this question, students worked in collaborative group of two students and used the materials outlined in Figure 1. We recruited student interest by explaining that they needed to identify two different ways to reshape the soil. To encourage equity during the investigation, we stated each partner would get a chance to interact with the soil. Upon receiving the materials, the students used their creativity to reshape the soil into slopes, hills, and/or trenches. We formatively assessed the students’ thinking by asking: How do you think your design (i.e., structure) will reduce the impact of flooding (i.e., function)? We documented whether students were able to explain how their landform could divert water away from an area. Students who made slopes or hills stated, “The water will flow down the side.” Groups that made a trench shared, “The water will flow inside the hole.”
Lesson materials.
Lesson 1
- Wood tongue depressor
- Fleece fabric
- Sponge
- Aluminum foil
- Rock
- Wax paper
- Cardboard
- Plastic
- Foam
- Grass
- Cups of water
- Pipette
Lesson 2
- Two 6 qt storage containers
- Mixture of topsoil, clay, and water
- Children’s watering can
- Water
Lessons 3 & 4
- Materials from Lesson 1 & 2
To test their design, we gave each group a watering can that was half-full of water. Each group was instructed to pour the water onto their landform and record pictorial and/or written observations of what happened to the water and soil before, during, and after the water was added. Some groups did need additional prompting, such as: Where did the water go? What happened to the soil? Our purpose for asking these questions was to draw the students’ attention to whether the water was being diverted away from where it was poured and if the soil was eroding away. From our formative assessment of the students recording sheets, students were noticing that “some soil was moving” and “the water was moving away from where it was poured.”
When we engaged the students in a sense-making discussion as a whole group, we asked them to respond to two questions: How did you reshape the ground (i.e., structure)? What did you observe happen to the water and soil when you poured the water (i.e., function)? We documented the students’ verbal ideas on a visual reference chart (CAST 2018). Groups that made a trench noticed, “water and soil from the sides of the trench went into the hole.” Those that made a slope or hill noticed, “water and some soil moved down the side.” From this discussion we were able to work together as a class to construct a scientific explanation that answered the investigable question. Our claim was that slopes, hills, and trenches can reduce the impact of flooding. The evidence was that slopes and hills cause water to flow away and trenches collect the water. Our reasoning was if you divert the water to a different location, the impact of flooding can be reduced.
Given the students noticed the water was causing the soil to move, we asked them: What other problems could occur if too much soil erodes away? Students concluded that if too much soil eroded, “buildings could also erode down the slope/hill or into the trench.” We asked students to record in their science notebook using words and/or pictures different ways they could prevent erosion from happening using some of the materials they investigated in lesson one. Multiple students stated they would use plants because their “roots would hold the soil in place.” Other students thought of lining the trench with rocks “to keep the water from eroding the sides of the trench.” This discussion was a perfect way for students to connect the first two lessons and another fourth-grade performance expectation regarding erosion.
Lesson 3: Research and Design
At the beginning of lesson three, we activated the students’ knowledge from lessons one and two, as this information would help them design a solution to reduce the impact of flooding on a Lego house. After this review, we asked students to think, pair, share about the work of an engineer. Some common thoughts the students had were that “engineers are builders and designers.” We then provided a visual representation of the engineering design process and verbally introduced each step. We emphasized that an engineer creates multiple designs before they find the best solution. Finally, we reviewed the engineering problem the students would be finding a solution for as well as the criteria and constraints. The following criterion was necessary for the design to be successful: Your design must reduce the impact of flooding on a Lego house. When designing a solution that addressed this criterion, the students also had to consider two constraints: (1) Time: You have two 45 minute class periods to design, construct, and test your design, and (2) Materials: Each group will be limited by the materials and landform designs from lessons one and two.
To support the students in their design process, they researched flooding solutions by examining pictures to help spark some ideas (see Supplemental Resources). We asked students to pay attention to the materials used as well as how the land was shaped. For the remainder of lesson three, the students worked on drawing an individual design and collaborating with a partner to discuss their design and come to a consensus on a final design (Figure 2). While students were working with their partner, we rotated to the different groups to formatively assess their decision making. A few questions we asked were: Tell me about your design? What made you decide to include (insert student response) in your design? How do you think (insert student response) will reduce the impact of flooding? We listened to the students’ abilities to state what material and/or landform they would use in their design (i.e., structure) and how it would reduce the impact of flooding. An example of a statement made by a student was, “We will create a hill to make the water flow away from the house. We will put grass on the hill so that the soil stays in place.”
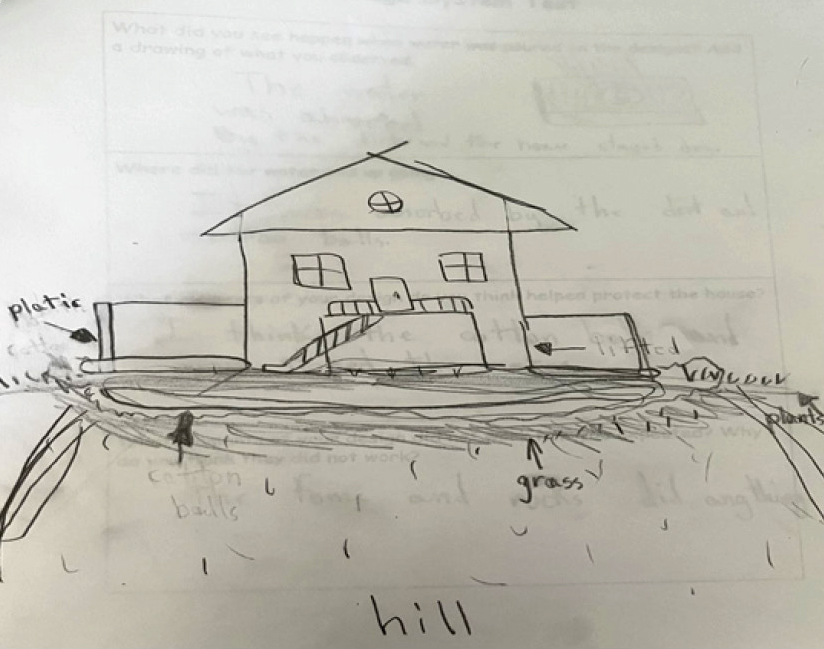
A student group’s design.
Lesson 4: Build and Test
We began lesson four by having students analyze two pictures of flooding solutions from lesson three and answer questions, such as What materials do you see that would absorb or repel water? What do you notice about the shape of the landscape? How do you think this design would reduce the impact of flooding? Next, we reviewed the problem as well as the criterion and constraints.
After everyone had finalized their solutions, we informed the students that when it was their group’s turn to test their design, they would: (1) give a brief explanation of their design, (2) take a before picture, (3) pour a child’s size watering can full of water on their solution, (4) explain what they observed, and (5) take an after picture. For safety reasons, students were asked to notify us of any spills right away. Once these instructions were given, all the students sat in a circle, and we began testing.
One of the many solutions students came up with can be found in Figure 3. This group created a trench for the water to go into, planted grass to reduce erosion, and used sponges to help absorb the water. Figure 3 also shows what happened after the water was poured on the solution. Each of the design features of this solution worked as the group expected; however, they realized that the soil under the house could eventually erode. As a result, they mentioned they should put rock and/or grass around the house as well. Students’ verbal explanations when presenting their design solutions served as our summative assessment. We created a rubric that focused on the students’ abilities to explain how the materials and/or shape of the landscape (i.e., structure) would reduce the impact of flooding (i.e., function) as well as analyze and interpret the results (Table 1).
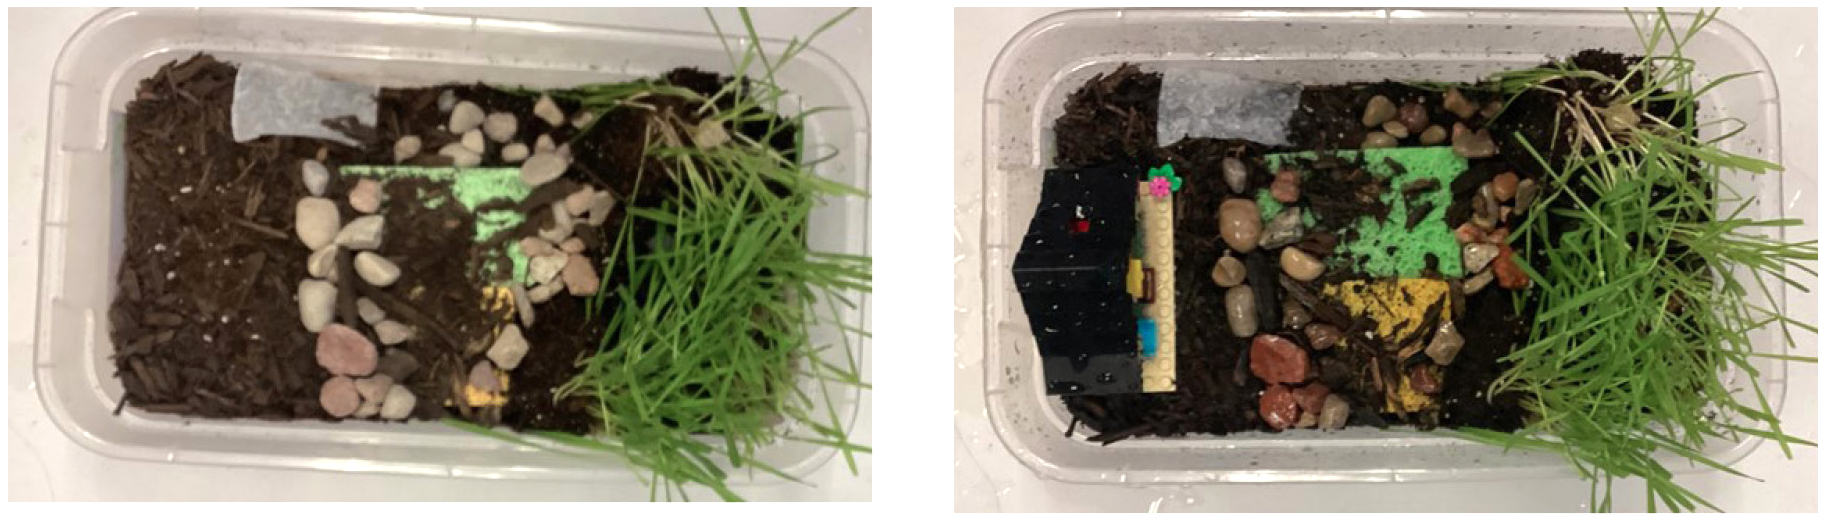
A design solution before (left) and after (right) testing.
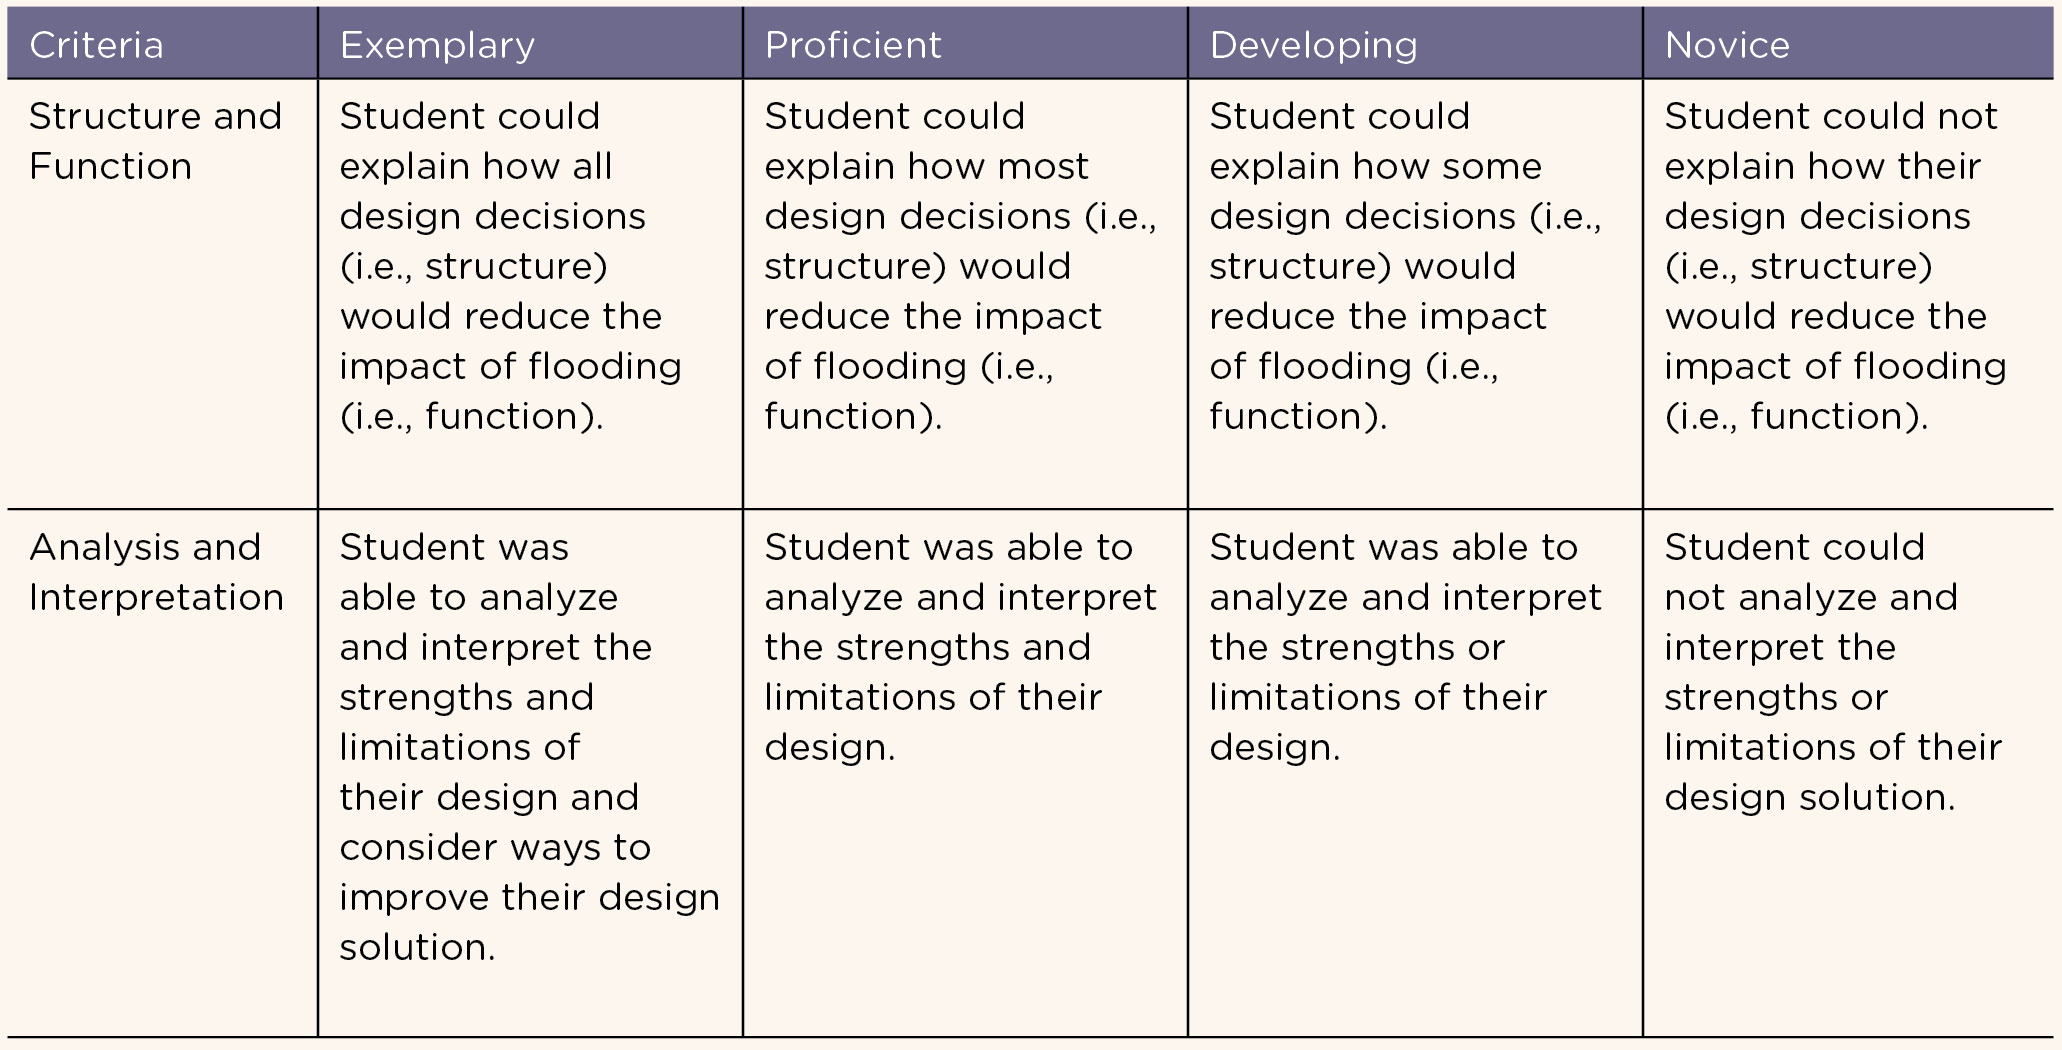
Summative assessment rubric.
Conclusion
By the end of the four lessons, the fourth-grade students were able to experience and learn how objects absorb or repel water and how changes could be made to the ground (e.g., slopes, hills, and/or trenches) to reduce the impact of flooding. Students were able to apply what they learned in lessons one and two when developing a solution to reduce the impact of flooding. Due to only having four days with the students, they did not have time to improve and retest their designs with us. Instead, we asked the students what they would do differently to improve their designs, and the classroom teacher worked with the students to modify and retest their design a different day. Overall, the students are aware of some solutions they could use to reduce the impact of flooding on humanmade structures.
Supplemental Resources
View the images students used for research at https://bit.ly/43Nl81z.
Heidi Masters (hmasters@uwlax.edu) is an associate professor, and Sydney Jares, Alyah Tesch, and Emma Kleindl are teacher candidates, all at the University of Wisconsin – La Crosse, in La Crosse, Wisconsin.
Environmental Science Phenomena Physical Science Grade 4