
Classic Lessons 2.0
Directed inquiry and three-dimensional learning
Heat and energy concepts
The approach profiled in this article makes use of directed inquiry as an instructional vstrategy. Sometimes called structured inquiry, directed inquiry provides a means to organize classroom experiences that strikes a balance between open inquiry and what is often described as a “cookbook” type of lesson.
Martin-Hansen (2002) notes several ways to include more student involvement in the investigation. For example, the teacher can remove a data table and help students determine what information should be collected to interpret the meaning of the investigation. Students might also be asked to explain how an investigation can be improved, based on the results they obtained.
In this lesson, students are directed to develop a product to solve a problem—bringing an ice cube to class without it melting—and using the results from their investigation to develop key concepts in heat and energy. Students follow this action by using what they learned to improve the operation of this device. The student-devised solutions to the problem and student-constructed devices are what serve to elevate a lesson into the realm of directed inquiry; students have agency in terms of how they decide to construct the device to transport an ice cube to school. The teacher provides a task, but students determine how to best accomplish it.
Lesson
Engagement
The day before assigning the project, place a large ice cube in a bowl in the front of the room. Using a larger-than-customary ice cube will gather student attention. (There is no need to introduce the ice cube directly at the start of class.) At some point near the end of the class meeting, ask students what they have observed about the piece of ice during the class period. Students may volunteer one or more of these points: the ice is melting, the rate at which the ice is melting, what might happen if they return later in the day, and so forth.
Begin by asking students what is happening to the ice cube. As they note that the ice cube is melting, seek feedback to determine what students understand about the cause of melting. Ensure that they understand that ice melts as heat energy is transferred to the piece of ice from the environment.
Use these student comments to present a challenge: What can students create to reduce the melting of an ice cube? Solicit suggestions from the members of the class as to what they should consider to accomplish this task. Encourage further questions by students. Emphasize the following:
- It must be a student-constructed device.
- Everyone will start with the same size piece of ice. If students are doing this at home, the teacher will provide a small plastic cup (a medicine dose cup) to use to make the ice.
- The device should not include something that is designed to keep substances warm or cool (i.e., a cooler, a Thermos, an insulated cup, etc.), but students may consider their characteristics when constructing their devices.
- The success of the device will be based on the size of the piece of ice that remains after several hours or what students bring to school from home. The larger the piece of ice remaining from the standard piece of ice, the more successful the device. Note that the length of time that the student-constructed device will hold the ice cube will vary, based on the time of school day when the science class meets.
- We expect that the piece of ice will partially melt between the time it is placed in the student-constructed device and when it arrives at school.
- Students should create a statement (in writing) the next day, sharing what they did to create the device to transport the ice cube. The statement should also include a drawing of their device, with labeled parts of the ice container that students created. See the Online Supplemental Materials for a sample student planning sheet. The same document may be used to show how the student revised the device after the initial testing.
Challenge students to take the same things engineers consider into consideration when designing a product or a process: criteria and constraints. Criteria describe what the device is supposed to accomplish and what needs to be considered as part of the design. For this investigation, students should take the following into consideration as they start designing and constructing their ice-keeping device: the temperature difference the device needs to maintain and how long it needs to maintain the temperature difference. The importance of maintaining a temperature difference is to keep the inside of the container, which contains the ice, from warming to the same temperature as the outside of the device, where the ice cube would melt.
Constraints offer boundaries for constructing a device. Products do not generally have unlimited budgets, and unsafe devices are unacceptable. For this project, students consider these constraints as they prepare to develop their projects: which materials are available, how to ensure that the ice is not contaminated by the device, how much time they have to construct their devices, and how to manage the costs for materials used to construct the device. For example, with this activity you may provide a limit on how much students may spend if students purchase materials to build their device. This is a great example of a constraint.
Depending on the home situation of your students, you can either have students supply the materials they will use for the investigation by constructing it at home, supply materials for students to take home and construct their device, or have students create their device in the classroom. A variety of materials such as Styrofoam cups, disposable food storage containers, paper towels, plastic bags, aluminum foil, shredded paper, and foam packing peanuts should be made available to students.
Exploration
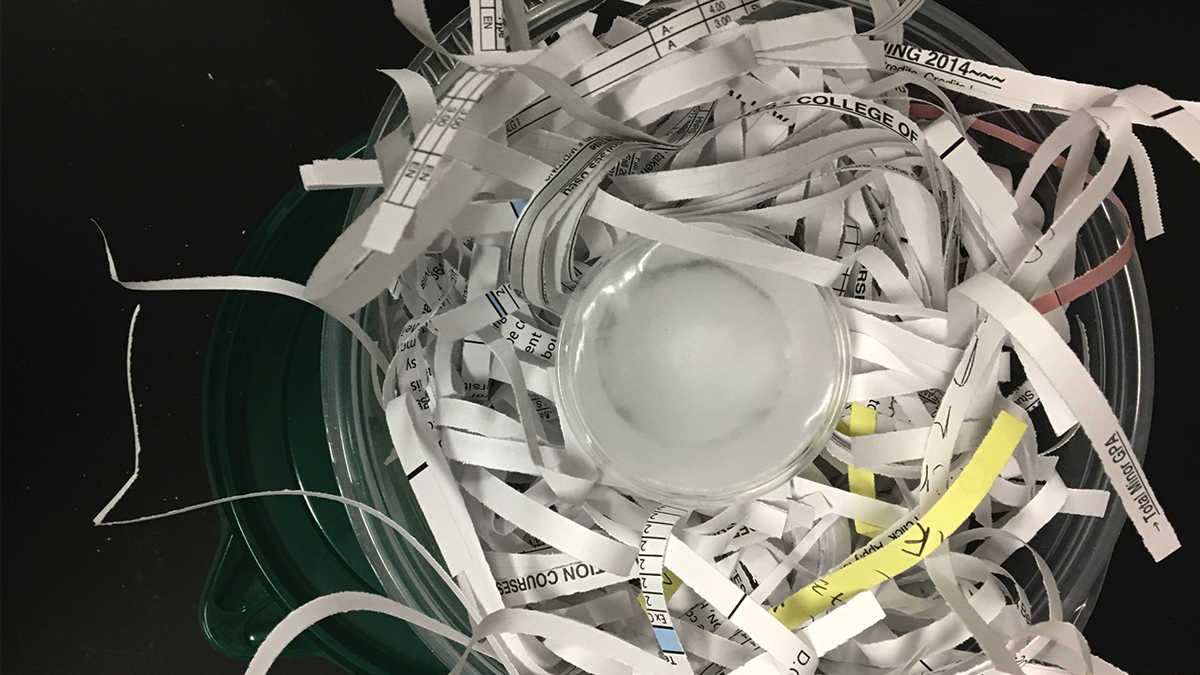
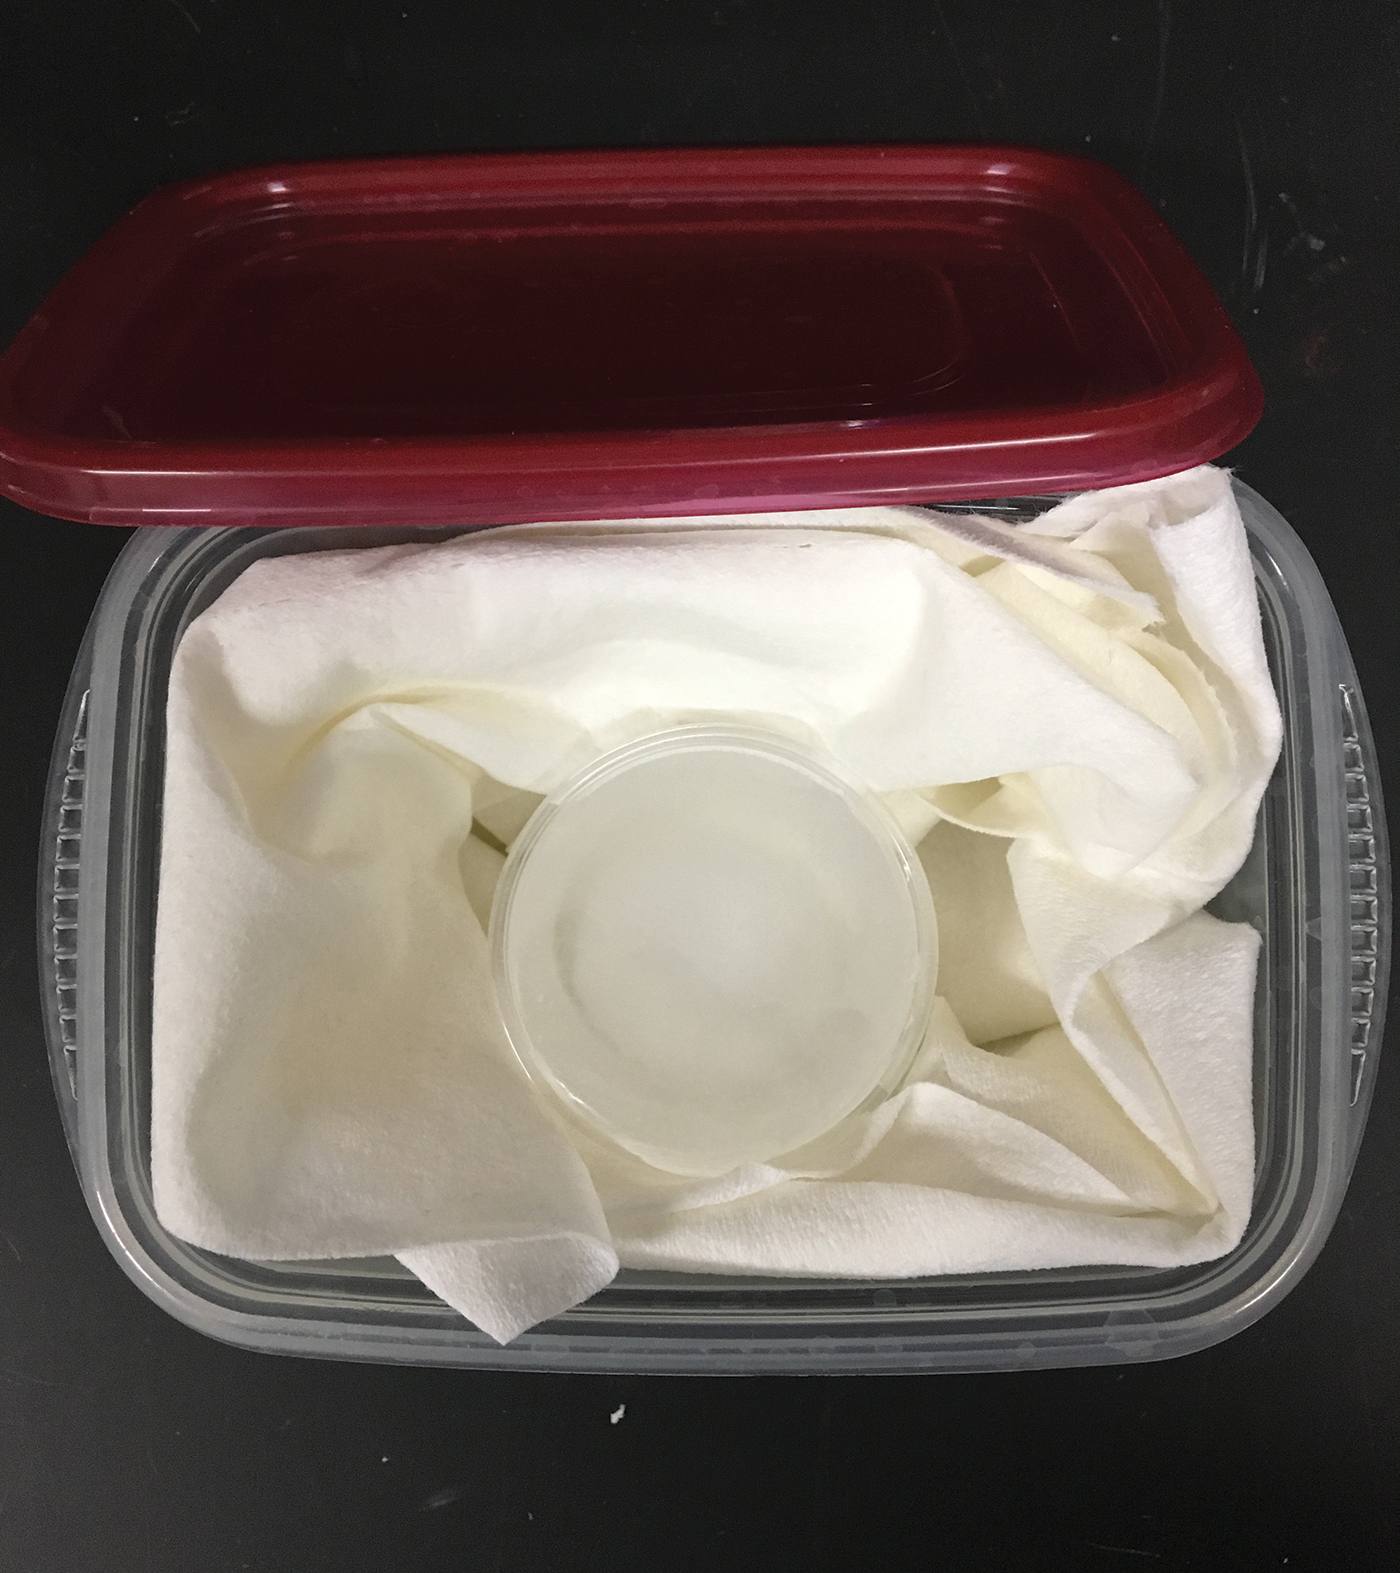
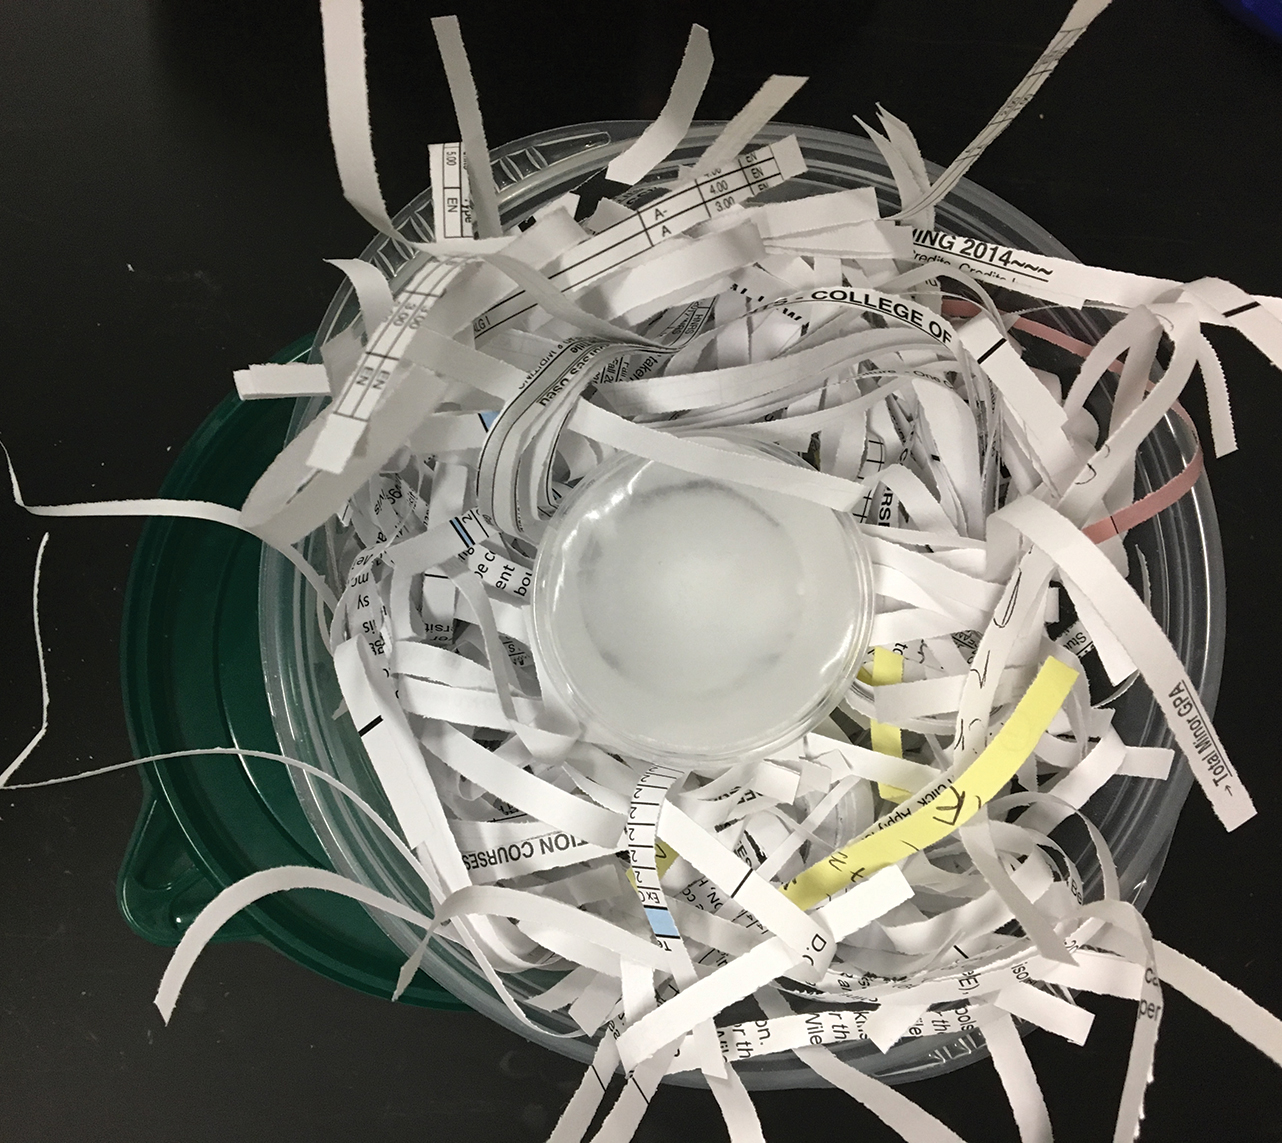
Figures 1 and 2 show photographs of student-constructed devices. To ensure data integrity, one possible solution may be to have students drop off the materials at the start of the school day and have the teacher add the standard-size pieces of ice at that time. Another solution may be to set a time for students to add the standard-size piece of ice to the ice-keeping device at home before members of the class come to school. When we previously carried out this activity with students, there was generally ice present five or six hours after placing it into the container.
Sample ice-keeper. Plastic tub, paper towel insulation
Sample ice-keeper. Plastic tub, shredded paper insulation, tightly packed
When the time arrives for students to determine how much ice remains, be prepared with needed instruments on hand for students to use. Based on our experience, having students pour the water that melted from the ice cube into a graduated cylinder works well. This gives an accurate and easy-to-obtain measure of the amount of melted ice. This underscores the value of using a standard-sized piece of ice for all students.
For the lesson profiled here, the volume of the water in the cups was 55 ml, so the starting mass was 55 g. Pouring the melted water into the graduated cylinders provides the mass of the remaining ice cube: 55 g— (mass of melted ice) = (mass of remaining ice cube). Students should be advised to take care in pouring out the water to ensure that volume measurements are accurate. A funnel is helpful to ensure that all melted ice is recovered and measurements are accurate.
Supplies to clean up spilled water are advised. In case water spills out of the dose cups, the weight of the remaining piece of ice may be measured directly. As an alternative, small cups with lids (such as those used to package condiments in take-out foods) may be used.
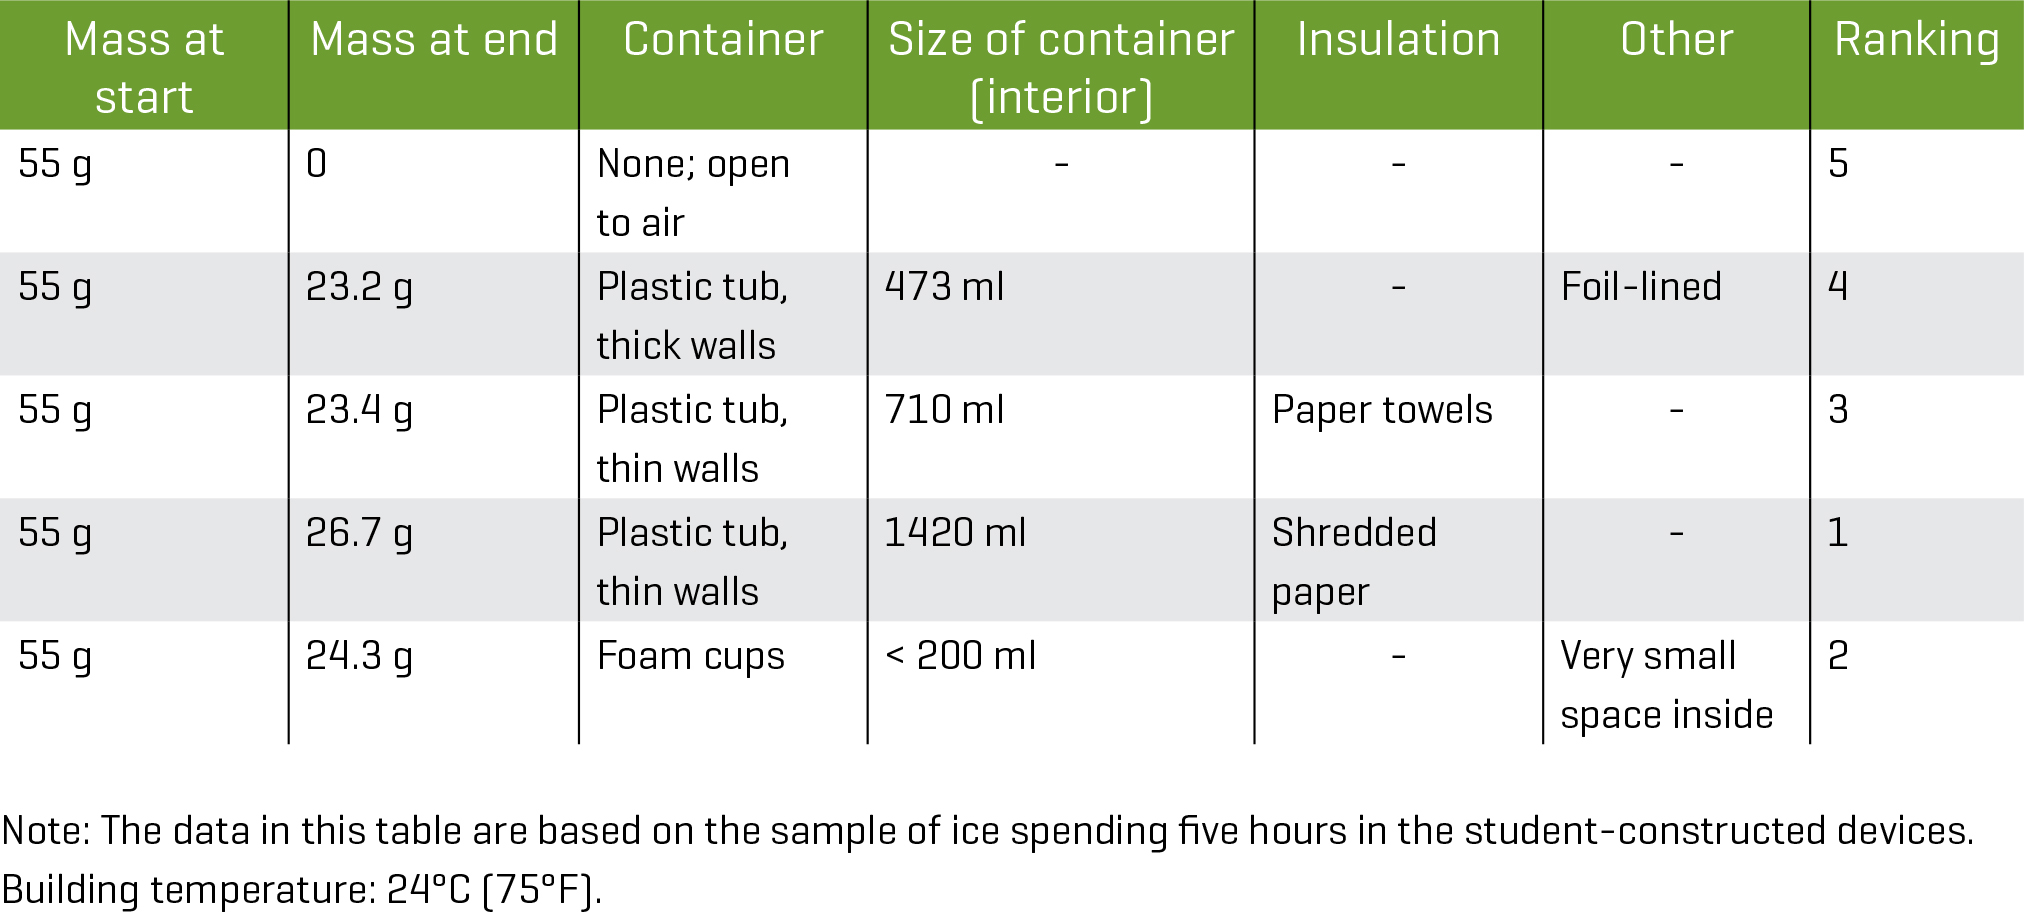
Depending on the level of experience students have with data analysis and discourse, you may find it helpful to either construct a chart such as the one shown in Figure 3 that can help students or guide them in constructing it themselves. The pieces of ice were in the student-created devices for five hours. As a control, a piece of ice of the same size as the pieces of ice in the ice-keepers was kept in the room in the 1-oz. dose cup with no insulation. It lasted approximately five hours before melting completely.
Student analysis for group of five students
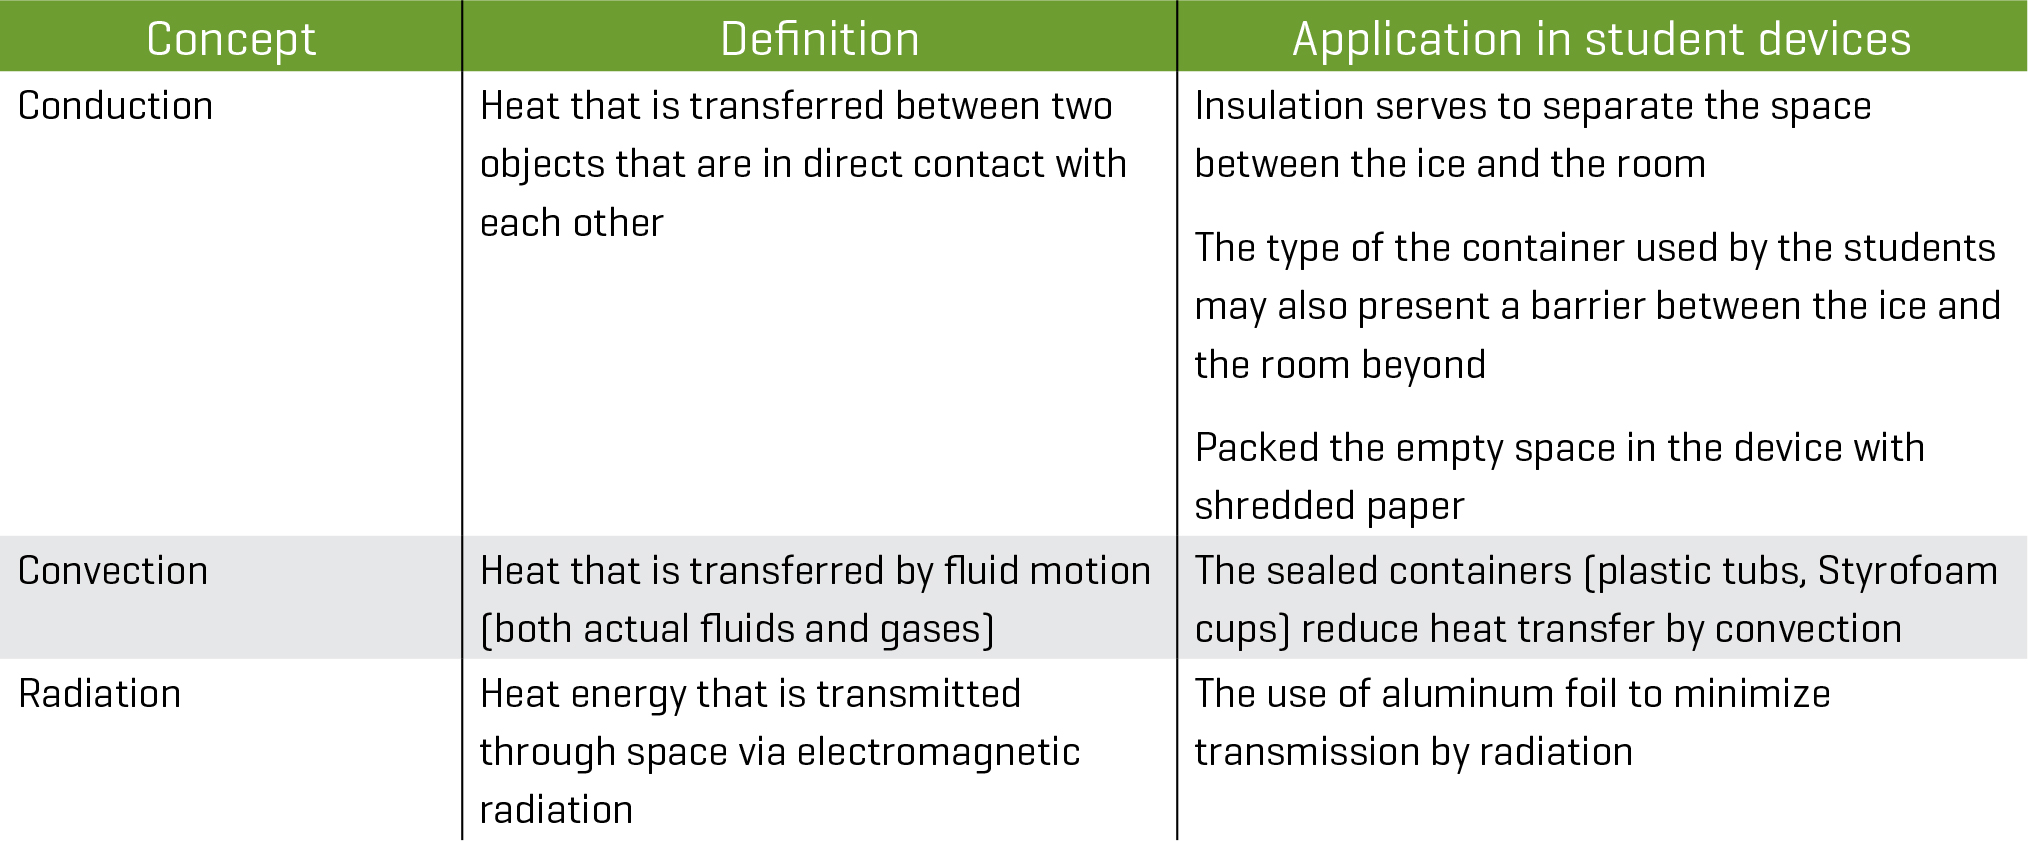
For example, after sharing the definition of conduction, the teacher can enter into the chart the role of insulation in moderating conduction. The teacher can ask students what they observed and recorded in Figure 4 and where those ideas fit into Figure 5. Note that in the examples shown here, each idea suggested in Figure 4 was recorded in Figure 5.
Consider a student who stated that she packed shredded paper around the piece of ice. The teacher can refer to Figure 4 and ask the student why they did that and what effect the student believed her action would have on the transfer of heat energy. By asking the student where she should record the use of the shredded paper as an insulating material, the teacher can gain insights into what the student understands.
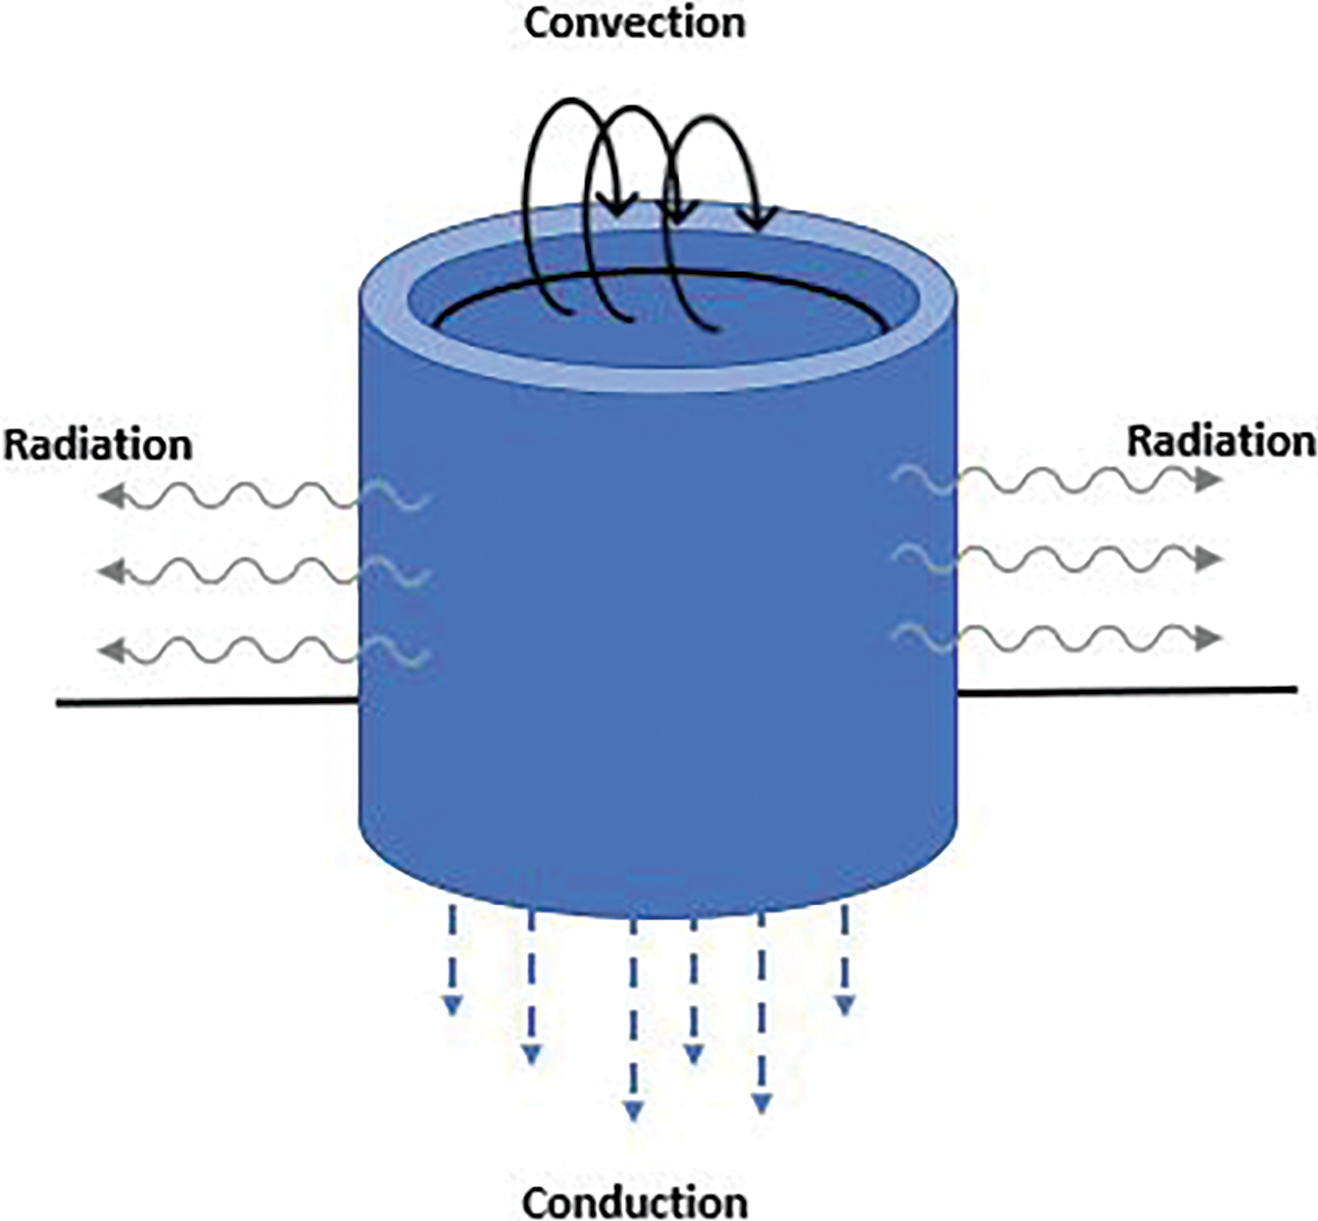
The relationship among conduction, convection, and radiation can be further explained using Figure 6. The figure shows a cup of hot liquid sitting on a tabletop, with arrows to indicate energy transfer related to conduction, convection, and radiation. As an alternative, you could set out a beaker of hot water and ask a student to confirm your statements. Moving the beaker, for example, would allow a student witness to confirm that the table beneath where the beaker was placed is now warmer than the surrounding table material, providing evidence of energy transfer (make sure to move the beaker away from students prior to having them touch the table).
Convection, radiation, and conduction
As students continue to share information, the discussion that results helps the members of the class understand what action the parts of their ice-keeping device have on preserving the ice and make connections with conduction, convection, and radiation. Using students’ experiences with their devices and the guided discussion to identify how to make sense of their results in terms of heat and energy concepts will help to develop conceptual understanding of the concepts of conduction, convection, and radiation. Look for evidence during your discussion that students can identify the features of their devices that worked well and connect these features with concepts related to energy transfer through convection, conduction, and radiation.
Lead a class-wide discussion regarding how students can apply what they have learned about heat transfer to develop an improved ice-keeping device. During the class discussion, bring up these points and help students look for provisional answers based on what they learned as they constructed and analyzed how well their ice-keepers kept the ice from melting.
Ask students to explain how their initial design limited conduction, convection, and radiation, which slowed the melting process. Students should explain these concepts developed during the class discussion with the context of the devices they constructed. Specific discussion points are outlined below:
- What will they do to minimize energy transfer by conduction? Placing insulating material around the ice minimizes energy transfer by conduction. Some materials do a better job than others. Examples of substances that insulate well include fiberglass, mineral wool, cellulose, natural fibers, polystyrene, and polyurethane (U.S. Department of Energy, n.d.).
- What will they do to minimize energy transfer by radiation? Radiation can be managed by, for example, a reflective surface.
- What will they do to minimize energy transfer by convection? Convection can be managed by limiting the exposure to the atmosphere. The sealed container reduces energy transfer by convection. What are the most important things to keep from their prototype devices? The devices that take into consideration the effect of conduction, convection, and radiation will produce the most effective devices.
- What are the most important things to change from their prototype devices? If the prototype did not include a way of managing conduction, convection, or radiation, the revised version should do so.
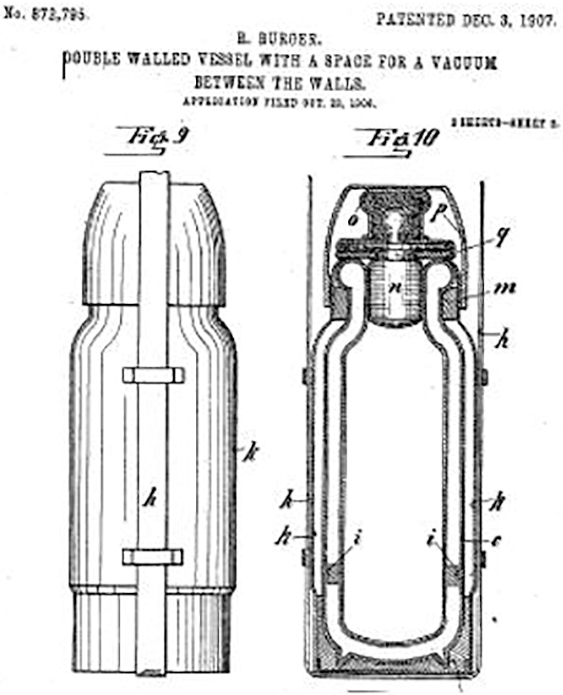
The Thermos bottle is an excellent example to show how the design of a device is governed by its purpose—and how the scientific principles that govern heat transfer are managed by the way the artifact is constructed.
Shown in the diagram is the patent application for the original Thermos bottle (Burger and Aschenbrenner 1907). The construction is guided by the concepts discussed above. Key features of this device include the following:
- The vacuum surrounding the glass container inside the metal exterior reduces energy transfer by conduction
- The insulated stopper reduces energy transfer by convection
- The stopper is constructed from materials that minimize energy transfer by conduction
- The reflective surface inside the bottle reflects the infrared radiation back into the liquid inside the bottle; the metal case that holds the Thermos bottle additionally prevents energy transfer by radiation
You may decide to use this information as part of the closure discussion for this investigation. Students can compare the ice keepers they created with a Thermos bottle and compare their solution with how the Thermos bottle meets the same challenge of keeping something cold— or hot
Present the following task to the members of the class: Using what they have learned from their prototype ice-keeping devices and the class discussion on heat transfer, what changes would they make for a new ice-keeper? Using the sketch and description of their first device, students identify specific changes that they will make to modify their devices. They should use the academic language of heat and energy transfer to identify the expected improvement in the function of the ice-keeper and include a new design for their revised ice-keeper. Students can use the Student Design and Planning Sheet (see Online Supplemental Materials) to sketch a new design and describe the changes in their design and offer a rationale as to why they made the changes. These may be collected as part of assessing student learning.
Having students test their devices by measuring how much ice remains at the end of the testing process provides important evidence as to the success of the project. Student work could be summarized at the end of the second trial by using a chart similar to Figure 7.
Sample student analysis

With a completed chart and newly tested devices, students can share their work through brief presentations focused on what they did differently and how the outcomes changed since they tested their prototype devices. Students should reference their findings and explain to the class why they made specific changes. They should emphasize during their explanation how they managed the mechanism of energy transfer—conduction, convection, and radiation—based on the modifications they made to the device. Look for evidence that students applied what they learned about heat transfer to improve their device so that it could keep a piece of ice intact longer than in the previous investigation by reducing heat transfer. Students should also explicitly state how energy is transferred in the devices they created through conduction, radiation, and convection and how their changes contributed to improved results.
Evaluation and assessment
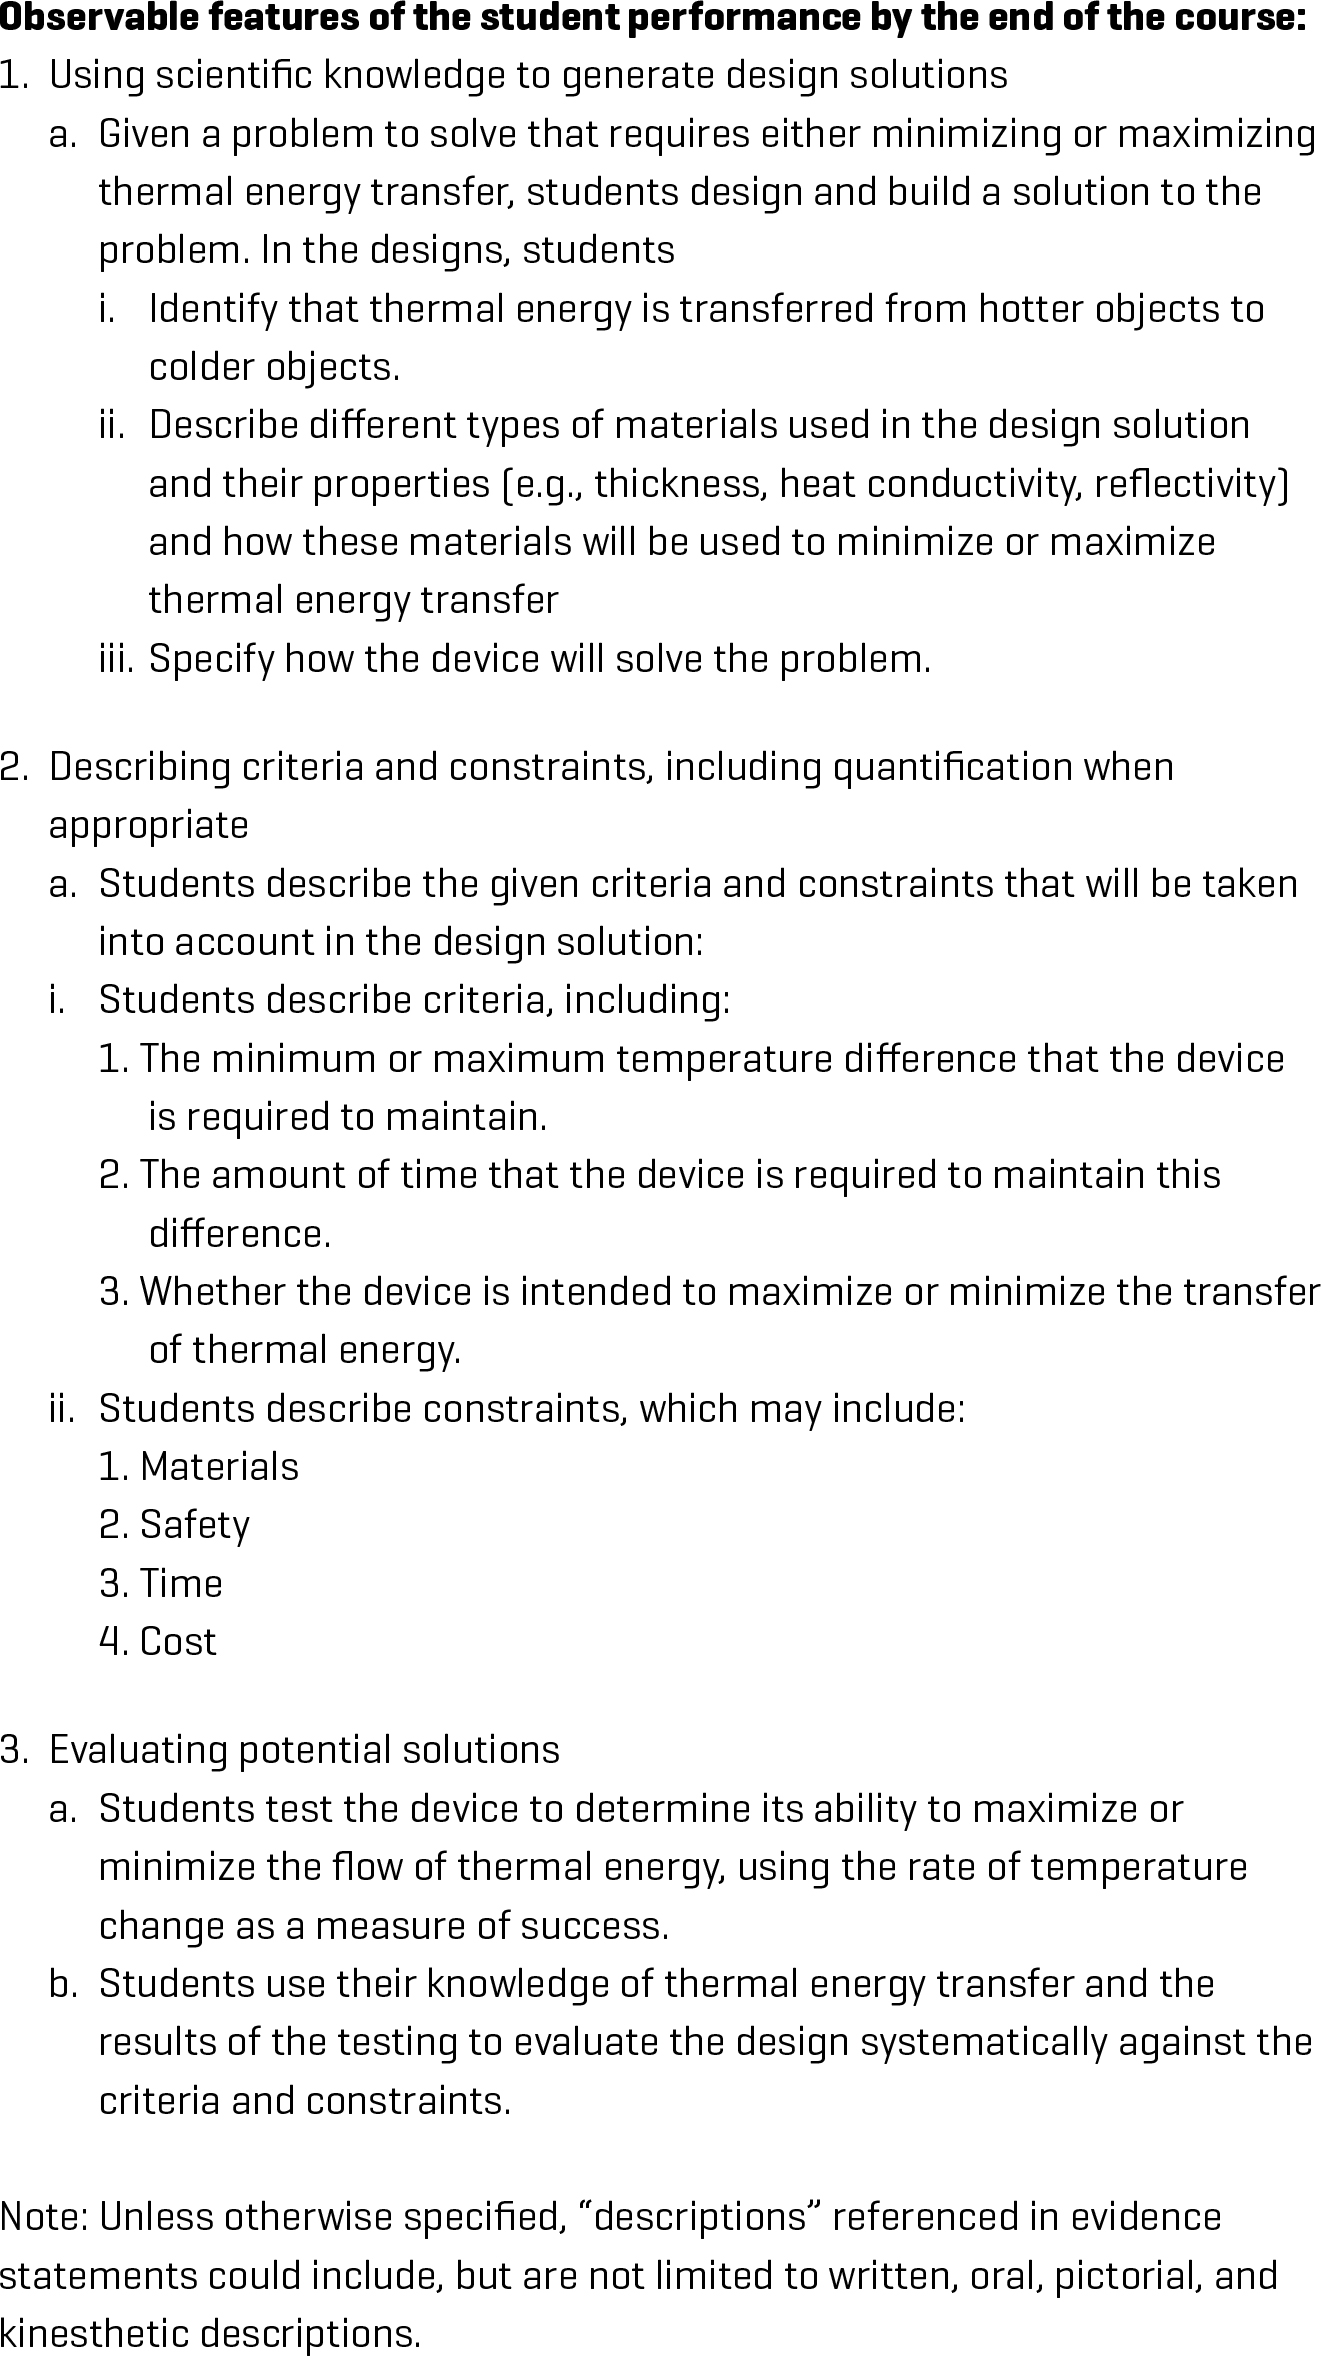
Assessment is carried out via a teacher-developed rubric. The rubric (see Online Supplemental Materials) was developed by consulting both the NGSS standard and the evidence statement for the standard (Figure 8). The rubric can be used throughout the investigation to provide feedback throughout the learning process. Consistent with the NGSS evidence statement for this standard, explanations made by students could include, but are not limited to written, oral, pictorial, and kinesthetic descriptions. This lesson has multiple opportunities to assess student learning: the construction of the device, through the classroom data collection and analysis, and through the written statements that students created that explain what they learned and how they applied what they learned.
What should you assess?
- Developing and using a device that preserves an ice cube for transportation to class
- Developing a device considering both design criteria (e.g., what the device is supposed to do) and design constraints (e.g., safety, cost of materials)
- Analysis of patterns present in devices related to how well the device accomplished its function
- Developing a modified artifact to transport ice to school
- Explaining, using academic language related to heat transfer (conduction, convection, radiation) to characterize and provide a rationale for their revisions
During classroom activities, I used the rubric twice—once to provide a baseline assessment of what students knew and understood and again to see what had changed in terms of how students were able to apply what they had learned to make an improved ice-keeper. The rubric may be used to capture both formative and summative information. The first assessment provides formative feedback and can be shared with students. The second review of work can be used for summative assessment. As a teacher, I gathered information about what students learned through brief questioning of students and through the presentations of their work. You may wish to gather this information either through interviews and consulting with students (especially if they construct the device during class time) or by a written statement from students that provides a rationale for the choices they made both in terms of construction materials and the constraints established for constructing the ice-keeper.
Inquiry Physical Science Three-Dimensional Learning Middle School