
Making in the Middle
Making as a Performance Task
Science Scope—March 2019 (Volume 42, Issue 7)
By Kira Lowery, Shelly Rodriguez, and Patrick R. Benfield
A performance task is one that asks students to do or create something that shows evidence of what they have learned. This type of assessment gives students the opportunity to display their understanding outside of the traditional multiple choice test or essay. Rigorous performance tasks are those that call for the application of knowledge and skills, are open-ended, provide authentic contexts, and show evidence of understanding (McTighe 2015).
The tenets underlying an authentic performance task align with those at the foundation of maker-centered learning. Making is a process of building and creating that allows for students to express themselves through the creation of meaningful products that are shared with a larger community (Rodriguez et al. 2018). Both performance tasks and making rest on the notion of students doing and creating as a way to learn, apply, and demonstrate knowledge. The National Science Foundation (NSF) has acknowledged the potential of making to foster innovation, increase student retention, and broaden participation in STEM (science, technology, engineering, and math) education (NSF 2017). Making helps students develop a “maker mindset” (Martin 2015), which promotes playfulness, resilience, collaboration, and reflection. The process of making also promotes 21st-century skills such as problem-solving, design thinking, and the integration of technology. When used as a performance task, making can help teachers gauge students’ understanding of disciplinary core ideas and proficiency with science and engineering process skills.
This article describes how a maker-centered unit project, called Cells and Me, was used as a performance task to gauge student understanding of cell organelles. Instead of enacting our traditional unit on cells, our students spent time researching organelles; making unique, interactive 3-D models; and presenting these models to a group of elementary students. By formulating the unit into an extended maker project, we hoped that students would take ownership of their learning and become experts through the process of creation and presentation. To make the project meaningful and authentic, we decided to have students make an exhibit for younger children and incorporate a technology component. This maker-centered unit project took nine days to complete, the same amount of time given to our customary cell unit.
Engagement: An introduction to tools and materials (55 min.)
For the engagement, we had students experiment with Makey Makey and Scratch as a way to expose them to coding and increase their comfort with trial and error. Makey Makey (see Resources) is a small electronics board that, when connected to a computer, enables users to add hand-made external components in lieu of specific keyboard keys. Scratch (see Resources) is a free, blockbased programming enviroment and online site where people can create their own digital stories, programs, or games. When combined, the Makey Makey can be used to trigger events created in the Scratch program. Some examples of these two technologies working together can be found online (see Resources).
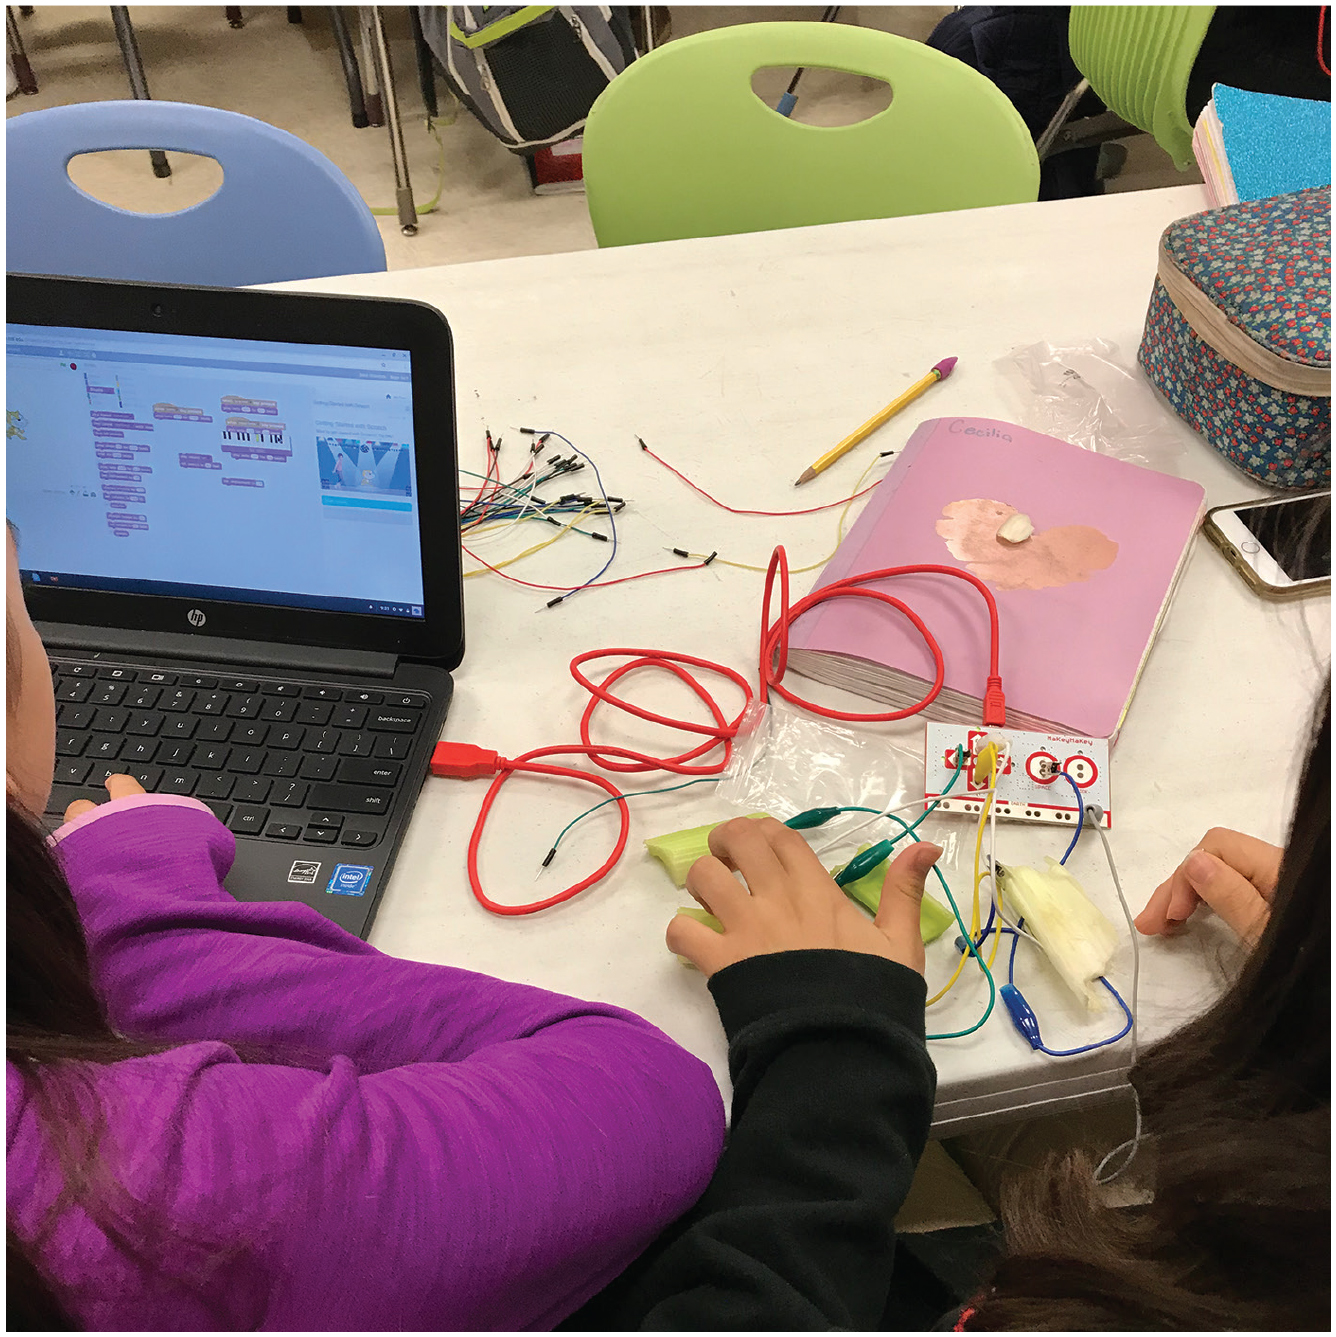
To build interest, students were divided into teams of two and presented the challenge of designing a musical instrument using Scratch, four pieces of celery, and a Makey Makey. Students worked together to explore and build their instruments (see Figure 1). This was an open-ended exploration; however, students were given the hint that the Makey Makey connects objects to the computer. Although many of our students had prior experience with Scratch, we provided scaffolding when needed and students used each other as a resource. To help students who were not as acquainted with Scratch, we directed them to the online tutorials found on the Scratch website (see Resources). We also provided one-on-one help to show students the basics of Scratch, how to drag and drop commands, where to find functions, and how to upload graphics or audio files. Eventually, each team was able to connect the celery to the Makey Makey and use Scratch’s media to program different sounds to test their celery. As an extension, teams that finished early used MP3 converters to upload songs to Scratch so that each celery could play a different song. Some students also experimented with other conductive materials to make musical instruments from objects around the room.
Students make musical celery with Scratch and Makey Makey.
Exploration: Research and construction (six 55-min. class periods)
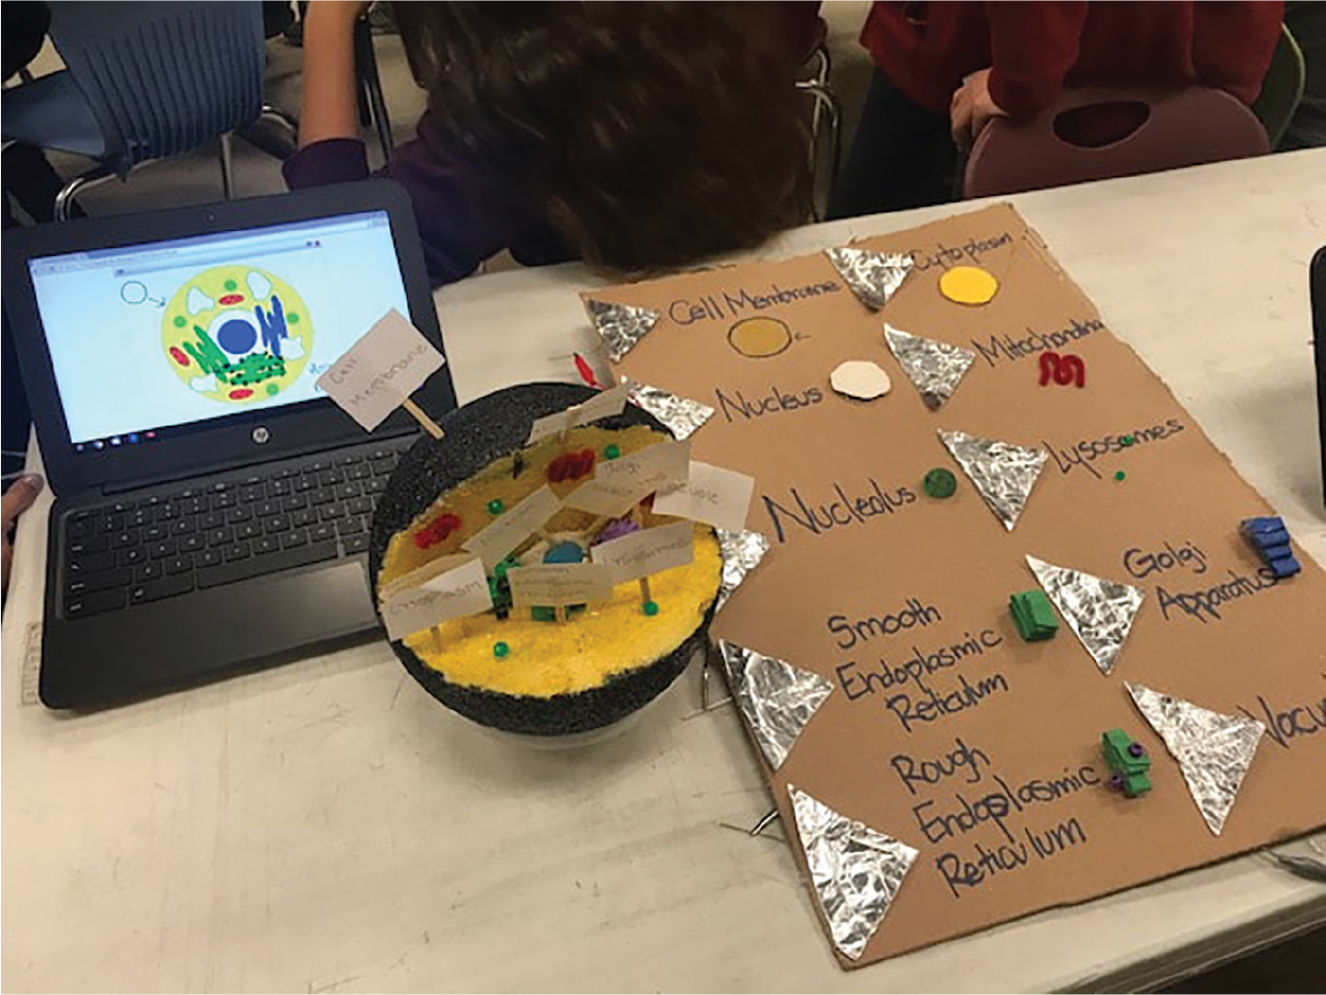
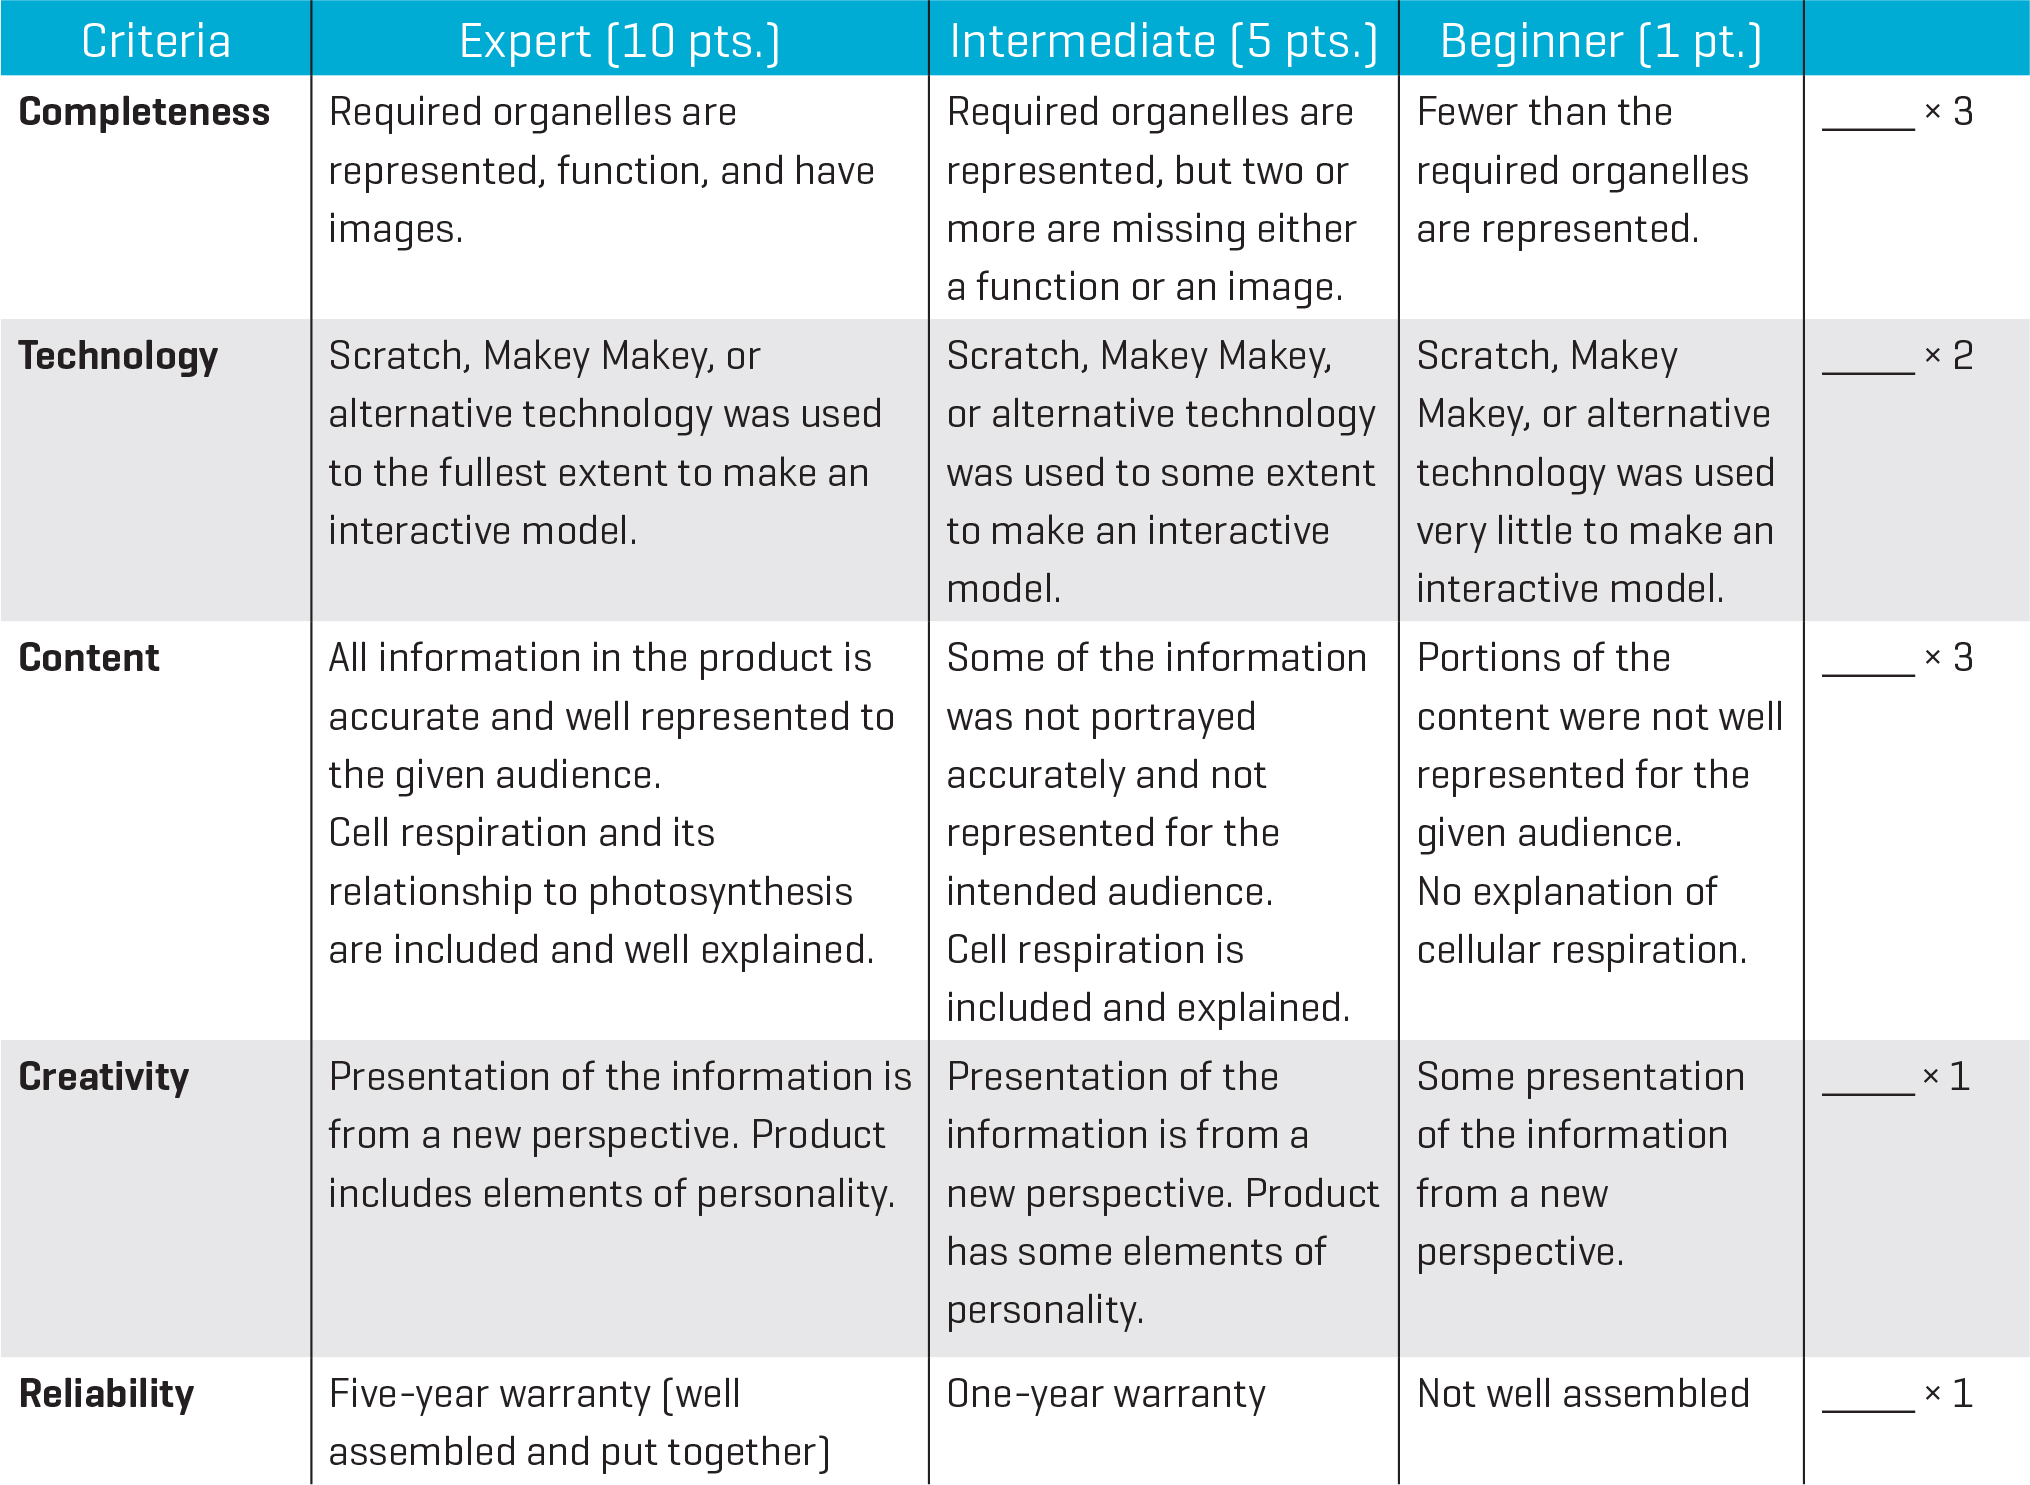
Next, students were challenged to use this technology to create an interactive 3-D model to promote the importance of cells for fifth-grade students at NYOS Charter School’s elementary campus in Austin, Texas. Students were encouraged to make their 3-D models interactive by using Scratch and Makey Makey (see Figure 2). Students were provided with suggestions for interactive projects, such as animated books, video games, and touch-screen models. Each student team used the Scratch and Makey Makey technologies in a different way. Some used the technologies to make an interactive legend that accompanied their cell model, whereas other groups made the model itself interactive using touch-to-trigger narration or other elements of their Scratch program. A rubric (Figure 3) was provided to outline required content and project elements. Student teams were also provided with a group contract to outline roles and provide descriptions of their duties (see Online Supplemental Materials). Starting an open-ended maker-centered project with a rubric and group contract helps students organize their work and holds students accountable for equal contribution.
Students complete animal cell model coding on Scratch, using Key Board for each organelle.
Cells and Me rubric
For this project, students chose unique roles and provided descriptions of their duties, as well as a plan about how to handle any disagreements or conflicts. These plans were provided to instructors for approval. Most student groups used the divide-and-conquer approach to set up their roles. For example, many groups chose one member to be the lead coder and one to be the lead builder. However, some students took a different approach and chose roles such as “creative manager” and “logistics manager” so that each student contributed equally to each portion of the project, but with different ideas for input. The creative manager, for example, chose to focus on how to make the project fun and engaging, whereas the logistics manager ensured that all the requirements were being met and that the curriculum was presented accurately.
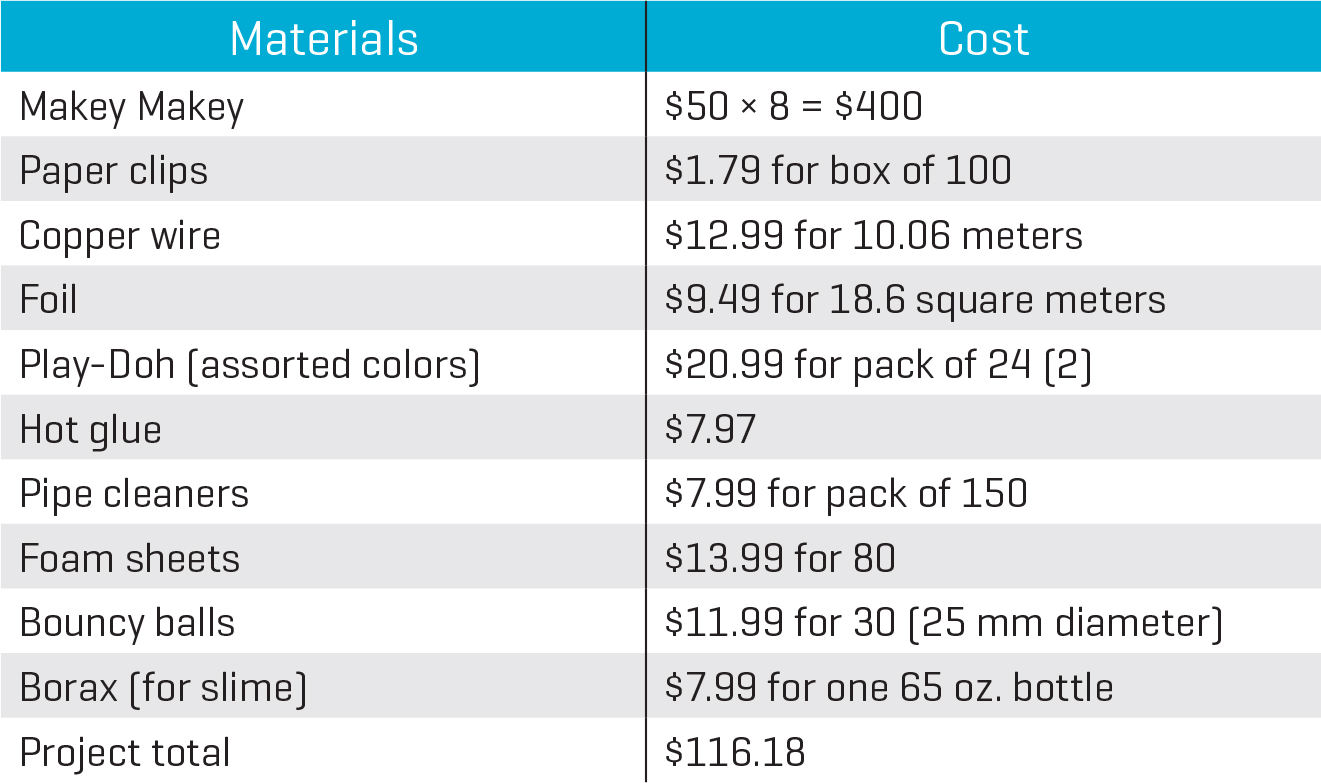
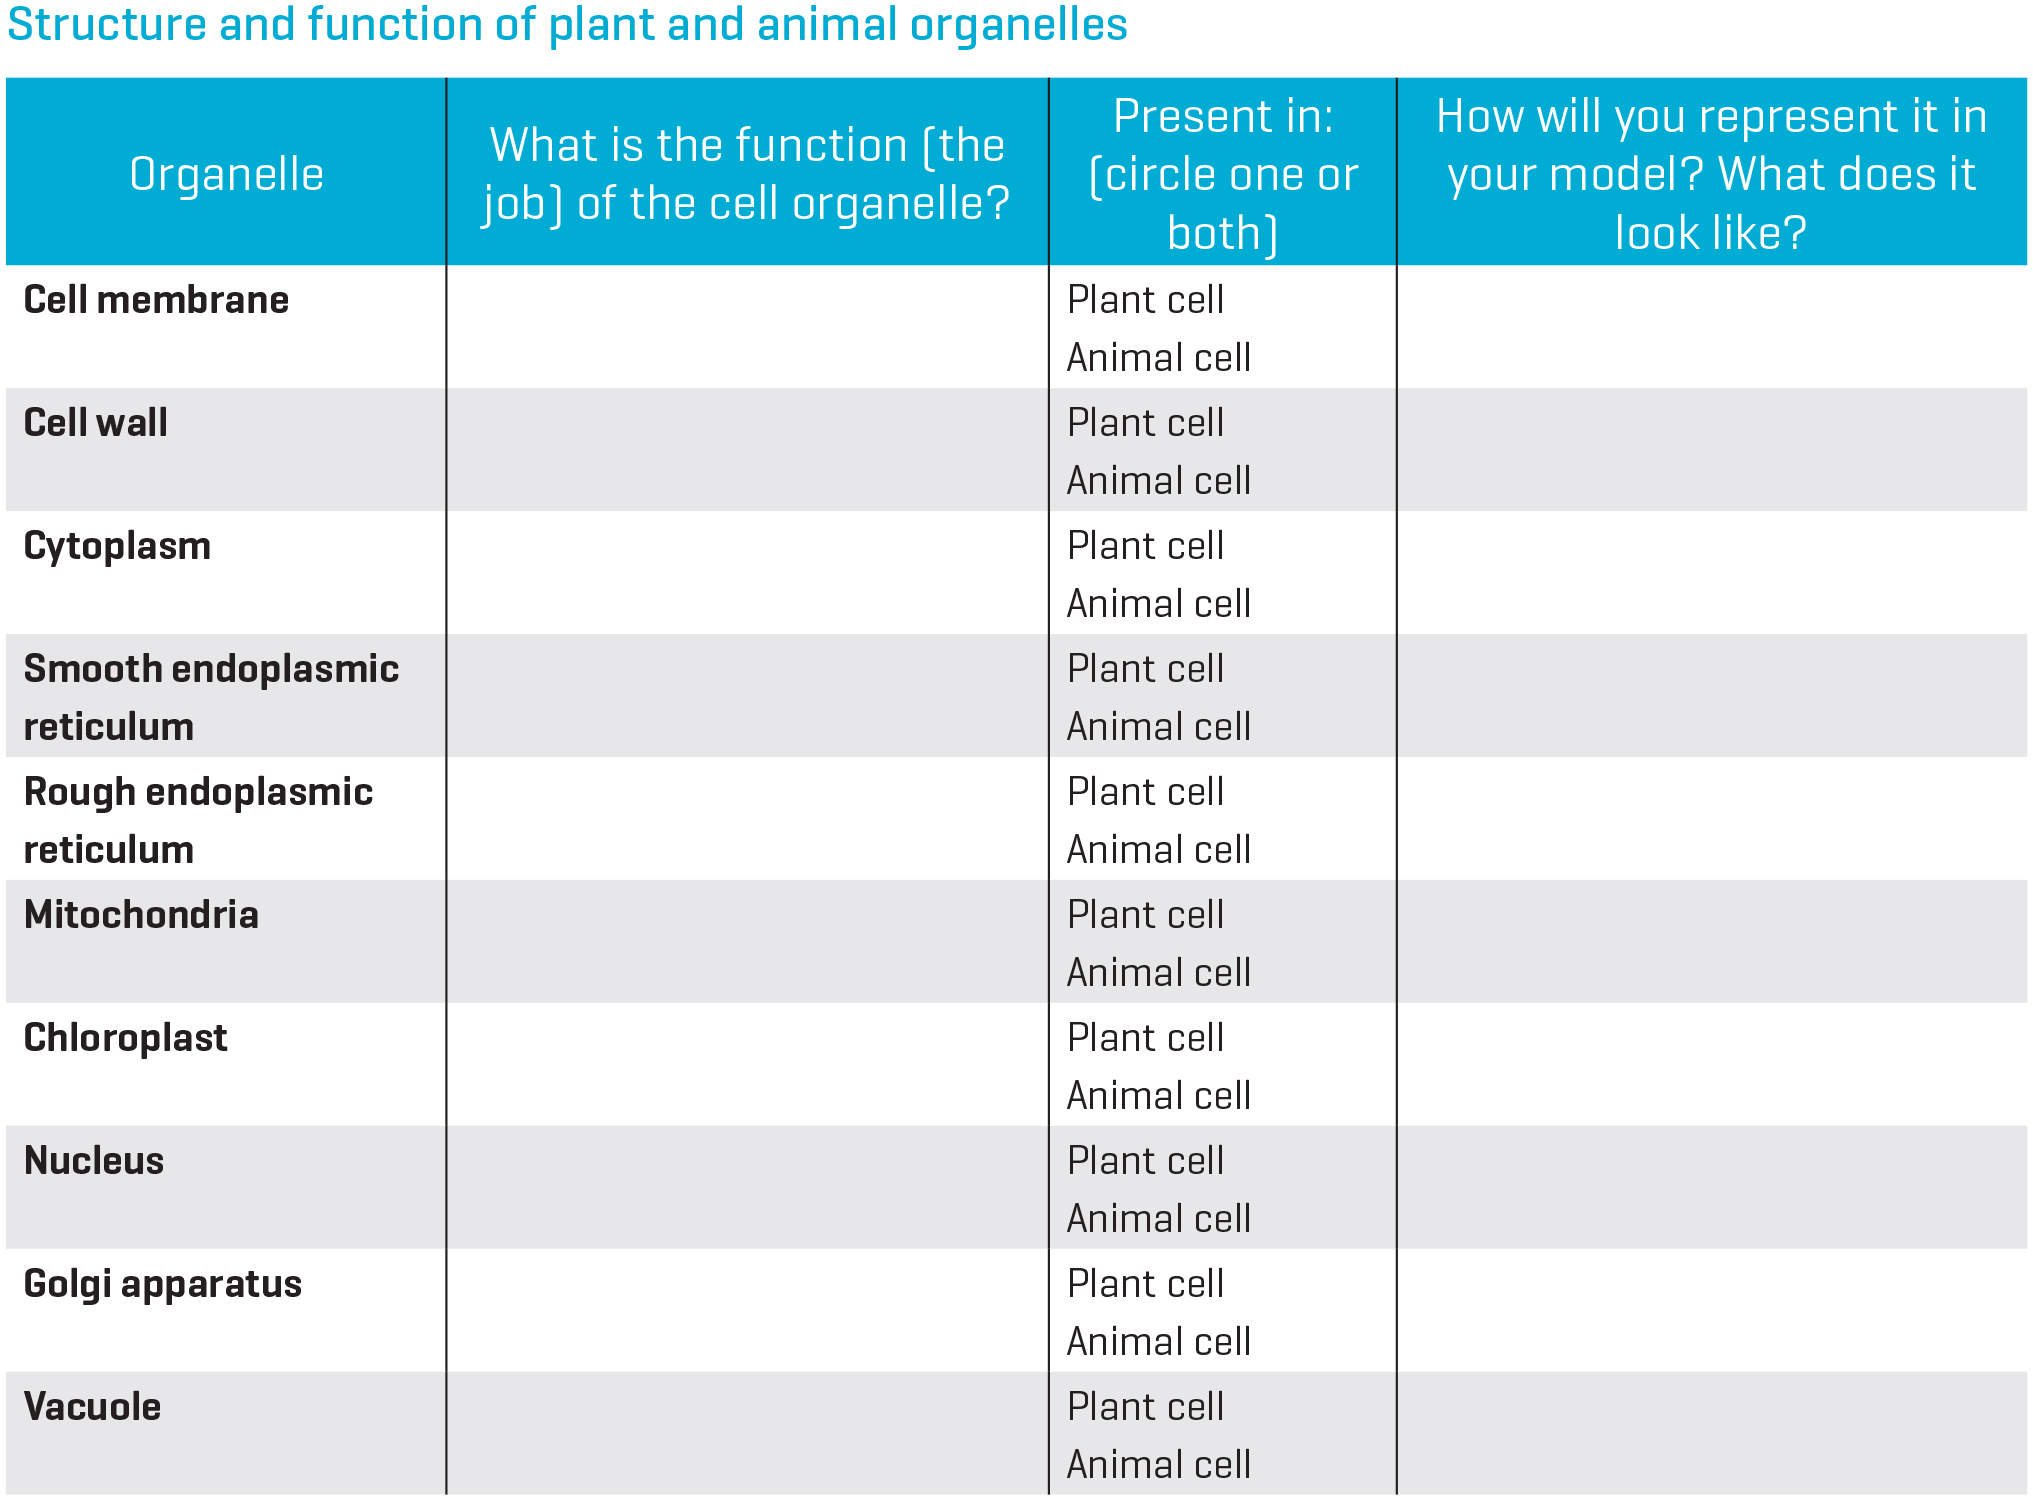
Once students established roles, they brainstormed ideas for their project and the class developed a list of materials for the teachers to provide (see Figure 4). Student teams had the option of bringing in additional materials. Once initial ideas for their model were approved, students began their research. All members of the team were responsible for research. Each student curated information for at least five organelles and created a short description that would be used in their group model. Students learned about each organelle’s contribution to maintaining cell function and its role in supporting the organism as a whole. For example, students researched the cell membrane’s function in monitoring the entry and exit of substances in the cell. Students were also responsible for explaining and demonstrating the difference between cellular respiration and photosynthesis. Students were provided with a handout (see Figure 5) and multiple resources (see Resources) to support this work.
Materials for a class of 30
Student research handout
Upon the completion of their research, students were allowed to begin making. During the building stage, teacher assistance was given when students were handling materials that could be harmful. For example, some students used a box cutter to cut foam, cardboard, and plastic bins. We made sure to review the correct procedure and provide assistance when groups were using these tools. Cutting foam also generates debris, so students used protective glasses when working with this material. Other students used borax cleaning detergent to make over-activated slime. The slime was then used to represent organelles such as cytoplasm and vacuoles. Because borax can cause irritation to skin, students were required to wear goggles and gloves when working with this material.
Because the project had few restrictions, models evolved based on how students chose to present the information. Some groups decided to make games using Scratch. One group had a main character, a wizard, traveling through and exploring various parts of the cell. Another group made a virtual classroom and had an animated teacher explain the organelles and their functions. Some students chose to record their explanations and have them play when a particular organelle on their model was touched, whereas other groups chose to have text displayed on the screen of their computers when their model was activated.
Explanation: Gallery walk (55 min.)
After the models were created, a gallery walk served as a practice run for the upcoming publication party during which students would present to fifth graders from the school. During the gallery walk, each student explained concepts related to cellular structure and function. Using their interactive 3-D models, students described how the organelles work together to keep the cell functioning and alive. Students were required to identify each organelle’s main function and validate why they chose to represent each organelle with various materials. Students also had to explain respiration and photosynthesis and connect each process to the cell model. During this time, half of the class presented while the other students observed and wrote feedback. In this way, students engaged in peer-to-peer review and teams were able to use this task to refine their explanations and models.
Elaboration: Publication party (55 min.)
During the publication party, students used their models to teach younger children about the importance of cells. The main purpose of the party was to allow students to communicate the content to others. For this activity, the cell models were set up around the room, and younger students rotated to visit the different exhibits. The publication party was also open to teachers from various grade levels. All attendees were able to explore the models and ask presenters questions. Each audience member had a feedback form to take notes on (see Online Supplemental Materials). This form also asked the audience members to identify something they learned and something they still had questions about, and included a place to note questions they had for the presenters. At the end of the party, students reflected on their experience. They used this time to discuss improvements, what they had learned through the process, and think about their teamwork and collaboration efforts.
Evaluation through performance tasks
This maker-centered project provided multiple opportunities for assessment through performance tasks. During research and construction, students were asked to describe organelles, compare and contrast organelles, and draw connections between cellular structure and function. When circulating, the teacher asked questions such as, “How does what you are making show the structure of the organelle?” or “What is the function of this organelle and how does its structure help it perform?” Student responses provided insight into their thinking. For example, one group chose to represent chloroplasts with pasta. When asked about the purpose of using this material, students explained that they realized the double membrane could be represented by grooves in pasta and decided they could make many thylakoids encased in shells. This description revealed their recognition of a connection between cellular structure and function.
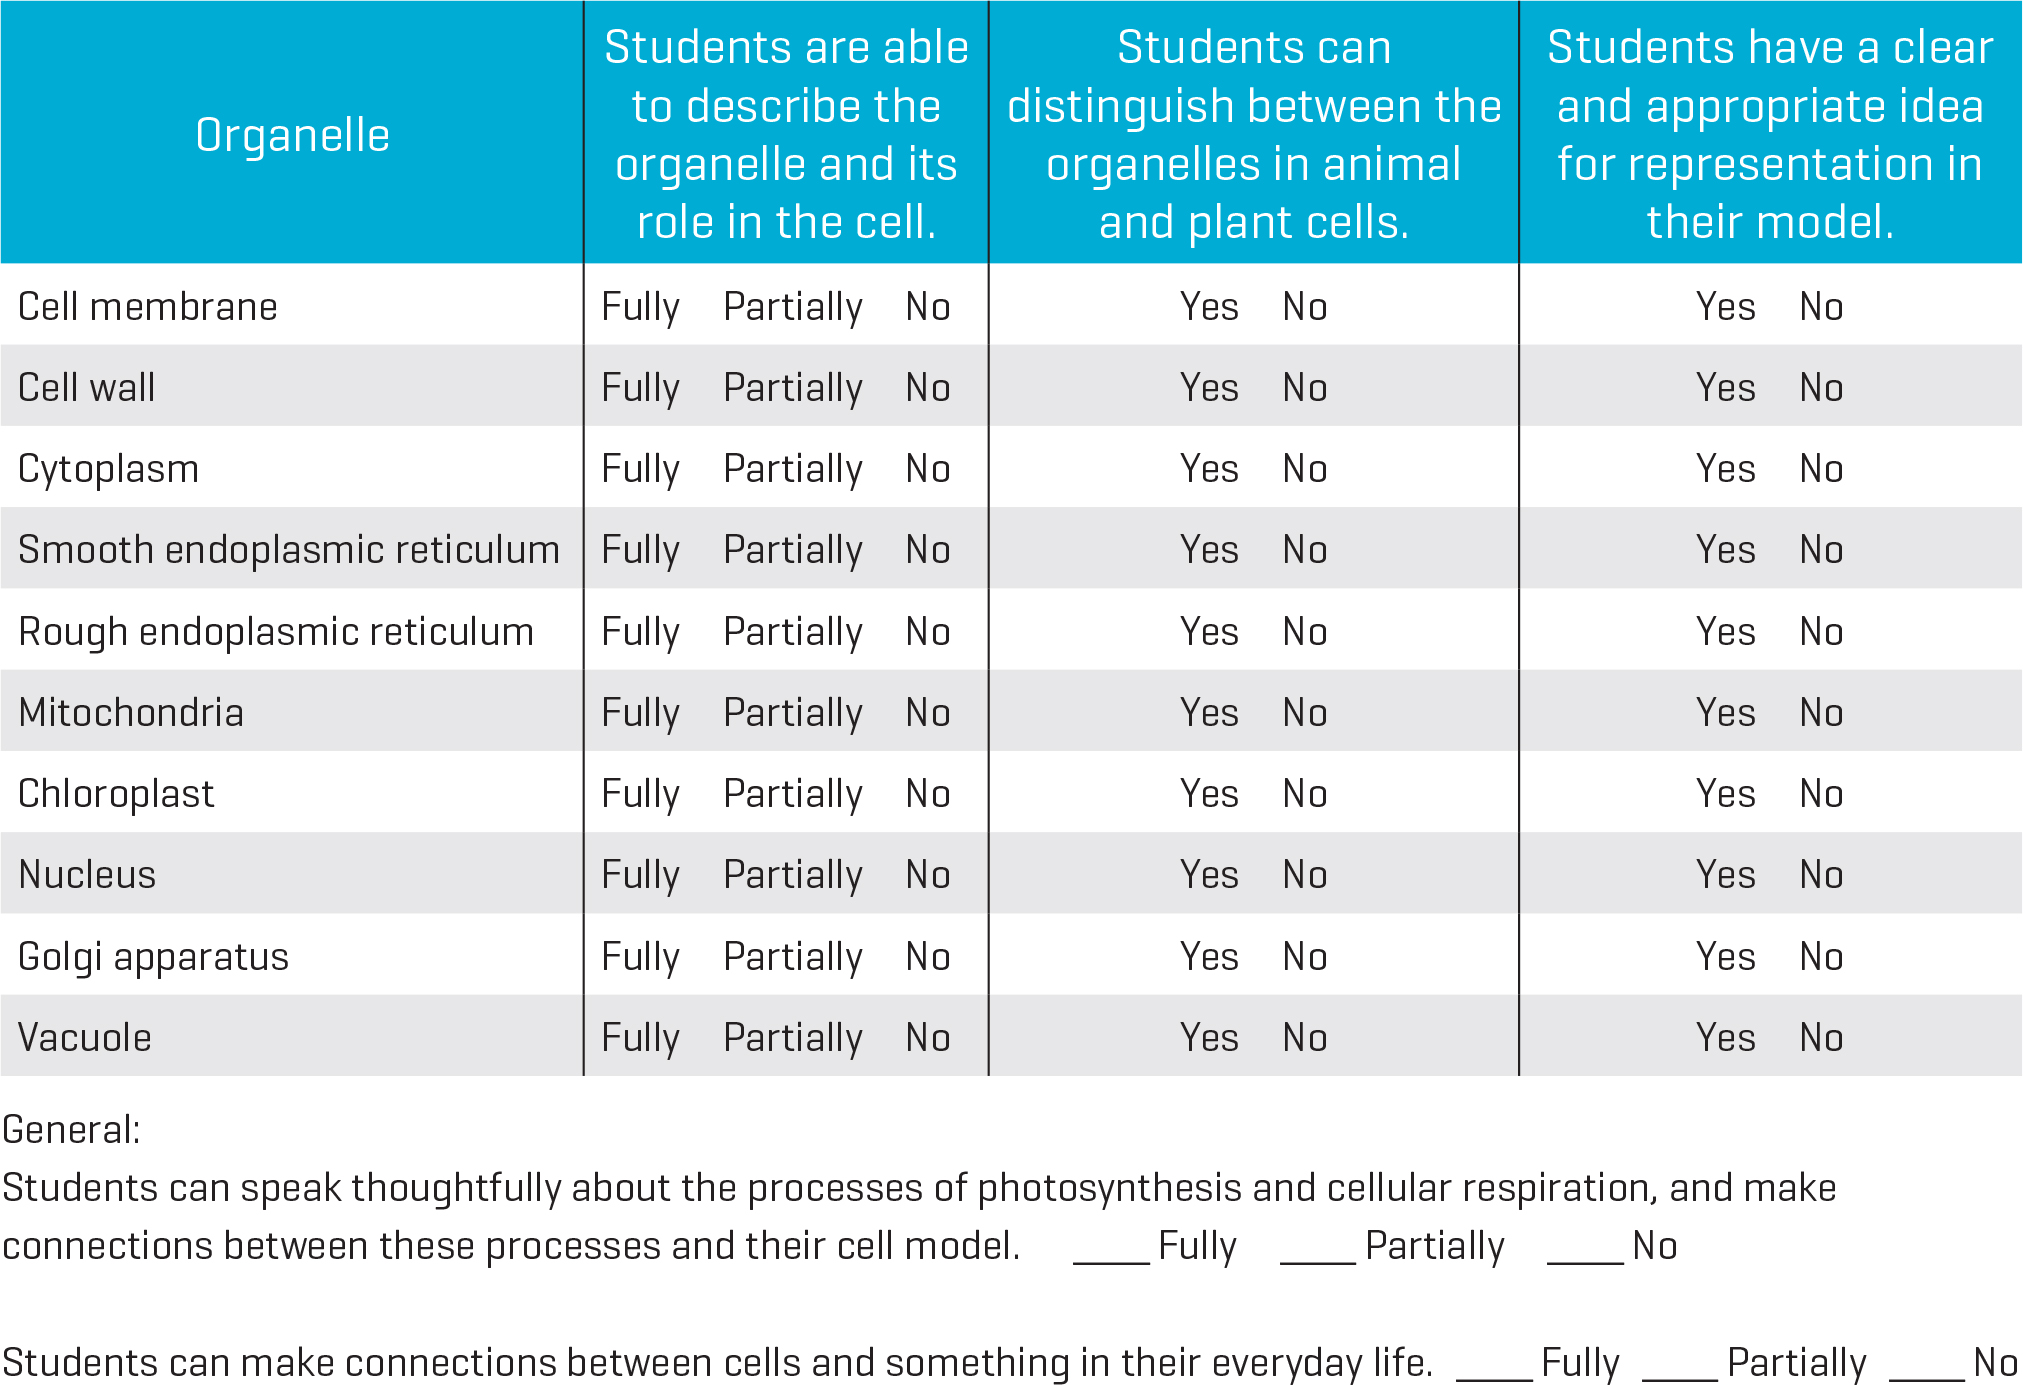
Teachers also used an assessment checklist (see Figure 6) to capture student understanding and guide future questions. They noted whether a student struggled to validate project choices or could not identify the function of the organelle he or she was building. Teachers would then discuss misconceptions with the student, give more time for research, and reassess. This process allowed for immediate and recursive feedback for students.
Cells and Me assessment checklist
Additionally, students had to complete journal entries and maintain a Google document to record their progress. Students were prompted to reflect on both the content and process of making their model.
Through formative assessment, we observed students drawing original analogies between everyday objects and organelles as they reflected on which materials were best suited for their model. We also observed students asking themselves questions that they thought the elementary children would want to know. This pushed them to develop more complete and relevant explanations than they might have otherwise.
During the gallery walk, student presentations were assessed using the rubric received at the beginning of the project. The rubric looked for the explanation of each organelle’s function. It also required students to make the project personal and show how they had integrated technology. During this time, instructors used the same assessment checklist used previously to add information as students were able to demonstrate additional understanding.
As the final performance task, the publication party proved effective in showing what students had learned. As students showcased their 3-D interactive cell models, they used academic vocabulary and made the extra effort needed to explain concepts in ways the younger group could understand. This process pushed our students to present core ideas in everyday language rather than relying on textbook definitions. The publication party showed that students were confident with the content and proud of their creations, and it provided a final opportunity for students to showcase their knowledge and skills. In comparison to previous years, the Cells and Me project led to a higher percentage of students who were able to identify the importance of each organelle. Students were able to make deeper connections about the jobs of organelles and how they work together to keep a whole organism alive.
Discussion
Making allows students to build and present a unique artifact of their own design. Tools such as Makey Makey and Scratch can support this type of creativity in the classroom. Although Scratch is free, Makey Makeys cost approximately $50 each. There is also a less expensive counterpart available, the Makey Makey Go, that is significantly cheaper at $20 each. Crowdfunding sites, such as DonorsChoose.org, can be a way of acquiring a class set. Depending on your budget, you can provide each group with a Makey Makey of its own or share them between groups such that each group uses them to test and showcase their interactive designs as needed. Makey Makeys are a versatile tool that make a good addition to any science equipment inventory. Both the Makey Makey and Scratch websites have nice tutorials, sample projects, and resources for educators (see Resources).
Making gives students agency in their learning as they make creative choices, and it serves as an authentic performance task. Students can be assessed formatively as they build and create, and assessed summatively as they present their creations to others. Because making is a student-centered activity, teachers can act as facilitators who observe and provide differentiated feedback. Unlike with paper-and-pencil tests, this feedback can be given in real time such that it can be used by students to improve their work. By using the authentic assessment opportunities provided by making, we may foster an environment where students are open to feedback, have a positive relationship with assessment, and are more willing to take risks in the classroom.
Engineering Teaching Strategies Middle School