
Elementary | Daily Do
How Do Kites Fly?

Crosscutting Concepts Disciplinary Core Ideas Is Lesson Plan Lesson Plans NGSS Phenomena Physical Science Science and Engineering Practices Three-Dimensional Learning Elementary Grade 3 Grade K
Sensemaking Checklist


Introduction
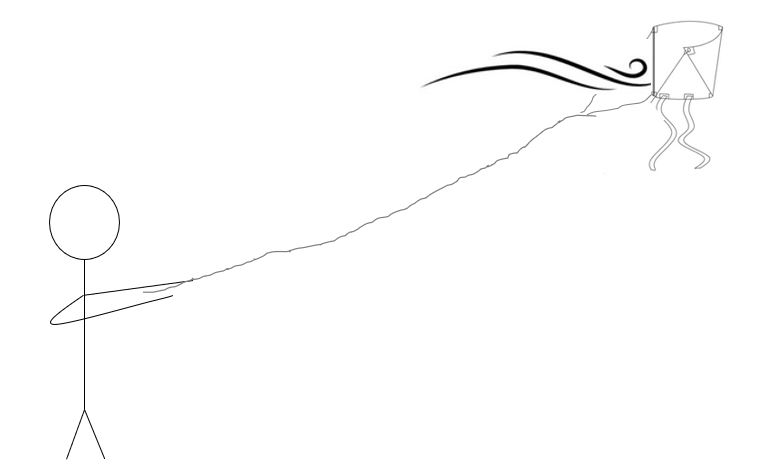
Let's go fly a kite! In today's task, How do kites fly?, students and their families experience firsthand the phenomenon of a flying kite. Students (with help from adults or older siblings) build and fly a sled kite, which can be made from materials likely to be found in every home. Their noticings and wonderings lead them to investigate the pushes and pulls on a flying kite—and what happens when those pushes and pulls change. The children's book Catch the Wind! All About Kites by Gail Gibbons can be used to launch this Daily Do task and to support student sensemaking.
This task is based on an activity described in the article "Teaching Through Trade Books: Kite Explorations" published in the NSTA elementary-level journal Science and Children.
Daily Do Playlist: Pushes and Pulls
How do kites fly? is a stand-alone task. However it can be taught as part of an instructional sequence in which students coherently build ownership of science ideas about what pushes and pulls can do. In this third playlist lesson, students move from observing the effect pushes can have on objects (prior two lessons) to experiencing firsthand the effect of their pulls on a kite.
Experience the Phenomenon
You might begin the task with a read aloud or read along of Catch the Wind! All About Kites by Gail Gibbons. Consider stopping after reading the page with the following text:
As Katie and Sam look around the shop, Ike tells them about kites and kite flying. Any object flown in the air at the end of line is called a kite, named after the graceful, soaring kite bird.
Say to students, "Today we're going to build and fly objects flown in the air at the end of a line! Kites!"
Materials
- 20 cm x 35 cm piece of *lightweight plastic (per kite)
- Two (2) 2 cm x 6 cm pieces of lightweight plastic (per kite)
- Two (2) plastic or stiff paper drinking straws (per kite)
- 1-m length of **line (per kite)
- extra line for attaching the bridle and ***flying the kite
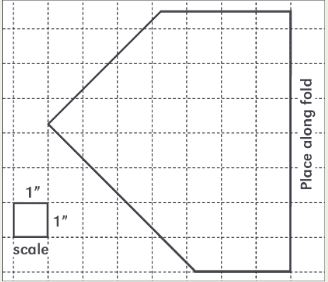
- 1-inch graph paper
- scissors
- hole punch
- craft sticks (optional)
*plastic grocery bags, 13-gallon kitchen trash bags, cellophane wrap
**crochet line, DMC floss, string, yarn (the less stretchy the better)
***You might pre-cut flying line in 5-meter lengths and wrap each length around a craft stick. Use a small "flag" made out of tape to mark the line at 1 meter and 2 meters. Consider using only a 1-meter length to fly kites when you first move outdoors, then allowing students to increase the length based on the number of students and kite-flying space.
Directions (Part 1)
- Create the kite pattern (shown at right) using the graph paper. You might use a highlighter or bright-colored marker to mark the fold line.
- Fold the larger piece of plastic in half.
- Place the kite pattern on the folded plastic, lining up the fold line with the fold in the plastic. Trace the pattern on the plastic.
- Cut out the pattern. Make sure not to cut along the fold line.
- Unfold the plastic.
- Fold the triangle pieces of plastic in toward the center of the kite and make a crease (as best you can).
Directions (Part 2)
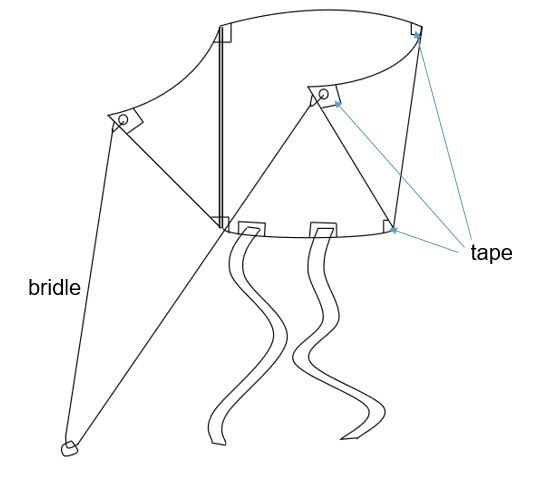
- Unfold the triangle pieces. Tape the straws in the creases to create two spines.
- Tape each corner to reinforce the plastic.
- Punch a hole (through the tape) in each pointed end.
- Tie a small loop of thread through each hole.
- Tie one end of the 1-m (100-cm) length of line to each thread loop. This is the bridle.
- Attach a loop of thread to the bridle. Attach the ***flying line to this loop.
- Tape the two smaller pieces of plastic to the kite as shown at right.
Explore the Kite
Before heading outdoors, ask students to independently observe their kites (Alone Zone). Then ask students to turn to a partner and share their noticings.
Bring the class back together. Ask students to share their observations or a partner's observations with the class. Make a class list of observations. You might create a Notice and Wonder t-chart so you have a place to record questions that arise as students share their observations.
When you are back indoors, ask students to independently draw or write what they observed (Alone Zone). Then ask them to share their noticings with a partner or small group. As you move from group to group, you might ask, "Did you notice things your partner noticed? What noticings are the same? Did you notice things your partner didn't notice? What noticings are different?"
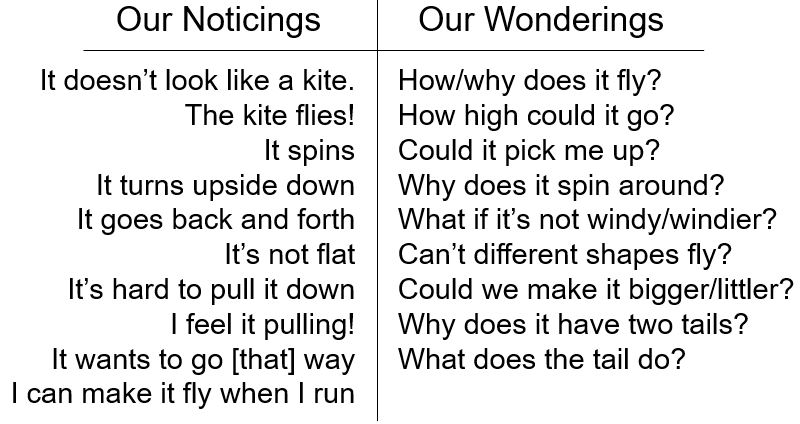
Bring the class back together. Ask students to share their observations or a partner's observations with the class. Add these observations to the class list. Record any questions that arise as students share their observations. Some examples of student observations and questions are shown at right.
Create a Model
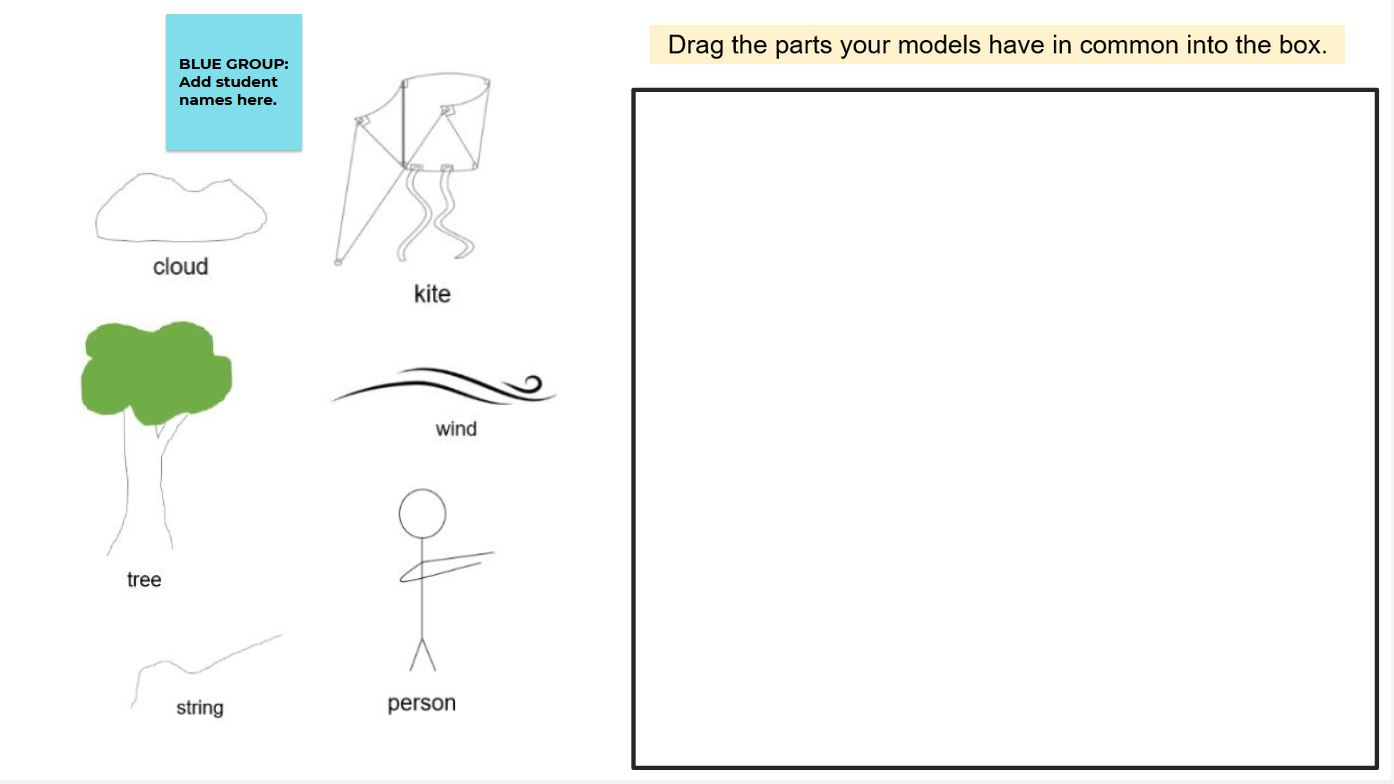
Use the common parts of students' models to create a class consensus model. As you add each part to the class model, ask if the class agrees with the placement/relationship between each part. Students may want to show the wind blowing on both the kite and the person. They may also want to include the cloud, tree, or other parts (like the Sun). This is acceptable. As students' focus shifts to the kite as they move through the lesson, you can revisit these parts and decide if they are needed to explain how the kite flies.
Investigations
Ask students, "Are there any pushes on the flying kite?" Students will likely say the wind pushes on the kite. Add this idea (wind pushes) to the class model. You might ask students how you could represent the wind pushing using pictures and/or symbols.
Next, ask students, "Are there any pulls on the flying kite?" Students will likely say we pulled on the kite. Some students may say gravity pulls on the kite. Add these ideas (person pulls, gravity pulls) to the class model. Ask students how you could represent these pulls on the kites using pictures and/or symbols.
Note: Although students will likely notice the kite pulls on them, keep the focus on the forces acting on the kite for now. This is building the foundation for the grade 3 science idea "Each force acts on one particular object and has both strength and a direction." You may choose to continue with the lesson and ask students to consider the forces acting on them to answer their question, "Can the kite pick me up?"
Go back to the class Notice and Wonder t-chart. Say to students, "Many of us wondered what would happen if it was windier or less windy. Since we're thinking about pushes and pulls, does it make sense to investigate this question first?"
You might pose the question, "How might the wind's push on the kite be different tomorrow than it was today (or on the day you flew the kites)?" Students might say,
- The wind can blow harder.
- The wind can blow softer.
- The wind might push in a different direction.
Next, ask, "How might our pulls on the kite change if the wind's pushes changed?" Point to each situation and record students' responses about pulls in a different color. Students might say,
- the wind can blow harder: We have to pull harder so the kite doesn't fly away! We might let go if the wind pushes too hard.
- the wind can blow softer: We can't pull too hard or the kite might come out of the sky. We can pull it around wherever we want.
- the wind might push in a different direction: We have to pull this way if the wind pushes that way.
Ask students, "Should we investigate?!"
Note: These investigations occur over time. You may have to wait for the right conditions to continue the kite investigations.
After students have investigated pushes and pulls on the kite, return to the class consensus model. Ask students, "What would you add to or change on our class model based on our observations about pushes and pulls on the kite?" Give students independent thinking time, then ask students to share their ideas with a partner. Bring the class together and ask them to share their ideas or a partner's idea with the class. Always follow up with "Why do you say so?" and encourage students to support their ideas with evidence from their observations (data). At this time, students should agree trees, clouds, and other components can be removed from the model.
Return to the class Notice and Wonder chart and ask students if we can now answer some of our questions.
Return to Catch the Wind! All About Kites
Consider returning to Catch the Wind! All About Kites at this point in the lesson. Pause on pages that offer opportunities for students to reinforce the ideas they have built through their investigations or provide information that can help explain how or why kites fly. These are just a few suggestions:
Page with text Flexible kites are designed to form different shapes when the wind fills them. Ask students, "Which kite looks like our kite?" "How are the kites on this page similar?" "How are the kites on this page different?" You might flip one page back and/or one page forward and ask students if they can find at least two things that are similar among all of the kites. What about three?
Page with text 'Catch the wind!' Ike shouts to Katie and Sam. Ask students, "What do you think Ike means when he says 'Catch the wind'?" You might use this question as a formative assessment or provide students the chance to turn and talk to their partner and share their ideas about Ike's statement before sharing them with the class.
Note: On the page with the text How Kites Fly, you might share with students that scientists use the word lift when they mean the wind's push that helps cause an object to fly. However, lift alone doesn't explain how the kite flies. You might refer students to the class model to identify all of the pushes and pulls on the kite.
When you finish reading the story, make sure to return to the Notice and Wonder chart. Ask students which questions we can now answer.
You might then ask, "What should we investigate next?!"