
Teaching Teachers
Engineering Science Teacher Creativity!
STEM in action with preservice teachers
Science and Children—January 2020 (Volume 57, Issue 5)
By Christine Preston
The skills for the 21st century are communication, creativity, critical thinking, and collaboration (Partnership for 21st Century Skills 2011). To achieve these, Science-Technology-Mathematics-Engineering (STEM) must be made a priority at the elementary level (PwC 2016). This article spotlights a participatory workshop designed for teachers to experience STEM teaching and learning. It has been used in professional learning with inservice teachers. Here its use with preservice teachers at university is profiled. This multi-faceted teaching approach was designed to promote self-efficacy through
- opportunities for learning about STEM content;
- learning teaching techniques for elementary STEM;
- practicing hands-on activities;
- working in cooperative groups;
- participating in discussion; and
- observing instructors model good teaching practice (Palmer, Dixon, and Archer 2015, p. 29).
The task described here is suitable for a fifth-grade class. It aims to help elementary students
- connect science ideas about forces and motion;
- develop engineering design skills;
- apply mathematical thinking; and use
- physical and potentially digital technologies.
The article is interspersed with comments (in italics) made by preservice teachers in a reflective journal comprising part of their university assessment. Using the Photovoice method (Cook and Buck 2010) my students uploaded and commented on selected photographs (taken in class). Photos identified aspects of their university work they considered influential to their learning about science teaching. This workshop was a popular choice and the students’ voices tell you why.
Engaging the Students
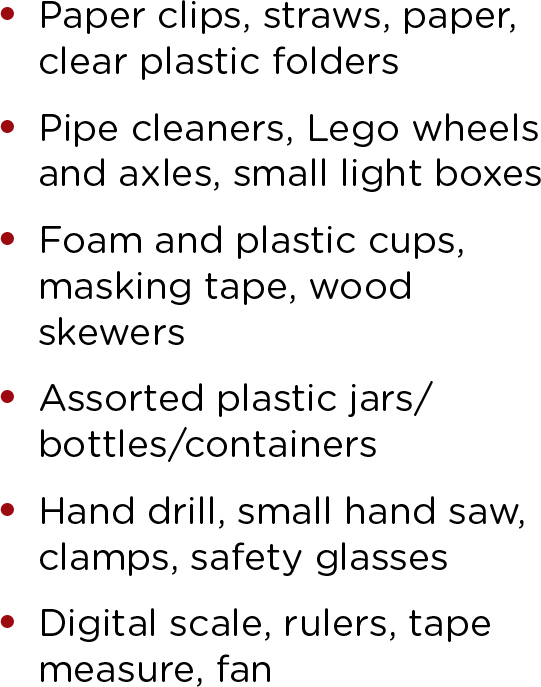
I wanted the preservice teachers to experience STEM learning firsthand like children in elementary school. A “learning by doing” approach suited the mostly mature age students who would not have encountered STEM curriculum in their schooling. Equipment (Figure 1) was prepared and set out before class: “I liked the ‘wonder-filled environment’ (, p. 25) Chris created when we walked into the classroom. All the materials placed around the room made me excited to think about what we may be creating today.”
Materials.
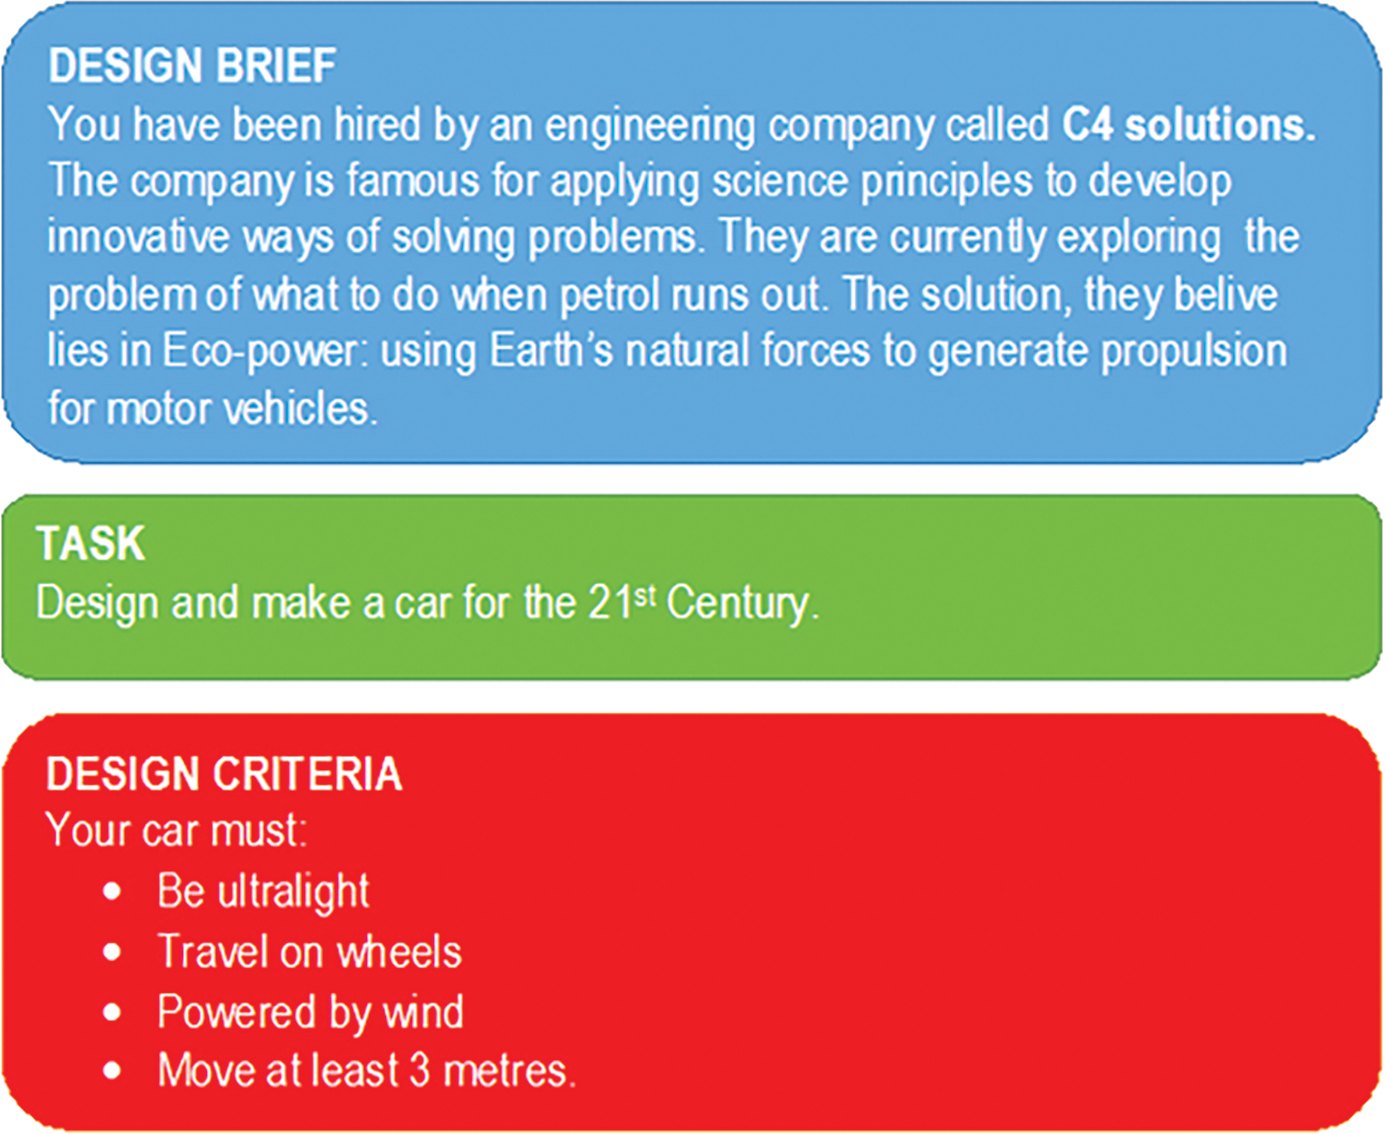
I delivered a letter to each group containing the design brief (Figure 2, p. 70). This modeled a motivating introduction: “We had to design a 21st century transportation device that could move in the wind. This was an ideal ‘hook’ to the lesson, we were immediately engaged and enthused.”
Design brief.
My students are encouraged to wear two “hats” during class. In the role of children, they experience lessons from the learner’s perspective: “The structure of the lesson allowed us to participate in student-centered learning, whereby hands-on experience enhanced engagement and developed learning.” They also view the lessons in their future role as teachers. Analyzing the science pedagogy being demonstrated includes thinking about many details:
- eliciting prior knowledge
- giving instructions
- scaffolding
- questioning
- explaining
- encouraging creative thinking
- distributing materials
- managing safety
- monitoring time
- consolidating learning.
Defining the Problem
To help the students make sense of the brief, they had a short group discussion. They considered questions related to the design criteria such as:
- What do we mean by ultralight? How can we define it?
- What do you know about wheels and how they work? What needs to be considered to ensure the wheels function properly?
- Can you think of any existing technologies that use wind? What design features might help your vehicle capture the wind? Are there any potential problems if you incorporate these into your car design?
- What factors might affect how far your car can travel along our floor test track?
Next, I facilitated a whole-class discussion. Sharing of ideas helped students define the design problem. This strategy was recognized as valuable: “It would be really great to involve students in clarifying the design parameters like we did, to give them a sense of task ownership.”
My experience in conducting a similar activity with mid–elementary level students indicated the need to guide students’ attention to critical details they may overlook. This modeled dialogic teaching, which “harnesses the power of talk to engage children, stimulate and extend their thinking” (Alexander 2006, p. 27.) It also elicited prior knowledge: “The class discussed some factors to consider in our design: wind direction, weight distribution, wheel rotation, and how to harness the wind for propulsion. I learned having this conversation with the students before they start designing helps them process the factors that will contribute to the success of their vehicle.”
Developing Possible Solutions
Students could see but not touch the available materials. They individually designed and sketched more than one idea for a 21st century vehicle. Grid paper was provided for drawing plans. I suggested they include both top and side views. Scaffolding this step of the design process was remarked on: “We also had to draw a plan of our design. Often children will be eager to start building their design immediately; however, this planning time needs to be integrated into the lesson and it will help make their design more successful.” Students used the drawings to discuss their design ideas. A final group design was developed collaboratively. Decisions were made about which materials to use. They discussed how to construct a prototype ready for testing.
Collaborating to Construct a Prototype
With great enthusiasm, the preservice teachers worked together to create their design solutions. Students perceived that this aspect “made me reflect on how collaborative tasks are crucial for primary aged students, as they develop essential interpersonal, reasoning, conflict resolution and listening skills.” Also “by working together and negotiating our design choices, we effectively shared and explained our own ideas to then make the best possible ‘car’ as a team.”
Managing Safety
I was vigilant about safety. We used hand drills for making holes in hard materials, and small hand saws for cutting. Points were removed from wooden skewers and students were issued with protective eye wear. Timely interventions prevented accidents. For example “use the drill not scissors to make that hole” and “use a clamp to hold it while you saw it.” I showed how children can use construction technology themselves. We always need to be mindful of children’s safety. I pointed out that teachers need to supervise children using common classroom equipment and shared resources and techniques to shape and join materials. This includes taking care with using scissors, staplers, tape dispensers, and ensuring correct use of tools. For example, a single hole punch can be used for safely making holes in materials like paper and some plastics. I set up a test area at the side of the classroom where prototypes can be placed on the ground away from desks and chairs to avoid trip hazards. With young children, the teacher operates the fan, first making sure long hair or loose clothing are restrained to avoid getting caught by the fan blades. The fan I use has mesh encasing the blades, but it is good practice to turn the fan off when students place their cars on the start line ready for testing. Children move off the “test track” and sit along the sides to observe at a safe distance before the fan is started. Such considerations and preventative actions are part of the risk assessment completed before all laboratory classes.
Fostering Creativity
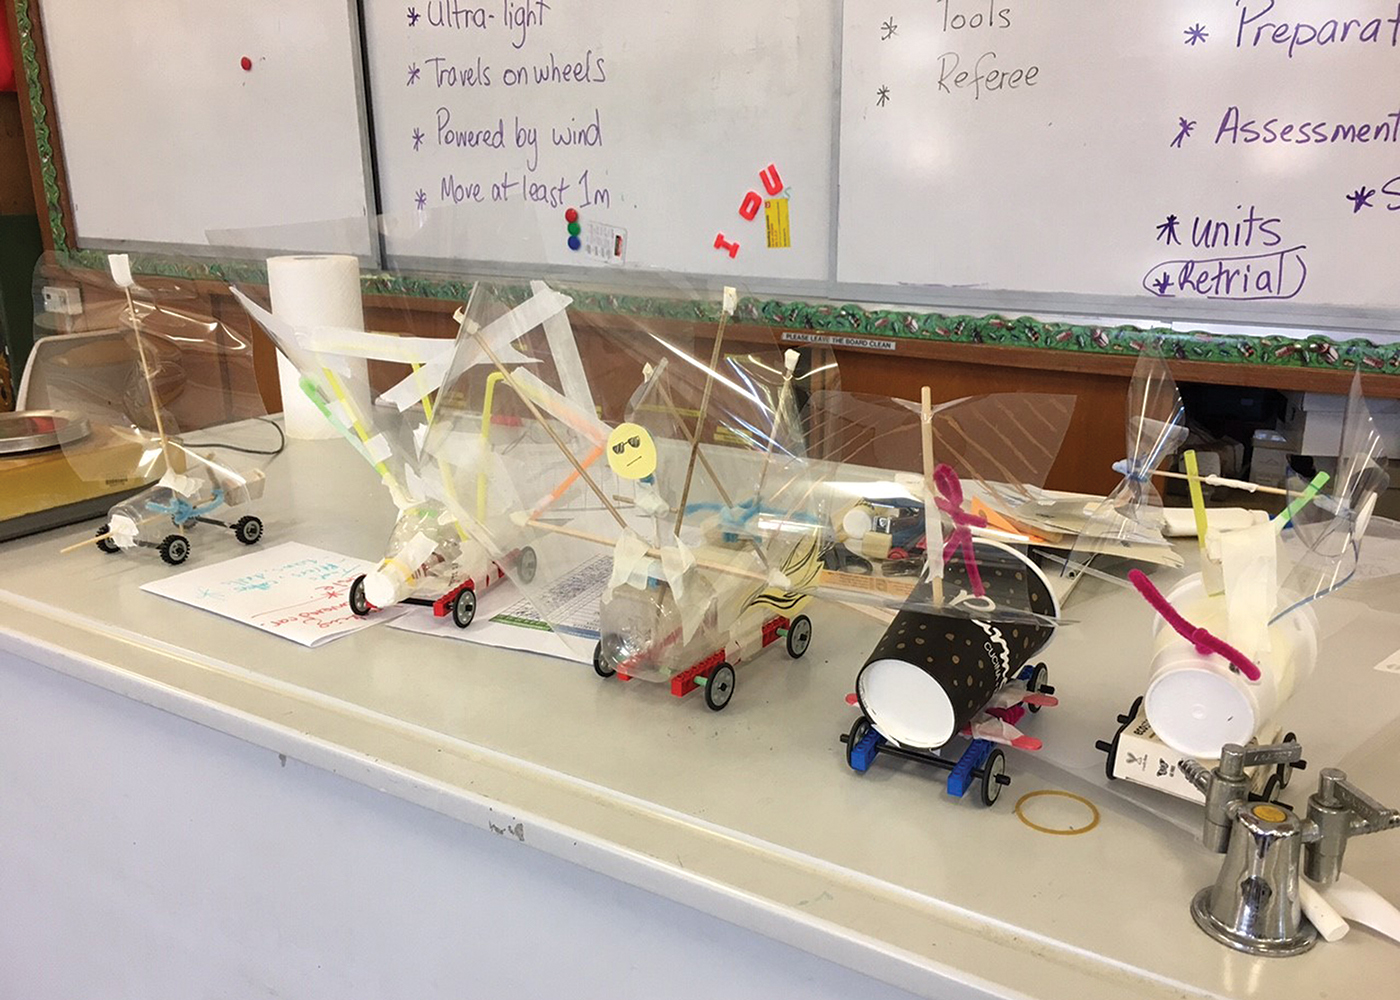
All groups had the same materials but a surprising variety of design solutions were developed (Figure 3). As one student explained: “It highlighted the importance of infusing creativity into students’ science experiences, this photo () clearly exemplified how creativity could be fostered through design-based STEM projects ().”
Design examples.
Some students experienced the corollary—pre-testing stifled their creativity. One student admitted: “My team designed a simple model with just a cup and wheels. Our idea was that the air could move through the cup and push it far. We tested our car and got complacent because it was working. Worried that we would ruin it if changes were made, we left it rather than trying other techniques like adding a sail. Our concern for failure led to failure, teaching us a valuable lesson.” Perkins Coppola and Merz (2017) offer suggestions for combating such “design fixation” (p. 79) that works against innovative solutions, for example:
- Brainstorming a range (3–4) of possible solutions to the design problem,
- Sharing individual ideas and combining them to develop more than 1 prototype, and
- Ensuring sufficient time is spent in planning before students can start constructing.
Some groups made two car models to compare alternative design ideas.
Testing Prototype Designs
Students used a makeshift race track on the floor to test their designs. This strategy enabled experimenting with different ideas. Students could develop “tried and true” solutions rather than rely on trial and error. The latter involves guesswork, not application of knowledge and ideas. As observed, students “could see flaws in our design, as well as what was working and then make improvements until we knew that it met the criteria.”
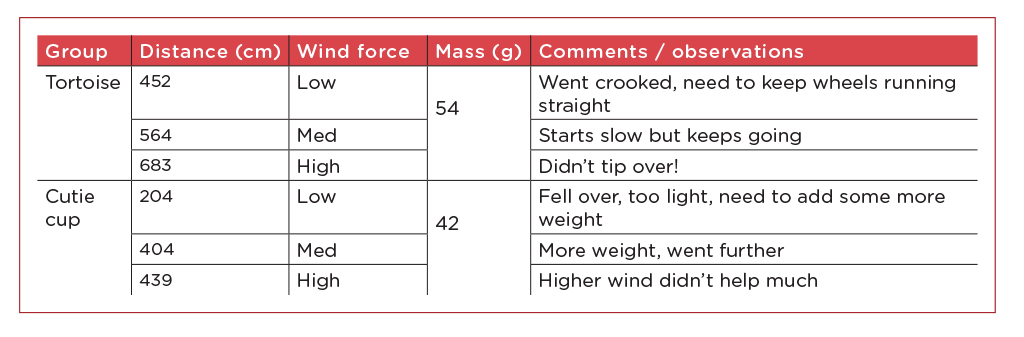
A high power fan with variable settings created the wind to test the 21st- century vehicle prototypes. A starting line and fan position was marked to control variables. All cars were tested under the same conditions. Students decided on three test trials with each car: low, medium, and high wind. A fair comparison could be made. The effect of different wind conditions could also be determined. Students measured and recorded the data in a large table on the whiteboard (see Table 1).
Making Sense of Data
Students found out that testing the cars and collecting the data was not the end of the process. This is where mathematical thinking became paramount. They had to decide how to measure and record the data. For example, should we use centimeters or meters (with decimal points)? This requires coordinating Science with Common Core State Standards (NGAC and CCSSO 2010) for Mathematics. Distance and mass were discussed as different types of measures. A digital scale was used to measure mass in grams (we rounded up to whole numbers). The seamless integration of learning areas resulting in a meaningful investigation was noticed: “We were able to explore mathematic concepts throughout the activity in discovering the things that impacted the distance our cars travelled.”
We also considered which car(s) were successful, and on what basis. Students made a reliable and accurate evaluation of the extent that each prototype met the design criteria. This was made more complex because of the first and last design criteria. Did the model that travelled the greatest distance also have the least mass? A trade-off was sometimes needed between the car being ultralight but stable. Stability meant the car would not be blown over or off-course by the wind.
From the teachers perspective, this student-teacher dialogue demonstrates effective practice in two ways. First, it helps the students focus on the data as evidence to support their scientific reasoning. Second, it connects the reasons for relative performance of the car to these design elements. In a student’s words: “following the testing of all the prototypes, we analyzed and compared the data we had recorded. I found this part interesting and was surprised that each design had different advantages and disadvantages.” We also discussed why certain design features worked better than others. This helps children learn to appreciate that design flaws are simply ineffective elements. They learn these can be altered in successive models. Students could apply scientific reasoning and develop explanations for the success (or otherwise) of their design solutions. This develops analytical skills and emphasizes the iterative nature of the design process. It also reinforced understanding: “It made me aware of some scientific and technological concepts that were buried deep in the back of my brain, unbeknownst to me! For example, the vehicle should probably have a low centre of gravity to maintain stability and needed a large surface area to catch wind.”
As the preservice teachers participate in the task, they realize the importance of scientific reasoning in developing solutions to design problems. It also provides insight into opportune times for engaging in teacher-student dialogue about science concepts. Such discussions emphasize that crosscutting patterns and core disciplinary ideas are developed alongside scientific and engineering practices. For example, children will observe that the distance travelled follows a pattern (increasing wind speed usually makes the cars travel a greater distance). Teachers can ask questions leading to the explanation that increasing the force of the air pushes harder on the car, making it move farther due to greater energy. Preservice teachers learn that an explicit focus on concepts is vital for supporting student understanding in their future classrooms. The analytical nature of the task also helps the teachers perceive the promotion of scientific thinking.
Optimizing the Design Solution
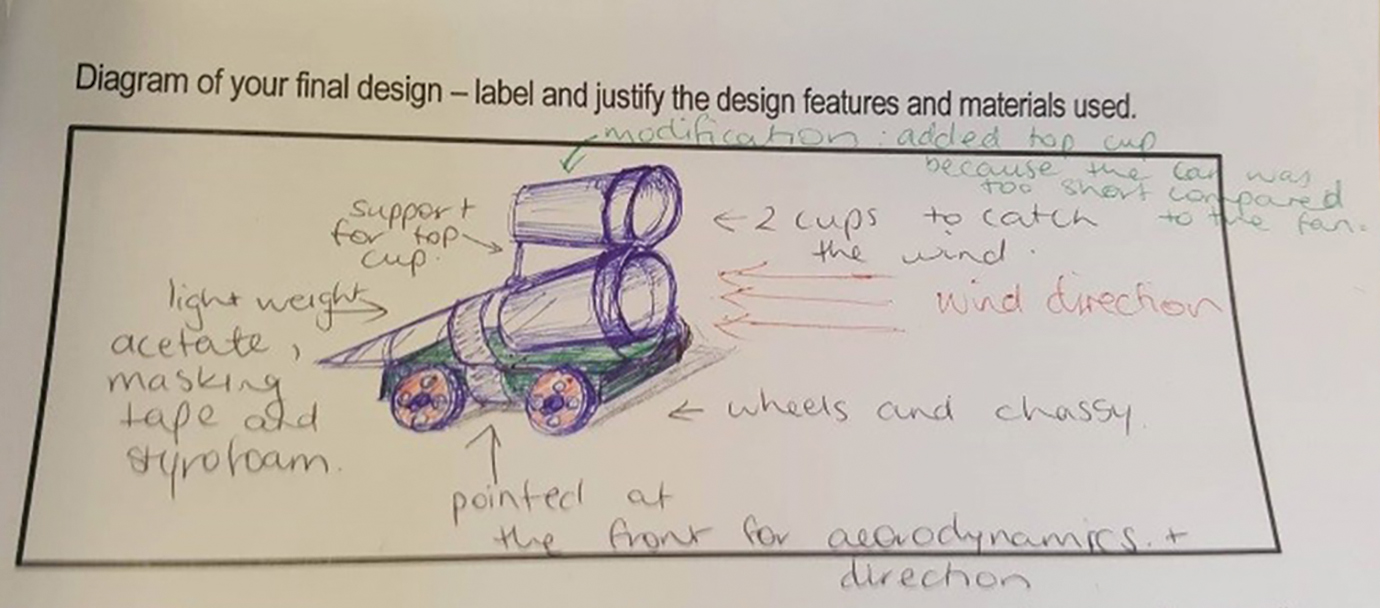
Students returned to their groups to individually draw a diagram of their completed prototype (see Figure 4). They labelled the features and explained how each contributed to the success of the design. Materials used were also listed and reasons for their selection were justified. Possibilities for assessing children’s learning were discussed at this point. I stressed going beyond traditional strategies of lab reports for summative assessment. For example, I recommend encouraging the use of multi-modal representations (Tytler et al. 2013). Science data or ideas can be embodied (represented) using different modes—pictorial, linguistic, numerical, graphical, tabular—for communication. Modal forms can also be integrated to create multimodal representations (Skamp 2018). Such representations like the one shown in Figure 4 can inform the teachers of the children’s learning about structure and function of their design solution, e.g., front shape (aerodynamic) to reduce drag and provide support (maintain shape and position). Children could construct representations to illustrate and explain how the concepts of force and energy impact on the design solution. Student representations can be used to assess their understanding because they communicate the meanings they have made. Students can communicate understanding of phenomena in a variety of ways (conversation, gesture, drawing, words, movement), and teachers learn how to look for signs of meaning-making to assess their learning. Other elements for assessment in this task can involve use of data collected from testing the cars. Ways students analyze and represent the data (e.g., through use of digital technologies to generate graphs or creative visual displays) cans also be assessed, along with the use of evidence in formulating conclusions.
Prototype illustration.
A final component of the task was to think about two endpoints. How could we consolidate the conceptual understanding from the practical work? How could children’s learning be extended? This part is sometimes referred to as the “so what?” aspect of design tasks. It is critical in helping elementary students value the task as a meaningful learning experience. We talked about various ways the learning task could be concluded or extended. One conclusion was to list factors the engineering company would need to consider if they wanted to make wind-powered passenger vehicles. Children could compose a return letter to “C4 engineering.” It would communicate advice about 21st century vehicles based on the children’s design and scientific testing of prototypes. As an extension, the best design features from each group could be used to generate an optimal design solution. Children could make a video of this master prototype in action. An informative commentary could be added to explain how this solution meets the design criteria. This provides scope for using digital technologies. Our two-hour workshop did not allow time for this inclusion.
The last two elements took about one-third of the workshop time. Significant discussion of teaching strategies and debriefing of the experience was incorporated. This discussion reinforced the importance of student-teacher dialogue to consolidate children’s learning. My students clearly understood that STEM is not merely about the hands-on practical work. The minds-on work involving analytical thinking, problem solving, and communicating outcomes of the engineering investigation are where substantial learning is realized.
Impact on Teachers
From a teacher education perspective, this participatory workshop is an exemplary component of a science teacher program. The program provides opportunities for preservice teachers to “learn the science content and practices in contexts that would be aligned to their future work as teachers” (Bybee 2012, p. 218). Students found the class influential to their learning about teaching science at the elementary level. A high number of journal entries made positive comments about this workshop. Reasons for its influence include:
- Relevance— “made me realize how relevant Science and Technology is to our lives and for the future. Activities like these will allow the students to develop thinking skills, which are necessary for 21st century workers.”
- Engagement— “We could not have been more engaged with this creative task, I will definitely use it with my future students. Practical tasks like this provide students the opportunity to embody their learning and make science happen!!”
- Challenge— “it was very challenging to invent a car which would go far, yet be ultralight. That made me really appreciate engineers’ work and realize how much they need science, technology, and maths.”
- Meaningful learning— “The process of designing, making, and evaluating highlighted the value of both hands-on experiences and creative thinking to solve real life issues. It shows how school science can be a realistic reflection of society and create meaningful, relatable learning experiences.”
Student’s involvement in the practical workshop also contributed to one of my goals “to enhance the self-efficacy of preservice teachers towards teaching science.” The comment: “as a student who is not confident in her science abilities, I was able to feel successful in my learning and even produced a car that travelled over 6 meters!” suggests that all teachers should be able to try this lesson with their students. More confident teachers can use this example as a guide to develop their own innovative learning experiences meeting the needs of their students. The ultimate goal of preservice teacher education is for students’ learning at university to translate into effective science teaching and learning in our schools.
Recording group data.
Engineering Teaching Strategies Elementary