
feature
Patterns That Matter
Helping second graders explore patterns of properties of matter and the nature of science
Science and Children—January/February 2022 (Volume 59, Issue 3)
By Jesse Wilcox, Reade Reiter, Abby Rose, Alex Alberts, and Katie Murano
Although the Next Generation Science Standards (NGSS) have three dimensions, the crosscutting concepts are often the forgotten dimension. One reason teachers may not emphasize the crosscutting concepts might be because they are broad, domain-general constructs that can be difficult to conceptualize in a meaningful way (Osborne, Rafanelli, and Kind 2018). Yet, when taught well, crosscutting concepts can “bridge the engineering, physical, life, and earth/space sciences” because these concepts can help students understand science as a way of knowing (Duschl 2012). When crosscutting concepts are taught alongside the nature of science, teachers can draw students’ attention to the important ideas about how science works and what scientists do. For example, the National Research Council (2011) points out the crosscutting concept of patterns is related to the nature of science because scientists often look for patterns in the natural world to help them make sense of phenomena.
A prerequisite to teaching nature of science is to have students act like scientists. Teaching science through inquiry promotes student decision making, curiosity, and critical-thinking skills that scientists frequently use in their work (Wilcox, Kruse, and Clough 2015). While inquiry experiences set the stage for nature of science, teachers need to explicitly teach nature of science concepts and help them reflect on their experiences (Khishfe and Abd-El-Khalick 2002). Additionally, Kruse et al. (2020) found specific nature of science questions (e.g., “Why might creativity be an important part of what scientists do?”) help students understand nature of science concepts better than general nature of science questions (“What do scientists do?”). We recommend using a planning tool (Table 1) to help teachers write specific, explicit reflective nature of science questions that are appropriate for elementary students (Wilcox and Lake 2018).
During a three-day lesson on structure and properties of matter (2-PS1-1), we help students understand how patterns of properties can be used to help sort and identify materials. These activities give students an inquiry experience from which we can explicitly discuss patterns and nature of science ideas.
Day 1 (45 minutes)
Preparing for the activity
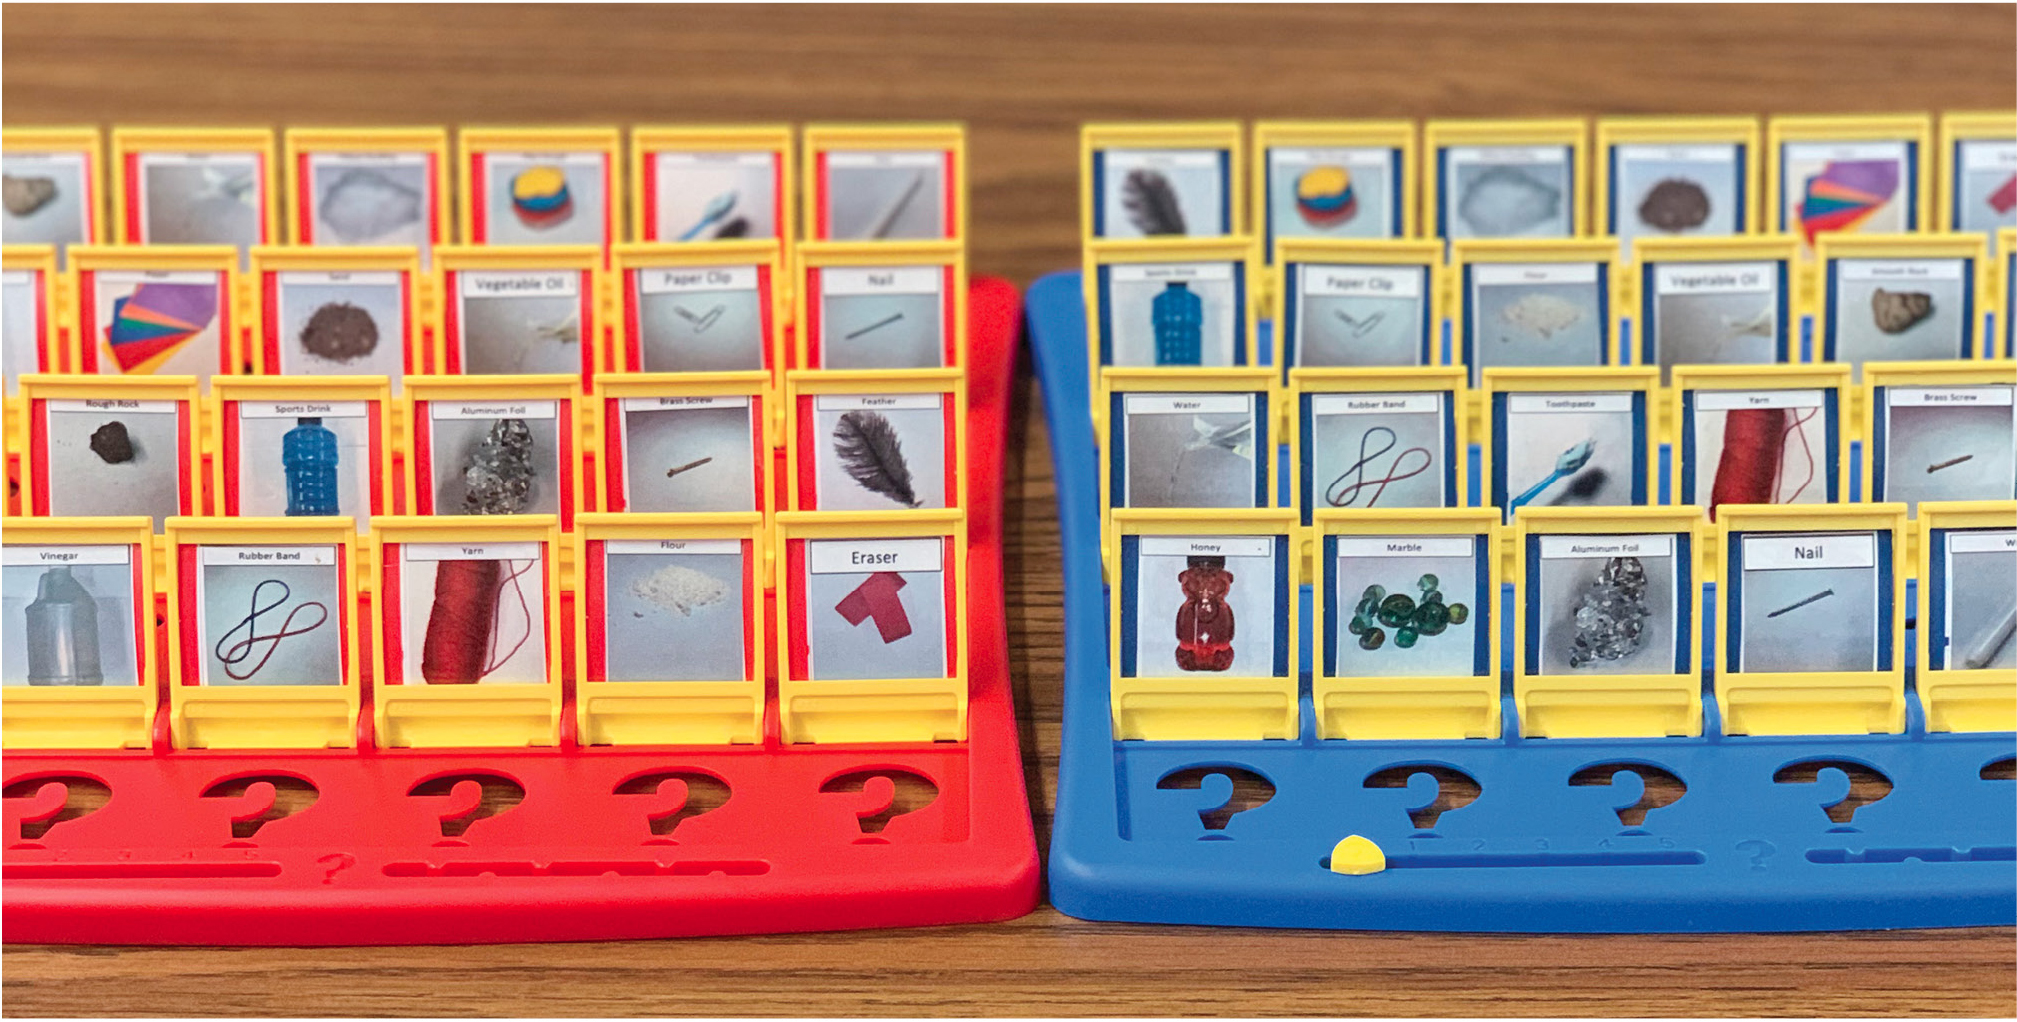
Prior to class, we prepare plastic boxes for groups of 2 students that contain 24 objects in them (Figure 1) along with a list of the items in each box. Fewer objects could be used, but we wanted to ensure we had at least two objects for each property of matter we wanted to discuss with students (e.g., state of matter, hardness, metals, magnetic, elasticity, viscosity, color, luster, smell). Additionally, these objects are also inexpensive, easy to obtain, and are safe for students to handle. We usually put the liquids in 2-ounce plastic cups with lids to reduce the chances of spilling.
Materials list.
- Paper clip
- Steel nail
- Aluminum foil
- Pencil eraser
- Rubber band
- Rough rock
- Smooth rock
- Brass screw
- Vegetable oil
- Water
- Vinegar
- Honey
- Sand
- Playdough
- Raw spaghetti noodles
- Yarn
- Paper
- Pillow stuffing
- Sports drink
- Feather
- Flour
- Marble
- Toothpaste
- Wax
Other Materials
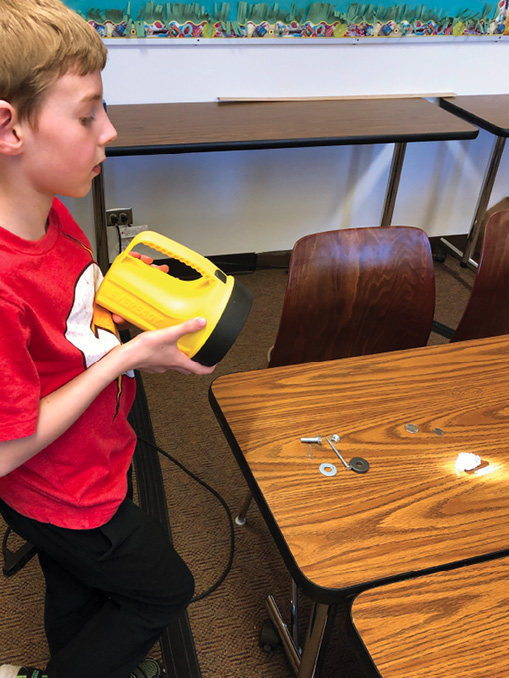
- Flashlight (Luster test)
- Magnet (Magnetism Test)
- Plastic lid (Viscosity test)
Starting the activity
We begin walking around the room and showing students one of the boxes of materials. We ask, “What do you notice about the objects inside the box?” Students often say, “There’s a lot of different stuff!” We then pose our guiding question: “How are the materials similar to and different from each other?” We have students turn and talk to a partner to discuss how they could approach the problem. Students discuss putting like materials by each other and looking at materials closely. Before we pass out the materials, we ask students to think about how they can stay safe. Our students often discuss not eating the materials, being careful not to spill them, and not throwing the materials. Be sure to check for food allergies.
After students understand the expectations, we put them in groups of two and have one student come and get a set of materials for themselves and their partner. When we group students, we consider their readiness and compatibility, and ensure that students work with many other students over time. We try to be flexible with our grouping to help students develop communication skills. Once students have the materials, we give them a few minutes to look at the materials and talk to their partner about what they are observing.
After students have had a minute or two to observe the materials, we have students put the materials back into the plastic box. We then ask them to turn to their partner and discuss their ideas about how they could put the materials into groups. We walk around the room and listen to their ideas. For example, we heard a group of students discussing water and vinegar. All of the students agreed they should be grouped together, but they initially couldn’t figure out how the liquids were different. After we suggested they carefully take off the lids and waft to smell, one student quickly exclaimed, “This one is vinegar because it is smelly! This one is water because it is see-through but isn’t smelly!” Other students recognized some objects are shinier than others. We asked them what they could use to help them figure out how shiny the objects are and one student recommended shining a flashlight on the objects to see if they shine.
After about five minutes, we have students come to the carpet area by the whiteboard. We ask students, “What are some ways you came up with to group the materials?” Students often come up with: color, “shiny or not,” smell, liquid/solid, metals, and hardness. We write ideas on a piece of chart paper and use the list as a reference point for students. To formatively assess the students on properties, we ask them to describe two of the objects using multiple properties in small groups and share with the large group. Our students could list multiple properties with the same material.
Going deeper with properties
Although our students can generate many properties of matter on their own, some require support. We often have to guide the students to consider other properties such as elasticity, viscosity, and magnetism. We ask students scaffolding questions such as, “How can we break the metals down even further?” and “How could a magnet help us do that?” In our experience, students often correctly identify many materials as metals or containing metal but are much less accurate concerning if the materials are magnetic or not. For example, one group of students believed that the marble, nail, screw, paper clip, and foil were all magnetic until testing them. Through testing, we helped them understand not all metals (or hard materials) are magnetic.
While teaching the lesson, some students wondered about different properties. For example, wondering, “What is a liquid?” These students had categorized all the liquids into one category except toothpaste and honey, which were in their own category. We asked how they came up with their ideas and they said, “We don’t know about toothpaste and honey.” We then asked what would happen if we poured water, toothpaste, and honey down a plastic lid we used as a ramp. After a moment, they exclaimed, “They would all move, but honey and toothpaste just move slow!” Once students understood the property, we explained viscosity. As the students in the class began to work more with their objects, we worked to scaffold them to more deeply explore the physical properties of the materials through open-ended questions. Finally, toward the end of the lesson, we add more properties of matter to discuss in the second round.
Day 2 (30 minutes)
Using an organization tool to help students categorize objects
On Day 2, we start by referring to the list of properties we made the first day. We then introduce an organization tool that students in groups of two use to physically group the objects given in a visual way that includes the names of the properties (Figure 2). We create 8–10 organizers for each group of students that each have a physical property on the top and two ways to divide the properties on the sides with brass fasteners. For example, one of the organizers may have the property texture written across the main strip, and rough and smooth written on the secondary strips coming off the sides. An opportunity for differentiation here is to include pictures of the objects on the organizers in addition to the property titles, as this provides an additional visual aid.
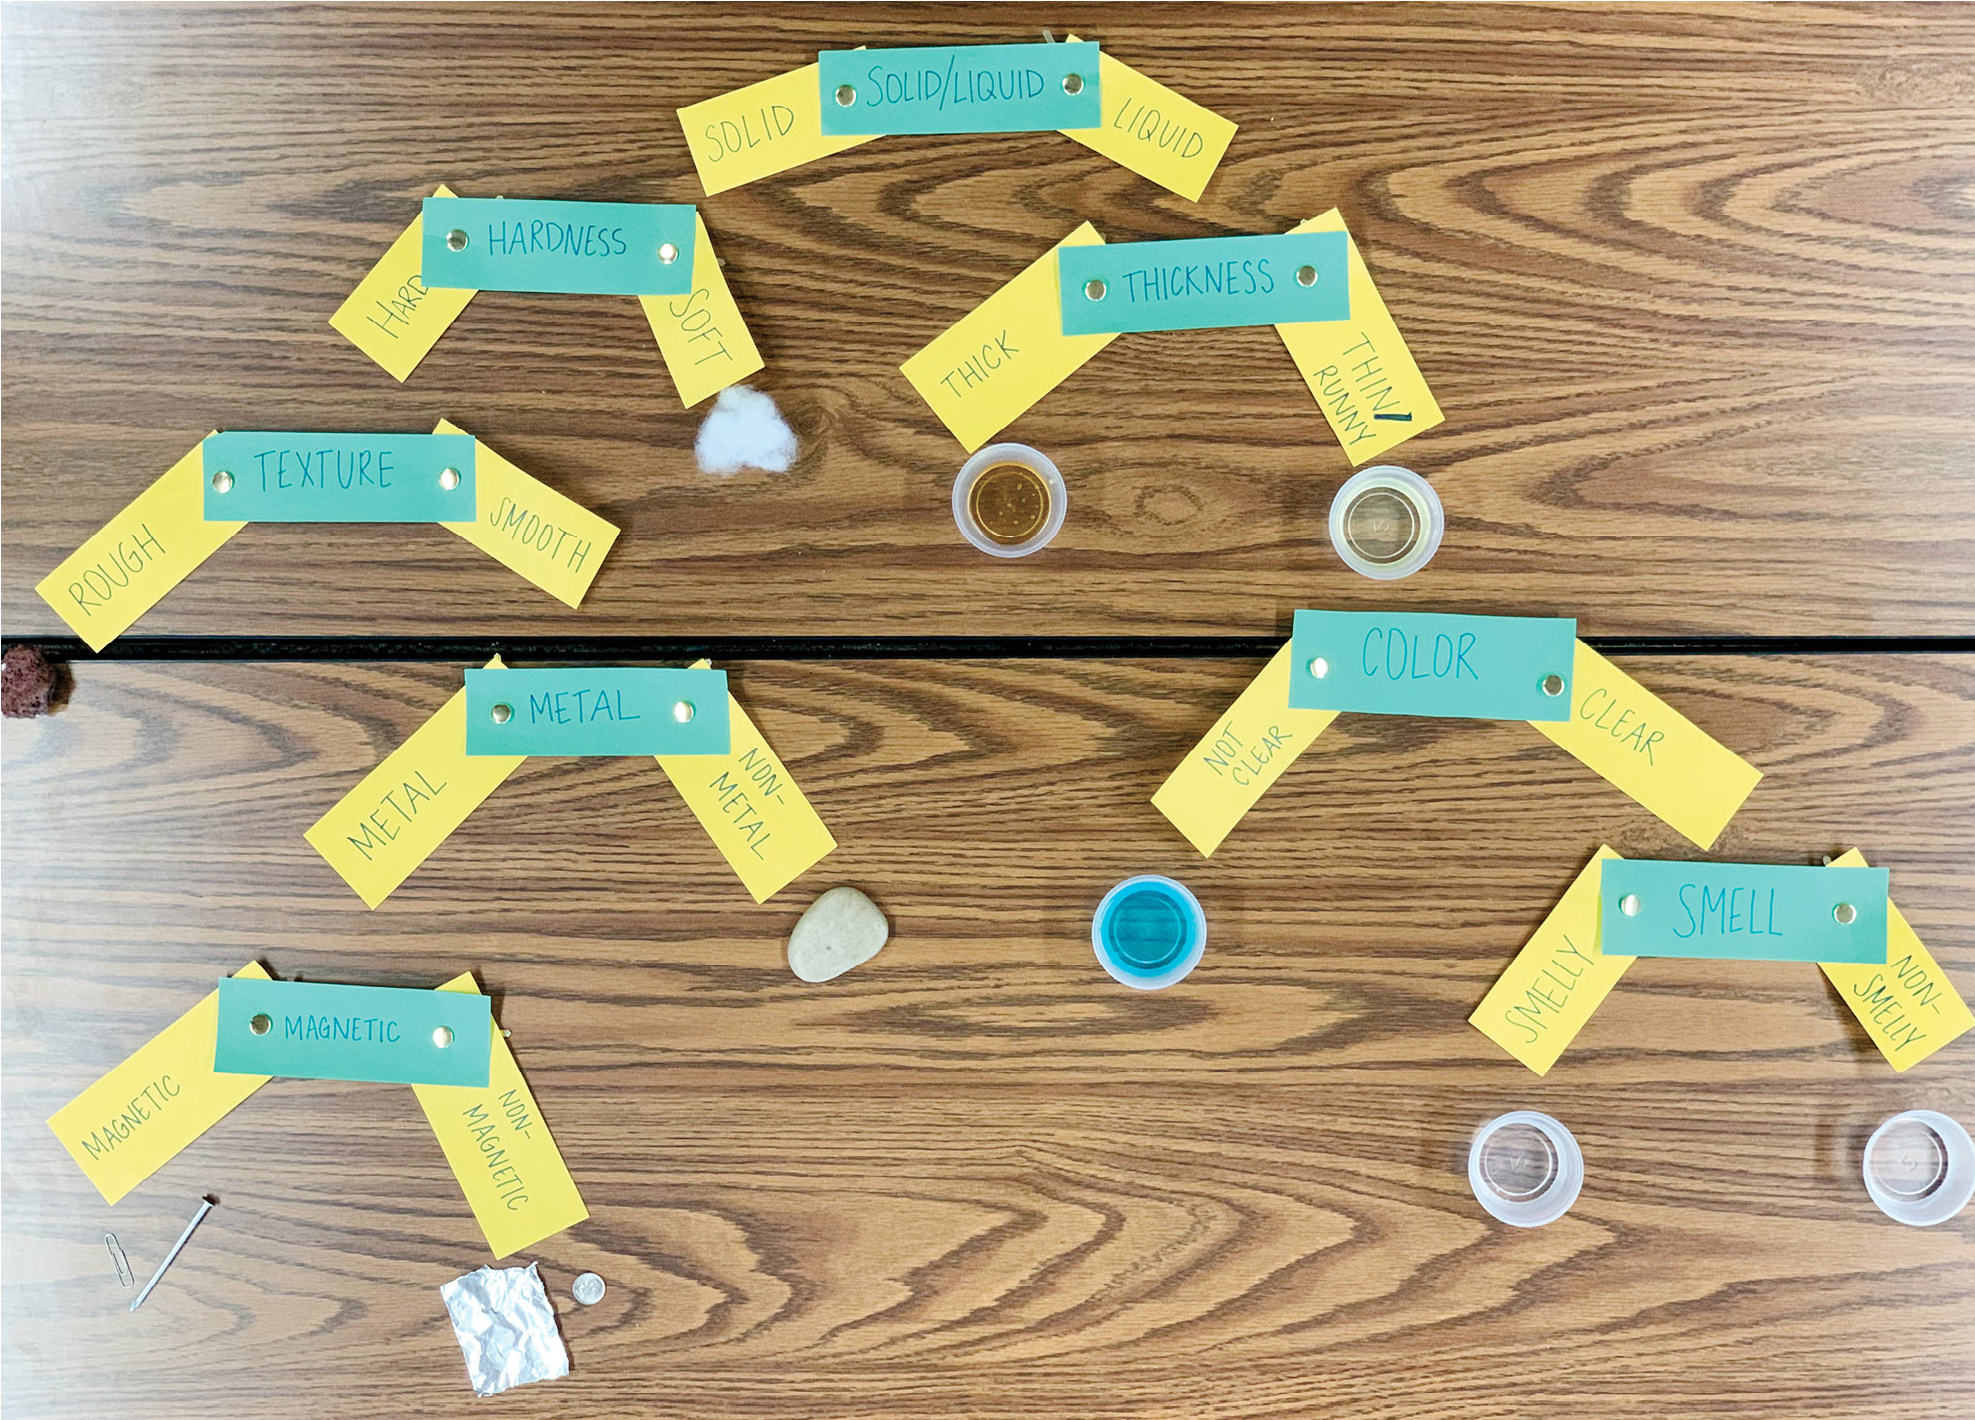
Organizing tool.
Students are given these organizers along with the physical materials and are given about 15 minutes to categorize and group the objects by using the names and titles from the organizers. By using these organizers, students are able to divide the materials even further. For example, one group of students who placed water and vinegar in one category under liquid further divided that liquid category by using another organizer titled “smell,” where they placed water under the “non-smelly” attachment and the vinegar under the “smelly” one. If students finish before other groups, we typically ask how they could divide their objects even further and we have blank organizers we give students to add their own ideas.
Explicitly teaching students about patterns and nature of science
Once students have completed their investigations, we ask them to come to the carpet to discuss what they found. After students have had a chance to reflect and summarize their experiences, we help students understand the crosscutting concept of patterns and nature of science concepts by asking students specific explicit/reflective questions such as:
- What patterns did you notice when you were working with the materials?
- Common responses: “Some are metals, some aren’t.” “Some are liquid and some are solids.”
- How did the patterns help you?
- Common responses: “Patterns help me know if I can pour it or not.” “It would help me know how to use it.”
- Why might scientists look for patterns in nature?
- Common responses: “So they can study it a lot easier.” “It helps them do their work.”
- How were you creative?
- “I used the things around it to see what was like it.” “I had to come up with how to group them.”
- Why might scientists want to be creative?
- Common responses: “Scientists have to come with how to group things.” “It helps them figure things out.”
Day 3 (30 minutes)
Guess Which Game
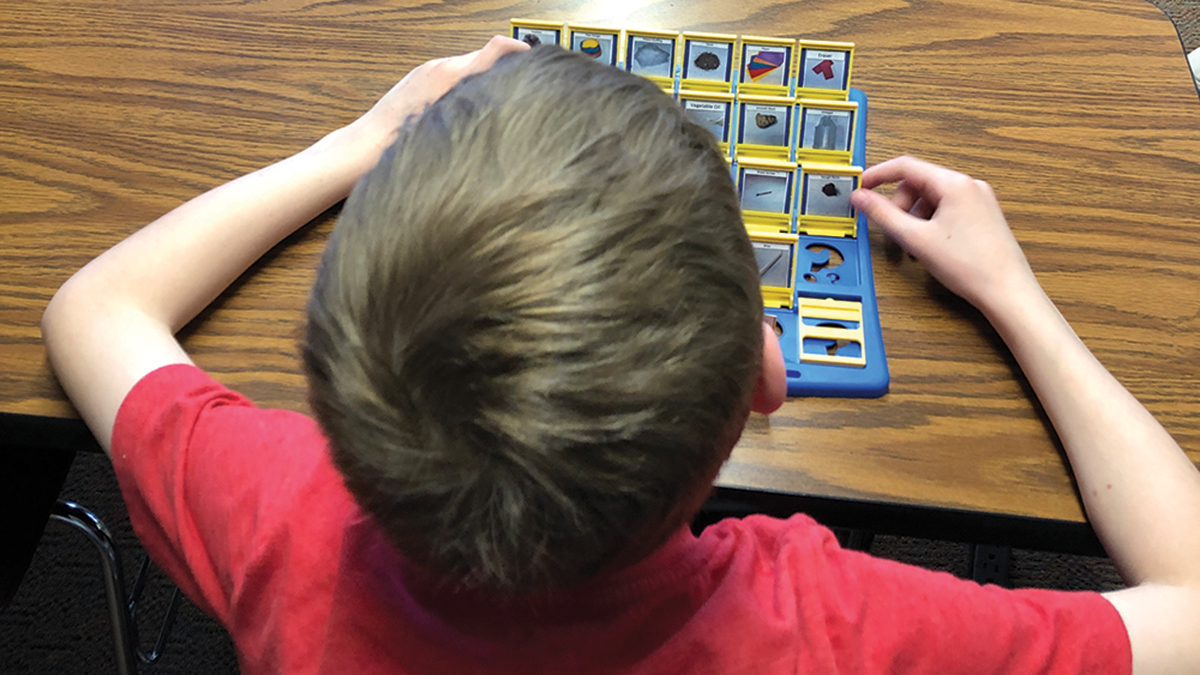
We use a modified version of the game “Guess Who?” That we call “Guess Which?” as a way to formatively assess students’ understanding of properties of matter (Figure 3). Just as in Guess Who?, students take turns asking each other questions in order to narrow 24 possibilities down to one. We substituted pictures of each of the objects students sorted in the first activity for the faces traditionally seen in the Guess Who? game. Alternatively, teachers could print and cut out the cards. Students could line up the cards and flip them over as they ask each other questions.
Guess Which? Board game.
We start by asking students if they have heard of the game Guess Who? In our experience, most of our students know the game. We then ask a student to explain the rules of the game to the rest of the class. Afterward, we explain to the students that we will be playing the game but with the materials we sorted in the previous class instead of people. We refer back to the chart we made from the first day and ask, “How could we use these properties to help us figure out what object the other person has?” Students note they could ask questions like, “Is it solid?” “Is it smooth?” or “Can you pour it easily?” Once students understand the rules of the game, we have them work in groups of four (two people on each team) to play the game. We formatively assess students by walking around while they are playing the game and we look to see which properties students seem to understand well and where they are struggling.
One problem we have had while playing the game is that some students simply ask, “is it ______” and guess the specific object rather than using the properties. We often scaffold those students by asking questions such as: “Why might asking ‘Is it a solid’ be better than asking ‘Is it spaghetti noodles?’” Students typically realize they could use the properties. We then remind students to use the properties of matter on the chart paper to help them. To differentiate, we give students a paper with guiding questions and pictures of the properties of matter to provide a scaffold and a visual aid. Overall, something we have found valuable about this assessment is that our students enjoy playing the game (and often want to keep playing) without realizing they are using the vocabulary and concepts from the previous lessons. We also gain a great deal of insight into their understanding of properties while we listen to them ask each other questions.
Next Steps
Exploring specific properties of matter in-depth
After our introduction to properties of matter, we often explore many of the properties more in-depth. For example, we engage students in numerous activities about magnetism and address any misconceptions they might have that come up during the properties of matter activities (e.g., hard things are magnetic, all metals are magnetic) (Wilcox and Richey 2012).
Additionally, we explore solids and liquids more in-depth with students through using the Oobleck activity (cornstarch, water, and food coloring) (Sneider 1985). On the first day of this lesson, students observe Oobleck to get an idea of what the substance is like. The class creates a spectrum with the word solid on one side and liquid on the other. Students then discuss where they would place Oobleck on that spectrum. We then talk about other substances (e.g., water, honey, toothpaste) from the property of matter activities to also place on the spectrum. Students on Day 2 will watch a Mythbusters video called “Walking on Water,” where the Mythbusters use the substance Oobleck to walk on. Day 3 consists of students brainstorming ideas to change the properties of Oobleck. Students are guided to think about heating or freezing the Oobleck, adding water, adding cornstarch, and so on. The students use these ideas in stations (see Supplemental Resources) to help wrestle with how they can change the properties of Oobleck.
Conclusion
When crosscutting concepts from the NGSS are taught in combination with the nature of science, teachers can guide students’ thinking and focus on the important ideas about how science works and what scientists do. This article specifically explored how this is done in connection with patterns, as scientists often look for patterns in the natural world in order to make sense of phenomena. We have found by carefully planning our lessons to include crosscutting concepts and nature of science, we can ensure the crosscutting concepts aren’t the forgotten dimension. ●
Supplemental Resources
Download the pictures for the Guess Which? game at https://bit.ly/31yxa3x.
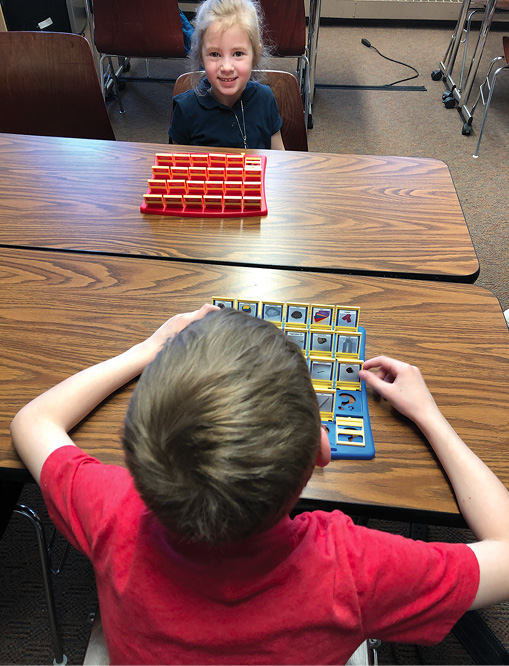
Students play a game of Guess Which?
Jesse Wilcox (jwilcox.23@gmail.com) is an assistant professor of biology and science education at the University of Northern Iowa in Cedar Falls, Iowa. Reade Reiter is a kindergarten teacher at Emerson Elementary in Indianola, Iowa. Abby Rose is a fourth-grade teacher at Wright Elementary School in Des Moines, Iowa. Alex Alberts is a fourth-grade teacher at Shuler Elementary School in Waukee, Iowa. Katie Murano is a student at Simpson College in Indianola.
Crosscutting Concepts Engineering Interdisciplinary NGSS