
Engineering encounters
Turn Up the Music!
Fourth-grade students explore sound with repurposed objects.
Science and Children—July/August 2021 (Volume 58, Issue 6)
By Caitlyn Lindaberry and Catherine Scott
The elementary school classroom provides unique opportunities for teachers to engage students in STEM thinking using scientific content and innovative thinking. In today’s world, educators spend time determining how to conserve resources when engaging students in hands-on experiences while still bringing relevant experiences into their lessons. In this lesson, we examine the ways that teachers can address student interests in music and technology through an engineering lesson focusing on amplification of sound and recycled materials. The lesson was conducted during the science portion of the school day over the span of several days, for a total of approximately 45 minutes per day (see Table 1).
The Classroom Context
This lesson was completed in a fourth-grade classroom in a Title I school. The teacher regularly created activities and projects that seamlessly integrated both STEM initiatives and the Next Generation Science Standards, and students were used to working together in small groups to complete their activities. For this lesson, students had to select a song and create a prototype that would amplify the volume of the song on their personal learning device. Students were paired with a friend of choice to complete this activity; however, teachers could adapt the pairing based on academic abilities and the needs of the students.
Sound is a form of energy that is produced by vibrating objects; in other words, sounds are merely the vibrations that we hear. The vibrations occur when an object is rhythmically moved back and forth, in a regularly or randomly manner, from the position it occupies when at rest (Sharp 2017). For sound to be heard, it requires a medium in which the vibrations can travel from the source to the ear. Most sounds that we hear are transmitted through the medium of air (Sharp 2017). An amplifier is used to “increase the amplitude of a signal waveform” (and thus the volume) without changing its other characteristics such as frequency or wave shape (Coates 2018). Although store-bought amplifiers are normally an electromagnet component used to boost an electric current, there are several materials that work well for sound amplification that children would have access to. From observing the children in the classroom, the following materials worked the best at amplifying the sound of their chosen song: cardboard shoe boxes and paper towel rolls with plastic solo cups attached at both ends. These materials worked the best because the cups at the end were conical, which enabled the sounds to resonate more. Additionally, these materials worked the best because they enabled the sound to travel through a constricted, solid medium. Sound travels much slower in an area that is exposed to a lot of gas (air) and liquids because molecules are not as structured as those in a solid.
As part of the task, students had to explore, experiment, and engage with how sound can travel from place to place. Students will need to be able to define what energy is and that sound is a form of energy that can travel through different mediums. The Disciplinary Core Idea PS3.B, conservation of energy and energy transfer, requires that students know that energy is present whenever there are moving objects, sound, light, or heat (NGSS Lead States 2013). The core idea also goes on to expect that students will be able to explain that when objects collide or change their motion heat and sound are produced. These concepts housed within these Next Generation Science Standards directly relate to what the students are being asked to do; through observations, experimentation, and research, create an object that enhances sound, or the amplitude of the wavelengths.
This lesson utilized commonly recycled materials and required students to create “something out of nothing.” The teacher should collect the recycled materials prior to assigning the project to ensure that they have enough resources and that the materials are diverse to meet the needs of the children’s creativity. Teachers can also allow students to bring in approved recycled materials from home, such as clean plastic bottles, paper towel or toilet paper rolls, empty food boxes, or plastic bottle caps. Students should not use materials that could be used to enhance the quality of the sound (i.e., a mini speaker with Bluetooth connection). The materials used during this lesson to build the student-made amplifier included shoe boxes, cereal boxes, cardboard boxes and lids, plastic cups of any size, soda caps, paper, newspapers, and so on. The teacher should also have materials that the students can use to assemble their products such as tape, scissors, and glue.
Turn Up the Music!
To begin the lesson, the students went on a gallery walk, where statements about sound were posted around the classroom. Because students previously learned about sound in the first grade (1.PS4.1), this activity served as a review and allowed the teacher to see what students remembered about sound and what misconceptions they had.
For the gallery walk, each student was provided eight stickers. Eight statements about sound were posted around the room; students put a sticker under “true” if they thought the statement was true, or “false” if they thought that the statement was false. The following statements were used to formatively assess students’ knowledge of sound:
- Sound is caused by vibrations of molecules. (true)
- Sound can travel through solids, liquids, and gases. (true)
- Pitch measures how loud a sound is. (false)
- Sounds can have a high pitch or a low pitch. (true)
- Sounds travel fastest through gas. (false)
- There is no sound in space. (true)
- Sounds with high volumes have large waves. (true)
After the teacher viewed student responses on the gallery walk, she engaged the students in conversation about their ideas. For example, students were uncertain about sound being caused by the vibration of molecules, because in most instances this was invisible to the naked eye. The students were asked if they’d ever seen guitar strings move when a musician played their instrument, which led to further discussion of student ideas. The students’ ideas and explanations were used to help build the definition of sound, which is vibrations that travel through a medium (such as air) and are heard or felt by animals.
After the students shared their ideas and had a definition of sound, the teacher questioned the students on how they believe that sound can be amplified or restricted. The teacher asked students to consider ways to impact the volume of the sound and explained to students that they would be experimenting with different items to create a device to amplify, or increase, the sound of their favorite song.
Creating an Amplifier Blueprint
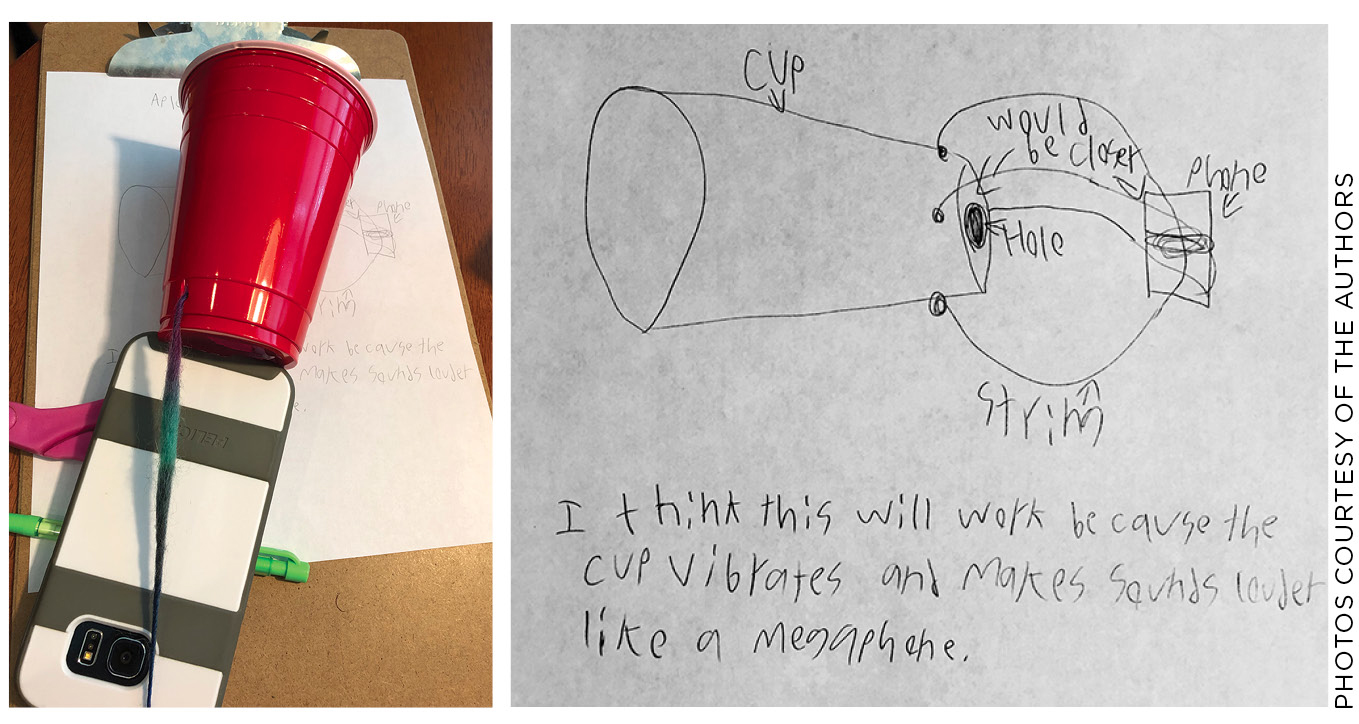
Students were provided time to select a partner and their song. The teacher may choose to assign partners and to have a pre-approved list of songs for the class, if needed. The class was provided the freedom to either chose their favorite, appropriate songs using a site such as KidsTube! or one that they had personally created on Garage Band. After having the song approved by the teacher, students began the planning process. To begin this process, students met with their partners to discuss material choices and ideas for ways to increase the amplification of the sound. Students were strongly encouraged to research articles and additional information that relate to how sound carries and amplifies best (for a list of resources to use during this process, see Supplemental Materials). While researching the information, students took notes and highlighted key information found regarding how sound can be transferred and amplified. Next, they drew a diagram representing how they will construct their amplification system including materials and a brief description of why they think the design will work based on their personal knowledge and research (Figure 1).
The Design Phase: Build, Test, and Revise
After the pairs developed a plan of action and drew a diagram, they started experimenting with the materials provided. The experimentation process consisted of students undergoing a process of trial and error experimenting with the recycled materials provided to develop a prototype of their amplifier. Students then started investigating the best way to construct their models. They were encouraged to use multiple materials in the design process. Students spent the next two days working on their designs, testing their ideas, and adjusting as they felt necessary.
Once students constructed their amplifier, they placed their personal learning device in the opening to see if the sound was amplified. Students used the free app dB Volume to measure the volume of their song and test if the volume increased with their amplification system. The app provides a visual cue (a line that changes from green to red, depending on volume) and numerical measurement for the volume, aiding students that may be hard of hearing. The visual provides a graphic representation for students of the energy created by sound; as the energy increases, the decibel level increases. If the sound does not increase in volume, the partners worked together to re-think their plan. Students were encouraged to refine and edit their designs more than once to continually improve their device’s ability to increase the song’s amplification. Once students were content with the volume of the music, they explored ways to make the design aesthetically pleasing or developed an advertisement for why their system is the best.
Modeling the Designs
After all students had constructed their amplifiers, each pair presented theirs to the class. As a class, they compared the prototypes and discussed which variables affected the volume of the sound positively and which ones negatively affected it. For example, students found that softer materials, such as fabrics and foam, absorbed the sound rather than amplifying it, like the prototypes made from cups and other materials designed to “gather” the sound.
To evaluate students’ work on the activity, the teacher created a rubric to evaluate the project (see Supplemental Resources). The students were evaluated on their perseverance and disposition, research content, diagram content, materials used, and their presentation of prototype.
Final Thoughts
Students were excited to be exploring and experimenting with the natural laws of physics and science around them. The enjoyment of learning was authentic; students could relate and activate prior knowledge to the task, which provoked interest among them that led to higher levels of engagement.
Supplemental Materials
Download the research resource list, Standards connections, and rubric at https://bit.ly/3zw2o7I.
Caitlyn Lindaberry (clindaberry@horrycountyschools.net) is a fifth-grade teacher at Waccamaw Elementary School in Conway, South Carolina. Catherine Scott (cscott1@coastal.edu) is an associate professor of education at Coastal Carolina University in Conway, South Carolina.
Engineering Interdisciplinary Physics STEM Elementary Grade 4