
Start With Phenomena
Immerse Elementary Students in Light Explorations
Using the anchoring phenomenon created by a camera obscura to examine light
Science and Children—November/December 2021 (Volume 59, Issue 2)
By Stephen Thompson, Kelley Hill, and Bridget Miller
“Wow, that is cool!” shrieked the fourth-grade student as she viewed inverted images of cars in the school parking lot projected on the classroom wall. “Look, people are walking by and they are upside down!” yelled another student. Similar excited comments reverberated around the room as students observed images created by the classroom camera obscura. Another student asked, “What makes the images show up on the wall like that?” Mrs. Hall responded, “That is the question we hope to answer during our light investigations. By learning more about light, we may be able to understand and explain our observations.” The response was met with approval as Mrs. Hall transitioned the students to their next task, creating drawings of what they were observing.
This vignette captures typical reactions we experience when elementary students encounter the camera obscura phenomenon. By darkening a normal classroom and admitting a small amount of light through a tiny hole in an exterior window, fourth-grade teacher Mrs. Hall created a classroom camera obscura, or “dark chamber,” which is the precursor of today’s camera (Wade and Finger 2001). The camera obscura phenomenon is also an eye model that demonstrates how light reflecting from objects and entering the eye allows objects to be seen. When the admitted light shines on an opposite wall, inverted images from outside are cast upon it.
This article explores how teachers can use the camera obscura, like we did, to help students learn about light while immersing them in scientific modeling (NGSS Lead States 2013). The activities and dialogue presented in this article focus on a fourth-grade classroom. However, the activities introduce students to science concepts they will learn about in greater depth during middle school and are appropriate for grade 4–8 students.
Engaging with the Camera Obscura
We begin by posing this question, “What do you think we will see in a completely dark room if a small amount of light (a ray) enters from the outside window?” Then, students share their ideas with their peers, followed by whole-class discussion. Here we emphasize that “idea sharing” is something scientists do. They share and discuss different ideas in order to make sense of phenomenon. For each idea proposed, the teacher prompts students to clarify ideas by asking follow-up questions such as, “Why do you think that is?” and “What makes you think that?” Students typically expressed initial ideas like, “I think the light will get wider like a flashlight does,” “I think it will form a rainbow. It will act like a prism,” and “It will make shadows from things outside. It is like what I see at my house sometimes when it is cloudy out.” We record students’ ideas in a public space and after student sharing, we show them the camera obscura, which we set up prior to the class discussion.
Setting Up a Classroom Camera Obscura
Table 1 summarizes key lesson objectives, vocabulary, materials, estimated time, and differentiation strategies associated with this activity sequence.
The phenomenon works best on a sunny day. Select a room with an exterior facing window. It is best if the selected window has an unobstructed view (nothing blocking the area immediately in front of the window) of interesting images like a parking lot or field. However, just about any exterior facing window will work. To create the camera obscura, cover all windows except for one exterior facing window with material that blocks light such as thick trash bags, aluminum foil, or cardboard. We attach the coverings with tape. Next, cut a small (3–5 cm) circular hole in the trash bag and cover the selected window so the hole is somewhat centered in the window. We suggest cutting the hole before placing the cover on the window. Other light sources in the room, like computer screens, also need to be covered. Once the room is darkened, outside images show up on opposite facing surfaces. To enhance the effect, project the images onto a flat, light colored wall.
We help students make sense of the unusual images, like trees that are upside down (Figure 1), by talking through our observations of them. We also make connections to eyes and how we see, emphasizing that the camera obscura is essentially a demonstration of what happens in our eyes that allows us to see. Students are awestruck and almost every group has a student who asks, “How does this happen?” We use this question to transition into investigations where students explore light and work to make sense of camera obscura observations. Before we transition to the light investigations, we require students to draw observations of what they observed in their science journals and emphasize the importance of collecting accurate observation data to describe or explain phenomenon like the camera obscura.
Camera obscura tree image.
Exploring Light
Before starting the investigations, we introduce students to scientific modeling as a tool (NRC 2012). First, we have students draw their observations of phenomenon revealed during each investigation. Then, we require that students add text, encouraging them to use newly learned vocabulary to describe and/or explain the phenomenon. Initially, we explain how students’ drawings with accompanying explanations are similar to tools scientists use in their work, called scientific models (NRC 2012). Throughout the investigations we focus students’ attention on conventions in their models that are similar to those scientists use to communicate when they engage in scientific modeling, and reinforce student use of them. Finally, at the end of each investigation we discuss any effect the activities had on student thinking about the camera obscura.
Exploration 1: How Does Light Travel?
Check with your state department of education to determine if laser pointers are legal to use in K–8 settings (NSTA 2021). Most laser products are required by law to have a label listing the Class in Arabic numerals. Class 2 lasers have output power below 1 milliwatt and are considered safe for classroom use (Harvard University Radiation Safety Services 2019). Red or orange lasers should be used due to the eye’s sensitivity to different colored light. Green laser should not be used. During the demonstration, we post a sign outside the classroom indicating lasers are being used, which is required by law. We also reinforce these safety rules with students:
- Do not point the laser at anyone.
- Do not point a laser at mirror-like surfaces. A reflected laser light acts on the eye the same way as the original light.
- Do not look directly into the beam or its reflection.
- Remove batteries when the laser is not in use.
- Do not use a laser pointer if it does not have a sticker on it identifying its class.
Table 1 summarizes key lesson objectives, vocabulary, materials, estimated time and differentiation strategies associated with this activity sequence.
To start, we emphasize that because light is everywhere it is hard to study. We elaborate that scientists sometimes deal with this problem by investigating single pieces of light (called rays) and making inferences about light behavior based on observations of one ray. We also explain that even though our light is red, it travels and behaves like other colors of light. Using the laser pointer, we ask students, “How do you think the light gets from here to the spot on the wall where we see it?” We also ask students to share why they thought of their idea. Typical student ideas include, “I think it will make a light cone that spreads out like a flashlight does,” “It will make a line. I saw something like that on a TV show,” and “The Earth and Moon move in circles around the Sun. So, light moves in a circle too.” After soliciting student ideas, we investigate. Before investigating, we discuss the safety statement.
This activity can be done as either a student investigation or a teacher demonstration if few laser pointers are available or safety is a concern. We have created such a demonstration (https://youtu.be/OzZGG1fMPEY). To demonstrate, shine a laser light through water in a clear plastic cup. Next, ask students, “What do you notice or observe about the light?” Provided the water is clean, students will not see any evidence of light traveling but may notice the light ray is hitting the opposite side of the cup or other objects. Then, we solicit students’ possible explanations for the observations. Typical student reasoning centers on the idea that the light is traveling in a straight direction, but we cannot see it. After sharing students’ ideas, the teacher creates a class model (drawing with written explanations) and uses discussion to help students understand that because water is clear or transparent, the light passes through it without bouncing, or reflecting, off it. Since the light does not reflect off anything, we cannot see it (see Figure 2a).
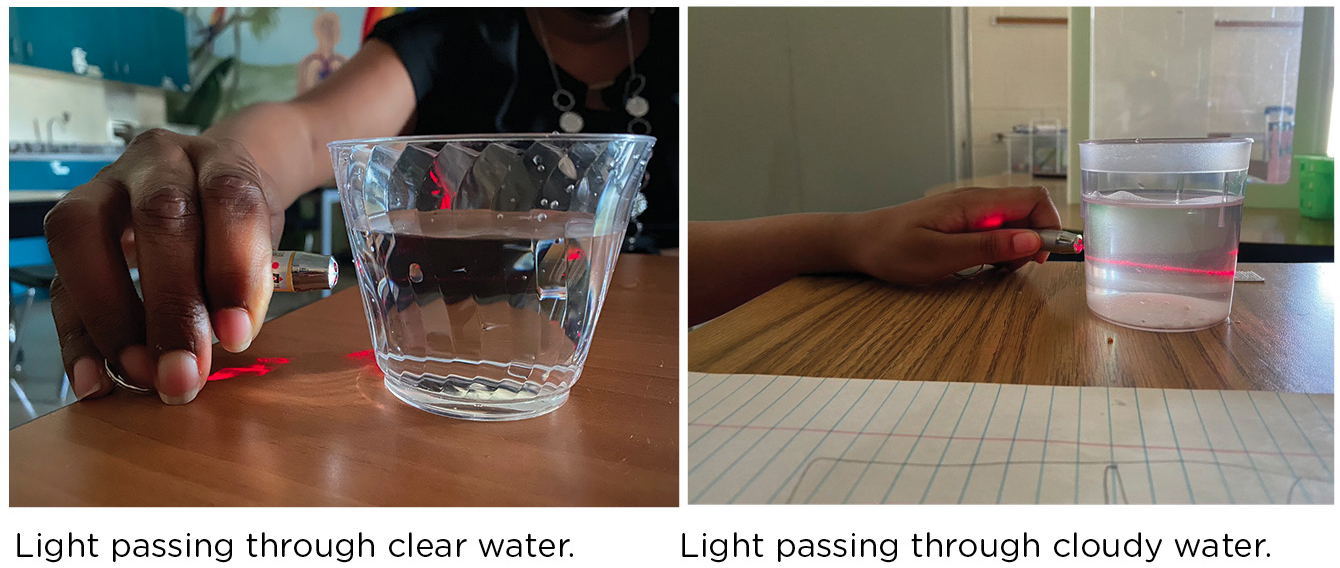
Light passing through water.
For the next part, mix a pinch of flour to a cup of water and again shine the laser through it. Now students observe the light traveling in a straight line (see Figure 2b). Students generally reason that the flour made the water cloudy, so the light ray is now visible. In some instances, students may state the light appears to be shaking or moving the water. These observations reveal students noticing the light reflecting off flour moving in the water. We build off these student observations and ideas to explain how light travels in a straight line until it hits material that blocks light, like the small pieces of flour floating in the water. We emphasize that when light bounces off materials that block light, called opaque materials, we see the materials because they reflect light to our eyes.
Then, students create individual scientific models in their journals by drawing and describing their observations (Figure 3). When working with students who need more academic support, we suggest leading an initial model creation and allowing students to create their own models alongside the teacher. Here, student models serve as a formative assessment. By viewing student models, we are able to determine how well students understand our essential learning goal. Finally, we hold whole-class discussions that invite students to share how this investigation influenced their thinking about the camera obscura.
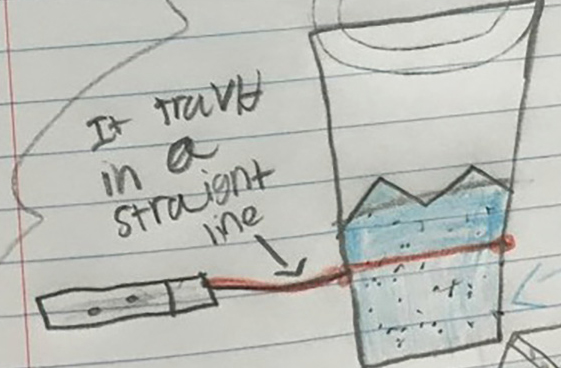
Student model of light traveling in a straight line.
Exploration 2: What Happens When Light Hits Colorful Materials?
Table 1 summarizes key lesson objectives, vocabulary, materials, estimated time and differentiation strategies associated with this activity sequence.
To start this investigation, we ask students, “If light shines on a red paper, what do you think will reflect off the paper?” Some representative ideas held by students we have captured include, “It would bounce off it to somewhere else. Like a mirror, you can see the light bounce off the mirror,” and “It reflects the color red to us.” After soliciting students’ ideas, we investigate. Here we place students in pairs and have them work together to shine the flashlight on a red paper and capture the reflection on a manila folder (Figure 4). Prior to this activity, we share these safety rules with students:
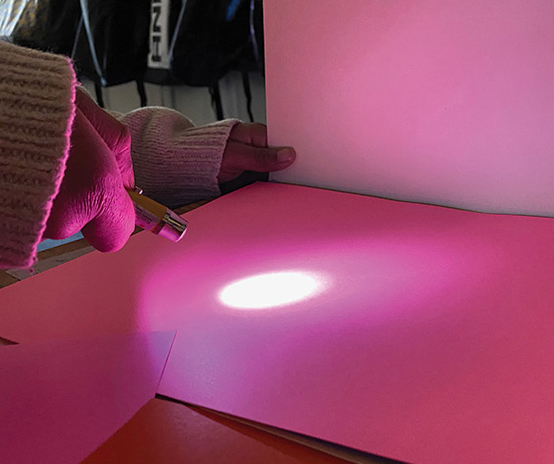
Student capturing reflection of red light.
- Do not point the flashlight at anyone.
- Do not point flashlights at mirror-like surfaces. Reflected light can hurt eyes the same way as the original light.
- Do not look directly into the beam or its reflection.
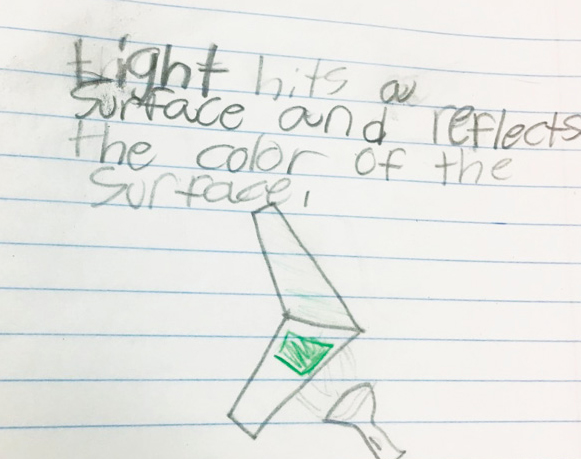
Next, students test several different colors of paper and notice the reflections. Students are then encouraged to see if they can find anything colorful that does not reflect the color of the object. After these explorations, we discuss observations and possible explanations for our observations, and then students create initial scientific models that capture their observations and thinking (see Figure 5).
For students who need more academic support, we suggest that the teacher lead an initial model creation while students create their own models alongside the teacher. For more academically independent students we have them create models individually. Then, we have selected students share their models with the class and talk through their representations and thinking. During sharing we highlight exemplar conventions used by the students on their individual models, arrows to present light moving for example, and reasoning about content we want to highlight for other students. We use this discourse, student models, and sometimes teacher- created models, to emphasize that light from the Sun, called white light, is composed of all colors of the visible spectrum, and when it strikes an opaque object all colors are absorbed except for the color reflected (which we see).
Then we have students revise their models so they capture current understandings of reflection. During this process we highlight how scientists revise models as they learn new information, which is a key aspect of scientific modeling. We also highlight how they use conventions like the students’ examples, to better communicate thinking. After the model revisions are complete, we hold a whole-class discussion centered on this new information and how it impacts students’ current ideas about the camera obscura. Both the students’ scientific models and the class discussion serve as formative assessment data the teacher can use to inform upcoming lessons.
Explaining with Models
Table 1 summarizes key lesson objectives, vocabulary, materials, estimated time and differentiation strategies associated with this activity sequence.
After engaging in the light explorations, the teacher constructs a class scientific model of the phenomenon using yarn and a camera obscura scenario sheet while students create a similar model independently (Scenario Sheet is shared online; see Supplementary Resources). Prior to and during this discussion, we reinforce that the camera obscura model also describes how an eye allows us to see. While constructing the models, we use questioning and thinking aloud to reinforce key ideas. In the following description, scenario images are used to capture relevant processes and key ideas emphasized during instruction are shared within the accompanying text.
To start, we use a single piece of white yarn to represent a light ray leaving the Sun. The white light travels in a straight line until it hits something it cannot pass through (like green leaves on the tree). Using the scenario sheet, we tape one end of the white yarn onto the Sun and the other end onto the green leaves, making sure the light is in a straight line (see Figure 6a).
Student drawing of reflection.
We then draw students’ attention to a key idea from a previous investigation, when white light strikes the green leaves it bounces off as the color green. To represent this, we tape one end of the green yarn to the green leaves on the normal tree image (in the same place the white light hit the leaves). We then show that when the green light reflects, it can go all sorts of different directions, but only in a straight line. We model this happening, and then we show and discuss how the green yarn/light can bounce off the tree, travel in a straight line, and pass through the camera obscura on the scenario sheet (see Figure 6b).
Next, we tape the green yarn in a straight line from the top of a tree outside, through the camera obscura hole, and to the inverted image of the treetop on the other side. This represents how the green light bouncing off leaves outside are inverted when it reaches the inside camera obscura.
Next, we discuss and show a second ray of light/white yarn leaving the Sun in a straight line and striking the brown base of the tree image. Here white yarn represents the light traveling in a straight line (see Figure 6c).
Then, we show and talk about where the brown light would be viewable and how it could pass through the hole of the camera obscura. Finally, the teacher and students tape the brown yarn light in a straight line from the tree base, through the hole, and to the inverted tree image on the other side (See Figure 6d).
Finally, we use the Figure 6d image to portray how many individual rays of light complete this process and form a wholistic, inverted image on the inside of the camera obscura (and likewise inside an eye).
To assess students’ understanding of the anchor question, we require them to complete a second, different physical model independently using yarn (Assessment Sheet is shared online; see Supplementary Resources). We also ask students to describe or explain what is happening. At the fourth-grade level, or when working with students who need additional academic assistance, we suggest gathering student descriptions during a student-teacher conference. With older students, or when working with students who are more academically independent, we require them to create written descriptions/explanations.
Possible Extensions
For an extension we invite parents or other students to learn about the camera obscura. Typically, we introduce the camera obscura phenomena in the same ways described in this article. Then, we allow our students to lead small groups as they complete the explorations described here and use the scientific models to describe how the camera obscura phenomenon occurs. The teacher supports students’ teaching efforts and gathers additional formative assessment data related to students’ understanding of key light concepts.
Conclusion
We find these activities to be compelling for students, who are motivated to make sense of the unexpected phenomenon. Engaging in this sequence of science practices helps students better understand and appreciate the work of scientists, and generally builds positive feelings toward science among students while reinforcing their ability to participate in scientific work.
Elementary students often explore ideas related to light, but do not have opportunities to engage in the sort of three-dimensional learning emphasized in guiding science education documents (NGSS Lead States 2013). This sequence demonstrates how we help students develop deeper understanding about light, while engaging in a meaningful science practice (Developing and Using Models) and connecting to cross-cutting concepts (Cause and Effect relationships). We encourage you to try these activities with your own students so they can experience the wonder of light and the power of scientific sense-making. ●

Scenario sheet examples.
Supplementary Resources
Scenario and assessment sheets are available at https://bit.ly/3aUZtu9.
Table 1 is available at https://www.nsta.org/sites/default/files/journal-articles/S%2BC_NovDec2021/SWP_table1.pdf
Stephen Thompson (sthompson@sc.edu) is a professor at the University of South Carolina in Columbia, South Carolina. Kelley Hill is a teacher for Lexington-Richland School District 5 in Irmo, South Carolina. Bridget Miller is an associate professor at the University of South Carolina.
Literacy Phenomena Physical Science