
engineering encounters
Can’t Pick It Up?
Student engineers solve big trash problem using a 3D printer
Science and Children—September/October 2022 (Volume 60, Issue 1)
By Erdogan Kaya, Hasan Deniz, and Ezgi Yesilyurt
Safety Note
We reminded our students to ask permission before approaching the 3D printer. They used the 3D printer under our supervision. We frequently reminded students that the extruder of the printer is hot (215ºC) and moving parts may hurt them. Students’ laptops were wirelessly connected to the 3D printer, and students were able to watch the printing process on their screen via a real-time feedback feature of the 3D printer software. We used a PLA filament (made from cornstarch), which is labeled as safe for indoor classroom use. Teachers should check ventilation requirements if they use other types of filaments.
With the Next Generation Science Standards (NGSS Lead States 2013) engineering is particularly prioritized and elevated to the same level as scientific inquiry. With 3D printers becoming more accessible every year, it may be the time for you to incorporate this technology into your classroom (Kaya et al. 2019). We have successfully implemented an engineering design challenge into our Saturday STEM Program—similar engineering design challenges can easily be integrated into STEM learning experiences in K–12 classrooms. In this article, we describe how we followed an engineering design process (Figure 1) to design mechanical grabbers using 3D printing technology.
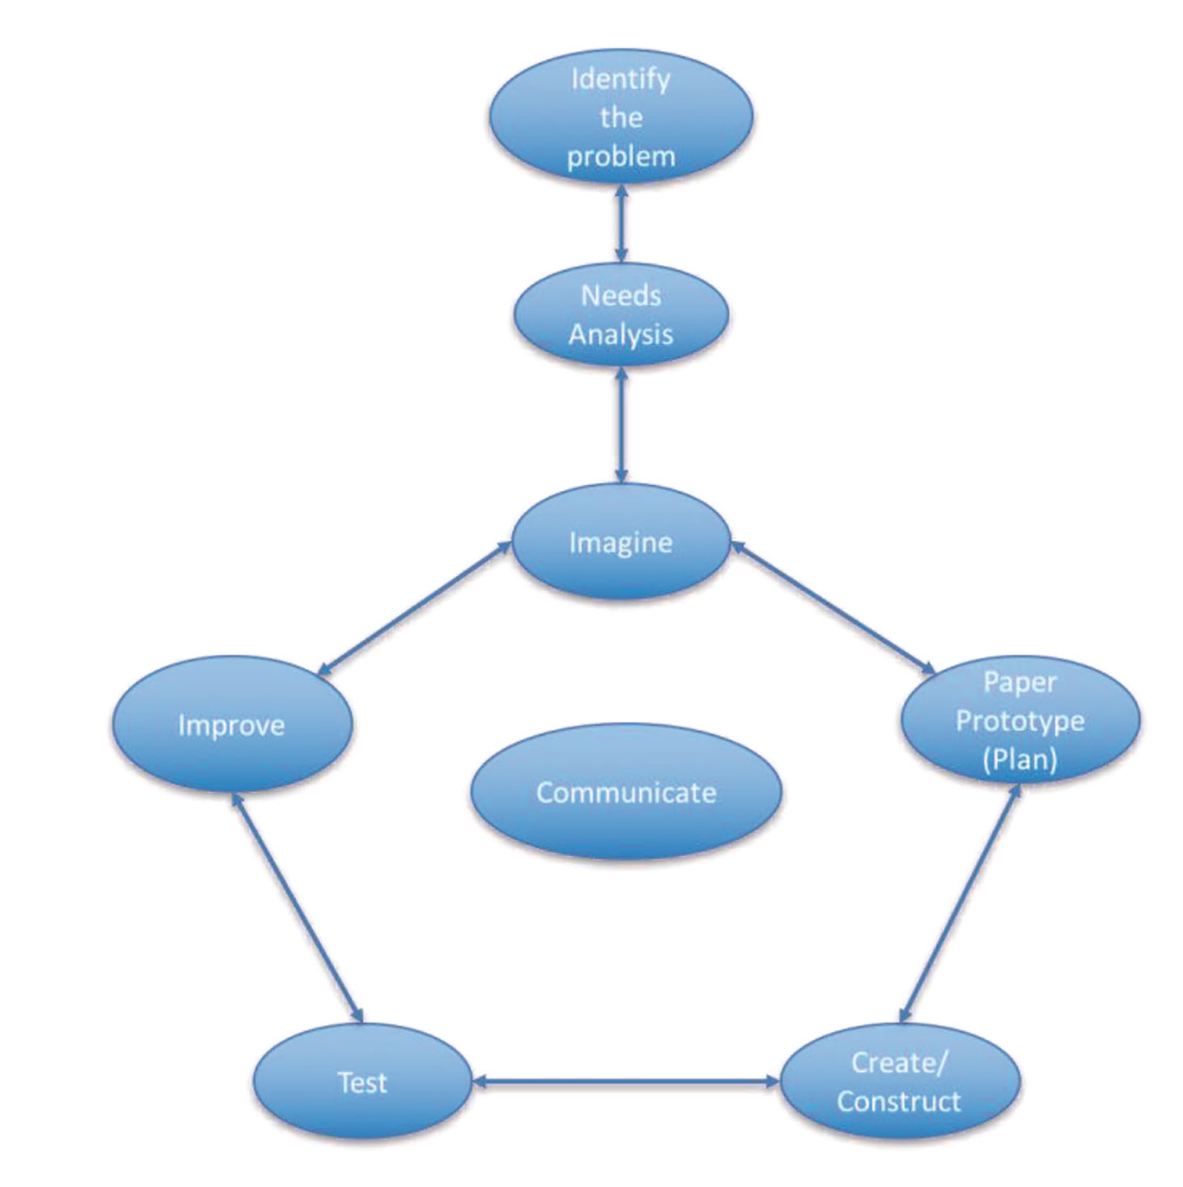
Engineering Design Process.
We dedicated 12 hours (over four weeks) for this project, but the timeline is flexible. Materials for the project were purchased by using a higher education mini teaching and learning grant. If you do not have access to 3D printers, contact local libraries, universities, or maker workshops. These organizations offer reasonable prices to educational organizations, which amount to less than 50 cents per 3D printed object. Aside from 3D printers, teachers only need common stationery and craft materials (see Materials list). For another approach to engineering design challenge without using 3D printers, see The Soda Can Crusher Challenge Exposing Elementary Students to the Engineering Design Process (Deniz, Kaya, and Yesilyurt 2018).
This engineering design challenge allowed us to emphasize scale, proportion, and quantity, and structure and function, two of the seven crosscutting concepts within NGSS. Additionally, this engineering design challenge also addressed performance expectation 3-5-ETS1-1: “Define a simple design problem reflecting a need or a want that includes specified criteria for success and constraints on materials, time, or cost” and engaged students in disciplinary core ideas ETS1.B: Developing Possible Solutions, and ETS1.C: Optimizing the Design Solution which state, “Testing a solution involves investigating how well it performs under a range of likely conditions” and “Different solutions need to be tested in order to determine which of them best solves the problem, given the criteria and the constraints” (NGSS Lead States 2013).
We strongly recommend that teachers visit the Thingiverse website as they integrate 3D printing into their science and engineering instruction. Thingiverse is an online educational community organized around educational applications of 3D printing. It includes hundreds of free NGSS-aligned science and engineering lessons integrating 3D printing. Thingiverse files should be downloaded as .STL files, a common file extension that works for most 3D printers. In Thingiverse, teachers can form focus groups to share best practices and troubleshooting techniques in 3D printing. Teachers can also share their own lesson plans in the Thingiverse environment.
Identify the Problem
To create a successful engineering design challenge for elementary school students, it is important to address a real problem. This helps students understand the importance of their work and see how their engineering design can make a difference. Additionally, addressing a real problem will also help to engage students in the engineering design process. Our engineering design challenge would assist our community’s trash collecting and recycling process by having students come up with creative ways to reduce the amount of waste in their neighborhoods.
We introduced the design challenge to our 16 upper elementary students (grade 3–5) by discussing the importance of collecting trash to keep our environment neat and clean. In the beginning of the project, we made a short presentation highlighting the impact of recycling and collecting trash piles so that resources can be conserved, energy is saved, pollution is reduced, and landfill waste is minimized. The following are some of the reasons why trash should be collected:
For one, it helps keep our environment clean. Litter can be harmful to wildlife, and it can also spread disease. In addition, trash collection helps to keep our communities safe. When trash is not properly disposed of, it can attract vermin like rats and cockroaches. These pests can carry diseases that can be harmful to humans.
In terms of pollution, recycling helps to reduce greenhouse gas emissions and the overall carbon footprint.
Finally, trash collection is important for the economy. Recycling and reuse of materials helps to create jobs and generate revenue. It’s not just about keeping our environment clean—it’s about keeping our communities safe and our economy strong.
After the presentation, we asked our students to design trash grabbers to pick up a crumpled piece of paper, a pencil, a plastic cup, and a table tennis ball (items that were readily accessible and light enough for the students to pick up with their trash grabber). We provided them with criteria and constraints (see Table 1) that they need to consider during the engineering design process.
Students worked in groups of three or four. Two members of each engineering team served as the manufacturing specialists, and two members served as the design specialists. Manufacturing specialists mostly focused on assembling the prototypes, while the design specialists worked on drafting the plan and designing the mechanical grabbers.
Needs Analysis
Students conducted a needs analysis activity intended to determine if there is a real need for mechanical trash grabbers in society. Students used Google Docs to create a needs analysis chart (see Supplemental Resources) and then surveyed two or three family members. We pooled the data to create a data set using Google Sheets. Students learned how to best represent the data by creating visual graphs showing potential clients’ needs and preferences (CCSS Connections Mathematics MP.5: Use appropriate tools strategically).
Next, we asked our students to do an internet search of commercially available trash grabbers (CCSS ELA/Literacy Connections RI.5.1: Draw on information from multiple print or digital sources, demonstrating the ability to locate an answer to a question quickly or to solve a problem efficiently). This exploration was followed by a discussion about the advantages and disadvantages of different designs. For example, one student stated that the foldability feature would help a mechanical grabber receive a high score on the portability criteria.
After analyzing the data (CCSS Connections Mathematics MP.2: Reason abstractly and quantitatively) and completing background research about available mechanical trash grabbers (CCSS Connections ELA/Literacy W.5.9: Draw evidence from literary or informational texts to support analysis, reflection, and research), we demonstrated a 3D printer in action to excite students about the prospect of printing their design. We introduced a video (see Online Resources) demonstrating the potential of 3D printing in different engineering fields, such as a 3D printed prosthetic arm in biomechanical engineering, 3D printed houses in construction engineering, and 3D printed human kidneys in biomedical engineering. We also briefly talked about the history of 3D printing technology and its societal applications. We probed students by asking “How can we use 3D printer in daily life” and we received responses such as “I will design a Minecraft themed customized phone case for my sister’s birthday,” and “When the doorknob is broken, my dad needs to go to Home Depot. If I had a 3D printer at home, we can fix household items without going to a shop.” Then, we distributed various 3D printed objects, such as an iPhone case, Minecraft characters, and a mug for close-up examination to our students and to develop students’ excitement more about 3D printing.
Imagine and Technical Drawings (Plan)
After demonstrating the 3D printer, our students brainstormed possible mechanical trash grabber design ideas that can meet the stipulated criteria and constraints. Students were encouraged to create detailed technical drawings rather than simple symbolic sketches because technical drawings are detailed representations that visually communicate how the mechanical grabber functions. A simple sketch can give an idea about a mechanical grabber design, but it does not have the same level of specificity for each component of the mechanical grabber. Technical drawings were not drawn to scale but the size of each piece was made proportional to each other.
We asked each student to come up with one technical drawing of their design idea. Students compared their design ideas with the provided design criteria and selected one design idea with possible modification to construct. Students identified the strengths and weaknesses of the different designs by using a rubric (see Supplemental Resources). They elaborated as to why some designs failed to meet the criteria and constraints and finally reached a consensus on a final design that the team would build. In this phase, teachers should encourage students to be respectful and honor everyone’s ideas as they discuss the pros and cons of different design proposals, while always being mindful of the given criteria and constraints. If this sensitive issue is not dealt with care, it may produce conflicts within groups and cause some students to dominate the group or discourage participation of other group members.
In the second part of the day, students explored 3D designing with Tinkercad. Tinkercad is a free, easy-to-use, visual, drag-and-drop cloud-based 3D design application. It required no prior experience in digital modeling, and it was easy to use. Learners create their designs by dragging the shapes from the menu, dropping them in the building plate, and modifying the shapes. We opened a teacher account in Tinkercad, which includes a learning management system embedded in Tinkercad. When teachers log into their Tinkercad teacher account, they can generate a code for kids under 12. Additionally, Tinkercad provides resources for teachers who need to learn more about 3D printing in conjunction with webinars and lesson plans. We created accounts for our students in advance under the teacher account. We shared the username and password with the students so that they could access the Tinkercad website. This account was created and administered by the instructors, and it was closed after the Saturday STEM program was concluded. We introduced Tinkercad to our students by showing them a three-minute video introducing Tinkercad interface to beginners (see Online Resources). The video helped our students to understand basic Tinkercad functions, such as dragging and dropping shapes from the toolbox to the work plane, using shapes as building blocks, and overlapping shapes to create 3D complex objects. Interactive tutorials guided students on how to place the shapes into the workplane, move the shapes around the workplane, view the shapes from all sides, rotate the shapes, resize the shapes, group the pieces, and align them.
None of our students had earlier experiences with 3D design, so it was important to give them ample time to explore the application until they felt confident using it. In less than an hour, students started feeling comfortable with the application and they easily navigated the interface.
Create
After students agreed on their design idea, they proceeded to build prototypes of mechanical grabbers by using cardboards and brass fasteners (Figure 2). We reminded students to be careful with the sharp blades of the scissors, and students wore safety glasses when constructing the grabbers. When students completed construction, we asked them to reflect on the problems they faced with these initial models. Students noted that cardboard prototypes resembled the actual trash grabbers, but they were not sturdy enough to pick up heavier objects. At this point, we brainstormed about more appropriate materials to use in constructing trash grabbers. As a result, students recommended stronger materials, such as plastic, metal, or wood, to build more reliable mechanical grabbers. We explained that a mechanical trash grabber constructed with 3D printed pieces can be sturdier than a trash grabber made of cardboard, and it can be as sturdy as a trash grabber fashioned out of plastic, metal, or wood.
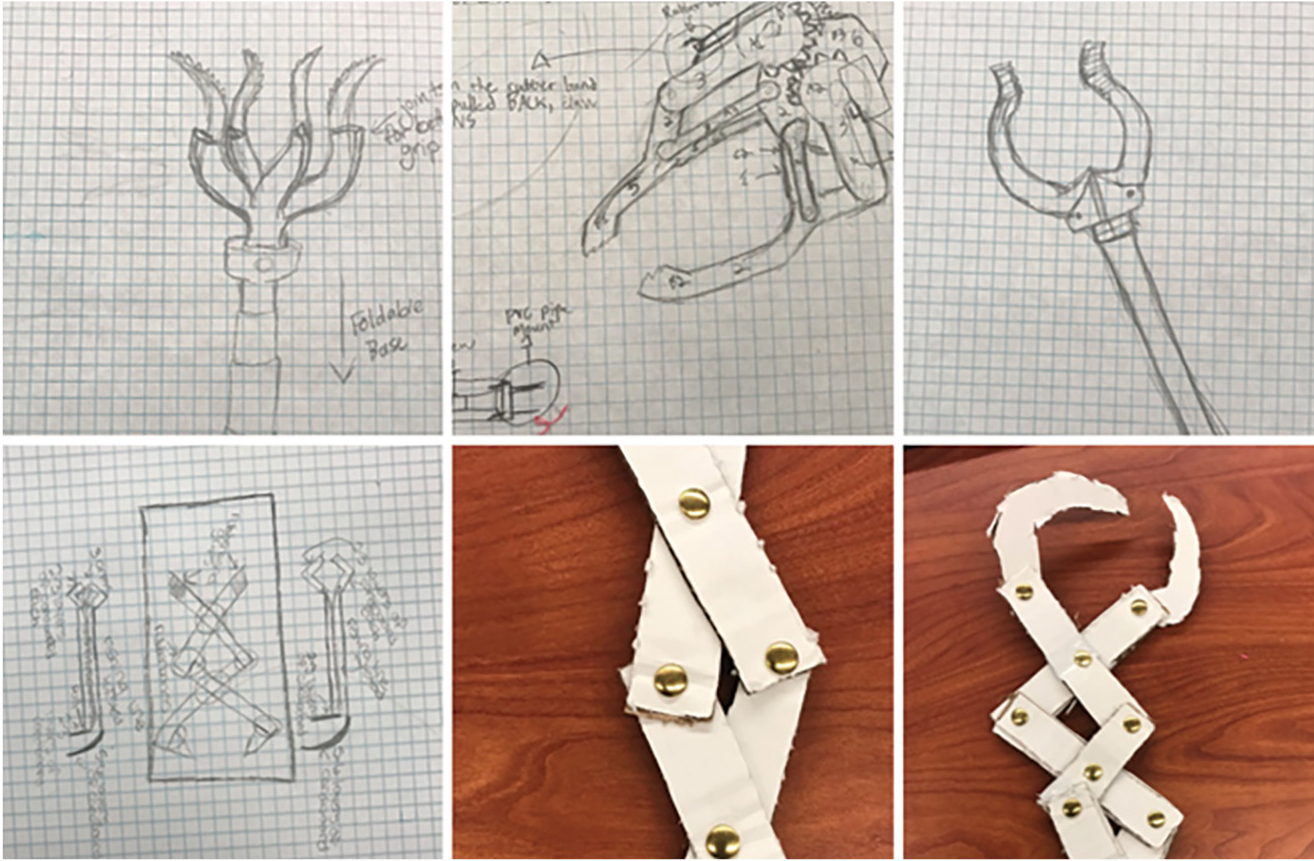
Sketches and prototypes.
| Table 1. Criteria and constraints. | ||||||||||
|---|---|---|---|---|---|---|---|---|---|---|
|
It was time to start designing mechanical grabbers in 3D modeling software. Each part of the mechanical grabber was assigned to a group member. When using CAD software, students were challenged to think in virtual 3D space, which was not possible with technical drawings on paper. Some students struggled to navigate in a 3D environment, and they had difficulties in understanding depth and rotation in a 3D spatial medium. These students were encouraged to ask for help from their group members and teachers. As a result, students were able to provide feedback to each other for overcoming navigation challenges in Tinkercad.
Tinkercad allowed us to simultaneously see all student designs on the teacher dashboard. It also afforded us the ability to give instant feedback to our students so that they could modify and improve their 3D engineering designs.
Students were allowed to make choices and were given autonomy while designing their mechanical grabbers. Specifically, we let them make mistakes and called it FAIL, phrasing it as “First Attempt In Learning.” Since our students were motivated by the authentic experience of a relevant engineering design project, they were willing to persevere and collaborate in tackling the challenges as a team. This resulted in meaningful learning for all students in the classroom.
Test and Improve
After students assembled their 3D printed pieces into working mechanical trash grabbers, they tested their designs by picking up a crumpled piece of paper, a pencil, a plastic cup, and a table tennis ball.
While students tested their mechanical grabbers, we periodically reminded them that engineers test and redesign their designs many times until a satisfactory solution is found (Deniz et al. 2020). We emphasized that engineers can repeat test and improve phases many times based on the availability of time and resources.
We asked each group to consistently note the strengths and weaknesses of their design ideas, and to talk about various ways that they could address the weaknesses. Students kept testing their mechanical grabbers and continued modifying their 3D designs in Tinkercad and reprinted the new models until the engineered product met the criteria provided at the beginning of the engineering design process. We recommend that teachers allow ample opportunities for students to redesign their solutions, until the design meets all the criteria and constraints. We also recommend that students be allowed to display their designs to share ideas with other groups. Most groups’ mechanical grabber designs showed unique distinctions, and this allowed us to address the role of creativity in the engineering design process, as well as helped students to understand that there could be multiple solutions to the same problem (Deniz et al. 2020).
Communicate
We provided iPads for each group to record a two-minute video commercial to advertise their mechanical grabbers using the iMovie app (Figure 3). Students demonstrated and explained how their mechanical grabbers operated. If students do not have access to tablets or computers to shoot a video commercial, they may write a script and perform a skit to advertise their mechanical trash grabbers, or present their mechanical grabbers with MS PowerPoint, Google slides, or posters.
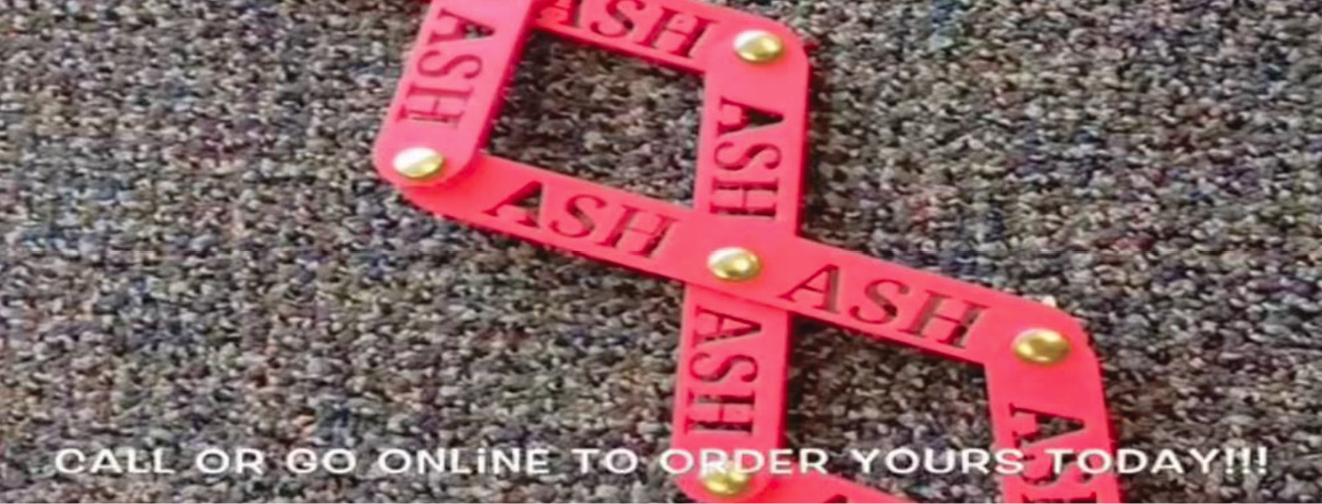
Screenshot of an advertisement for a 3D printed grabber.
Peer Evaluation
Students provided feedback to each other after watching their video commercials and testing each groups’ mechanical grabbers to determine how successfully the 3D printed mechanical grabbers met the criteria and constraints provided at the beginning of the engineering design challenge. The evaluation rubric offered an opportunity to students for peer feedback regarding how to further improve other groups’ designs. We encourage teachers to allow students to revise their engineering design ideas further, since there is always room for improving a designed product through revisions and modifications while being mindful of the criteria and constraints of a product.
Conclusion
We observed that our students quickly developed knowledge and skills that were necessary for engineering design and 3D printing. Introducing 3D design in the early grades may establish the foundations for more advanced Computer Aided Drafting (CAD) courses (e.g., AutoCAD and SolidWorks) in secondary school and college. ●
Online Resources
3D Printing Video: https://www.youtube.com/watch?v=a9OVU8LFRNc
TinkerCAD Video Tutorial: https://www.youtube.com/watch?time_continue=1&v=MwjWT-EvKSU
TinkerCAD Tutorials: https://www.tinkercad.com/learn/project-gallery;collectionId=OPC41AJJKIKDWDV
3D Printing Service: https://www.makexyz.com/
3D printing Lesson Plans: https://www.thingiverse.com/education
Supplemental Resources
Download background info on 3D printing, the materials list, needs analysis form, and rubric at https://bit.ly/3TfXEgu.
Erdogan Kaya (ekaya3@gmu.edu) is an assistant professor at George Mason University in Fairfax, Virginia. Hasan Deniz is a professor at University of Nevada Las Vegas. Ezgi Yesilyurt is an assistant professor at Weber State University in Ogden, Utah.
Engineering Instructional Materials STEM Technology Elementary