
feature
Green Plants, Red Glow
Chlorophyll’s Red Fluorescence as a Signal of Photosynthesis, Agriculture, and Global Ecology
Science Scope—July/August 2021 (Volume 44, Issue 6)
By Kathy-Uyen Nguyen, Andrew R. Ratchford, Jason L. Painter, Rachael Polmanteer, Ann E. Norcross, and Jonathan S. Lindsey
CONTENT AREA Biological Sciences
GRADE LEVEL 6–8
BIG IDEA/UNIT Photosynthesis can be assessed by the faint red glow from sunlit plants.
ESSENTIAL PRE-EXISTING KNOWLEDGE Photosynthesis provides the food for almost all life on Earth.
TIME REQUIRED 1 hour
COST $22 for a class of 30
SAFETY Chemical splash-proof safety glasses and gloves must be worn during handling of rubbing alcohol and throughout the chlorophyll extraction process.
Materials
|
Item per each working group (1–4 students) |
Cost for class of 30 |
|
30 ml of rubbing alcohol |
$5 |
|
1 coffee filter (optional napkin, paper towel) |
$2 |
|
5–7 spinach leaves (remove stems) |
$4 |
|
~25 ml glass container (or baby food jar) |
— |
|
1 mortar and pestle (or cup and wooden spoon) |
— |
|
1 graduated cylinder (or beaker or measuring cup) |
— |
|
1 small funnel (or strainer with a cotton layer) |
— |
|
1 bright flashlight |
$5 |
|
dark space for visualization |
— |
|
food coloring |
$4 |
|
mystery substance (e.g., a colored beverage) |
$2 |
|
Total |
$22 |
Photosynthesis is one of the most important biological processes, but it can be challenging to teach and obscure for students. This article presents a one-hour, hands-on classroom activity that lets students extract chlorophyll from spinach leaves and directly observe the red light (fluorescence) emitted by the chlorophyll upon illumination. Students then learn that the same red light—emitted from plants in fields and forests around the sunlit planet—can be observed by satellites and used as a proxy for the extent of global photosynthesis. Using the 5E model, we introduce students to the concepts of chlorophyll and fluorescence as related to photosynthesis. Although experiments involving chlorophyll often require expensive equipment, this low-cost activity uses materials that can be found at a neighborhood grocery store or pharmacy (see Materials list below). This classroom activity was developed in collaboration with middle school educators and North Carolina State University scientists, and tested at a Montessori middle school and a Title 1 middle school in Raleigh, North Carolina. The activity provides an anchor for teaching photosynthesis in a biological, agricultural, and ecological context and for inspiring students to see plants as fascinating and vital to life on Earth.
Background information
Photosynthesis is often summarized by the equation [6 CO2 + 6 H2O + light --> C6H12O6 + 6 O2], which of course is correct, but this focus on input (carbon dioxide, water, and light) and output (carbohydrate and oxygen) diverts attention from the essential role of chlorophyll. Indeed, chlorophyll is not present in the equation at all, but should at least be written along the arrow to indicate its essential enabling role. Chlorophyll, the abundant green molecule in plants, absorbs light and channels the energy to drive the photosynthesis equation. Chlorophyll is located in chloroplasts—subcellular factories for solar energy utilization—which in turn are located in plant cells. In plants, most of the absorbed light energy is channeled into photosynthesis, and the tiny amount that is emitted as red fluorescence is not visible by the naked eye but is detectable by satellites.
When plant leaves are treated with a solvent such as rubbing alcohol, chlorophyll is removed from plant cells to give a green solution. Chlorophyll still absorbs light, but uncoupled from the photosynthetic apparatus, the absorbed light energy has nowhere to go, and a large red glow is visible.
Opening activity
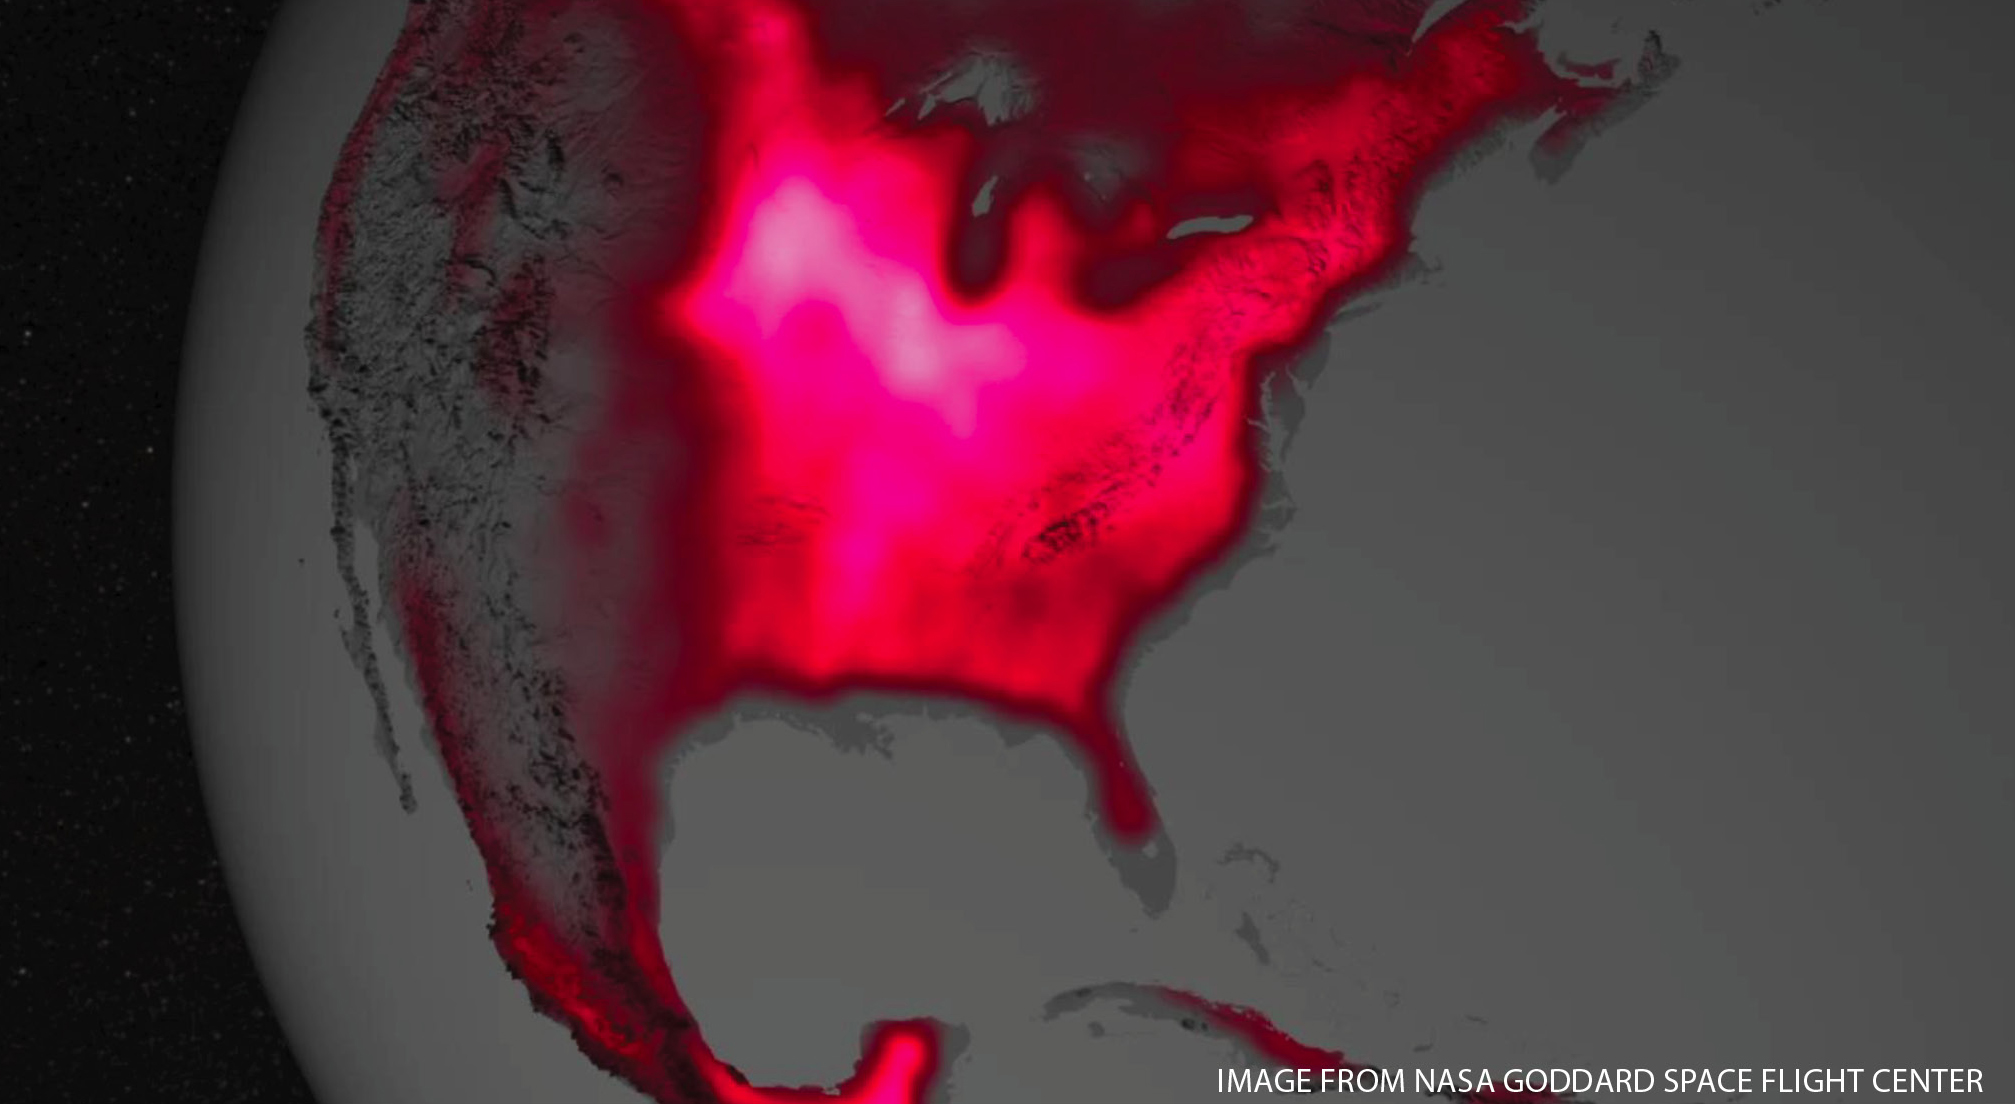
Figure 1 shows a satellite image. To begin the activity, ask students to describe what they see: “What do you see in Figure 1?” Make a chart of student observations and questions so that you can track them throughout the lesson. Students should look for scale, patterns, shapes, textures, and colors (including shadows) and consider their prior knowledge. Observations such as “I wonder why some regions are bright pink, others red, yet others completely dark” flow nicely into the question of how plants work that they will explore during the lesson. It is important that teachers not answer the questions at this time; instead, students should build answers to these questions as they move through the lesson.
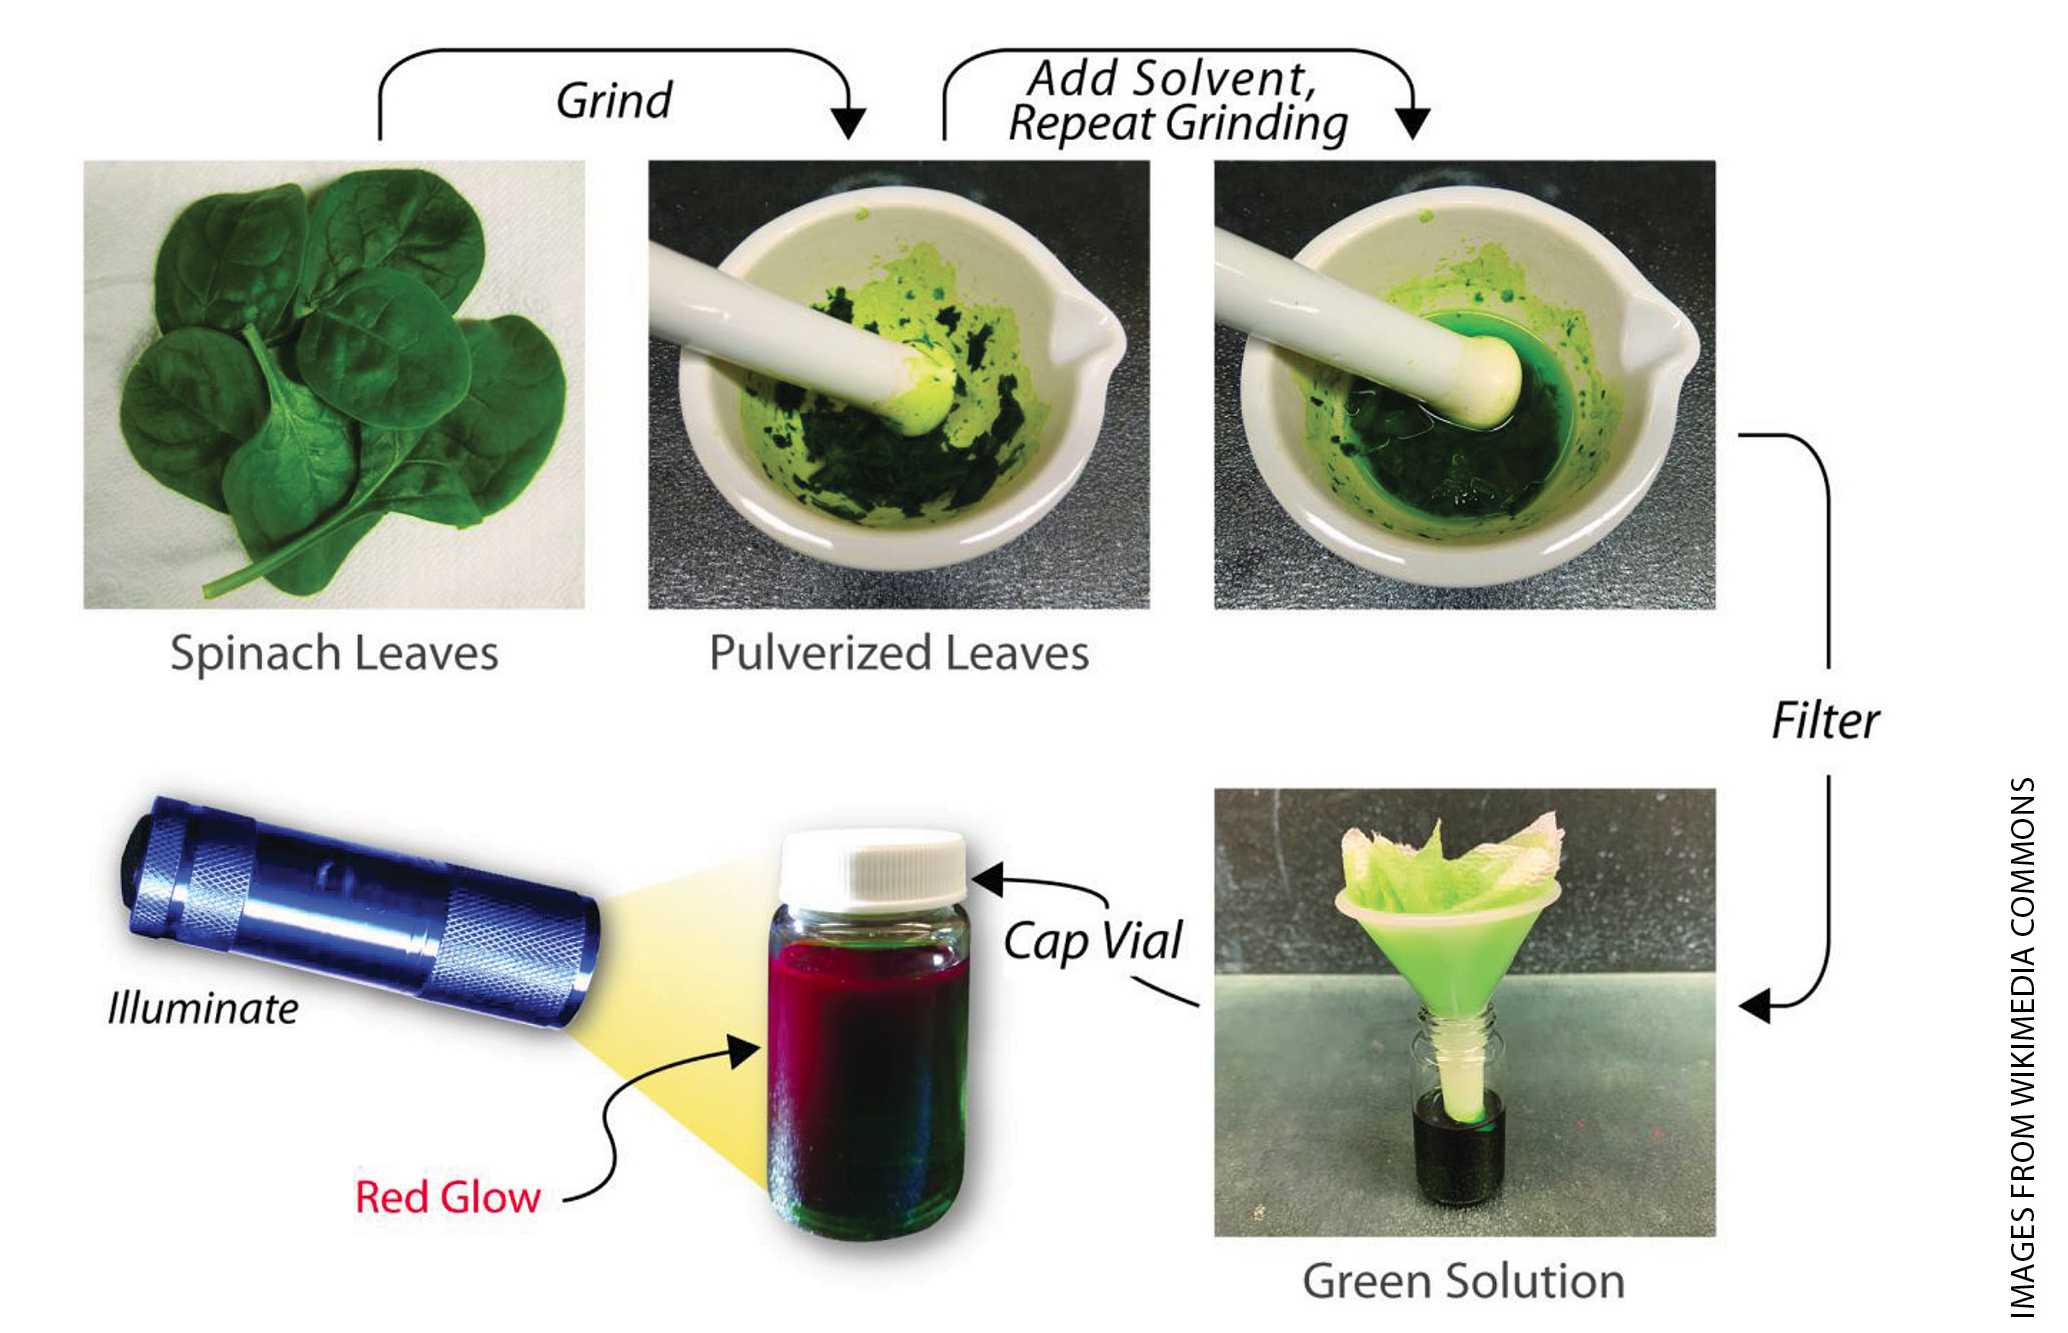
Say to students: “If we’d like to learn more about this red glow, we need to do an experiment.” Before starting the process in Figure 2, please review safe laboratory procedures. Although handling small quantities of rubbing alcohol is quite safe, there are still several precautionary steps:
- Provide students with splash-proof eyewear and safety gloves to limit exposure.
- Pour the rubbing alcohol solutions from one container to another with care to avoid spills, which in small quantity can be cleaned up by wiping with paper towels.
- No materials used in this activity should be ingested. Note that rubbing alcohol contains ~91% isopropyl alcohol, ~9% water, and bitter additives to thwart ingestion.
- Rubbing alcohol is flammable; store and use away from any open flames. For further information about rubbing alcohol, see Supplemental Materials.
The following five steps enable the student to observe the red fluorescence from chlorophyll using common household items:
- Pulverize spinach. Students work in groups of three to four to break up five to seven spinach leaves into small pieces by hands or scissors. They place the broken leaves into a mortar and grind the leaves thoroughly using a pestle, in circular motions, for a minute or two. Next, they add 30 milliliters of rubbing alcohol to the leaves and repeat the grinding process. Students carefully set aside the mortar and move to the next step.
- Assemble the filter. Students cover the mouth of a small funnel with two layers of paper napkin or paper towel, or a coffee filter. Then they place the funnel over a glass container, completing the filter assembly.
- Strain the suspension through the filter. Students carefully pour the green suspension from the mortar into the funnel, aiming for the center of the paper filter. Unwanted leaf tissue is retained by the filter, and the green solution filters into the container. If a clear, dark green solution is not obtained, the students should pour the liquid back into the mortar, create a new filter, and repeat the straining process.
- Observe the red glow. After the clear, dark green liquid is completely filtered into the container, students put the container in a dark space, turn on a flashlight, shine the light through the container, and observe a red glow around the edges of the container. If students have difficulty seeing the red glow, move the flashlight back and forth, closer and farther away from the container. See Supplemental Materials for brief video demonstrations of each step.
- Record. Students write down their observations, questions, and ideas. A laboratory procedure sheet for the above procedure, and an observation/assessment sheet, are provided in Supplemental Materials.
Teacher notes for experiment
Students are very eager to begin the extraction step of this activity, so be careful to limit spills. Students may have to strain the green suspension more than once.
Depending on how brightly lit the classroom is even with the lights off, students may need a darker space such as a cabinet or an assembled light box. See Supplemental Materials for directions on how to create a simple cardboard light box.
Students should use a bright flashlight so the chlorophyll receives ample light energy, thus emitting a strong, red glow. Fluorescence intensity decreases as the flashlight moves away from the container. Because chlorophyll absorbs more strongly in the visible region than in the ultraviolet, a flashlight is superior than a (ultraviolet) black light to induce fluorescence.
Note that the amount of emitted light from chlorophyll in solution is up to 32%—in other words, for 100 molecules of chlorophyll that each absorb a photon of light, up to 32 emit a photon (red light). For chlorophyll in a healthy leaf, only about 1% or less emit (Schlau-Cohen and Berry 2015). The latter can’t be seen by the naked eye, first because the intensity is very low and second because of the large abundance of natural light of the same general color.
Class discussion
Class discussion should take place after the experiment and students have written down their own observations, questions, and ideas. Working in their experimental groups, students should spend 10–15 minutes brainstorming and discussing what they think is going on. Spinach is a plant, and they should consider what plants need to live. One purpose of this activity is to find out what your students already know about plants and how they grow. Many students may be familiar with photosynthesis, but others may not. Three possible question prompts are (1) What makes plants green? (2) What do plants need/use/consume? and (3) What do plants give off? This activity should shift the focus of just learning about photosynthesis, for example, to figuring out why or how something happens. Students should be engaged in building evidence-based explanatory ideas that help them figure out how plants or trees grow as opposed to simply learning about the topic of photosynthesis.
After 10–15 minutes of small-group discussions, teachers should bring the class together and ask a member from each group about the group’s observations, questions, and ideas. These should be written on the board for each group. In this stage, teachers can ask a few questions to guide students’ knowledge, if needed. These questions should be framed in such a way as to make students think more deeply. Possible questions are: Why was spinach used in this experiment? Why was rubbing alcohol used? Why were the spinach leaves pulverized? What would cause the green liquid to glow red? How does the red glow relate to the satellite image (see Figure 1) we viewed at the beginning of this lesson? How might the red glow (how bright or dark it is) relate to agriculture, farming, and the health of plants?
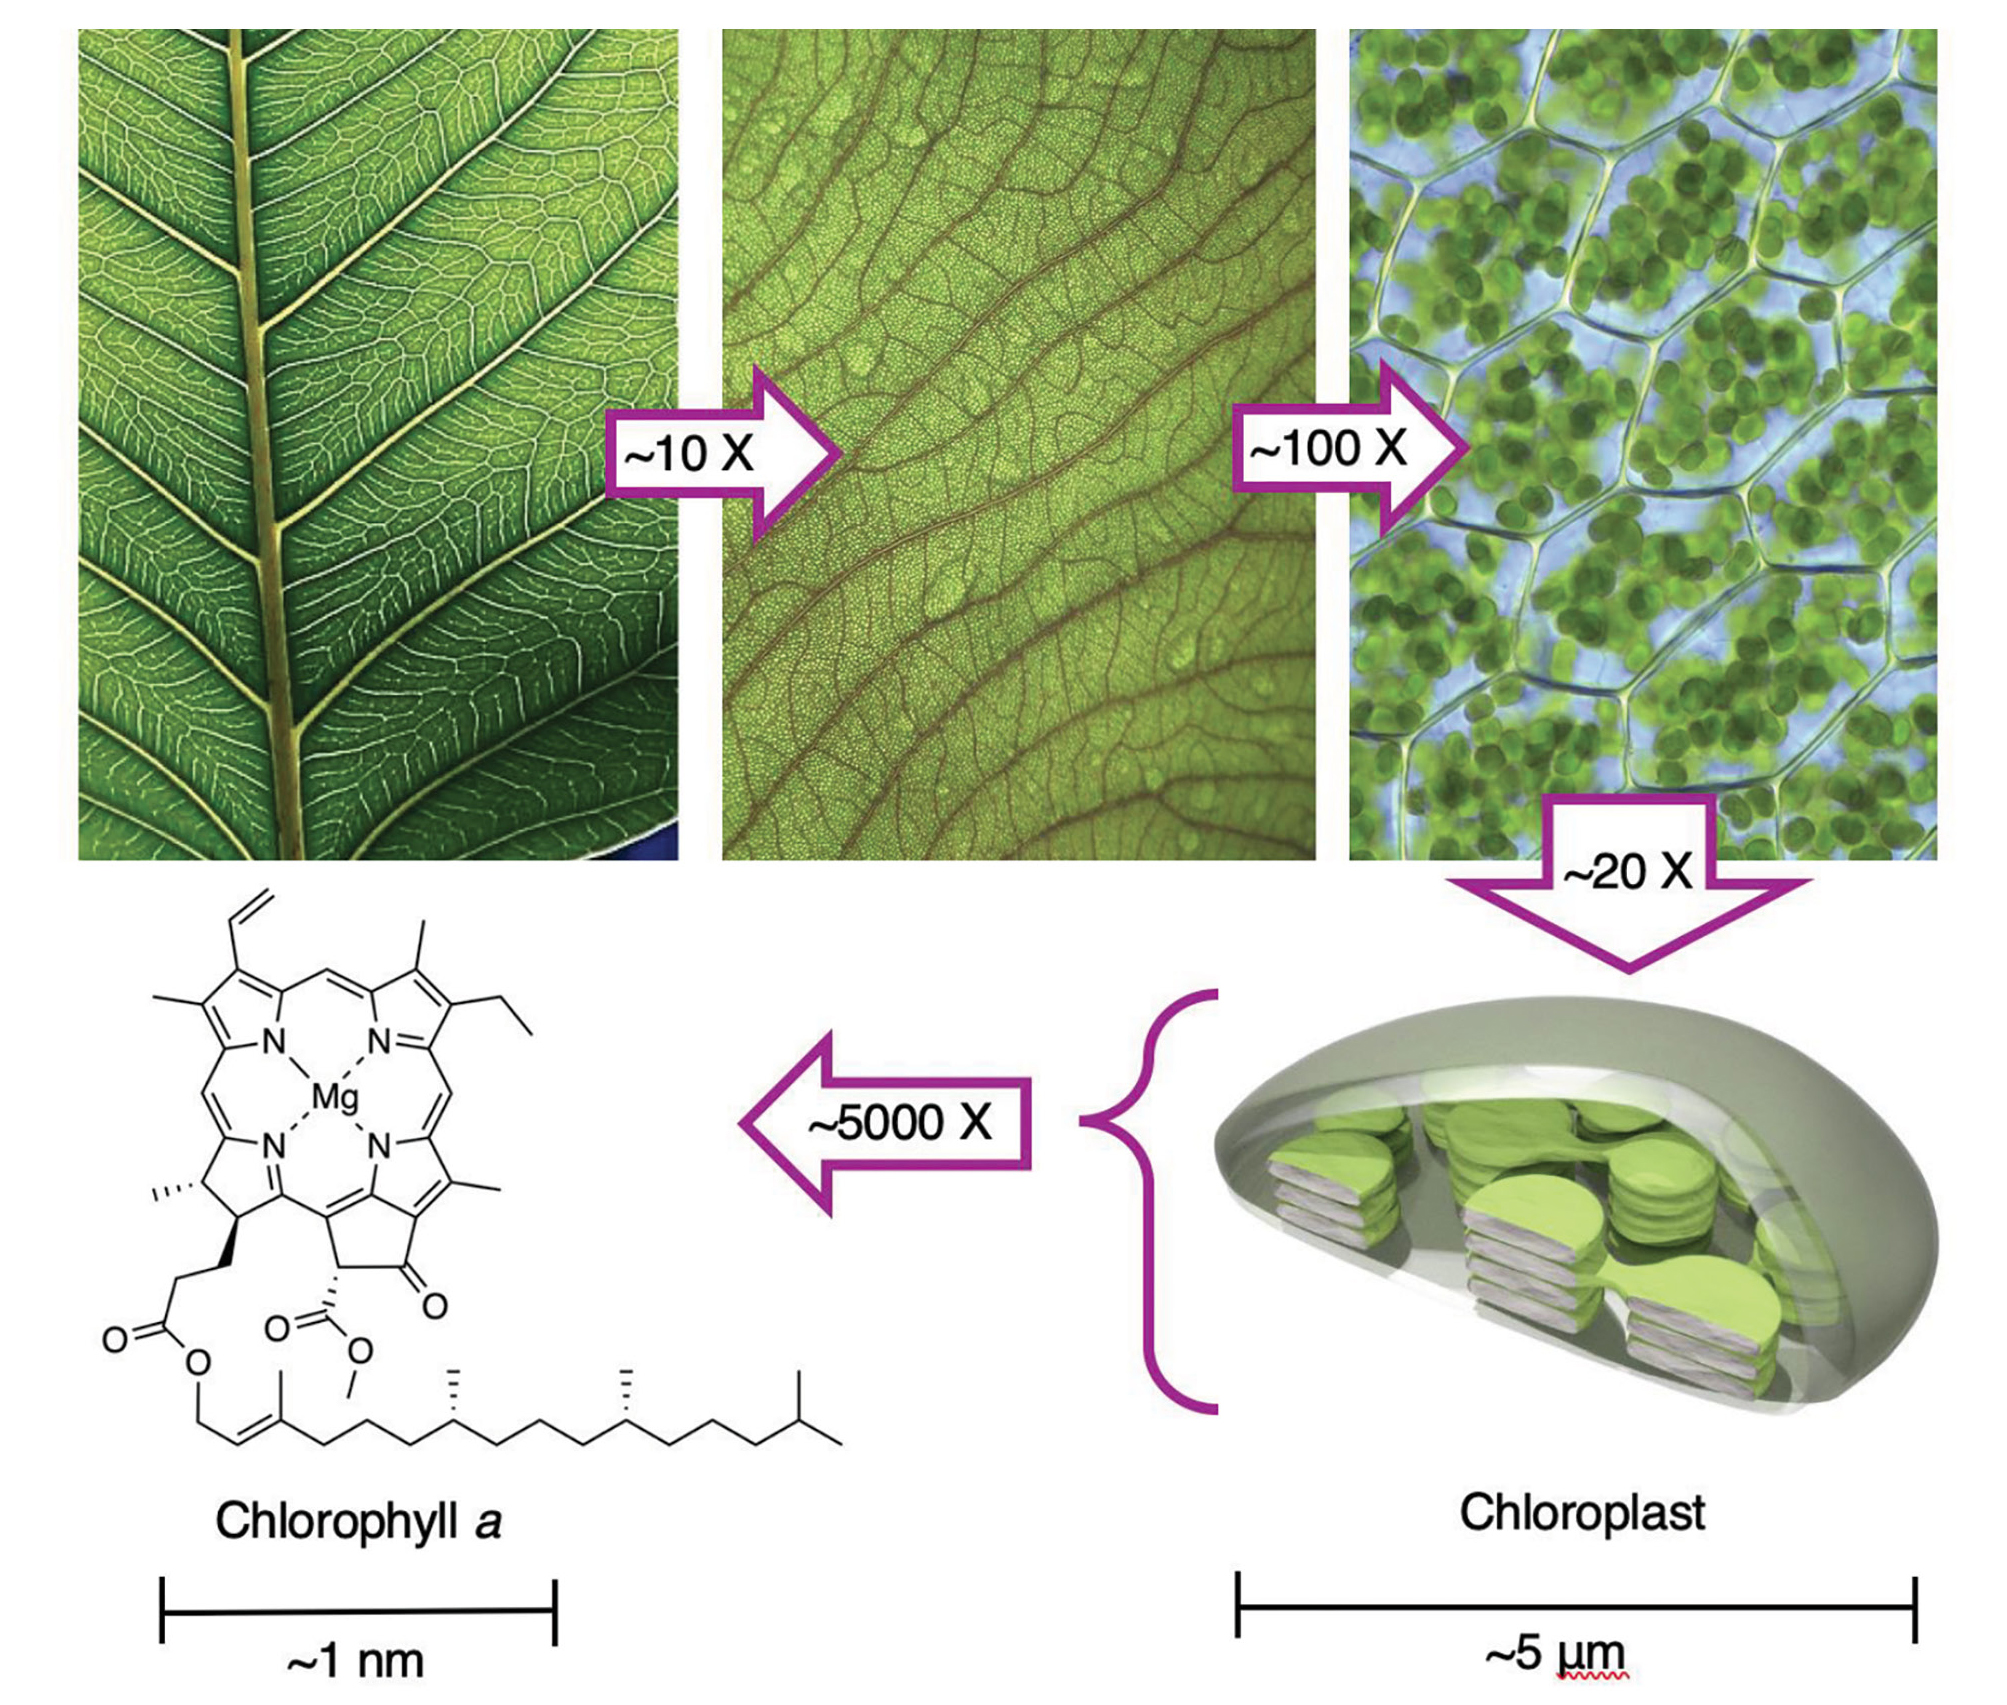
Through the group and whole-class discussions, knowledge is individually and socially constructed as students work out their own understanding of the red-glow phenomenon while being facilitated by a more knowledgeable other (the teacher). Students bring different amounts of prior knowledge about the process of photosynthesis to the activity, which they will readily share with their groups. Through the whole-class discussion, key concepts around photosynthesis will arise including light energy, chemical energy, leaves, chlorophyll, chloroplasts, carbon dioxide, oxygen, water, and others. Teachers guide a whole-class discussion about the observations, questions, and ideas from each group and see if the class can agree on some hypotheses, models, and explanations for the red glow experiment. Teachers are encouraged to use Figure 3 in discussing the structure and function of chloroplasts.
Teacher notes for class discussion
Chlorophyll is a molecule. Yet advanced concepts about chemistry (atoms, molecules), biology (cells and organelles), and physics (energy) are not required to accomplish the objectives of this activity.
There actually are two dominant forms of chlorophyll in plants, chlorophyll a and chlorophyll b; here we use the term chlorophyll collectively.
When chlorophyll absorbs light, all of the energy can be used for photosynthesis, at least in principle. But in practice, some energy is released as heat, and a tiny amount is emitted as red light (fluorescence). We can’t see this fluorescence from a leaf by our naked eye, but satellites with sensitive detectors can detect this red glow (solar-induced fluorescence [SIF; see Online Resources]). Figure 1 shows the red glow from the North American Midwestern farm belt. The more chlorophyll, the more red glow; therefore, the intensity of the glow is a marker of the health, vigor, and density of plants.
What happens if chlorophyll is taken out of the plant? Now part of the energy that would have gone into photosynthesis is released in abundance as red fluorescence, which the student can see in the spinach extraction activity.
The organization of components in leaves is essential for efficient capture and utilization of light energy. As seen in Figure 3, the characteristic green color of leaves is due to the presence of chlorophyll within the chloroplasts of plant cells. Rubbing alcohol disrupts the cell membranes (where chlorophyll is located) and dissolves (i.e., extracts) the chlorophyll.
Satellite monitoring of SIF can be used on a global scale. Examples include monitoring the health of the Amazon Rainforest, tracking rising temperatures globally, and measuring extended wet seasons across the Earth (De Sousa et al. 2017).
When discussing SIF, a map of SIF should be displayed to aid visual learners. For proper explanation, students worked through extensions on their lab activity sheet. Students checked the capability of food coloring and a mystery substance (such as a popular colored beverage) to fluoresce red. Working together in a group, students discussed the observable differences between both leaves and the food coloring. Students were able to conclude that food coloring lacks the presence of chlorophyll and therefore does not glow red. This led to the discussion of their mystery substance and the conclusion that it could not contain chlorophyll for the same reasonings.
Related activities: Fluorescers and nonfluorescers
The following three questions pertain to elaborative activities for which procedures and materials supplies are described in the Supplemental Materials.
Does any green solution glow red? To test this, prepare a solution of green food coloring in water. Illumination with a flashlight should show no red fluorescence. These kinds of dyes absorb light (hence their color) but almost instantly release all of the energy as heat. If we had a sensitive thermal detector, this release of heat could be detected. This experiment provides a counterexample to the features of chlorophyll. A counterexample with a mystery substance also can be employed—for example, a popular colored carbonated beverage.
Is red the only fluorescent color? Chlorophyll is hardly unique in exhibiting fluorescence—many substances give off light after absorbing light. Common examples are provided by the dyes used in text highlighters. Immerse the tip of a text highlighter in rubbing alcohol until a colored solution results. Illuminate the colored solution with the flashlight and observe the fluorescence. State the color of the solution and the color of the fluorescence.
Is spinach special? All plants contain chlorophyll. Spinach is very attractive because it has a high concentration of chlorophyll, and the tissue is soft enough for ease of extraction. But other leaves certainly can be used, and students may wish to bring in their own plant material. Some leaves (e.g., holly) have a tough outer layer for which rubbing alcohol is insufficient to break through the leaves. But the chlorophyll is still there, and if released, would also glow bright red.
Assessment
Students are evaluated on their participation in the lab, discussion, and conclusive lab questions. Students should complete a lab write-up that will be turned in to assess understanding. As part of the lab write-up, students should address the following questions: (1) What molecule makes leaves green, and what is its function? (2) Where is chlorophyll located within a plant? (3) Where does the red glow come from? (4) Why is the red glow used as a measure of plant health? (5) What would farmers be able to learn from images taken by satellites? Students should be able to (1) explain what molecule makes leaves green and its function, (2) describe the observable differences between the leaves and food coloring, (3) determine if a mystery substance has the presence of chlorophyll and explain their reasoning, (4) explain how SIF images help scientists study the effects of global climate change, and (5) explain what farmers would be able to learn from SIF images taken by satellite.
Conclusion
Photosynthesis and the life cycle of plants lie at the foundation of life on Earth. Students are introduced to a new technology of growing importance to agricultural scientists and ecologists, solar-induced fluorescence, which detects red light emitted from sunlit plants and thereby enables visualization of photosynthetic productivity on a global scale. The “green plants/red glow” activity connects the abstract idea of photosynthetic efficiency to the hands-on experience of seeing (by naked eye) the red glow from chlorophyll upon removal from the organized molecular architecture of the plant cell. The activity described here is simple, meaningful, and captivating for students in middle schools. •
Acknowledgments
This project was funded by the National Science Foundation Division of Chemistry (Award #1760839). The authors thank Follow the Child Montessori School (https://followthechild.org) and River Bend Middle School (https://www.wcpss.net/riverbendms) in Raleigh, North Carolina, where in 2019 this activity was presented in two upper elementary classes (ages ~9 to 12 years old; 4th–6th grades) and four middle school classes (ages ~13-15 years old; 8th grade), respectively.
Online Resources
Additional information can be found by searching “SIF” at www.nasa.gov.
Supplemental Materials
Information for the instructor along with demonstration videos
Jonathan S. Lindsey (jlindsey@ncsu.edu) is a professor, Kathy-Uyen Nguyen is a doctoral student, Andrew R. Ratchford is a doctoral student, Jason L. Painter is the director of the Science House, and Ann E. Norcross is an administrative assistant, all in the College of Sciences at North Carolina State University in Raleigh. Rachael Polmanteer is science teacher at River Bend Middle School in Raleigh, North Carolina.
Biology Interdisciplinary Life Science Literacy Middle School