
Engineering Encounters
Rosie Revere’s Orangutan Dilemma
Integrating computational thinking through engineering practices
Science and Children—November/December 2020 (Volume 58, Issue 2)
By Tyler S. Love and Carolyn J. Griess
Computational thinking has been taught in elementary classrooms in other countries for many years, but in the United States this has only been a focus recently due to the drastic shortage of computer scientists. Early exposure to computational thinking has been shown to motivate students to pursue STEM careers, especially computer science (Jin, Haynie, and Kearns 2016). Despite this recent focus on teaching computational thinking in the early grades, many U.S. teachers still lack innovative pedagogical approaches to deliver these concepts. Computational thinking at the elementary level is often taught using pre-assembled devices or virtual simulations/games programmed via drag and drop software (e.g., Scratch, Hour of Code). More engaging approaches that encourage inquiry and creativity when teaching computer science concepts are needed in U.S. elementary classrooms (Jin et al. 2016). In this article we present a design challenge focused on teaching third- and fourth-grade students computational thinking skills based on a scenario from a children’s book. The nature of this lesson lends itself to be modified for other grade levels or contexts to integrate literacy and computational thinking through authentic engineering design scenarios.
Applying computational thinking and the engineering design process are important skill sets for students because of the increasing number of engineered devices in our world that operate using programmed electronics and artificial intelligence (e.g., smart traffic signals, smart home devices). This importance is reflected in the Next Generation Science Standards (NGSS), in which computational thinking is one of the eight science and engineering practices. It is also one of the eight technology and engineering contexts within the Standards for Technological and Engineering Literacy (ITEEA 2020), the national standards for K–12 technology and engineering education. It is most meaningful to teach young students to apply these skills within the context of authentic hands-on, scientific inquiry and engineering design challenges that provide instant feedback (Love and Bhatty 2019). This hands-on approach that integrates computational thinking and engineering design is better known as physical computing—the programming of interactive physical systems or devices via software (Cápay and Klimová 2019). Physical computing encourages interdisciplinary learning and entrepreneurial thinking, and it fosters creativity by helping students bridge the gap between the digital and physical worlds. It also helps nurture the interaction (programming and feedback) between students and programmed devices. For example, it requires students to apply the engineering design process when developing prototypes that integrate computational devices, therefore making the students creators of technology, not solely users (Genota 2019). Physical computing has demonstrated many learning benefits. It appeals to various learning styles by presenting computational concepts not only on the screen but through tangible objects. Additionally, it has been shown to increase female students’ confidence in programming (Rubio, Romero-Zaliz, Mãnoso, and de Madrid 2015) and have a greater influence on student learning in comparison to traditional screen-based only experiences (Sentance, Waite, Hodges, MacLeod, and Yeomans 2017).
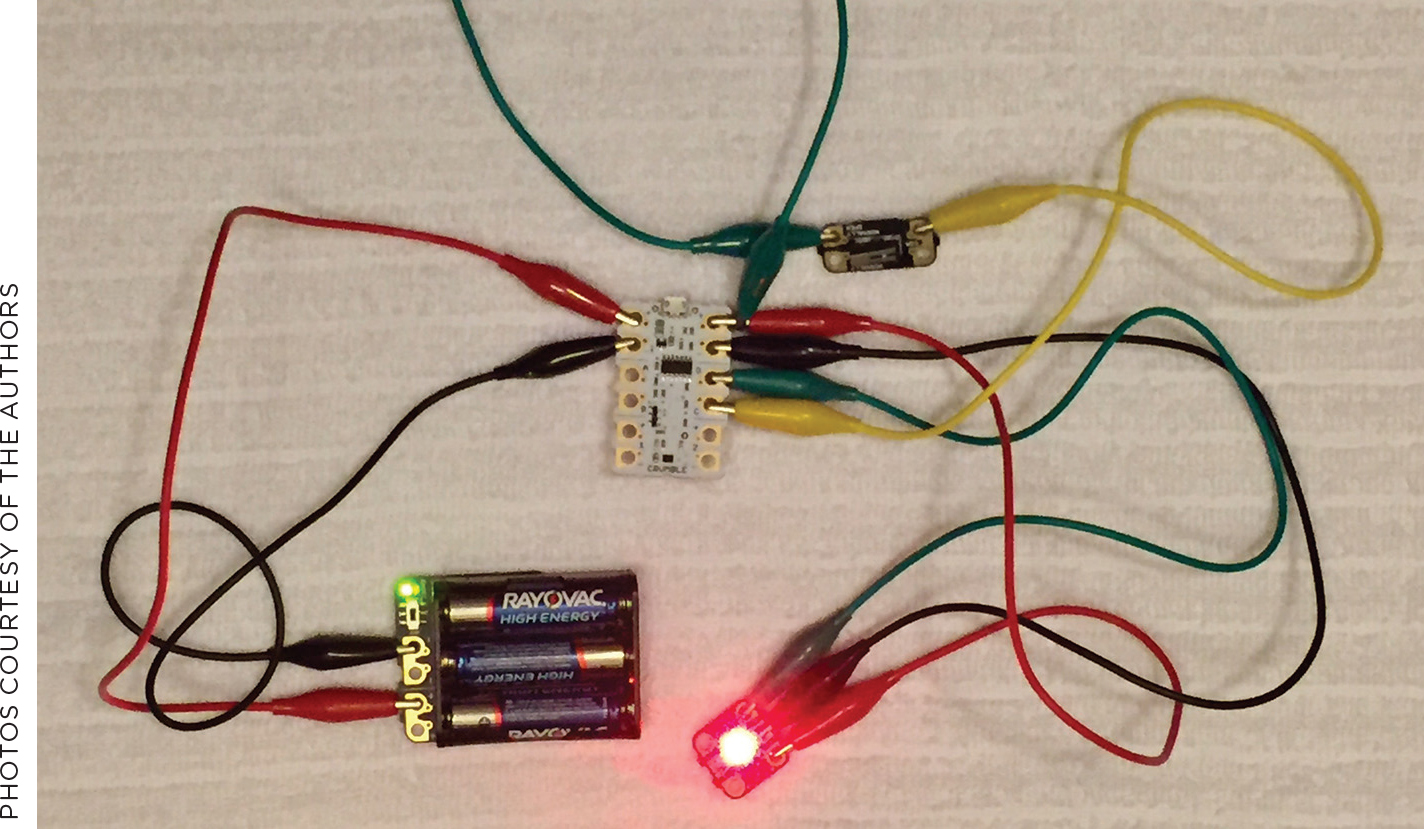
A circuit using the micro switch and sparkle light.
Literacy Connection
The context for this design challenge comes from Rosie Revere’s Big Project Book for Bold Engineers (Beaty 2017). Rosie Revere is an elementary student with aspirations of becoming an engineer. This book invites students to help Rosie participate in engineering challenges. The design of the book features engaging illustrations, age-appropriate directions and explanations, and intriguing engineering design scenarios that engage students in critical thinking and problem-solving. Also, Rosie helps students cope with success and failure as it is a natural part of the engineering design process.
In this particular book, Rosie’s Uncle Fred is a zookeeper. Uncle Fred is having a problem keeping the orangutans in their cages/enclosures overnight because they have designed strategies to escape. While they are out of their cages, they cause all sorts of shenanigans in the zoo with other animals. In this design challenge Rosie needs the students to engineer a solution that will keep the orangutans from escaping their enclosure (Beaty 2017, p. 38).
The Engineering Design Challenge and Constraints
This lesson is well suited for the elementary classroom thanks to the incorporation of simple, low cost materials (Figure 1). It addresses a number of student learning outcomes that integrate concepts and standards from multiple content areas (Figure 2). Simply stated, this design challenge requires students to create a program that controls the actions of sensors within an electronic circuit. One solution we posed to students was that Rosie wanted to help Uncle Fred by adding lights to the orangutans’ enclosures. These lights needed to be programmed to turn from green to red when an orangutan escaped the enclosure. Rosie anticipated that Uncle Fred will be awoken by the red light, run to the primates’ habitats, and return the mischievous orangutans to their enclosures before they cause any problems.
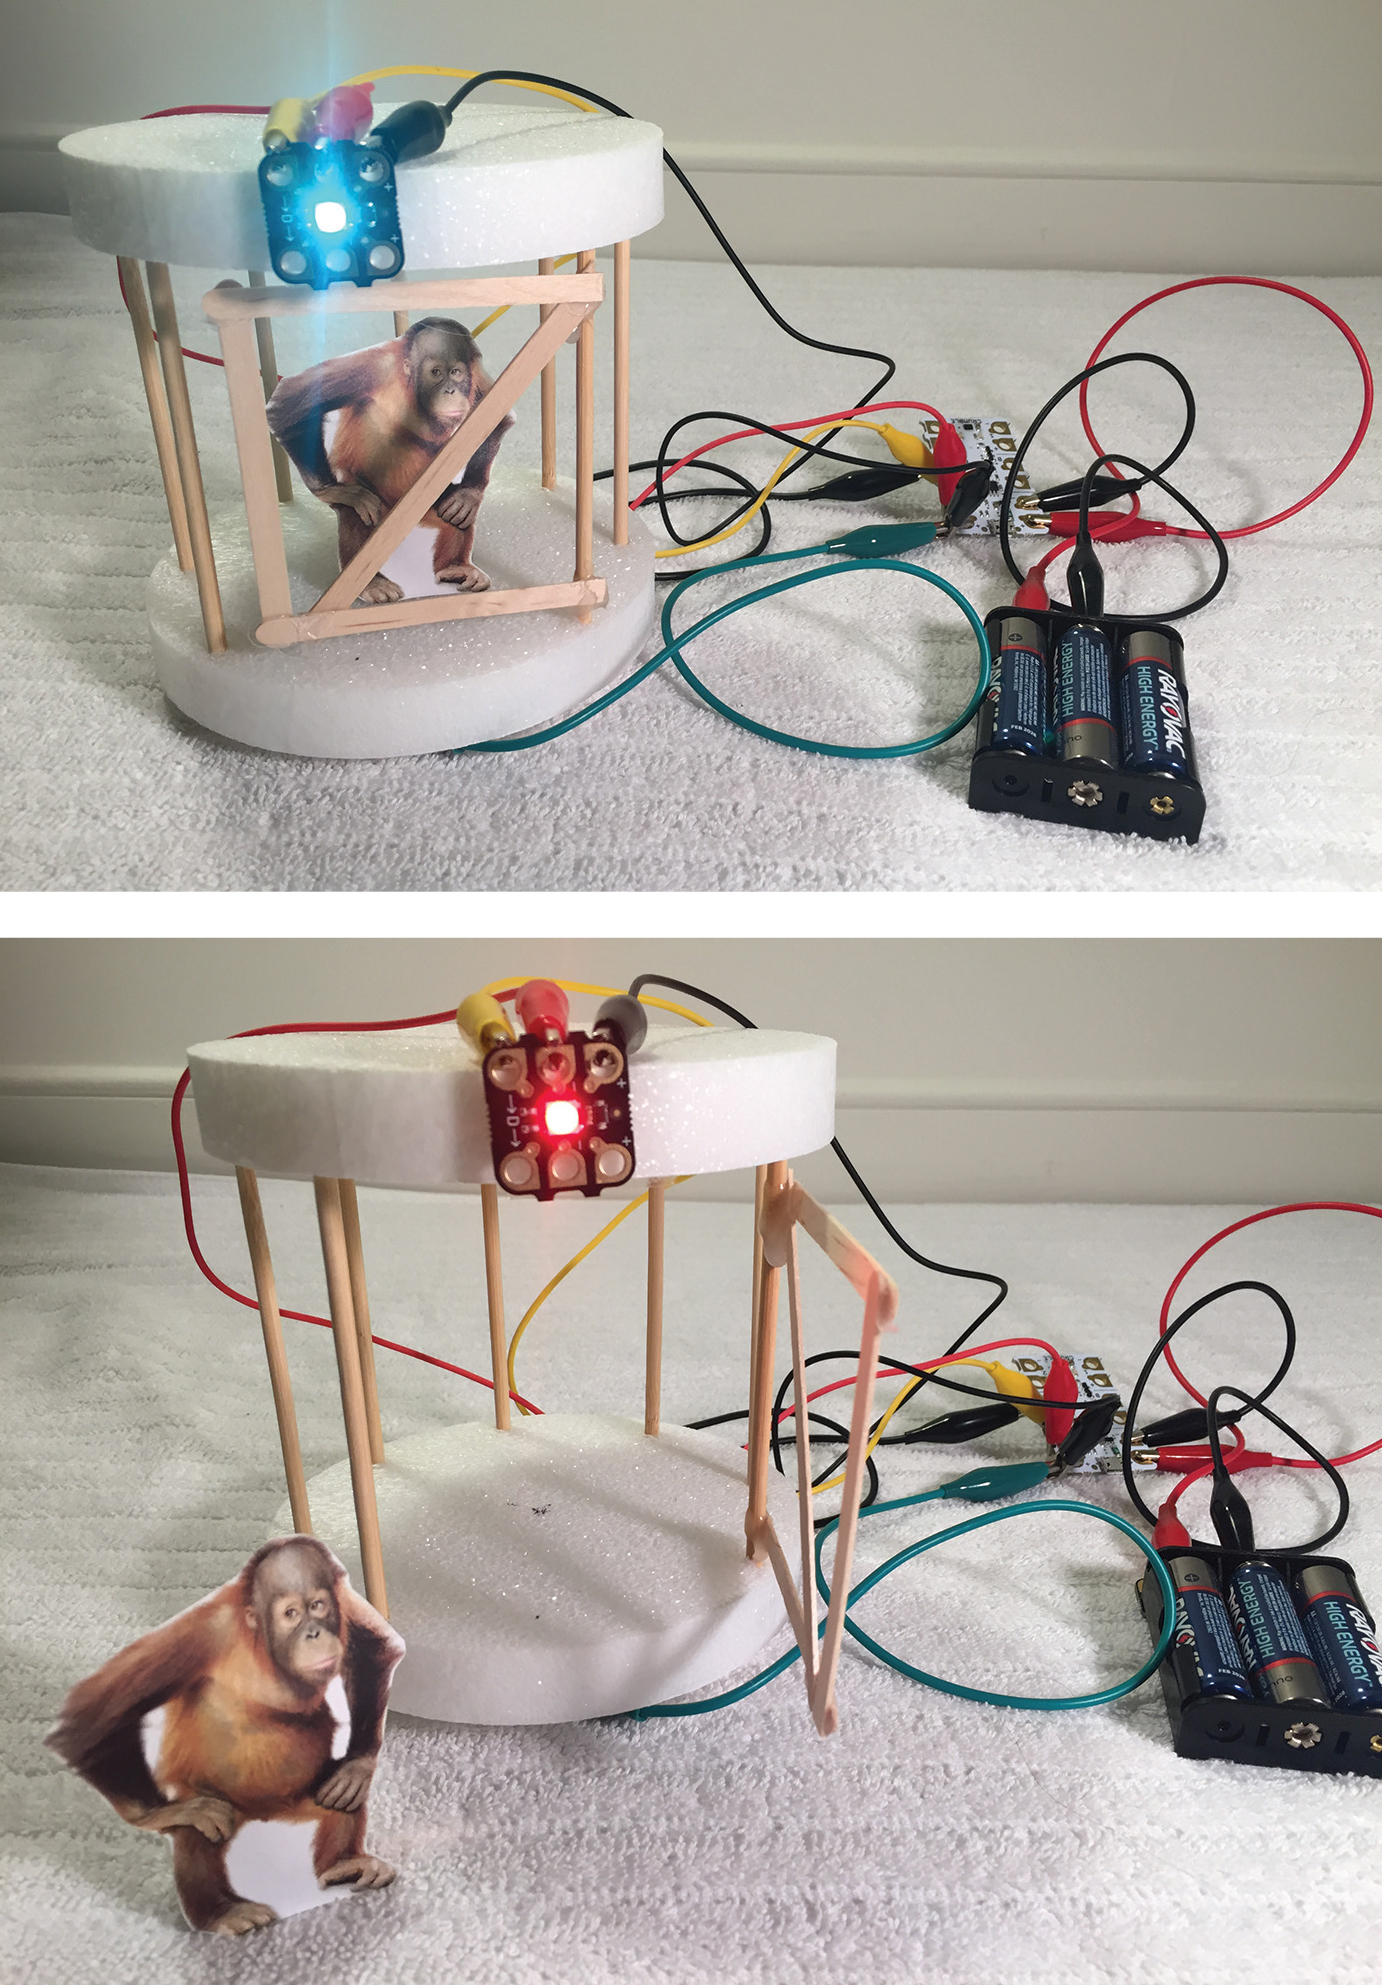
The orangutan’s out—A and B:
Example of a design solution integrating the micro switch under the enclosure and programmed to change the light color when the orangutan escapes.
Materials used in the design challenge.
The following items are required for each group of two or three students:
- 1 Crumble Starter Kit ($50)
- 1 Crumble Friendly Buzzer ($5.50)
- 1 Crumble Friendly Reed Switch and Magnet ($6)
- 3 AA batteries
- Computer with a USB port (Windows, Mac, or Chromebook)
- Crumble Software (Free download, see Internet Resources)
- Safety glasses/goggles (ANSI Z87.1 rated)
The following items are recommended for each group of two or three students:
- Scissors
- Multi-cutter tool from TeacherGeek
- Cardboard
- Styrofoam
- Tape, glue, or low temp hot glue guns
- Paper/index cards and colored pencils
- Popsicle sticks, coffee stirrers, or kebab skewers
- Drinking straws
- Small plastic container filled with pebbles or pennies to simulate the Orangutan
- Activity worksheet (see NSTA Connection)
Cross-disciplinary standards connections.
Common Core English Language Arts Standards: Grade 4
- CCSS.ELA-Literacy.RL.4.1: Refer to details and examples in a text when explaining what the text says explicitly and when drawing inferences from the text.
- CCSS.ELA-Literacy.RL.4.8: Make connections between the text of a story or drama and a visual or oral presentation of the text, identifying where each version reflects specific descriptions and directions in the text.
ITEEA Standards for Technological and Engineering Literacy: Grade band 3–5
- STEL-1H: Design solutions by safely using tools, materials, and skills.
- STEL-3D: Explain how various relationships can exist between technology and engineering and other content areas.
- STEL-7I: Apply the technology and engineering design process.
- STEL-8F: Identify why a product or system is not working properly.
- Technology and Engineering Practices – TEP-1: Systems Thinking, TEP-2: Creativity, and TEP-3: Making and Doing
- Technology and Engineering Context – TEC-1: Computation, Automation, Artificial Intelligence, and Robotics
CSTA K-12 Computer Science Standards: Grades 3–5
- 1B-CS-01: Describe how internal and external parts of computing devices function to form a system.
- 1B-AP-10: Create programs that include sequences, events, loops, and conditionals.
- 1B-AP-15: Test and debug (identify and fix errors) a program or algorithm to ensure it runs as intended.
To complete this design challenge, students will need to use some small electronic components and a device called the Crumble. The Crumble is a durable, cost effective, reusable controller that can be programmed using free, user-friendly drag and drop software (similar to Scratch) to control various external sensors. It has been widely used in the United Kingdom for a number of years and shown to be successful for teaching coding through open-ended, hands-on design challenges at the elementary (Gomersall 2017) and middle school grade levels (Love and Bhatty 2019). The Crumble was selected for this design challenge over other microcontrollers primarily due to its cost and usability for children. When compared to other microcontrollers with similar sensor kits appropriate for students this age (e.g., Lego Mindstorms EV3 $350, SAM Labs $160, Hummingbird $117, and Micro:bit $65), the Crumble ($62) provides a more cost-effective option for schools, especially when considering the initial cost divided over multiple years of use. (The previously mentioned costs each reflect a set that can accommodate up to 3 students. An entire class set would cost more.) For teachers and students, the Crumble is relatively easy to learn how to use thanks to the wealth of instructional resources available (see Internet Resources). For this design challenge, grades three and four were specifically selected because of the motor skills needed for students to connect the alligator clips used for the circuit and the computational thinking skills required to develop a successful program using the free drag and drop software.
Instructional Procedures
On the first day, about an hour was spent setting the context by demonstrating the basics of electricity and electronics. The instructors began by showing what happened when battery terminals were connected directly to a LED or a buzzer, and then what happened when one of the wires was removed. Students were given time to brainstorm what was happening. A common student response was that there was no power, but they often did not trace the flow of electricity through the circuit. The instructors used the analogy of a garden hose (wires) and water flowing through it (electricity) to produce an output of spraying water (turned on a LED/buzzer). It was explained that if the hose had a kink, was disconnected, or had no water source it would not work, just like an electric circuit.
Next, students were introduced to key vocabulary terms such as engineering design process, electricity, circuit, programming, prototype, LED, electronic sensor (switch and buzzer). After being introduced to these terms, they viewed the Crumble preview video (see Internet Resources) and were then given a brief overview of the Crumble. Students were now primed to read the Rosie Revere story and be introduced to the design challenge. They were asked to Think-Pair-Share ways in which they could use the Crumble to help Uncle Fred. Students wrote their responses in their engineering design journal and then posted their ideas on a flipchart or white board. Students often associated the switch as something that needed to be human controlled. This prompted the instructors to demonstrate how the switch could be controlled if placed under a platform and allowed students to further brainstorm how it could be used.
The following are examples of some teacher questions and student responses about the operation of the switch: “Does the orangutan weigh a certain amount of pounds like a person or a dog?” Students were able to relate to this. “What force keeps the orangutan from floating away?” Students indicated gravity. “How would gravity effect a switch that is placed under the orangutan’s enclosure?” Students had an ah-ha moment realizing that the weight of the orangutan could press the switch, allowing an alarm to go off when the orangutan left the enclosure. As a formative assessment, students were asked to write a constructive response in their journal using the key vocabulary terms to describe what they saw happen during the circuit demonstration. The flipchart and design ideas in their journal also served as excellent formative assessments.
Day two required about an hour to teach students how to use the Crumble. Students were placed in groups of three and walked through the Getting Started with the Crumble video (see Internet Resources). The instructors helped them get the circuit connected correctly and program the Crumble to turn on a light with a switch. They also discussed with students what each line of the Crumble program was telling the sensors (see Figure 3). Students were then given the opportunity to experiment with the various light colors (Note: Crumble calls their lights “sparkles”). Students who finished early were directed to the Police Car Lights project on the projects page of the Crumble website. For formative assessment students had to demonstrate how their circuit would work and describe each step of the program to the instructor so they could receive permission to move onto another sensor programming tutorial or challenge. To close out day two, students were tasked with developing design sketches for their orangutan enclosure using the materials available.
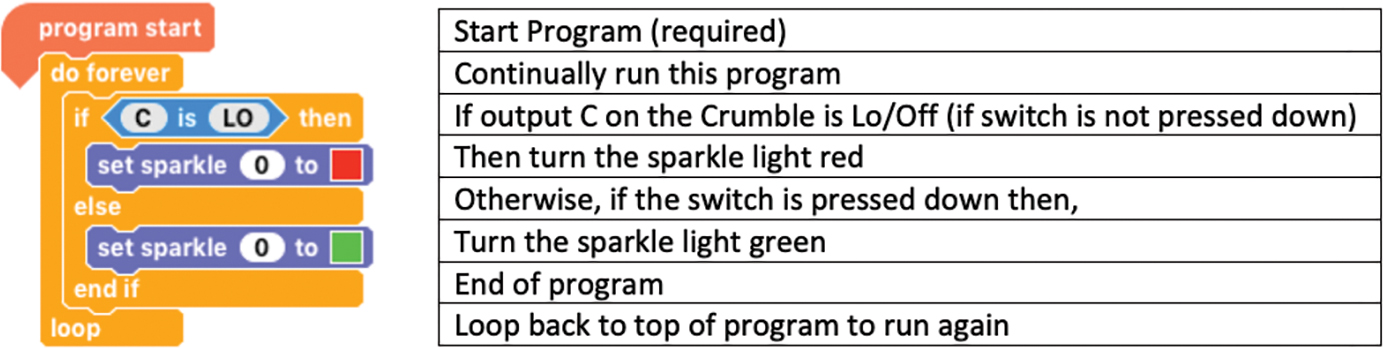
Crumble instructions to sensors.
On the third and final day, students spent approximately 45 minutes building their enclosure prototype and integrating the Crumble plus the sensors. The instructors helped students troubleshoot their circuit and program so the switch and light operated as described in the design challenge scenario. Students were required to wear ANSI Z87.1 impact rated safety glasses/goggles throughout all phases of the prototype construction. The instructors prompted students to test and redesign their prototype as needed while documenting their changes in their engineering design journal. Many students had preconceived notions about what an enclosure at a zoo should look like. For most, they designed solutions depicting a cage with some sort of door. However, some students expressed concerns about the wellbeing of the orangutan and said they did not think a cage or bars were needed because the orangutan should learn to stay on the platform after seeing the alarm go off a few times when they leave the enclosure and get caught by Uncle Fred. This provided opportunities for discourse about there being no single correct design and incorporating key engineering design considerations such as empathy.
Students that finished early or had an advanced understanding of the Crumble were encouraged to complete the reed switch or buzzer tutorial and use those in place of the micro-switch or sparkle light (see Extension section). Formative assessments included the instructors looking for detailed prototype drawings with labels in the students’ engineering design journals. Students were expected to explain in writing or verbally why they believed the selected solution was best. Examples of summative assessments included a vocabulary quiz, a written explanation describing what each step of the program was doing, a written reflection about the how the engineering design process was used to develop a final design and how students addressed any challenges encountered, and a rubric (see Internet Resources) used to assess various criteria contributing to their final design.
Tips and Suggestions
With the constructing of the enclosures, there are a few hazards that teachers must address. As mentioned previously, students should wear ANSI Z87.1 safety goggles or glasses when retrieving materials, during the activity, and during clean-up. Wooden skewers, popsicle sticks, coffee stirrers, and scissors can pose a hazard, which reinforces the importance of wearing safety goggles/glasses. The multi-cutter tool is relatively easy to use but can be more hazardous than a pair of scissors if not used correctly. The instructor may consider being the sole operator of the multi-cutter, or they could set up a cutting and hot gluing station where they could directly supervise students who are conducting these activities. Additionally, this design challenge could be modified to use consumables that are easier for students to work with, such as construction paper, Styrofoam plates, and tape. Weaver (2017) presents some excellent strategies for minimizing safety hazards in an elementary classroom during engineering design challenges.
To help organize the Crumble and various small sensor components, it is recommended that inexpensive sealable plastic bins be purchased and group kits pre-made. These can be inventoried by students using a checklist each day during clean-up to prevent lost or broken parts. Instructors will need to have any consumable materials ready for students to access. Assigning prices to each item and providing students with a fictitious budget can reinforce math skills while also reducing waste. Additionally, computers with a USB port will be needed, and the instructor must ensure the free Crumble programming software is installed.
If students have never worked with the Crumble or electronic sensors, allot time for students to independently experiment with these materials. After sufficient time to explore the materials, provide students with written directions on a handout or displayed in the front of the classroom to guide them through programming the sensors. Invite students to follow the teachers’ step-by-step directions for creating a program. For students that require additional support, the tutorial documents from the Crumble website can also be printed out for students to follow along. Next, ask students to work together to create a new program. Finally, challenge students to develop a program that will meet all the criteria specified by Rosie.
The Crumble also has the capability of being used in distance learning settings thanks to the detailed tutorial documents provided on the Crumble website. Teachers could consider loaning out the inventoried kits in plastic bins as previously described in this section. Students could be requested to submit videos, pictures, or screen shots of their circuit and program for troubleshooting and assessment purposes. Instructors could also create their own videos or help students design their circuit live during a video conference. Upon return of the kits, teachers should ensure all components are properly sanitized before redistributing. Although this method provides a limited engineering design experience, it still allows students to encounter physical computing and enhance their computational thinking skills.
This challenge really tests students’ ability to follow directions, pay attention to detail, innovatively design, and troubleshoot. Just one minor error in the circuit or code can keep the system from operating correctly. For students that find the programming challenging, the instructor may find it helpful to create flash cards that have common terms on one side like turn on the light, wait 2 seconds, or when the switch is pressed. On the other side, the cards may have a picture of the block command from the Crumble software that would perform the operation specified on the other side. This can help students organize their thoughts and scaffold them to proficiently use the programming commands. Students must ensure the wire from the positive power source on the Crumble is connected to the “normally open” side of the micro-switch. If the circuit does not work, have students check that their alligator clips are connected securely to the metal contacts on each component, not touching any other metal contacts or alligator clips, and that their circuit matches the pictures provided. The instructor or other students may have to assist those who need help connecting the alligator clips. If students are still experiencing problems, ask them to check the variables specified in their program and ensure that they match the output where the electronic component is connected on the Crumble. If experiencing problems with the sparkle light, confirm that: (1) it is connected to output D on the Crumble, (2) the wire from Crumble output D is connected to letter D on the sparkle light and following the correct direction of the arrows, and (3) the first sparkle light is identified as number 0 in the program. Additional troubleshooting tips can be found on the Crumble website (see Internet Resources). While we provided some recommendations for modifying portions of this design challenge, we recommend instructors work with their special education department to make the appropriate accommodations or modifications for each student.
Extension Activities
For students who successfully completed the design challenge quickly, they were tasked with incorporating a buzzer or other sensors in place of the sparkle light. Teachers who are comfortable using various materials can create their own switch/pressure pad for the orangutan using tin foil, coffee stirrers, and index cards or card stock as demonstrated on the Crumble website (https://redfernelectronics.co.uk/projects/catch-santa). Additionally, the Crumble could be coupled with engineering design challenges featured in other Rosie Revere books.
Once students learn how to code these basic sensors they can easily learn how to use more advanced components in their designs via the sensor tutorials provided on the Crumble website. This also introduces them to additional programming concepts, providing a progression toward using more advanced materials and program concepts at the middle school level. Love and Bhatty (2019) presented an example of how the Crumble could be integrated with engineering design and 3D printing to help teach about data collection and prediction, as well as basic physics concepts. Additionally, they provided examples of many other design challenges in which the Crumble was integrated to teach various STEM practices, and a rubric for evaluating physical computing design challenge solutions. Instructors have access to many other types of microcontrollers and can very easily use them within the context of design challenges like the one presented in this article.
Conclusion
This design challenge represents one example of an engaging learning experience that helped elementary educators naturally integrate standards-aligned practices from multiple content areas. Rosie Revere’s Big Project Book for Bold Engineers (Beaty 2017) not only helped elementary students enhance their literacy skills, but it also provided an exciting context to which they could relate. Moreover, integrating programming and engineering design through physical computing provided a tangible opportunity for students to apply computational thinking and engineering practices. As a result, students developed the ability to create, explain, and troubleshoot systems that incorporated both digital programs and physical prototypes. Students also gained a deeper understanding of basic programming commands and concepts such as loops and conditionals. A greater understanding of these concepts and how they interrelate to solve authentic problems in the world around us will better prepare our students to address future challenges we will face.
Dedication
This article is dedicated in memory of Dr. Carolyn J. Griess (1973–2020) for her invaluable contributions to this manuscript and the field of elementary education. Dr. Griess was a dedicated educator, mentor, scholar, and friend to many.
Internet Resources
Introduction to the Crumble video
Crumble website with free coding software
Tutorials for individual Crumble sensors
Silent Alarm Scanner Bot design challenge
TeacherGeek® (U.S. distributor of the Crumble)
Tyler S. Love (tsl48@psu.edu) is an assistant professor of elementary/middle grades STEM education and a member of NSTA’s Safety Advisory Board, and Carolyn J. Griess was an assistant teaching professor of education and program coordinator of elementary education, both at Penn State Harrisburg in Harrisburg, Pennsylvania.
Computer Science Crosscutting Concepts Engineering Interdisciplinary Maker Spaces Teaching Strategies Technology Elementary Grade 3 Grade 4 Grade 5