
What Does 3-Dimensional Space Look Like
By Korei Martin
Posted on 2018-06-28
When transitioning my classroom instruction to three dimensional learning, I decided to start with one or two areas in each unit or lesson set where I felt the most need. I was already purposeful in selecting activities that I carefully sequenced to support student learning of concepts and big ideas, but I expected students to make connections using crosscutting concepts without explicit instruction. In addition, I was not using phenomena as a vehicle for explanation, but assumed that once students learned the concepts, they would be able to apply them to explain the everyday phenomena that they encountered. I also knew that the way in which I used models in my classroom needed to be rethought. For that, there was no better place to start than my space science lessons.
I felt very comfortable with the activities I used in my space science instruction. Most of them were models that I had been using in my classroom and with girls at Girl Scout events for many years. Traditionally, teachers have used models in space science instruction to make the concepts and processes that are difficult more accessible to students. In my space science lessons, I used a variety of models – physical models, drawings, diagrams, and even kinesthetic models to illustrate science ideas for students. There is nothing wrong with these types of models and they are an important resource for classroom use; however, I was using them very narrowly thus missing important components for sense making. I was not effective at making sure that students were using the models to develop their ideas or make connections between their ideas and the phenomena. I realized that I needed to take a step back and analyze how students were using the practice of developing and using models in my classroom. How were they using models to connect their ideas to phenomenon and how was I going to better facilitate that?
I started with the lessons around the phenomenon of daily changes of length and direction of shadows created by objects and the sunlight. After eliciting student ideas about how their shadows changed or stayed the same at different times of day on the playground, as a class, we developed a method for testing these ideas. In partners, students used a golf tee on a large sheet of paper and traced shadows of the tee every hour during the school day. The next day, the partners discussed the patterns they observed in their shadow data. Then they did a gallery walk to view other groups’ shadow data to decide if there were similar patterns. As a class, we discussed that two patterns were observed. The shadows shortened until midday and then lengthened until we stopped collecting data. In addition, the shadows moved from west to east on their papers in a northerly direction (Fig. 1). I asked them if there were other ways we could represent the daily shadow lengths and directions to show the patterns. They determined that we could graph the lengths and the angles of the shadows. After doing that and writing about our observations, I asked them if this occurs every day and if so, why does this occurs? So we embarked on a quest for cause and effect.

I gave them the task of recreating their shadow data in the classroom with a flashlight and golf tee. They discovered that there was a pattern of light movement that occurs that coincides with the pattern of shadows. My questioning led them to a cause and effect relationship between the position of the light and the resulting shadow length and direction. Does that mean that the sun changes position in the sky during the day? So we set out to find out. This was done by observation outside and the use of Stellarium, a computer planetarium software, and led to the question of why the sun changes position in the sky in a pattern – another cause and effect relationship. Most of my students can tell you at this point that it is because the Earth is rotating; however, if I question them further for a more detailed explanation, they falter. At this point, I bring in the models – flashlights and inflatable globes, computer simulations, and one of my favorites, Kinesthetic Astronomy.
Kinesthetic Astronomy can be used as a model of Earth’s movements. In this model, students are the Earth and stand in a circle around a student Sun. In their left hand, they hold a stick with the letter E representing east and in their right hand they hold a stick with the letter W for west. Their arms are outstretched representing the horizon. With their arms outstretched, they are asked to rotate in a counterclockwise direction (Fig.2). If they look down their arm when their arms are pointing in the direction of the sun, they can see the sun along their arm or horizon. This is sunset or sunrise, depending on which arm is pointing in the direction of the sun. If the front of their body is facing the sun, it is midday and if the back of their body is facing the sun, it is midnight. We use the front of their body as their position on Earth. As they rotate during the day, I ask them to notice the change in the position of the sun – lower in the sky at sunrise and sunset, getting increasingly higher from sunrise to midday and then lower from midday to sunset. In years prior, I assumed this part was evident in the model and they could see this relationship. However, this time, in my effort to make sure students made connections to their ideas and the phenomenon, I asked them to turn to a partner and discuss how this related to the changing length and direction of shadows. As I walked around, it became clear to me in listening to their conversations, that students did not see the changing angle of the sun in their “Earth” rotation in this model. How could I help them with this?

The next day, I brought out a lamp without a lamp shade. We did the kinesthetic model again with the lamp as the sun instead of a student. This made the difference for some students and they  could see the changing position of the sun (lamplight) and relate it to their observations outside or on Stellarium, but many were still not making those connections. After much thought, I came up with an idea that I hoped would help. I attached a protractor to a meter stick (Fig. 3).
The meter stick became the horizon and I attached the E and W to each end. There was a piece of string or yarn connected to the protractor. In partners, they used this model to note the changing angle of the sun during rotation. One person was the sun and held the end of the string. The other person was Earth and rotated from sunrise to sunset (Fig. 4). The yarn then showed the changing angle of the sun which they could connect to their observations.
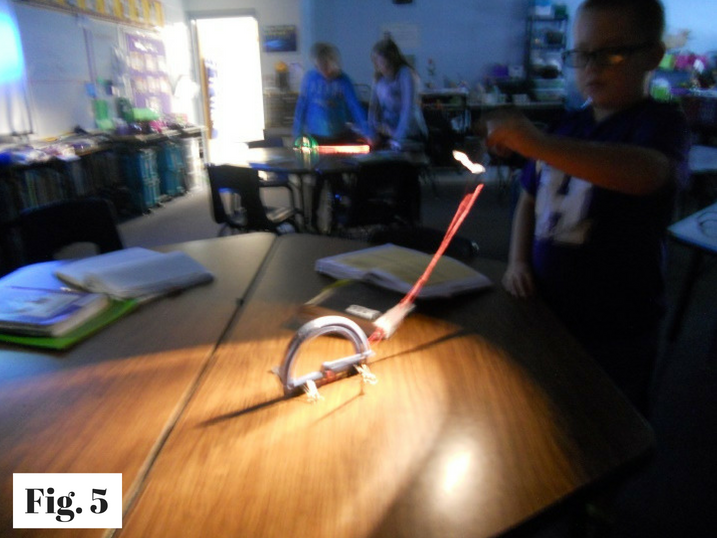
I then gave them a protractor attached to binder clips (as a stand) and a flashlight and asked them to create a model to show the changing light on a table or the floor connecting it to the meter stick model (Fig. 5). We discussed as a class how we modified the model we were using to better explain daily shadow changes. This set the stage for revision of models as an explanation tool for phenomenon for the rest of the year.
Throughout this instruction when using models, I also made sure we were explicit in identifying the features that the models were highlighting, and also what features were either not accurate or left out of the models. In other words, what are a model’s limitations?
 These changes and attention to how students were using the practices and crosscutting concepts vastly improved student learning in this set of lessons. This process of reflection about three dimensional learning is ongoing in all of my lessons and units. It is impossible to change everything at once. We need to be patient with ourselves and continually reflect and make changes in our practice to strengthen students’ ability to explain the phenomena around them. It will take time, but the change will be worth the effort.
Betsy O’Day is an elementary science specialist at Hallsville Intermediate in Hallsville, Missouri.
This article was featured in the June issue of Next Gen Navigator, a monthly e-newsletter from NSTA delivering information, insights, resources, and professional learning opportunities for science educators by science educators on the Next Generation Science Standards and three-dimensional instruction. Click here to sign up to receive the Navigator every month.
Visit NSTA’s NGSS@NSTA Hub for hundreds of vetted classroom resources, professional learning opportunities, publications, ebooks and more; connect with your teacher colleagues on the NGSS listservs (members can sign up here); and join us for discussions around NGSS at an upcoming conference.
The mission of NSTA is to promote excellence and innovation in science teaching and learning for all.
Future NSTA Conferences
2018 STEM Forum & Expo
Dive into Three-Dimensional Instruction Workshop
2018 Area Conferences
2019 National Conference
Follow NSTA
 |
 |
 |
 |
 |
Disclaimer: The views expressed in this blog post are those of the author(s) and do not necessarily reflect the official position of the National Science Teaching Association (NSTA).
Astronomy Crosscutting Concepts Earth & Space Science NGSS Phenomena Science and Engineering Practices Teaching Strategies Three-Dimensional Learning Elementary