
feature
Wondering About Wobbling
An earthquake design challenge for upper elementary students
Science and Children—January/February 2022 (Volume 59, Issue 3)
By Alexandria Muller, Tarah Connolly, John Galisky, Ron Skinner, Devon M. Christman, and Danielle Harlow
As the world becomes increasingly complex, students will be faced with problems that require outside-of-the-box thinking. The complexity of these problems is compounded when considering the needs of people and their impacts on the environment. The Next Generation Science Standards (NGSS) incorporate engineering design to develop students’ skills at defining and delimiting problems, designing solutions to problems, and optimizing the design solutions—all while maximizing benefit and minimizing risk (NGSS Lead States 2013). Design thinking furthers the engineering design process by acknowledging that solutions to engineering design problems may differ depending on the community the solution serves and the environment for which the solution is designed (Brown 2008). For example, if the challenge is to “build a strong building,” students located in Florida would consider whether the building could handle the strong winds and rains of a hurricane, while students located in California, where earthquakes are common, may view strong buildings as those that can withstand earthquakes.
Through a partnership with a local interactive science center in California, we developed engineering activities that engaged students in design thinking. The activity presented in this article is part of a four-part module that centers earthquakes as a common phenomenon that our students experience and introduces the idea of a resonant frequency. When the seismic waves from an earthquake encounter a building, the subsequent oscillating motion of the ground causes the building to move back and forth. Some seismic waves are long and slow; others move back and forth quickly. Buildings react differently to the different types of motion, sometimes producing surprising results. For example, students may see images of the results of earthquakes in large cities where only the medium height buildings are damaged and the tallest and shortest buildings remain undamaged. This happens because each building has a natural frequency at which the building naturally vibrates back and forth. If the ground motion from an earthquake matches the natural frequency of a building, the building will begin to sway back and forth in larger and larger motions. When this motion becomes large enough it can cause extreme structural damage. While scientists would refer to the natural frequency at which the building sways as its resonant frequency, we use the term wobble point throughout this activity.
The activity described here was implemented on a field trip to an interactive science center. We assume that students have some experience with the relationship between wavelength, frequency, and energy transmission through waves, either from activities in standard curricula about waves or through two classroom activities that we have developed as optional supplemental activities for teachers to use prior to bringing their students on the field trip (see Online Resources). In the first activity we have developed, students explore various structures around their schools to develop an understanding of common stabilizing methods used in construction. In the second activity, students explore the resonant frequencies of different-size strips of cardstock as they vary the frequency of the shaking motion applied to the strips. During this activity, they develop an understanding of how waves can cause objects to move as they transfer energy to the cardstock strips. The activity presented in this article pulls upon the knowledge and experiences gained in these first two classroom activities as students are challenged to stabilize three-dimensional buildings on variable frequency shaker tables. This was piloted as a field trip program to the interactive science center with fourth and fifth graders. Below we outline the full activity, provide sample student ideas that were shared during our testing, and offer some suggestions for adapting this activity to a classroom environment.
Engage
We engaged students by demonstrating the motion of a tall 1:75 scale model skyscraper building frame made from K’nex pieces on a variable frequency shaker table that had a fixed motion amplitude, or distance the table moved side to side. As such, students could vary the frequency of the shaker table but not the size of the movement. Students observed the motion of the building while a facilitator adjusted the frequency of the shaker table platform slowly from 0 cycles per second (platform is still) to 24 cycles per second (maximum frequency of shakes). The facilitator elicited student observations by asking, “What is going on here?” and “Why do you think that?” to which several students responded “earthquake…because the building was shaking.” One student mentioned that the building “is strong because it didn’t fall down when it wobbled back and forth.” Think-pair-share or reflective writing may be used to encourage student participation in this discussion.
Explore
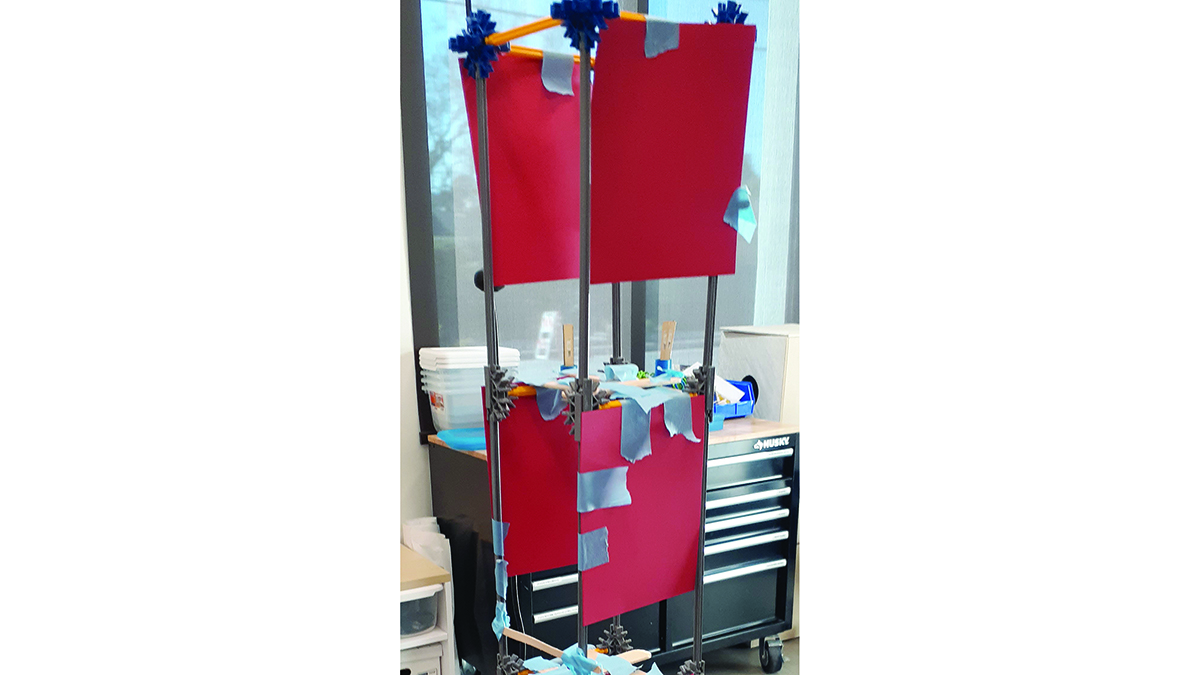
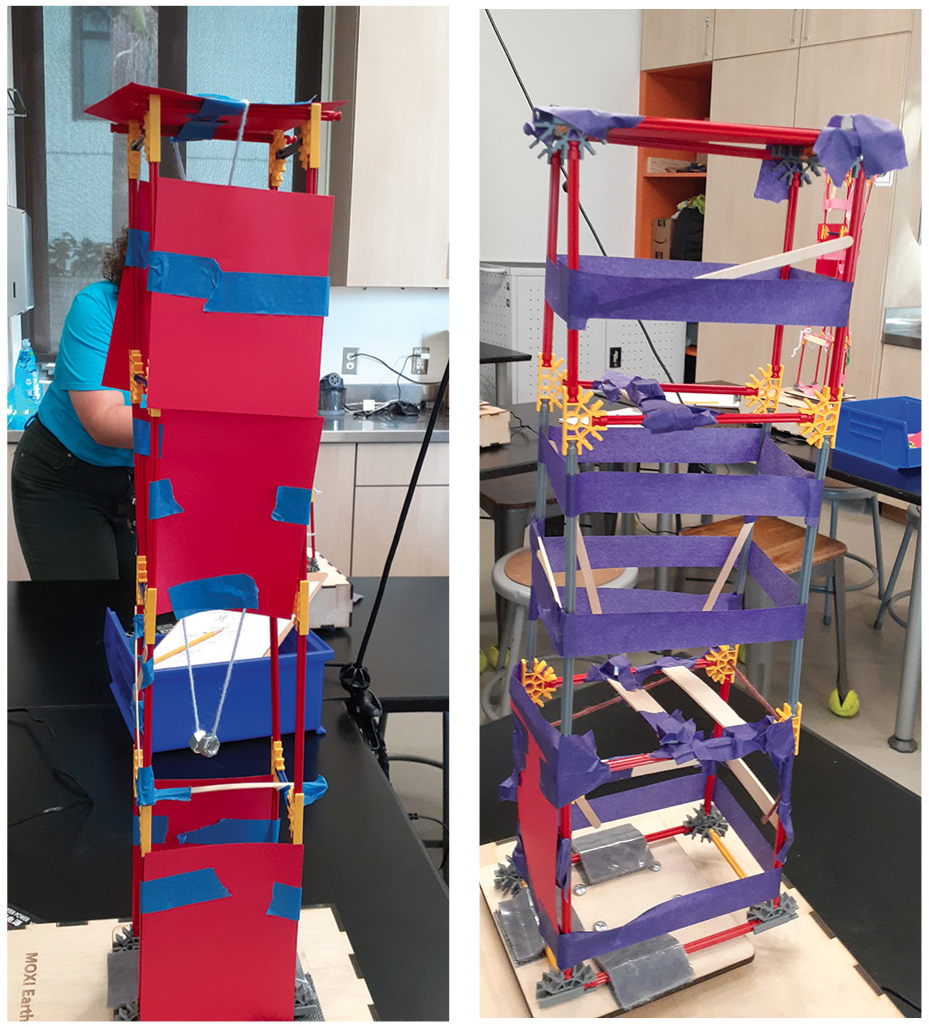
The facilitator then shifted the focus of the discussion from the single-building demonstration to six different models of building frames made of K’nex placed around the room on shaker tables. The buildings varied in height from 0.5 m (20 inches) to 1.0 m (39 inches) and each model building featured slightly different construction. In two of the buildings, a pendulum was created by suspending a metal washer on a string between two horizontal beams; two buildings had note cards taped to the vertical beams; and two buildings used diagonal craft sticks as braces to connect corners of beams (Figure 1).
Building demonstration models.
Students identified that the key differences between the buildings were that there were three sizes of buildings (short, medium, and tall) and that some buildings had additional materials attached to them. Working in small groups, students rotated amongst each building station and tested the movement of the building through the full range of frequencies. It is important to note that all model buildings were secured to the shaker tables using Velcro to ensure the safety of students. In addition, the frequency of the shaker table never exceeded the breaking point of the model buildings so students were not in danger of the buildings collapsing onto them. When all groups had tested each building, the facilitator asked students to share their observations and inferences about what was happening. One student noticed that the two metal washers hanging on a building were positioned perpendicular to each other (see Figure 2 for model of this setup) and only the pendulum oriented along the same direction as the motion of the shaker table swayed during testing. Another student suggested that “the one that weighs less moves slower and the one with more weight moves faster” (note that the students did not weigh the buildings, but the student may have assumed that the taller building was heavier than the shorter one). Another student observed that “when you start going to the max [highest frequency], [the building] starts moving a lot, but when you put it to the max it stops moving a lot and just stays still.” The facilitator built upon this observation and asked students if anyone else had noticed a similar phenomenon during their testing to which several students responded affirmatively. Connecting the idea that buildings wobble more at certain frequencies to concerns of safety, students claimed that they would rather have buildings that shook less drastically because it would be safer.
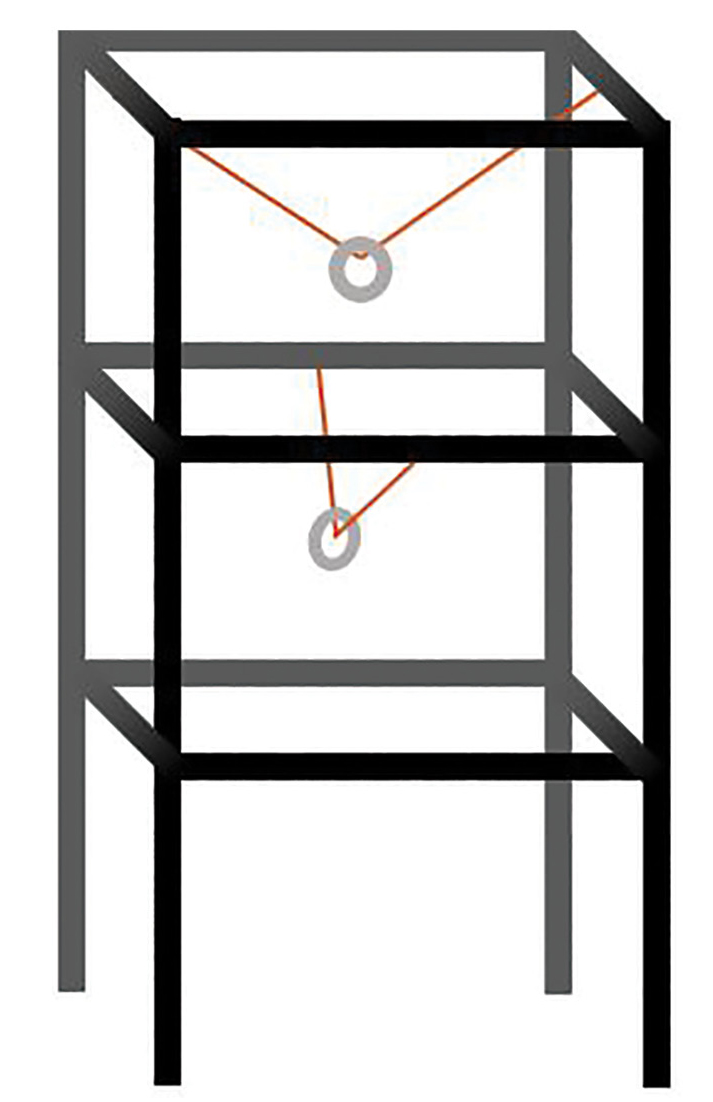
Model of setup with washers.
Design and Iterate
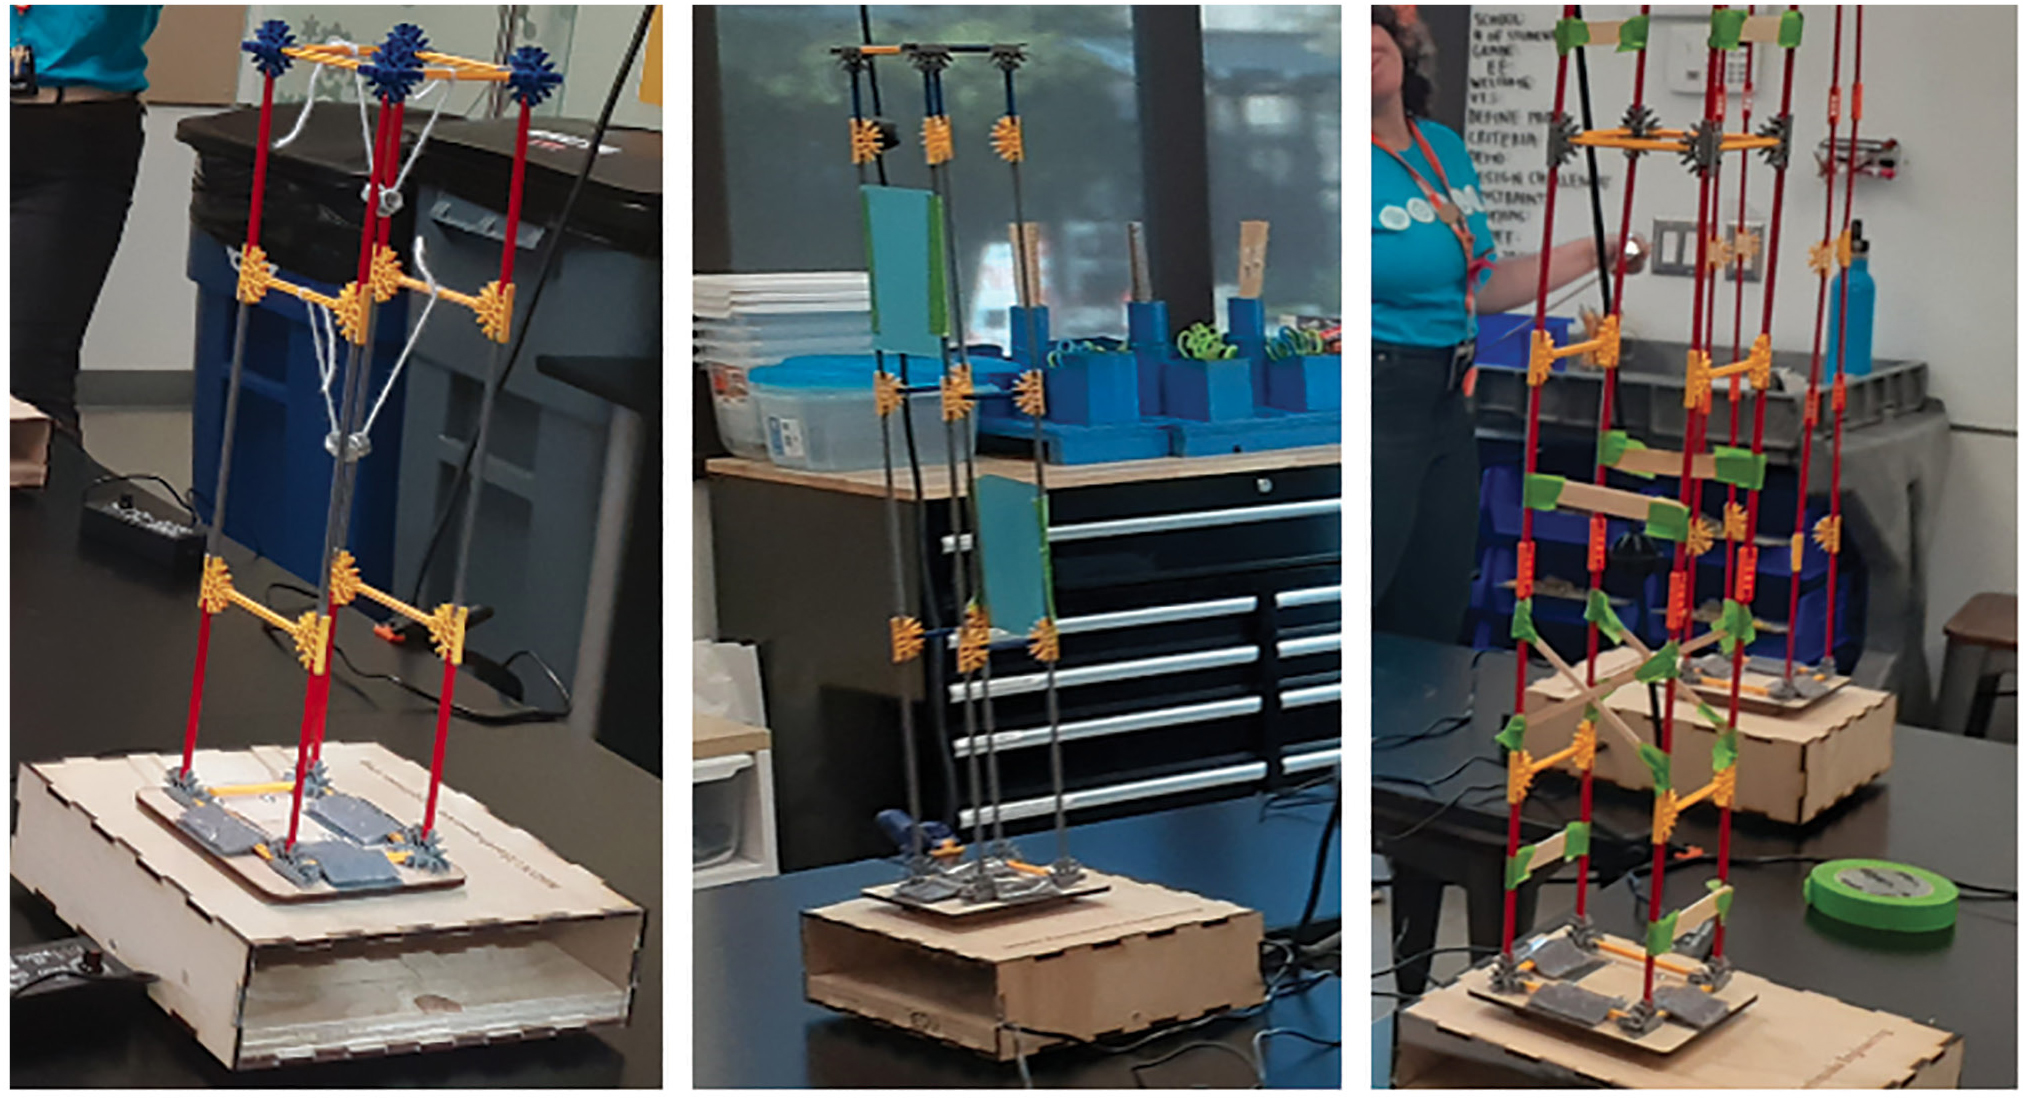
The students’ observations of buildings that shook less during an earthquake led to the design challenge: to modify existing buildings to make the structures as safe as possible during an earthquake. Eliciting ideas of how students would know they achieved this challenge, the class developed the criteria that students would reduce (or dampen) the movement of the building at its “wobble point” (resonant frequency). The facilitator added an additional criterion that students could not alter the base structure of the building or alter the height of the building. Constraints, or limitations, of the design challenge were outlined by the facilitator noting that students would have access to limited materials to use in their designs and only 25 minutes to complete their task. Each group of students was provided with a unique building made of K’nex without any crossbeams or additional bracing and access to cardstock paper, tape, string, metal washers, and craft sticks. They spent five minutes identifying the initial wobble point of their building, brainstorming their design solutions, and drawing them on paper (Figure 3). Afterward, students spent 20 minutes iteratively testing and revising their design solutions. While this time was a free iterative design and test period, students were encouraged to draw upon their observations earlier on how different braces affected the sway of the building, as well as test frequently in between adding layers to their design solution.
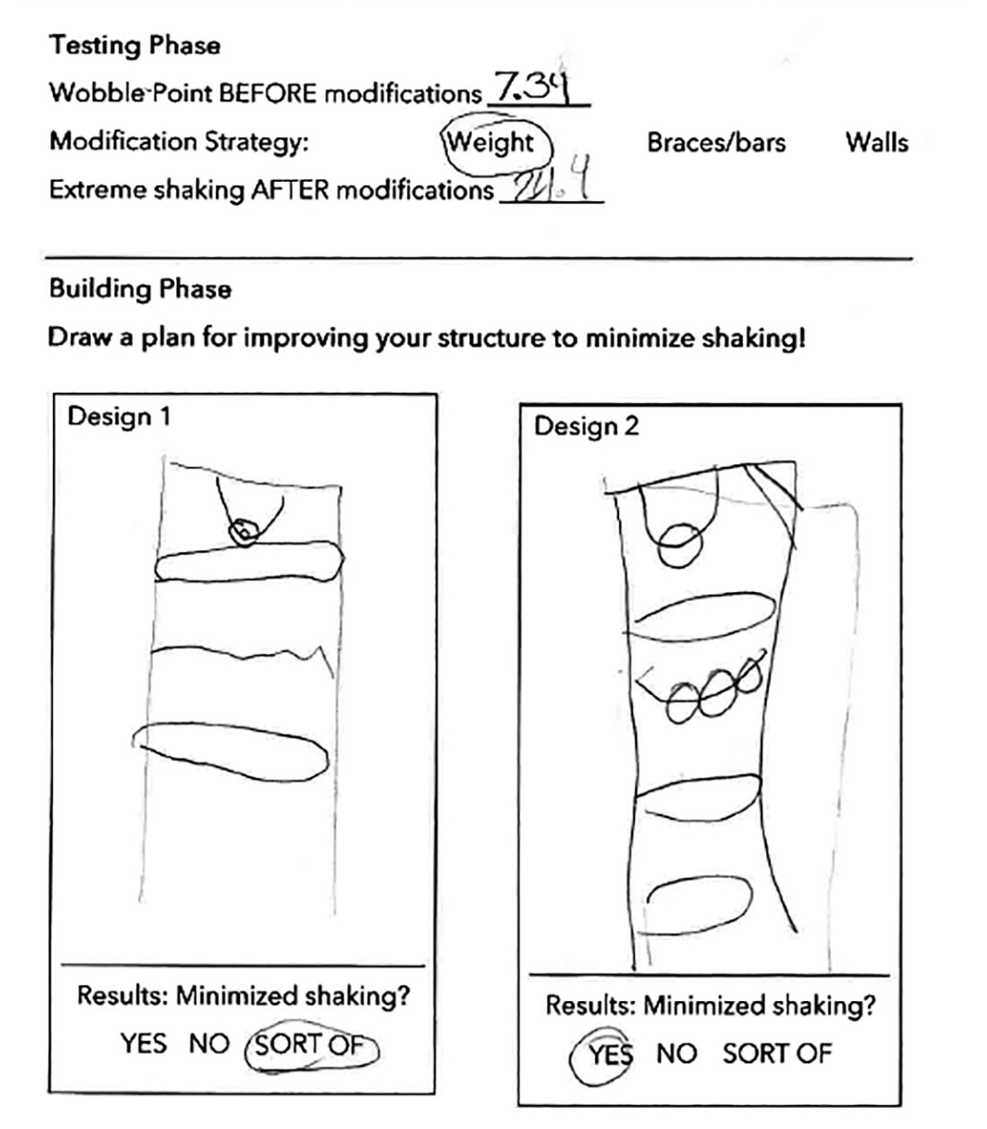
Student planning sheet.
One group of students started by using the pendulum design they observed earlier; however, after testing, they decided that the building still swayed too much and chose to use paper and tape to minimize the wobble (Figure 4, left). Another group attached pieces of paper along the outside, then added cross beams using craft sticks at each level of the building (see photograph on first page). A third group started by using craft sticks to create cross beams but noticed that there was still quite a bit of swaying between levels. They chose to add thin craft sticks in a triangle formation to support the corners of each level of the building, and after another round of testing, they added several rings of tape around the outside to hold the four posts of the building (Figure 4, right).
Student work examples.
Following this iterative build and test period, the facilitator led a full-class discussion, asking students to share the frequency of their wobble point, what they chose to modify, and what happened when they tested the modified building. One group shared, “Our wobble point was 11.2 [cycles per second] and we made [the building] thicker…heavier… We put craft sticks, tape, weights.” They noticed that by bracing their building, it stopped wobbling at 11.2 cycles per second but now had a new wobble at 13.1 cycles per second. Other groups reported similar findings. The facilitator emphasized this finding that the motion of the building did not stop, but rather the frequency at which it wobbled excessively was shifted by the modifications.
Connections to the Engineering Design Process
To wrap up the activity, the facilitator led students through a discussion of the engineering design process highlighting how they had defined their problem, brainstormed, and designed solutions that they built and iteratively tested on their shaker tables. Students remarked that they needed to make lots of changes and tests to continue to address this design challenge. The facilitator ended by stating, “engineers are often faced with difficult challenges like making buildings as safe as possible and they engage in the same thinking processes that we used today to solve this problem.”
Assessment
The facilitator formatively assessed student engagement and learning throughout the lesson by eliciting student ideas, observing drawings of design solutions, and engaging students in discussions throughout the design process. Students showed thoughtful consideration of the design challenge and were able to construct explanations of how their design solutions affected the motion of the buildings using evidence from the testing of their prototypes. Due to the time constraints of field trip programs, more extensive assessment was not possible; however, if adapted for the classroom, teachers may consider asking students to reflect upon their observations of the effects of modulating the frequency on different heights of buildings to develop and represent a relationship between the frequency of the shaker tables, building height, and the movement of the buildings to assess for understanding of wave frequency, and energy transmission. When assessing student understanding, the observable features of student performance located in the NGSS 4-PS4-1 Evidence Statements may serve as a guide for scoring student work. Alternatively, assessment on student understanding of the engineering design process (EDP) may be done by asking students to detail how they used the EDP to modify their buildings. Students should identify the three parts of the EDP as defined by the NGSS—define and delimit the problem (dampen the motion of a building at a certain frequency), design solutions (modifications to their buildings), and optimize the design solution (iteratively test multiple solutions to find which one best meets the criteria and constraints of the problem). Students may represent this process as linear or circular.
Discussion
This activity introduced students to the concept of a resonant or natural frequency while supporting their use of design thinking through an engineering problem. Students were provided opportunities to define the problem using criteria and constraints that considered the needs of local populations, design creative solutions to address the design challenge, and iteratively prototype and test their design solutions. By providing students with a phenomenon that they were familiar with, they were better able to understand the needs of the users and clearly define the problem and associated criteria.
This activity used shaker tables with variable frequencies, a tool that is not readily available in classrooms. We have provided a sampling of resources available online that detail how to construct low-cost (<$20) shaker tables such as Questacon or the Teaching Channel (see Online Resources). One limitation to these designs is the inability to consistently control the frequency of vibrations. The resource we provide from Michigan Technological University describes how to build a controllable shaker table for around $125. Alternatively, teachers could use a steady flat surface such as a clipboard or piece of cardboard for the buildings to rest upon. Students can shake this platform to simulate an earthquake, making sure that the back-and-forth distance the board moves is constant and changing only the rate at which the platform shakes (approximately 0–25 cycles per second).
An important distinction within this activity is that we were not testing buildings to failure, a common activity in engineering-focused curricula, but rather designing modifications to shift the natural frequency or dampen the movement of the building. If using a manual shaker table, remind students that the goal of the challenge is not to shake their designs until they break but to observe how the building moves under different frequencies of shaking that simulate what would happen during a real earthquake. While it can be useful to test to failure and learn about solutions that do not work, ultimately, students are tasked with finding an effective solution like a professional engineer. Also, alternative materials such as craft sticks or straws could be used to construct the models.
All over the world, natural hazards like earthquakes must be considered in designing buildings that are resilient and yet affordable. In California and much of the western United States, where students have experienced earthquakes, they may also observe the measures taken on new buildings and retrofits made to older buildings to mitigate the effects. Shaker table activities like the one described here give students opportunities to recognize the importance of these mitigation efforts and explore the many ways in which large buildings can be reinforced. ●
Acknowledgments
This material is based upon work supported by the National Science Foundation (grant EEC-1824856; EEC-1824859). We’d also like to thank the contributions of Christine Hirst in the preparation of this manuscript.
Online Resources
Pre-Activity Instructions
https://faculty.education.ucsb.edu/dharlow/ee3-earthquake#overlaycontext=research/engineering-explorations
Resources for Building Shaker Tables
Build a Shake Table. Teaching Channel
https://learn.teachingchannel.com/video/build-shake-table
Hagbo, C., K. Walch, R. Barron, and J. Diehl. 2001. Earthquake shake table. Houghton; Michigan Technological University.
Questacon Teacher Workshop 1: Shake Table
https://www.questacon.edu.au/resources/teacher-resources/shake-table
Alexandria Muller (Almuller@ucsb.edu) is a PhD student at University of California, Santa Barbara. Tarah Connolly is a graduate student at the University of Wisconsin, Madison. Ron Skinner is a PhD student at University of California, Santa Barbara, and a research and evaluation specialist at MOXI, The Wolf Museum of Exploration + Innovation in Santa Barbara. John Galisky and Devon Christman are PhD students at University of California, Santa Barbara. Danielle Harlow is a professor of STEM Education at University of California, Santa Barbara.
Engineering Instructional Materials Interdisciplinary Labs Teaching Strategies Technology Elementary Grade 4 Grade 5