
engineering encounters
Wipe Out: Preventing Water Hazards
Science and Children—March/April 2022 (Volume 59, Issue 4)
By Jordan Holub and Jerrid Kruse
Elementary students often hold misconceptions about engineering, including that engineers primarily fix, build, and work with materials (Capobianco et al. 2011). While engaging in engineering tasks is useful, learning about the nature of technology and engineering (NOTE) may provide students with deeper insights. NOTE teaching and learning requires students to wrestle with how engineers work and how technologies interact with society in both positive and negative ways. Drawing from those who have explored the NOTE philosophical literature (Pleasants and Olson 2019; Pleasants et al. 2019), researched NOTE learning (DiGironimo 2011; Kruse 2013), as well as classroom tested NOTE activities (Easter, Hollister, and Wilcox 2019; Holub, Kruse, and Menke 2019; 2020; Kruse and Wilcox 2017; Wilcox et al. 2019), this activity engages third-grade students in designing solutions and creating models to test out their ideas and make a claim about the merit of a design solution that reduces the impacts of a weather-related hazard (3-ESS3-1; NGSS Lead States 2013). After designing a solution, students generate and compare multiple solutions to a problem based on how well each is likely to meet the criteria and constraints of the problem (3-5-ETS1-2).
Introduction Activity (30 minutes)
To introduce the weather phenomenon of flooding, we started by showing students a YouTube video “Why do Floods Happen?” We asked, “What did you notice about floods?” One student shared, “There is a lot of water and it causes damage to the places the water hits.” We follow by asking, “How do you think floods occur?” One student shared that, “It rains a lot.” A different student shared, “Snow could melt and create a flood.”
After some initial idea sharing, we brought out a model replica of a neighborhood in a clear plastic container (comprised of sponges, toy cars, sand or dirt, legos, toy trees, scissors, clay, aluminum foil, tape, and glue). We had students make predictions by asking, “What do you think will happen when we spray the neighborhood with water from this spray bottle?” We used the think-pair-share model to have students talk to partners. When we began spraying, students noticed that the neighborhood looked the same but was wet instead of dry. We increased the sprays from the bottle. Then we used a colander to show how more rainwater creates increased change to the neighborhood.
To better understand what the students were noticing, we asked, “How has the increased rain changed the neighborhood?” Students noticed soil moved and other items in the model neighborhood were misplaced. We asked, “How could the change affect the neighborhood or the people in it?” Some students shared that people could get water in their basements, one student shared that the plants may die due to the amount of water.
Having previously read Rosie Revere, Engineer (Beatty 2013), we reminded students what engineers are and the work they do by asking, “What are some engineering examples?” One group shared, “Engineers build tall buildings and make sure they don’t fall down.” A different group shared, “Engineers create cars that keep people safe.” We then asked, “How do you think an engineer might be able to help address the problem of flooding?” Students thought that engineers might build bridges or move buildings to higher ground.
Planning for Flood Prevention (40 Minutes)
Reflecting on the previous day, we asked, “What occurred as more rainwater began to fall?” As students talked with a partner, we walked around listening for any misconceptions students may have about flooding. One misconception was that the water will rise without absorbing into the ground first. To confront such misconceptions, we brought our model back out and asked, “What happened to the first sprays of water?” Students usually note that it soaks into the sponges, but sometimes we scaffold by asking, “How do the sponges, or the soil of our model, prevent flooding for a little while?” With this scaffolding we pushed kids further by asking, “Even though there are sponges, why could it still flood?” One student noted, “Sponges can hold only a certain amount of water.” At this point, we move onto flood control and prevention.
To introduce the task, we asked, “We saw yesterday the effects of excessive water and flooding, how might we prevent a flood from occurring?” A couple students shared, “Someone could build a cement wall around their houses” and “A dam could be built.” We bring in NOTE by asking, “Sometimes an engineer might build a model to see their ideas visually, why might a model help engineers plan? Students easily note that models help test ideas and show others your ideas so we asked, “What materials could we use to create models in preventing a flood?”
While students shared many ideas, we needed to narrow down the options, so we displayed a variety of materials that students may use for their planning. We provided construction paper, tape, LEGOs, glue, scissors, clay, sponges, and aluminum foil. We incorporate the nature of engineering (NOE) by asking, “Why might an engineer be specific with their material choice?” One student shared, “They want to make sure their structures are reliable and sturdy.”
Students are purposely paired by mixed ability levels to ensure students receive equitable learning opportunities. Students with fine motor issues might use larger blocks to build their flood prevention model. After students are paired, we give them 20 minutes to begin planning their flood prevention creation. We provide paper and pencils for students to write and draw their ideas. Some groups start by drawing their creation. Other groups jump into creating their model. When we noticed these different approaches, we stopped the class and asked, “I notice some groups are drawing pictures, and others using the materials right away. Why is there not just one way to do engineering?” One student shared, “Our group talked about what we needed to do so we did not need to draw it out.” In total, we give them approximately 20 minutes to work.
In the final five minutes of class, we incorporated additional aspects of NOTE by asking, “Your groups elected to have individuals do different parts, why might engineers divide their work?” One group shared that one student was a good artist so they drew the ideas while other students gathered materials and started creating the model.
Refining and Building Models (40 Minutes)
The next class session, we have students review their model thus far. We want students to be thinking about NOE so we ask, “Your group might decide to make some revisions, why might engineers make revisions to their models?” One group shared that a model is less expensive to build than the actual structure, and another student noted that a model might show a mistake or problem. We introduce the word iterations and explain that engineers often make multiple versions of something as they improve their designs.
We have students discuss possible revisions with their groups. One group noted that their structure made of blocks allowed water to fill in through the gaps, so students placed aluminum foil over the blocks to prevent water from entering. Another group shared their structure was too thin and fell over so they increased thickness in order to create a stronger structure. After approximately 15 minutes, all groups were finished and ready to present their models to their classmates using clear containers (see Figure 1).
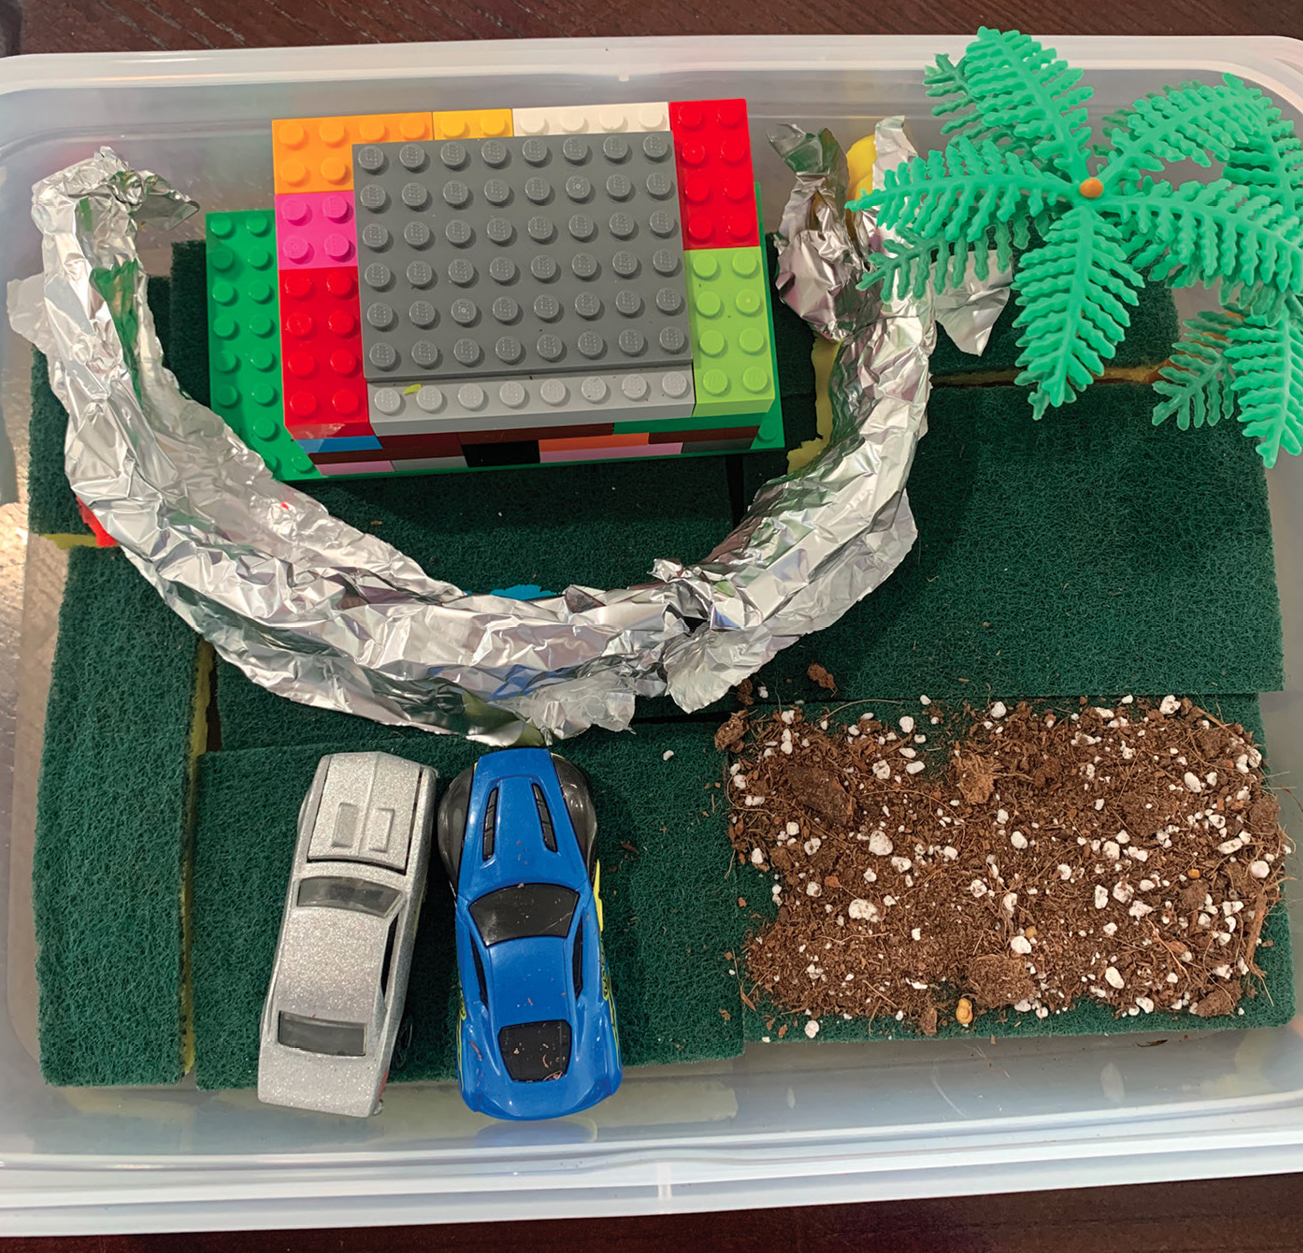
Student model example.
One group at a time, we tested out their models by pouring water through the colander. Students took notes of what went well and modifications needed for the next iteration. After each group presented, we came together for a discussion. We bring in NOE by asking, “Engineers have to deal with constraints when designing their models, what constraints did you face?” One group shared that they did not have enough time to make their model thick enough so water knocked it down. We also ask, “After seeing the different models and how they worked, what changes might you make to your next iteration?” to help students understand that engineers are always wanting to improve their designs. If time allows, students make changes and test their models one more time.
Assessment (20 minutes)
After students have presented their models, we have students complete an assessment. This assessment allowed us to see if students could make a claim about the merit of their design and support their claim with evidence. We used a rubric to grade student proficiency (Figure 2).
Water prevention rubric.
Lasting Effects of Water (30 minutes)
For the next class session, we wanted students to consider the repercussions of human decisions. To review, we asked, “What were some of the engineering ideas you incorporated during the investigation?” Students brought up how engineers make improvements to designs and how they need the materials to be reliable to create a safe environment.
We turned attention to pictures of different real life and local flood prevention techniques such as a dam and a levee (Figure 3). We used picture examples from our local area to connect to students’ preexisting knowledge or show students real-life examples around them. We suggest teachers use pictures from their local area or even have students visit a dam. We gave each table group of students two or three different pictures. After student groups observed the pictures and discussed their observations, we asked, “What do you notice about these pictures?” One student commented that the features were very big. A different student shared that cement was used a lot. Some students wondered how the rolling dam worked since water was falling over the side. Other students chimed in that the dam only lets some water instead of all the water through.
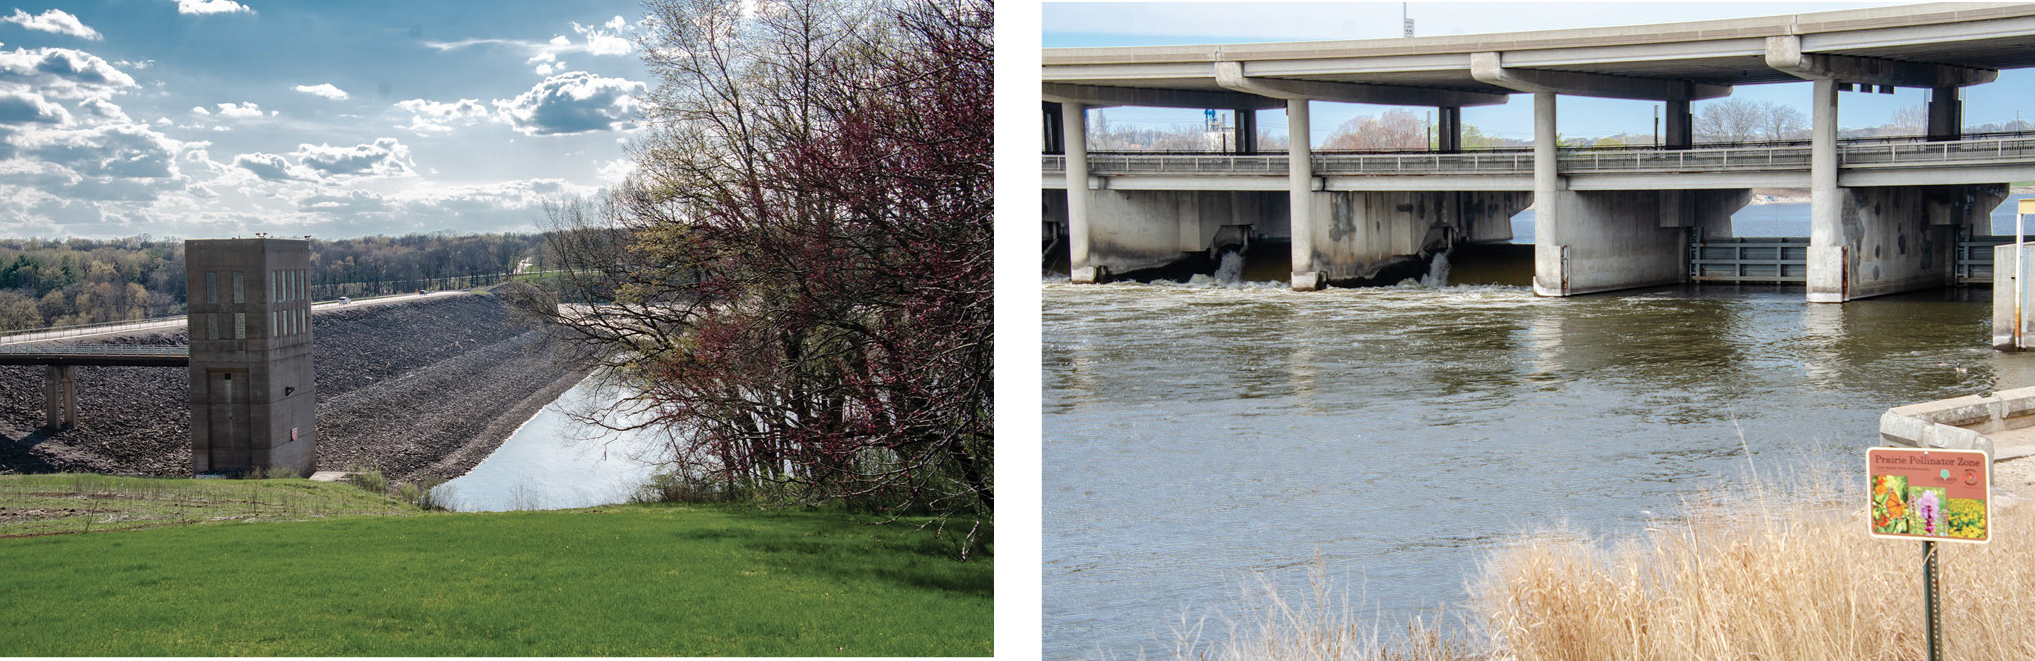
Real flood prevention techniques.
We used these activities to help students understand structure and function relationships by asking, “When you think about your models, how did the shape of your structures affect their ability to hold back water?” Students remembered that some of their walls were too thin and easily leaked or broke. We reiterated that the structure had to be thick so it could serve the function of holding back water. To connect structure and function to the real-world examples, we asked, “How do the structures in the pictures hold back water?” One student shared that their picture had a wall that could move up and down to allow water through when needed. A different student shared that their dam looked like it stopped water and didn’t allow it to move any further. We built on the first response by asking, “What function do you think the moving wall structure served?” Students recognized the movable wall structure allows the dam to let more or less water through.
We want students to understand that dams and levees have advantages and disadvantages that engineers need to weigh before making decisions. We started by asking, “What are the advantages of dams and levees?” One group shared that dams can help make electricity with the water. A different group shared that flooding doesn’t occur as often and that drinking water can be created. We pushed students to consider disadvantages by asking, “What is something you or your group shared as a disadvantage of dams and levees?” One student shared, “My partner and I think that it would be expensive.” Another student shared, “The amount of materials needed and the size of the structures.” A different group used “Frozen 2” to note that if the dam breaks, water would flood the town. We use this to push the students by asking, “If the dam breaks, that is a problem, but how did building the dam create problems?” With this prompting, the students remembered the negative effect of the dam on the people and nature who lived above the dam.
Because the students recognize the effect the dam may have on nature, we have students make predictions about what could occur with a dam in the forest. After a small-group discussion we ask, “What are the constraints engineers face with this scenario?” One student shared that animal habitats could be destroyed. To help students connect their thinking to consequences of decisions, we ask, “Why should engineers always consider what might go wrong when they are designing?” and “Why is there always a negative or downside with designs?” With these questions we are encouraging kids to recognize that all technologies have trade-offs.
When time allows, we push students a bit further by asking, “How do you think building dams changes the way we as humans think and act?” Students sometimes struggle with this question so we asked, “How do you think our city is different because of levees near the downtown river?” With this prompting the students are able to note that the buildings there might not be as tall or even have been built if that area flooded. We then ask, “How do you think dams and levees change the way people think about the weather?” After some group discussion time, students explained that people maybe don’t have to think about the weather as much, like how much rain happens, because they think the levee or dam will protect them.
Conclusion
Inclusion of engineering in the science curriculum can generate interest and excitement for students. However, such experiences can be done with little critical thinking or connection to the natural world. Therefore, we work to leverage this engineering activity to help students think more deeply about nature and think critically about engineering and technology. Through such discussions, students can make connections to real-world problems, engage in problem-solving, and become more critically aware of technology’s role in shaping our environment. ●
Jordan Holub (jordan.holub@drake.edu) is a doctoral candidate, and Jerrid Kruse is the Baker Professor of Education, both at Drake University in Des Moines, Iowa.
Earth & Space Science Engineering Environmental Science Interdisciplinary Phenomena Physical Science Teaching Strategies Elementary