
Teaching Teachers
Up To the Moon!
Using engineering to explore the Moon’s height in the sky with future teachers
Science and Children—November/December 2020 (Volume 58, Issue 2)
By Pamela Lottero-Perdue and Cody Sandifer
For over a decade, we have asked our undergraduate preservice teachers (PSTs) to investigate the Moon. In this investigation, our PSTs ask questions about our natural satellite, make real Moon observations, and attempt to answer their questions. One learning outcome is that the PSTs learn how the Moon moves across the sky from rise to set. Recently, we have added an engineering design challenge that: (1) introduces our PSTs to the two engineering-specific practices within the Next Generation Science Standards (NGSS) (Defining Problems and Developing Solutions) (NGSS Lead States 2013), and (2) involves the PSTs designing a tool —a quadrant—and then using it to measure the height of the Moon in the sky. The main purpose of this article is to explain the content, timing, and resources of the engineering and Moon observation lessons. More specifically, in this article we: Provide background about our course and instructional philosophy; Describe a quadrant and how it is used; Outline a lesson in which PSTs examine a quadrant to see how it works, engage in the engineering design process to design their own quadrants, and use their quadrants to observe the Moon; and Discuss how the height of astronomical bodies and the engineering design process can be connected to elementary classrooms.
Additionally, we provide suggested adaptations for online and socially distant learning. Here, “socially distant” means that learning occurs in a face-to-face format, but students do not work together in close proximity or handle the same materials.

Teachers test their quadrants.
Background
Each year, we prepare over 100 PSTs to teach elementary-level science and engineering. We do this in part by offering an Earth-Space Science course in which the PSTs learn content via active learning and engagement in scientific and engineering practices. This course is supported by our NGSS-based workbook that includes the engineering challenge and Moon investigation featured here.
There are two tenets that drive our instructional approach. First, in order for our PSTs to learn to be effective science and engineering teachers, we must not only discuss best practices in instructional methods, we must also model effective teaching practices. Among other things, this means our PSTs are not just learning about science and engineering; rather, they engage in scientific and engineering practices themselves and through their investigations learn cross-cutting concepts and disciplinary core ideas (NGSS Lead States 2013). Second, the PSTs should understand science and engineering concepts more deeply than is expected for their future elementary students. This means that the lesson presented here necessarily contains concepts that are somewhat beyond what elementary students would be expected to know.
What is a Quadrant?
A quadrant is a 2000-year-old technology that enabled early astronomers to better study the patterns of movement of celestial objects and helped maritime navigators to know where they were and where they were going (Figure 1). It is a simple device made of three parts: (1) a flat piece in the shape of a quarter circle with angular markings on the curved edge and two bumps (or “sights”) on one of the straight edges, (2) a string attached to the corner of the flat piece, and (3) a weight attached to the other end of the string that keeps the string taut.
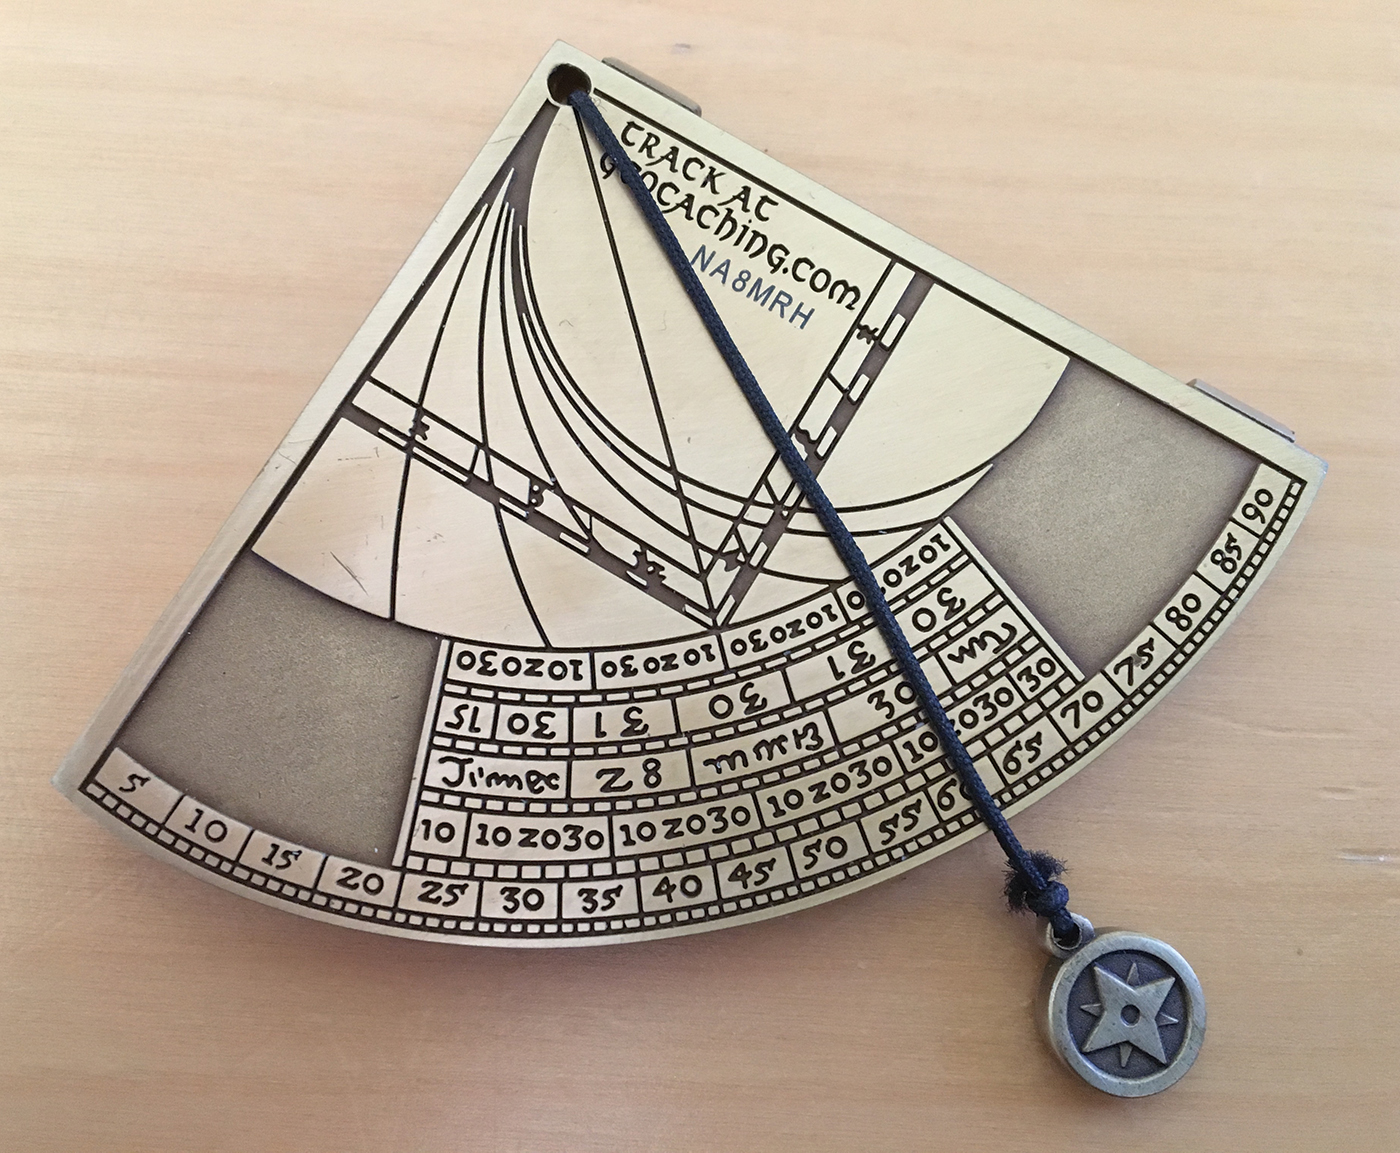
Brass quadrant.
Obtaining Quadrants
Quadrants can be purchased, but are hard to find and can be expensive. Kevin Perdue, a mechanical engineer, designed a simple quadrant using a 3D modeling program. Instructions for 3-D printing and assembling these quadrants are available for download from the NSTA website. 3-D printing is relatively inexpensive and can be done at many local libraries or through websites such as TinkerCAD. Assembly is simple, involving threading and tying both ends of a string.
The purpose of a quadrant is to measure the “angular height” of an astronomical body (see Figure 2, top). If the person in Figure 2 were using a quadrant, it would read 21°. An object directly overhead would have an angular height of 90°, and an object on the flat horizon would have an angular height of 0°. (Quadrants should not be used to directly measure the angular height of the Sun, as this will cause eye damage.)
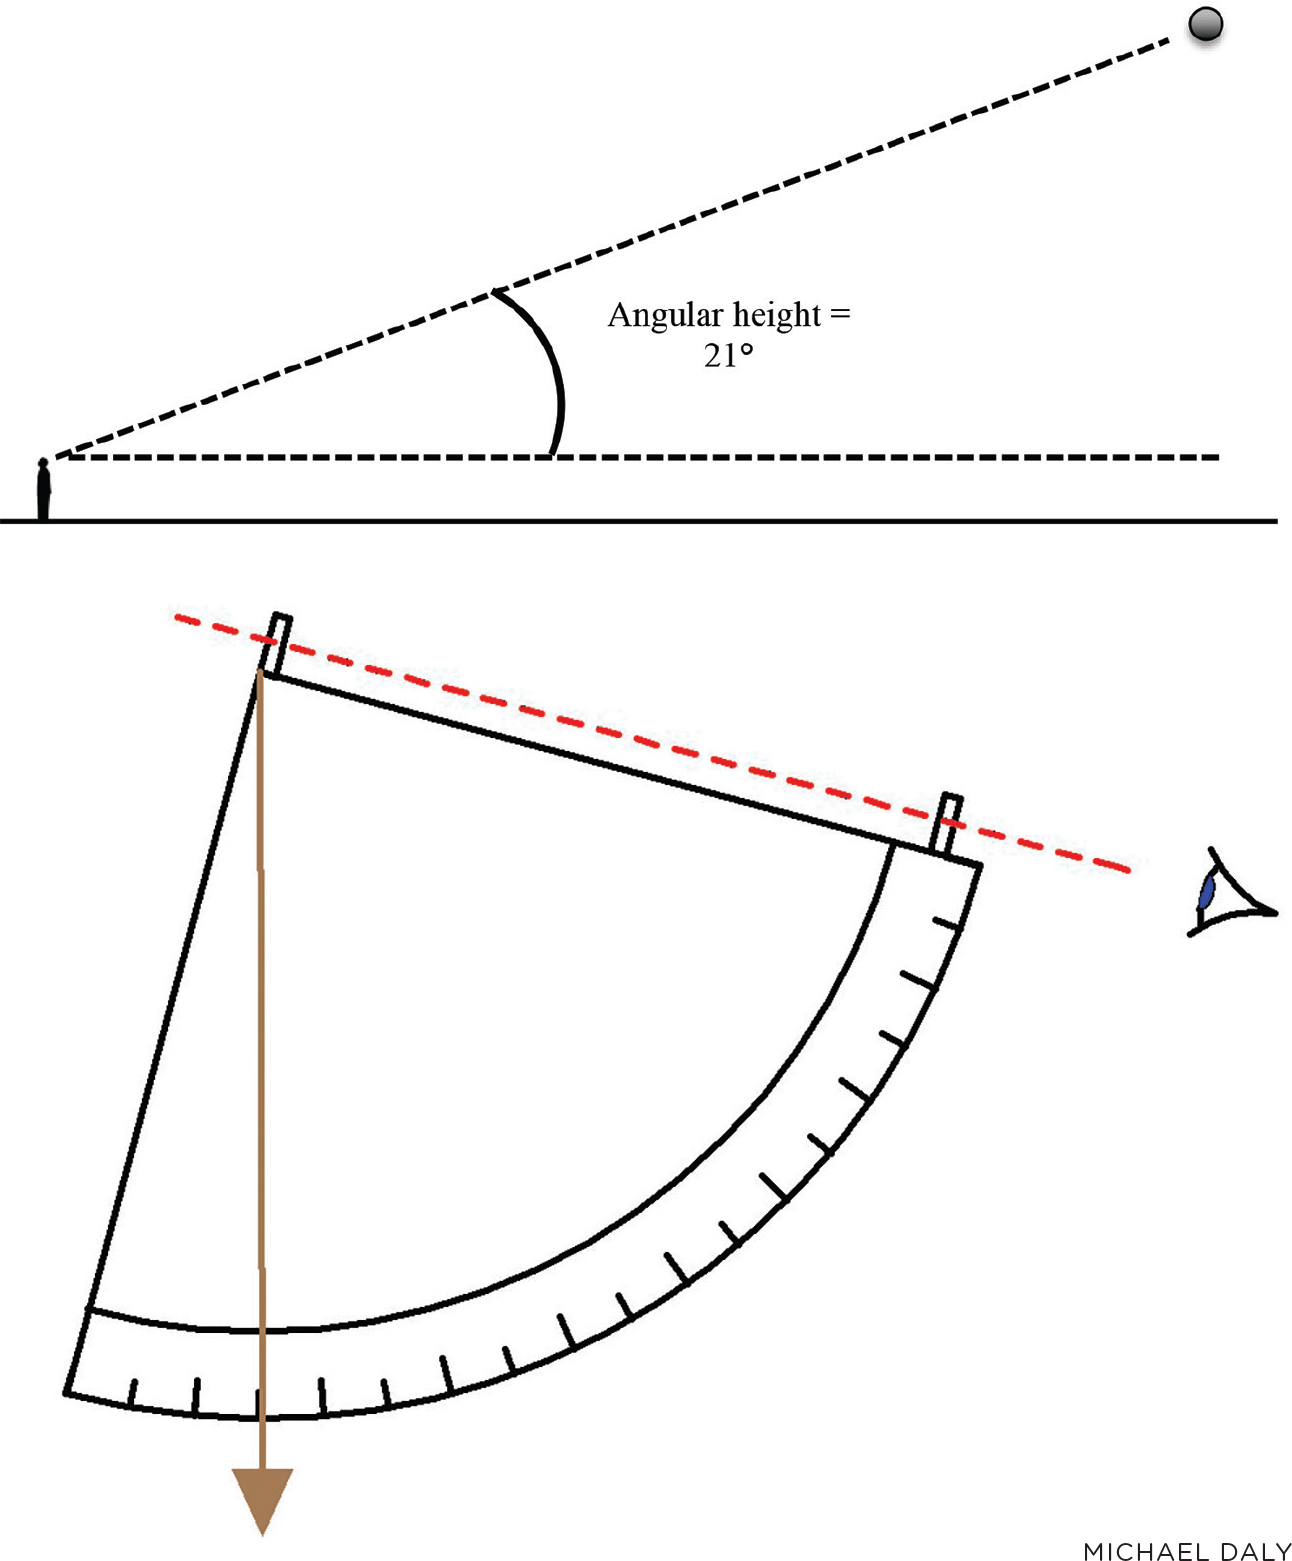
Using a quadrant to measure “angular height” of an astronomical body.
Introducing and Reverse Engineering Quadrants (30 Minutes)
We begin our lesson by presenting an image of a quadrant to our PSTs. We show Figure 1 and describe the purpose of the quadrant but do not demonstrate or describe how to use it. Next, we hand out one quadrant to each team of three or four PSTs. Some of these quadrants were purchased like the one shown in Figure 1, and some were 3D-printed. We ask each PST team to figure out how to use the quadrant to measure angular height given the ideas that (1) something on the horizon has an angular height of 0°, and (2) something directly overhead has an angular height of 90°. This figuring out, we share with our PSTs, is part of “reverse engineering,” i.e., analyzing or taking apart a technology to determine how it works. Engineers reverse engineer for many reasons, including to copy or improve upon a technology (Petroski 2011).
We walk around, listen to the PSTs’ ideas, and if necessary provide hints to redirect them. If the PSTs are unable to figure out the procedure for using the quadrant we may suggest that they feel the edges of the quadrant, noticing that there are two bumps on one straight edge, or that they allow the weighted string to hang down. If PST teams continue to struggle after 10 minutes, we present a drawing of a quadrant that clarifies its use (Figure 2, bottom).
To summarize their learning, we ask our PSTs to draw a quadrant, label the important parts, and write a short procedure for how to use a quadrant. This reverse engineering experience reinforces the NGSS crosscutting concept of Structure and Function in that the PSTs ultimately see how the three parts of the quadrant work together to measure angular height. We also ask the PSTs to consider why it is called a quadrant, connecting to Common Core State Standards (CCSS) in mathematics concepts related to recognizing angles (NGAC and CCSSO 2010).
Adaptations for Online Learning. If doing this reverse engineering activity online, provide access to documents—i.e., image of the brass and/or 3D-printed quadrant, a drawing that shows what is meant by angular height, and a drawing that clarifies how a quadrant is used—and links to short videos about how quadrants work (see Internet Resources). This can be done synchronously (live, with everyone meeting all together) or asynchronously (not live, with the PSTs working on their own). The analysis of physical quadrants, while beneficial for learning, is not absolutely necessary and may be skipped. If resources allow, quadrants could be purchased or fabricated and mailed to PSTs for analysis. We recommend having a synchronous discussion prior to PSTs being asked to create quadrant drawings and procedures; the purpose of this discussion is to ensure that PSTs understand how the quadrants work. PST’s labeled drawings and written procedures can be completed asynchronously and uploaded for instructor review.
Adaptations for Socially Distanced Learning: If doing this reverse engineering activity within a classroom in which the PSTs must be physically separated, the quadrant documents (images and drawings) and videos showing how quadrants work can be projected or viewed on individual laptops. Consider making or purchasing enough quadrants so that each PST can investigate their own.
Designing Quadrants Using an Engineering Design Process (210 Minutes)
We next challenge our PST teams to design their own functional, accurate quadrant using simple materials. Hereafter, we will call these “simple” quadrants. We give the PSTs an opportunity to ask questions about the challenge. They often ask: “What materials can we use?” or “How do we test the simple quadrants to see if they work?” This is a helpful segue into the Engineering Design Process (EDP) that we use for the challenge, developed by the Engineering is Elementary (EiE) program (EiE 2019). Table 1 summarizes the steps of the process: Ask, Imagine, Plan, Create, and Improve. As we guide our PSTs through the process we continually make them aware of where they are in the process and why that process step is important. This is an essential part of engaging PSTs in the NGSS practice of Designing Solutions.
| Table 1. The Engineering Design Process (EDP); modified version of EiE EDP (EiE 2019). | ||||||||||||
|---|---|---|---|---|---|---|---|---|---|---|---|---|
|
Ask (30 minutes). After allowing the PSTs to ask questions about the challenge, we present them with a design brief (Figure 3). The design brief answers most of the PSTs’ questions and provides information about the challenge’s problem, goal, constraints, and criteria. The goal represents how the problem will be tackled. Constraints are limitations placed on the challenge, while criteria are ways to measure design success or failure. The criteria for the challenge include that quadrants should be accurate, easy to use, and durable. These criteria are assessed via a rubric (see NSTA Connection). Together, the design brief and criteria rubric fully define the problem as described by the NGSS (Defining Problems). To conclude the Ask step, we prompt our PSTs to recall what they already know that is relevant to the challenge. This includes their prior knowledge from the reverse engineering activity and the PSTs’ familiarity with the simple materials and tools that they will use to create their quadrants. For instance, we might ask: “Why would a drawing compass (used to draw circles) or a protractor be helpful tools in creating your quadrants?”
Design Brief: Quadrant Engineering Design Challenge
Problem: Quadrants are helpful tools, but are expensive to purchase. We have purchased (or 3D printed) one quadrant per team of students, but we want each of you to have a quadrant to use.
Goal: To design a functional, accurate quadrant out of simple materials.
Constraints:
- Allowable materials: paper, card stock, overhead transparencies, straws, cellophane tape, string, fishing line, beads or washers, paper clips.
- Allowable tools: protractor, a drawing compass (used to draw circles), ruler, scissors, stapler, hole punch, pens, markers, and pencils.
- Any instructions for quadrant use (e.g., “this end up”) must be brief and written on the quadrant.
(Note: It is not necessary to use all materials or all tools.)
Criteria: Successful quadrants are:
- Accurate
- Easy to use
- Durable
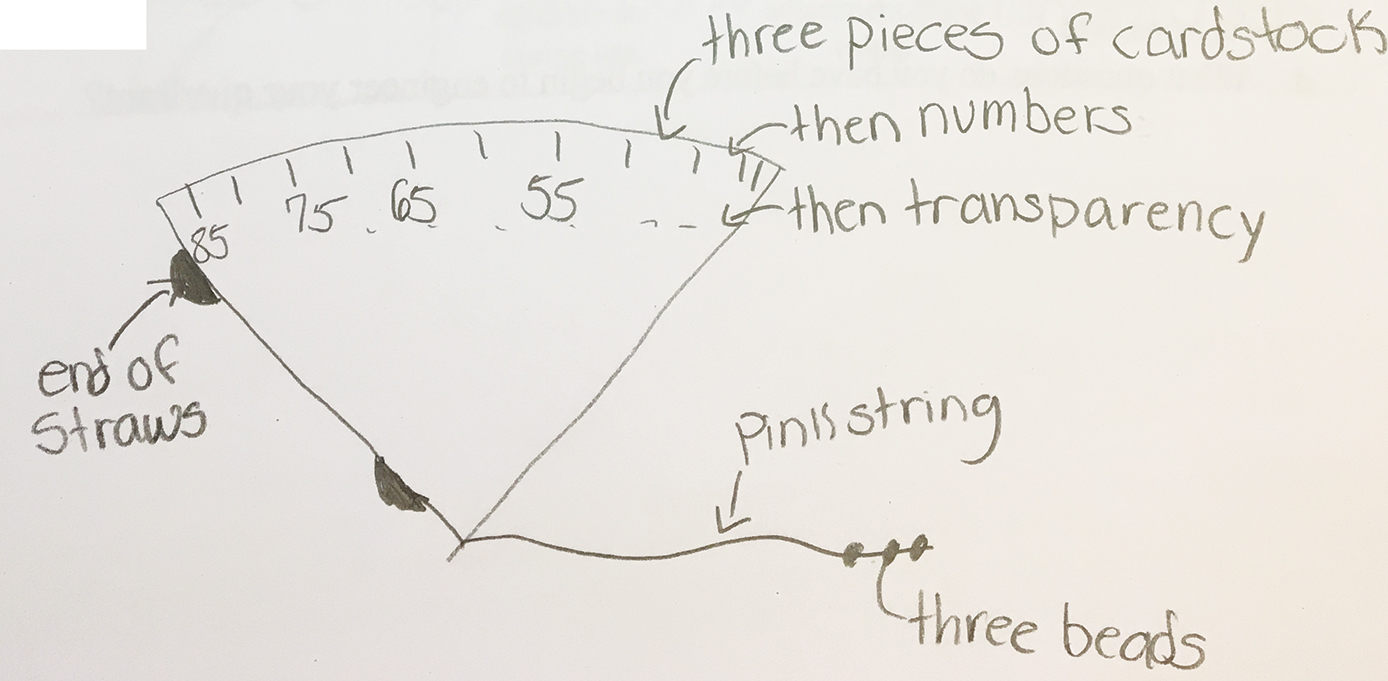
Imagine and Plan (30 minutes). Next, each team brainstorms and sketches at least two ways to use the materials to create a simple quadrant. This is a collaborative process, but each team member must document the team’s ideas. PST teams then select one of the ideas to pursue and create a plan for that idea, including a labeled drawing and a list of all required materials (Figure 4).
Create (and Test) (60 minutes). Each team collects their materials and creates their quadrant. Safety note: PSTs should wear safety glasses when using sharp objects such as drawing compasses. In doing so, the PSTs must use protractors and draw angles, addressing CCSS in mathematics. After all teams create their quadrants, they exchange their quadrant with another team for testing. When teams are in the evaluation role, they use the quadrants to measure the angular height of an object on campus from a viewing point pre-selected by the instructor. Each evaluation team uses an evaluation sheet to report three independent measurements of angular height, assess the extent to which the quadrant was easy to use and durable, and provide feedback how it might be improved (see NSTA Connection for a feedback form).
Improve (90 minutes). Each team begins this EDP step by reading feedback from the team that evaluated their simple quadrant (Design 1) and discussing how they might make improvements for Design 2. Before formalizing the Design 2 plan, we lead a whole-class discussion about Design 1 testing results and possibilities for improvement. This enables teams to learn from one another, which is an important aspect of the design process. In these discussions, the following improvements are often suggested: make the quadrants larger to improve their accuracy, line up the bumps more accurately to use them as sights for the object, and knot the string so it hangs down accurately. Teams then create a plan for Design 2 that incorporates improvements. Each team collects materials, creates a Design 2 simple quadrant, and then hands it off to another team for evaluation. After this process is complete, we lead a final discussion of how the Design 2 simple quadrants performed and how we would once again make changes if we had time to create a Design 3.
A final note: teams must create an entirely new Design 2, not simply make minor adjustments to Design 1. Small tweaks do not allow for significant changes such as increasing the quadrant’s size. Further, it is helpful for the PSTs to be able to hold, examine, and compare the Design 1 and Design 2 quadrants at the end of the EDP (see Figure 5).
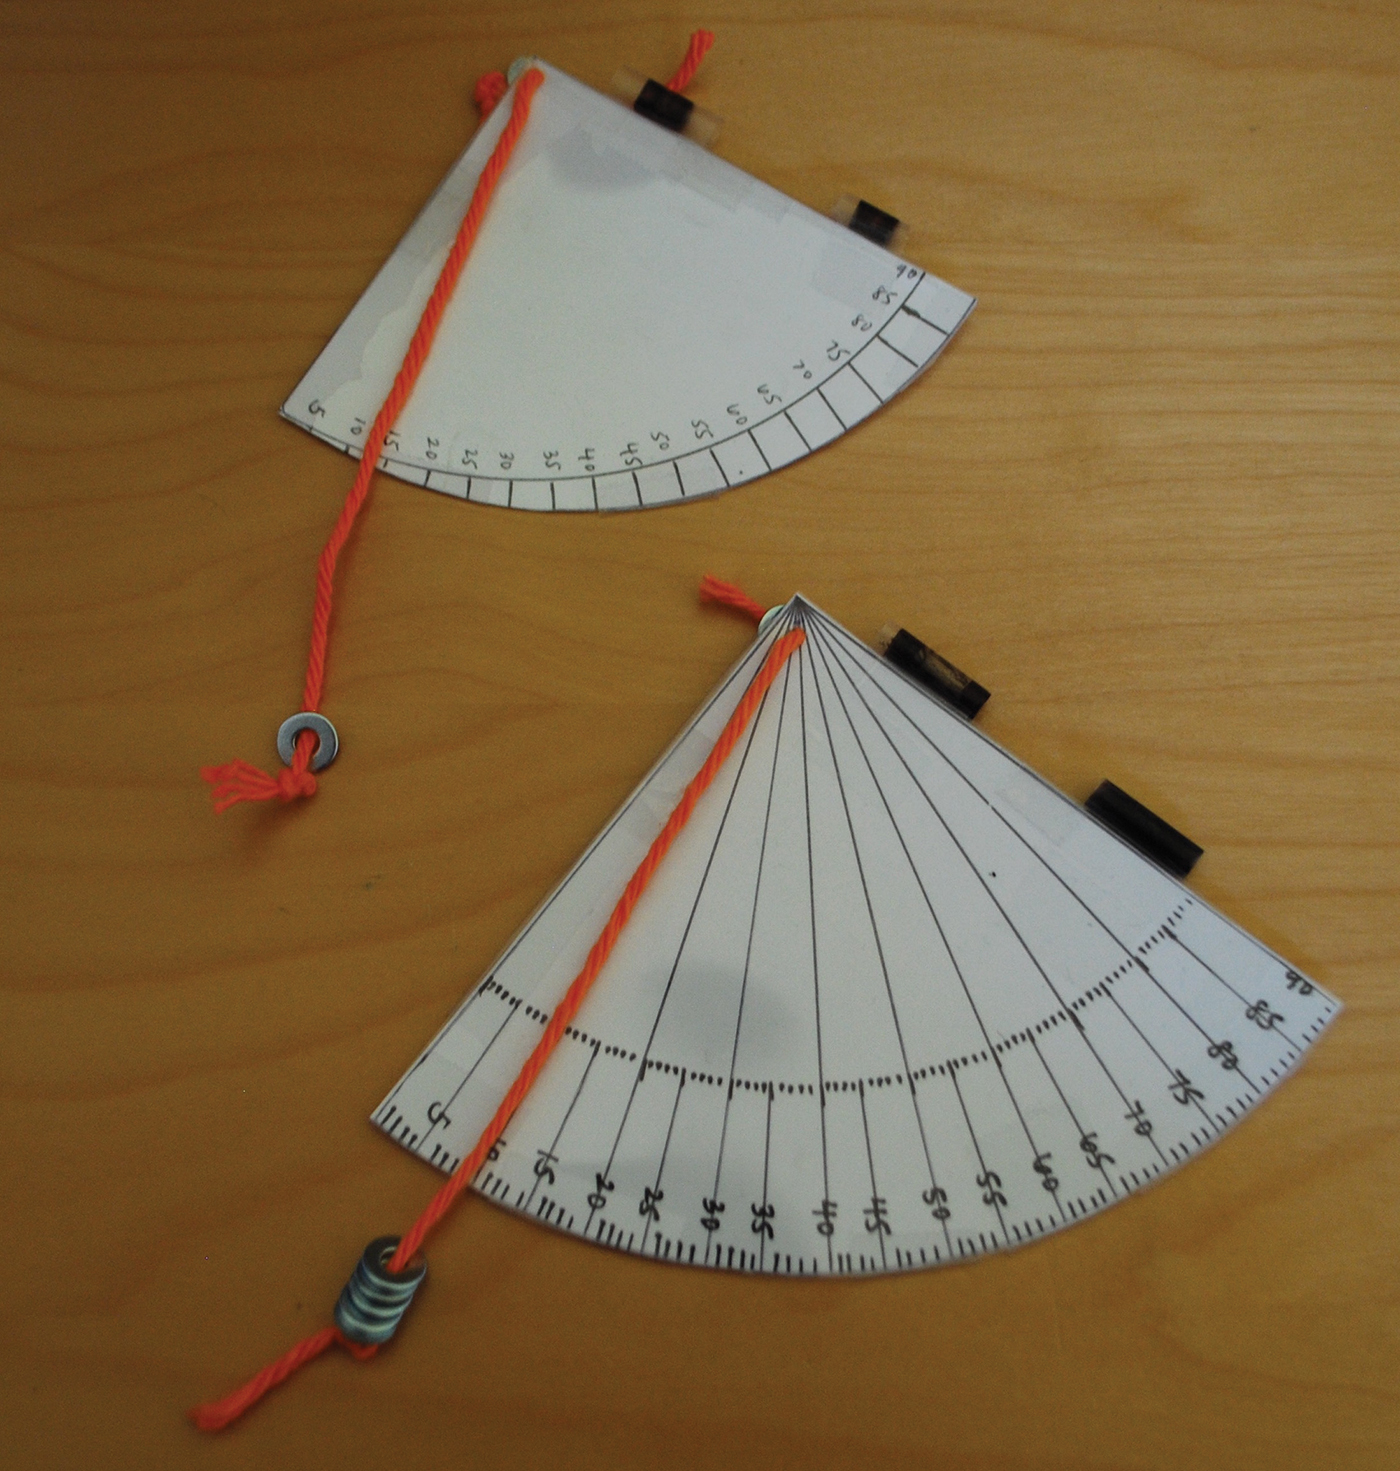
Comparing designs
Adaptations for Online Learning. In an online format, we suggest that discussions throughout the process be conducted synchronously. The more challenging pieces to accommodate for online learning involve (1) the team-oriented aspects of the challenge, (2) materials, and (3) testing. The Imagine step could be done in teams, with small groups sharing their sketches and ideas via file sharing and breakout groups. This would be followed by individual PSTs creating and testing their designs asynchronously. They would need to either use tools and materials from home or have the materials mailed to them.
When measuring angular height, PSTs would need to select their own target (e.g., a distant treetop) and test location (e.g., a specific sidewalk corner). They would need to first use an app on their phone to determine the “real” angular height of the object (see Internet Resources for a list of apps). PSTs should have someone else evaluate the accuracy of their engineered quadrant, much in the same way that we previously explained that teams would evaluate one another’s quadrants (not their own) in a more traditional face-to-face modality. This could be someone with whom the PST lives, for example. The PST should explain the testing procedure to the tester but not share the “real” angular height of the target, asking the tester to provide the numerical results and feedback about the ease of use and durability of the quadrant. Alternatively, if no one is available to test for the PST, they can evaluate accuracy and consider improvement ideas on their own, taking special care to evaluate as honestly as possible.
Adaptations for Socially Distanced Learning. Adaptations for this mode of instruction would be similar to those for online learning, with the exception that tools and materials could be provided in the classroom for each PST. To avoid multiple PSTs handling the same materials, quadrant testing would be performed at home as described above.
Engineering and The NGSS (20 Minutes)
Once the quadrant design challenge is complete, our PSTs reflect on their engagement in the practices of Defining Problems and Designing Solutions. While PSTs recognize that they were not the ones to define the problem, goal, constraints, and criteria, after engaging in the challenge they are well versed in what each of these elements mean and how they are applied in the EDP. Further, our PSTs are able to articulate how they have moved through each of the EiE EDP steps as they engineered their simple quadrants. They can also articulate big ideas about engineering design, including that multiple possible solutions should be generated to attempt to solve a problem, as addressed by NGSS performance expectation (PE) 3-5-ETS1-2, and that fair tests must be used to identify aspects of a design that can be improved, addressed by NGSS PE 3-5-ETS1-3 and ETS1.C, Developing Possible Solutions.
Our PSTs demonstrate their understanding of the NGSS practices, PEs, and angular height via formative assessment during group and whole-class discussions. We observe the PSTs to ensure that they: understand and are following the constraints and criteria of the challenge; document their brainstormed ideas prior to creating a plan; and follow the testing process and can demonstrate how to use a quadrant to measure angular height. A course exam also includes a summative assessment of our PSTs’ understanding of reverse engineering, the NGSS engineering practices, and how quadrants work to measure angular height.
Extending Learning: The Moon Investigation (60 Minutes in Class; 60 Minutes Out of Class)
The PSTs leave the quadrant design challenge with a solid understanding of angular height. This is a key concept in our Earth-Space Science course. They also leave the challenge with a functioning quadrant that they then use in a real-life, PST-led observational investigation of the Moon’s change in position in the sky. We provide materials so that each PST creates their own quadrant modeled after the best-performing quadrant made by their team. Each PST makes three or four distinct observations of the Moon during part of a 24-hour time period, each at least 30 minutes apart. For example, they may observe the Moon at 4:00 pm, 5:00 pm, and 6:00 pm. For each observation, they record data on angular height, as measured by their simple quadrants and the Moon’s cardinal direction data (e.g., east or west relative to the south-facing viewer). They also sketch the changing location of the Moon relative to a fixed object (e.g., a tree). When the PSTs come together to share their data, they are able to see that the Moon generally rises in the east and sets in the west and has an arc-like trajectory across the sky, characterized by different angular heights at different times. In this way, this engineering design challenge supports the PSTs’ subsequent learning of the NGSS crosscutting concept of Patterns, as well as of the disciplinary core idea (DCI) ESS1.B regarding observable patterns of celestial objects, including the Moon, Sun, and stars. If necessary, this Moon investigation is suitable for online and socially distanced learning given that data collection is conducted at home (asynchronously) and discussions about data can be conducted in face-to-face or synchronous online settings.
Connecting to Elementary Classrooms
Teachers reading this article may wonder what aspects of this PST learning experience can be applied to elementary classrooms. We have four suggestions:
Engage students in science-integrated engineering design challenges using an EDP. Our design challenge helped our PSTs to apply and reinforce their understanding of angular height. Similar elementary-level science-integrated engineering design challenges can be found in: NGSS PEs denoted by asterisks, the EiE curriculum (see Internet Resources), and past issues of Science and Children, to name a few examples. In our article, we recommended multiple tips for engaging in a design challenge using an EDP, which are applicable to elementary classrooms, e.g., use an EDP and make the steps explicit to students; make the problem, goal, constraints, and criteria clear; hold class discussions so teams can learn from one another; and have students create a separate second physical design (not simply alter the first).
Give students opportunities to reverse engineer. Our PSTs reverse engineered a quadrant. Consider having students reverse engineer simple technologies that connect to your local science curriculum. For example, students learning about forces could reverse engineer ball point pens to examine how the spring pushes the ink cartridge. To help your students learn more about reverse engineering, you might also read the award-winning book Ticktock Banneker’s Clock (Keller and Gardner 2016).
Have your students investigate the Moon’s changing position. Do a simplified version of our Moon investigation. Have students observe the position of the Moon a few times within one day as homework. Time this so that the Moon is out when students can observe it; see Internet Resources for Moon rise and set times. Suggest that students face south, so that to the right is west and to the left is east, and stand in the same place for each observation. Safety Note: Ensure that students have a trusted adult accompany them as they make observations. Have students devise their own ways to estimate how high the Moon is in the sky (e.g., by extending arms and counting how many fists the Moon is above the horizon). Students should record their observations on a single piece of paper or journal page, sketching what they see in their view and where the Moon is within that view for three observations. The view may include a house or a tree, for example. The right side of the view should be labeled “west” and left side “east.” Next to each Moon drawing should be the corresponding observation time and height in the sky (e.g., three fists).
Address angular height of the Sun if you teach seasons. The height of the Sun in the sky is another key idea within NGSS DCI ESS1.B Earth and the Solar System. Although students should never measure the angular height of the Sun directly, teachers should use physical models, photographs, drawings, and readings to help elementary students develop an understanding that the Sun reaches a lower height in the sky in the winter and a higher one in the summer.
Concluding Thoughts
In this article, we explained how our PSTs conducted a reverse engineering activity, engineering design challenge, and Moon investigation. We also suggested ways that these PST learning experiences can be applied to elementary classrooms. In addition, we want to communicate the positive impact that these activities have had on our PSTs. As a result of their participation, the PSTs have a better understanding of how engineers analyze and design technologies, come to see themselves as capable of learning and teaching engineering, and are exposed to a model of how to effectively integrate science and engineering education. Each semester, throughout the challenge, the PSTs laugh, smile, and take keepsake photographs as they work through the engineering design process themselves—sometimes for the first time in their lives. It is our hope our PSTs will go on to be enthusiastic and knowledgeable teachers of science and engineering in their future elementary classrooms.
Internet Resources
Quadrant by Michael Daly – Own work, CC BY-SA 3.0
Videos about Quadrants:
“Navigational Instruments – Segment 1 of 4 – Quadrant.”
“The Quadrant.”
Apps to Measure Angular Height:
There are various apps available to measure angular height. These are phone-based visual “clinometers.” Examples: Clinometer, SeeLevel, iPhone’s “Measure” App (Level). The end of this video is helpful when using a level app for measuring angular height (involves using two pieces of tape as sights on your phone:
“Measuring Slope, Angle, and Aspect” – Video about how to determine angular height using an app like Clinometer or iPhone’s Compass App: GROW Observatory.
NSTA Connection
Download the rubric at https://www.nsta.org/science-and-children.
Pamela Lottero-Perdue (plottero@towson.edu) and Cody Sandifer are professors of science education at Towson University in Towson, Maryland.
Astronomy Earth & Space Science Inquiry Instructional Materials New Science Teachers Preservice Science Education Teacher Preparation Teaching Strategies Elementary