
feature
Heat Reinvented
Using a Lunch Box–Design Project to Apply Multidisciplinary Knowledge and Develop Invention-Related Practices
Science Scope—September/October 2021 (Volume 45, Issue 1)
By Helen Zhang, David Jackson, Jeffrey Kiel, Leigh Estabrooks, So Lim Kim, Deoksoon Kim, Stephanie Couch, and G. Michael Barnett
CONTENT AREA Physical Science
GRADE LEVEL 6–8
BIG IDEA/UNIT Thermal energy and heat transfer
ESSENTIAL PRE-EXISTING KNOWLEDGE Energy
TIME REQUIRED Three weeks (15 class periods of 50 minutes)
COST $90 per class for consumables, $195 for durables, which can be shared across classes.
SAFETY Insulated gloves should be worn at all times when interacting with Peltier tiles.
Safety Considerations When Working With Peltier tiles (Module 5)
The Peltier tile rapidly becomes hot on one side and cold on the other side once it is connected to the batteries. The teacher needs to be cautious as it may get too hot for students to hold and should explicitly instruct students not to continuously hold the tile for more than five seconds while it is connected to the batteries. The tile should be connected with fans at all times. If the student does not feel the hot and cold difference between the two sides after two seconds, the teacher should ask the student to first disconnect the Peltier tile from the batteries and then check if there is any incorrect connection in the circuitry. It is highly unlikely that the Peltier tiles malfunction if purchased from reputable vendors (e.g., Sparkfun).
The “Chill Out!” unit engages students in inventing a lunch box to better serve users (e.g., people who spend all day in the sun such as landscapers). During the unit, students think about real-life scenarios when lunch boxes do not meet the needs of users; learn relevant science concepts; investigate practices of keeping warm or cold in different cultures; and integrate knowledge from culture, engineering, and science to invent and test a lunch box. The iterative design process and working with different materials help clarify students’ misconceptions and augment and refine their understanding of heat transfer. Additionally, by engaging students in thinking about familiar things in a different way, this unit presents a low barrier to entry and promotes students’ engagement and creativity.
Invention refers to a process during which one works with others to create something new that is useful or helpful, by means of one’s own investigation, experimentation, and thinking (Flemings 2004; Invention Education Research Group 2019). Different from routine problem solving and engineering, one key characteristic of inventing is user-centric. In this unit, students learn to think about and understand problems affecting real people and their specific needs.
Chill Out!: An invention curriculum for all learners
The Chill Out! unit was originally developed for and has been widely used in out-of-school space. Over the past three years, we have worked with five science teachers to revise the unit for middle school classroom settings, and we have tested and refined it with more than 600 seventh-grade students (Jackson, Kiel, and Zhang 2020; Jackson and Semerjian 2020; Zhang, Estabrooks, and Perry 2019).
The unit includes six modules and takes approximately three weeks, assuming daily classes of about 50 minutes each. Table 1 (see Online Connections) shows an outline of the modules. Next we describe the major activities, teaching tips, and student difficulties of each module (disciplines addressed in each module are included in parentheses).
Module 1: Introduction to invention and the lunch box invention project (engineering + social studies)
Students start the unit with a Digital Device Stand challenge, where they spend 15 minutes designing a low-cost phone/tablet stand using various types of tapes and heavy stock paper. Once they finish with the design, students are asked to evaluate whether/how much their stands can help users who (1) need a stand for both a phone and a tablet, (2) listen to music (i.e., the stand does not block the speaker/s), and (3) watch videos with a portrait/landscape view of the screen. They do a Gallery Walk of the stands created by their classmates, describe which user their stands would help, critique each other’s designs, and discuss revision plans. Afterward, the teacher leads a whole-class discussion around what is invention, emphasizing that invention is user-centric and involves multiple cycles of testing and revision, and that most inventions are small improvements that make people’s lives easier, better, or more convenient.
Our implementation of this activity showed that students often encountered two challenges: first, students may find it difficult to come up with unique ideas when working on the Digital Device Stand challenge. This represents a common misconception among students that invention must be completely new and unique. The teacher can ask students to think about how to improve the cell phone or iPad stands they have seen before and help students realize that small improvements can be inventions, too. Second, students often had difficulties presenting their own work, critiquing others’ work, and accepting criticisms. Many students were found to be unreceptive to others’ critiques and did not know what to do with the feedback. The teacher can lead a discussion about the benefits of feedback and also model and ask students to practice providing constructive feedback to others. One suggestion is to instruct students to provide at least one glow and one grow (a positive and a negative) in the feedback. To prevent students from taking the criticism personally, the teacher can ask students to present their classmates’ work. For instance, one of our teachers explained his enactment: “I asked students to walk around and choose one that they wanted to present for. I told students that you had to present something and you had to be nice because other people were going to present yours. I also explained why this [presentation] would be important when they’re inventing.”
The next activity is forming student teams. The teacher introduces the idea that most modern inventions are invented by teams, which consist of people with different interests and skills. Students first identify with one primary “type of team member” (tinker, doodler, organizer, or talker) and then form heterogeneous teams of inventors. We found that providing such a collaboration structure helps students start teamwork, as they know which roles they should play. It also helps to tailor the activity to meet students’ different needs (e.g., English learners and students with IEPs) because they can choose the work with which they feel more comfortable. We found students were generally most engaged when working in groups of three.
The third activity is introducing the lunch box invention problem. Almost all students are familiar with the lunch box they bring to school but may wonder why they would need to design a new lunch box. Students first brainstorm users or scenarios in which keeping things cool might be especially important and/or the standard lunch box does not meet users’ needs. Student sample ideas include school sports team members who are having a soccer game in the summer, people who spend all day on the road such as truck drivers or who spend all day in the sun such as landscapers, campers who need to spend a whole day hiking in the mountain, healthcare personnel who need to store insulin or vaccines in places that lack electricity, food vendors who need to keep food hot at outdoor events in the winter, and children from poor regions who cannot afford standard lunch boxes. The teacher then asks students to choose a potential user of their lunch box invention and write down the user’s needs and problem with regard to storing food safely.
For homework, students research inventions from regions or countries with which they feel affinity. Students share in class who the users of the inventions are and how these inventions improve the lives of people. This activity connects invention to students’ cultural backgrounds and reinforces the idea that inventions help humanity.
Module 2: Thermal energy transfer (physical science)
The first part of Module 2 focuses on learning science concepts of thermal energy, temperature, and heat transfer. It is highly likely that science teachers have curricular materials that have been used previously to teach these concepts. We recommend using these pre-existing activities with which teachers are familiar. For instance, in one class students watched a video that simulates the movement of molecules (e.g., air, water) of high and low temperatures. They compared and discussed their observations and learned that temperature is a measure of the average kinetic energy of the particles in an object. Afterward, students were asked to talk about prior experiences of boiling water and discussed how and why extra thermal energy is needed in order to boil the water.
As another example, one participating teacher used a lab demonstration of convection (see Figure 1). The demonstration requires the preparation of two, two-fluid-ounce plastic bottles, one filled with very warm water and a few drops of red food coloring, the other with cool water and blue food coloring (our participating teachers used electrical kettles to heat water before the class started). The demonstrator (teacher or student) places both bottles in a large container with water. Students are asked to predict what would happen if the demonstrator gently removed his or her thumbs. Next, the demonstrator removes thumbs from the opening of the bottles at the same time. Students then record and discuss the findings with classmates.
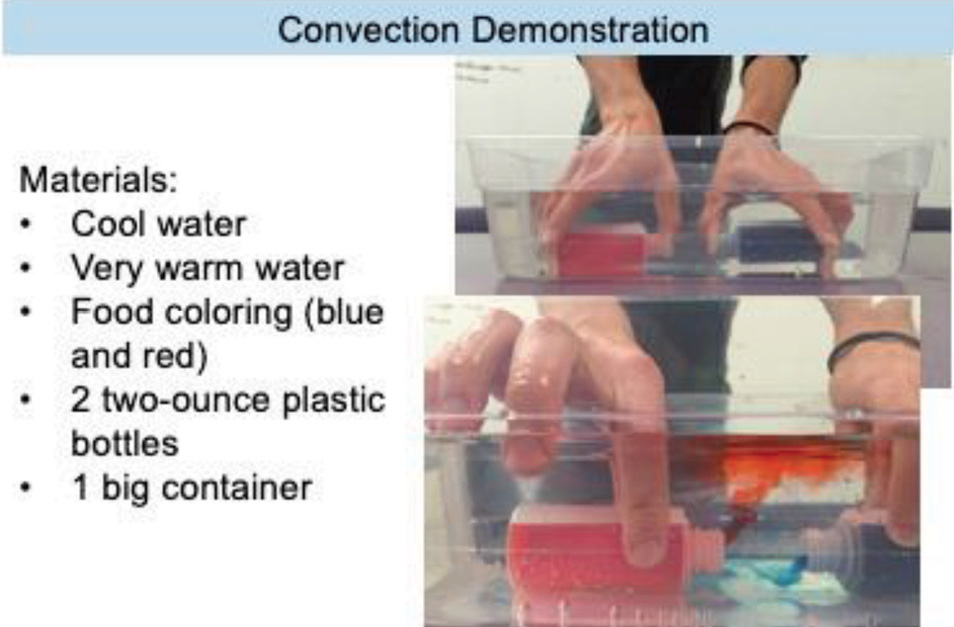
Lab demonstration of convection (Module 2).
Part 2 of this module engages students in an exploration of materials used in popular lunch boxes. The teacher introduces the idea that many inventors start their invention work by examining the materials and designs that have been used in similar products and focusing on how to improve them. Students work in teams to explore an item used in everyday life to keep food/drink cold, including a nylon-insulated lunch box, a neoprene lunch bag, a metal lunch box, a small foam cooler, and a metal vacuum flask. Each team cut the item in half or researched online for a picture of the cross section. Students then make a sketch of the cross section and write down explanations to answer questions in the worksheet, including “What kind of material is it made from?” “Why do you think people who designed it chose to use those particular materials?” “Do any of the items contain liquids or gels? What do you think these materials do?” and “How do the items keep hot things hot? How do they keep cold things cold?” Students often do not have answers to all of the questions. The teacher tells students that this is completely normal for inventors and that they will gain more experience with testing these and other materials in subsequent modules.
Module 3: Thermal conductivity of materials (physical science + social studies)
In this module students explore the thermal conductivity of various materials and learn the underlying science concepts. The teacher first introduces conduction, insulation, and thermal conductivity, and then explains why they need to explore thermal conductivity of materials (i.e., so that they can choose appropriate materials to minimize heat transfer in the lunch-box invention).
Next, students work on two science labs. In the Shortening Mitten lab, they create a mitten using vegetable shortening and two plastic bags. They first put one hand in ice water for 10 seconds, then put the other hand inside the mitten and submerge the hand in ice water for 10 seconds. Afterward, students discuss the feelings of both hands and why the hand wearing the mitten did not feel cold. They then watch a video about how emperor penguins can reduce heat transfer. Afterward, the teacher leads a class discussion to connect student observations of the lab and from the video. Students share their findings and explanations. They realize that the thick layer of blubber beneath penguins’ skin is just like the vegetable shortening. Both are excellent insulators that can help reduce the amount of heat lost to the surrounding cold water.
In the Thermal Resistance Efficiency lab, students further their learning of insulator and conductor by investigating the thermal resistance of a variety of common materials (e.g., aluminum foil, bubble wrap, packing peanuts, felt). Each team chooses a material to explore. They first measure the initial temperature of a water bottle (full of cold water) and cover it with a single layer of the material. They then place the bottle under a heat lamp for 20 minutes. Afterward, they take off the layer of material and measure the temperature of the water bottle again (we recommend using infrared thermometers or digital temperature probes), compare their findings to the initial temperature, discuss the thermal resistance of various materials, and rank the best conductors and insulators.
For homework, students were asked to talk with their family members about traditional clothing that helps keep people warm or cool in their affinity regions or cultures. We found that bringing the cultural aspect into the science learning activity helped to engage students, especially those whose families had come from other countries.
Module 4. Lunch box prototyping and testing (engineering)
In this module students build their lunch-box prototype using shoeboxes and common materials for the users they identified in Module 2. First, students work in teams to sketch their invention ideas (e.g., the size and shape of the lunch box). They also reflect on the practices of minimizing heat transfer in different cultures and biomimicry (the video of emperor penguins) learned in previous modules and discuss with team members whether and how to incorporate some of those practices in their lunch box design. Student teams also need to identify what materials they would like to use in their invention. Each team works on a budget ($50 of simulated “money”) and purchases materials from a “store” operated by the teacher (see price list in Table 2). Providing the constraint of a budget helps students learn to make trade-offs. We found that without a budget, students tended to use up all the materials to create the most insulated lunch box, which does not mimic the challenge of trading between cost and effectiveness that engineers and inventors typically need to consider. The budget constraint prompts students to work to choose the most cost-effective materials.
Next, each team spends approximately 30 minutes building their lunch boxes. Afterward, they test their invention prototypes. First, each team puts a bottle full of near-freezing water inside the lunch box and measures the initial temperature of the water bottle. Then they place the lunch box under a heat lamp and measure the temperature of the water bottle once every hour for four hours. (Note: An adult may need to measure and record the temperatures beyond class time; see Figure 2). During the next class session, students examine the recorded temperatures to compare the performance of the lunch boxes. Each team evaluates whether their lunch box meets the needs of their potential users and provides feedback to other teams on how to improve the design. We found that it was particularly helpful to present the results of all teams together in different modalities (i.e., graphs and number tables) so that students could easily compare their testing results with others. Afterward, students work with teammates to review their testing results and peers’ feedback and present their revision plans. If time permits, we recommend having students revise and test their designs again.
|
Materials |
Cost of simulated “money” |
|
Packing tape |
$1 per foot |
|
Masking tape |
$1 per 3 feet |
|
Duct tape |
$3 per foot |
|
Wax paper |
$2 per foot |
|
Plastic wrap |
$1 per foot |
|
Aluminum foil |
$2 per foot |
|
Bubble wrap |
$3 per foot |
|
Paper towel |
$2 per foot |
|
Paper |
$1 for three pieces |
|
Construction paper |
$1 for two pieces |
|
Cardboard |
$4 per square foot |
|
Feather |
$3 for 5 pieces |
|
Packing peanuts |
$2 per handful |
|
Plastic resealable bag |
$1 per two bags |
|
Felt (small) |
$2 per piece |
|
Felt (large) |
$4 per piece |
|
Cloth towel (large) |
$15 per piece |
Note: The number of materials and/or amount of each material could be restricted as needed due to pandemic-related budget or distribution constraints. In general, the most critical materials are aluminum foil, paper, bubble wrap, cardboard, and any type of tape.
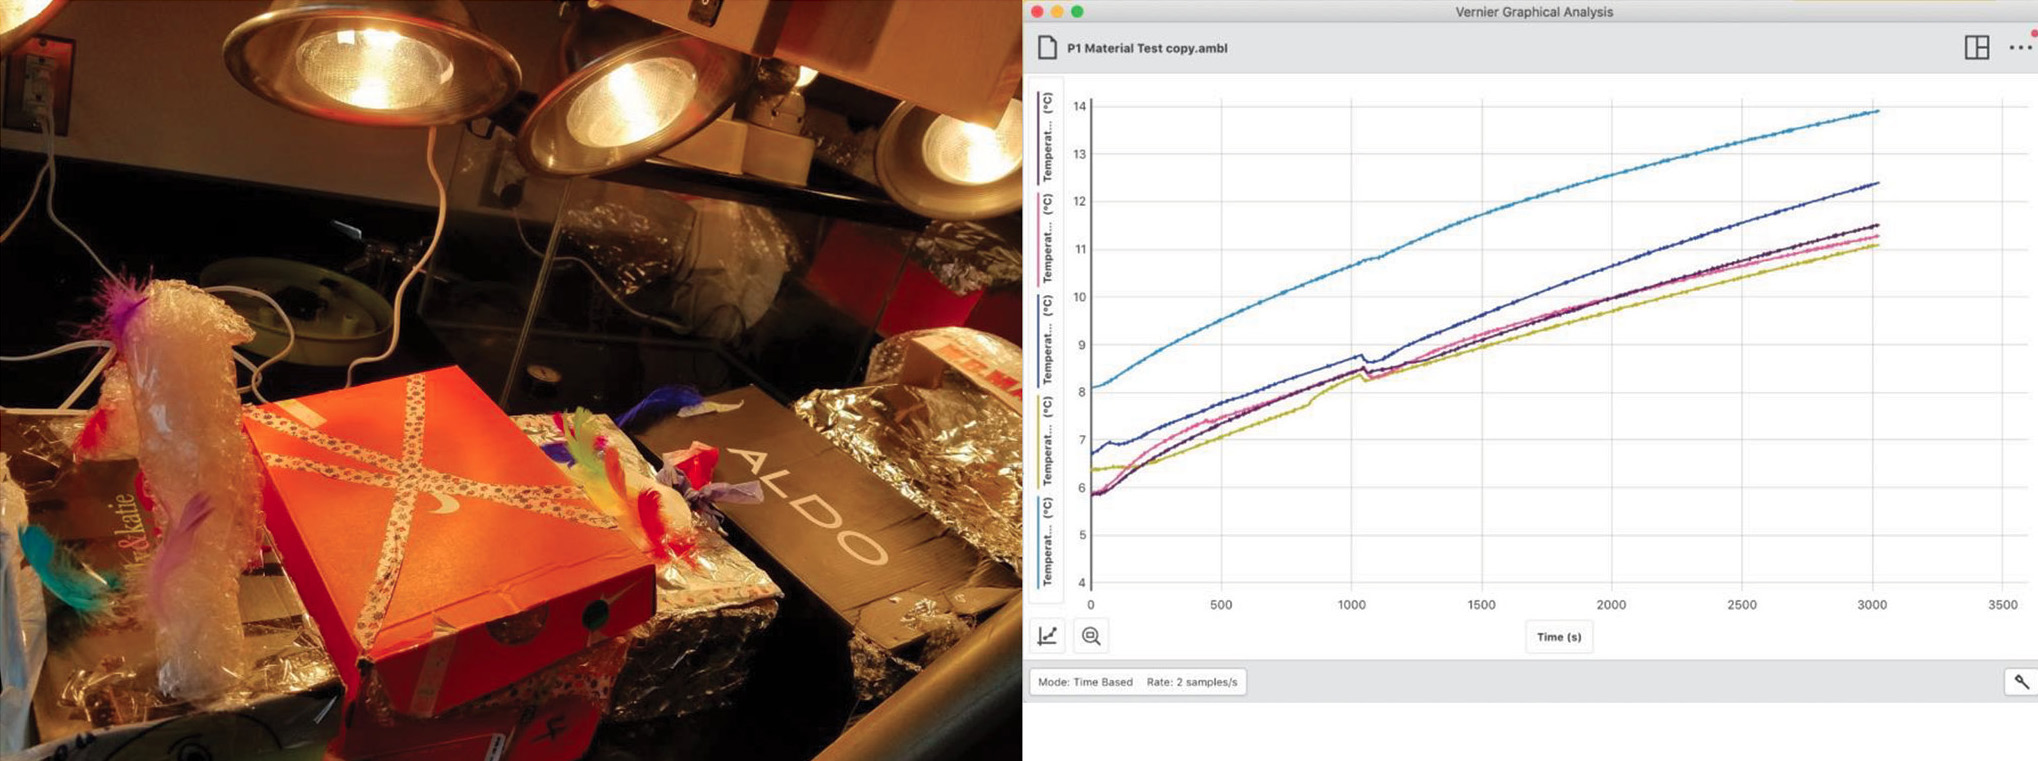
Left: the setup to test lunch box prototypes. Right: Graphs automatically generated with the graphical analysis software to show live changes in temperature. Each line represents temperature changes in one lunch box (Module 4).
Module 5. Peltier tiles to revise the lunch box (physical science + engineering)
Module 5 engages students in learning about thermoelectric effect and Peltier tiles, building a Peltier cooling unit, and considering whether they need to utilize Peltier tiles to improve their lunch boxes. Students first watch videos about urban heat islands and then discuss how heat waves can impact food storage and transportation and how their inventions may or may not help the users if they are experiencing a heat wave. Afterward, the teacher introduces the thermoelectric effect and Peltier tiles. Students are instructed to create and test a Peltier cooling unit to explore using thermoelectric effect to remove heat from a system. The cooling unit is a device made from a Peltier tile, a battery pack (four 1.5-volt batteries), and a cooling fan (see Figure 3 for the Peltier cooling unit activity instructions). Once connected to the battery, the Peltier tile immediately becomes hot on one side and cold on the other, which surprises most students as they can feel the sudden and substantial temperature difference between the two sides of the tile. However, the tile may get too hot to hold. The teacher needs to warn students not to leave wires connected for more than 30 seconds without the fans and not to continuously hold the tile while it is connected to the batteries (see the Safety Considerations section for detailed information). Afterward, students work in teams to discuss whether and how to include the Peltier cooling unit in their lunch box to improve its performance and better help people.
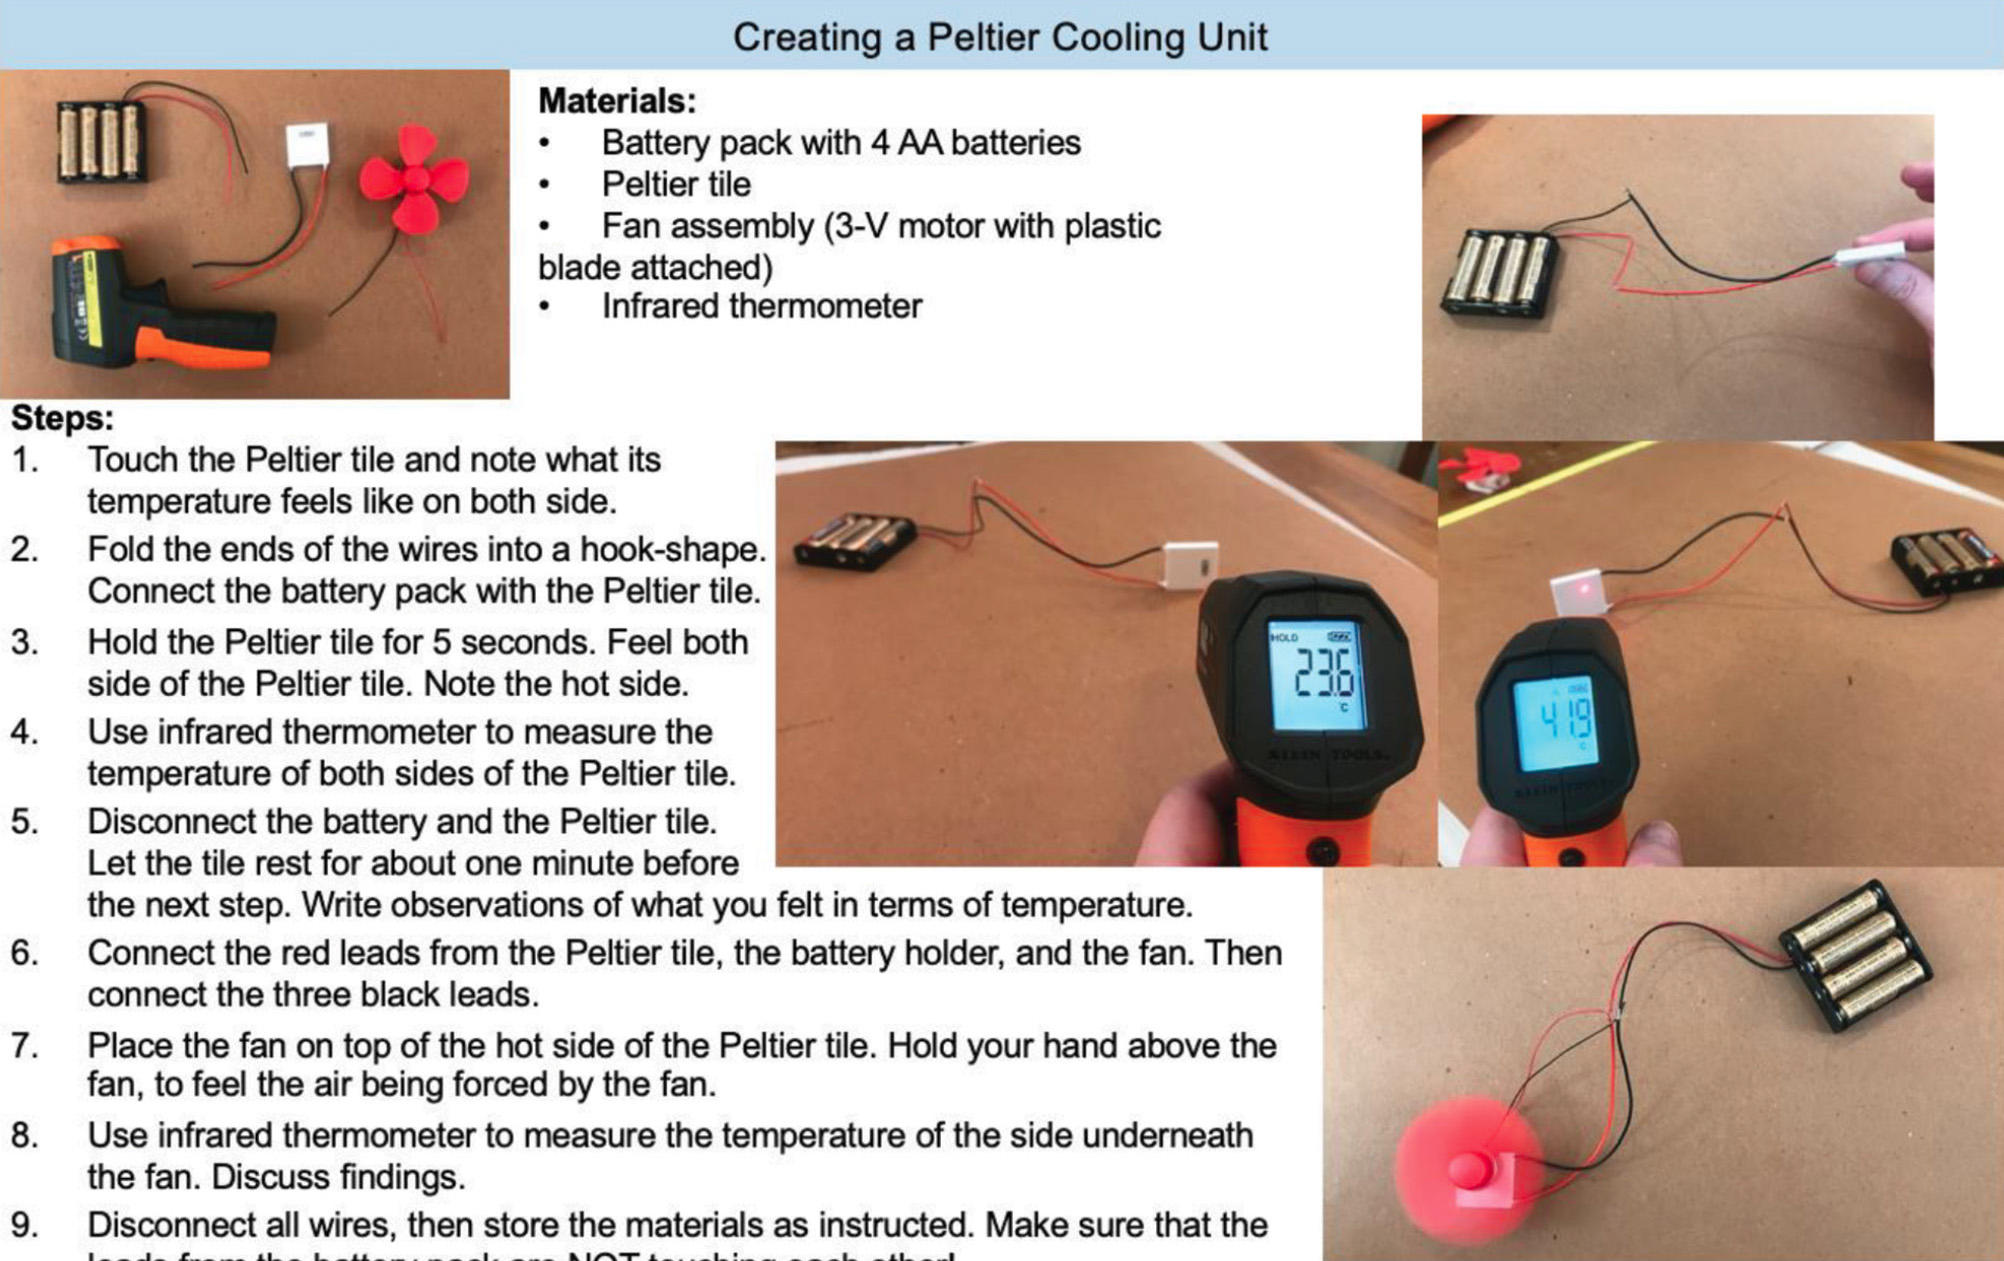
Peltier cooling unit design (Module 5).
Module 6. Poster for mock-patent application
Students create a poster that includes scientific explanations and technical drawings to apply for a (mock) “patent” of their lunch box invention. First the teacher introduces what a patent is and what needs to be included in a patent application (description of the invention, drawings, and explanations). Students browse through examples of patents and create a poster about their lunch box for patent application. They need to explicitly draw and explain the scientific concepts involved with their lunch boxes in the poster (e.g., dimensions, materials, and how the design minimizes various types of energy transfer). Table 3 (see Online Connections) shows the scoring rubrics designed by a participating teacher.
Notes on classroom management
Our experience shows that the Chill Out! unit is exciting and appealing to students. Yet, the classroom management could be challenging as students work with lots of materials in the unit. We recommend teachers stack projects after each class and preserve classroom desk- and table-space for the unit. Once a class completes an activity, the teacher can store the leftover materials in a separate container for potential reuse of the materials in other classes. Another challenge is supporting student teamwork. Many middle school students do not know how to give feedback or accept criticism. Teachers can spend time modeling how to work in a team (e.g., communicating with teammates, evaluating, and accepting others’ ideas). The third challenge is how to support students to connect the multiple components of this unit. It is critical to provide students with ample opportunities to reflect on what they have accomplished and discuss how the activities are related to the invention theme. One teacher mentioned that he held whole-group discussions with students about the connection to the invention project every time they started a new module. For instance, he would ask students questions like: “Why did we need to think about users for whom the regular lunch boxes do not work last week?” and “Today we are going to explore different materials. Why do you think inventors need to check the materials?” Such reflection and discussion questions helped students to understand the purpose of the various activities and to focus on the invention theme of the unit.
Further, we are aware that the pandemic has posed enormous challenges to teachers. After evaluating this project with our teachers, we posited that this project is manageable in online or hybrid learning environments because the number and amount of materials used in this project are flexible. The materials can be reduced and revised due to the pandemic-related budget or distribution constraints. Almost all the materials used in this project are recyclable materials that are easily sourced in households. Many of the tools can be replaced with those easily found in everyday lives (e.g., the infrared thermometers can be replaced with alcohol thermometers). The only tools that are not easily accessible are the Peltier tiles, which can be delivered to students. (For teachers with budget or distribution constraints, we recommend that the teacher conduct and video-record demonstrations of working with the Peltier tiles).
Cost of implementation
The total consumables cost of implementing Chill Out! is approximately $90 per class, assuming that cardboard shoeboxes can be obtained free of charge. The durables (e.g., heating lamps, battery holders) that many schools already have cost $195 and can be shared across classes. A set of six Peltier tiles costs $120 for reliable products from reputable vendors. A set of six 5-volt motors and plastic propeller fans costs about $20. Economical models of infrared thermometers cost around $35 each.
Conclusion
The Chill Out! unit engages students in applying knowledge and skills from multiple disciplines to build the inventions. We have seen students extend the project beyond lunch boxes and design insulating containers for life-saving medications during crises such as natural disasters. In other words, even when electric power goes out, empowered learners will continue to show their brilliance! •
Online Connections
Table 1: Chill Out! curriculum (50-minute class per day).
Helen Zhang (zhangzm@bc.edu, zhang.zhihui@gmail.com) is a senior research associate, David Jackson is a doctoral candidate, So Lim Kim is a doctoral candidate, Deoksoon Kim is an associate professor, and G. Michael Barnett is a professor, all in the School of Education at Boston College in Chestnut Hill, Massachusetts. Jeffrey Kiel is a teacher in the Waltham Public Schools in Waltham, Massachusetts. Stephanie Couch is the executive director and Leigh Estabrooks is an invention education officer, both in the Lemelson–MIT Program at the Massachusetts Institute of Technology in Cambridge, Massachusetts.
Crosscutting Concepts Curriculum Engineering Interdisciplinary Multicultural Physical Science Science and Engineering Practices STEM Middle School