
feature
Revolutionizing Robotics
Broadening the definition of engineering by engaging students in soft robotics
The Science Teacher—May/June 2023 (Volume 90, Issue 5)
By Thomas Tran, Elizabeth McNeela, Jason Robinson, Jill McLean, Karin Jensen, and Holly Golecki

Ask your students what they think of when they hear the word robotics. Most students likely imagine a large, clunky machine used in a manufacturing plant or construction site. Other students may mention modern humanoid robots that appear in popular culture like C-3PO from the Star Wars franchise. No matter the response, there is a good chance that nearly all students will mention a robot made of hard materials like metal. This article describes the introduction of a new field, soft robotics, into high school classrooms to broaden students’ perceptions of how robots can be used and who works on robotics. Soft robots are made from compliant materials, such as rubber or textiles, and have a wide variety of applications in the medical field, space exploration, and food distribution. This field provides an excellent opportunity to expand students’ view of robotics while learning how to think and design like an engineer.
The Next Generation Science Standards (NGSS Lead States 2013) call for optimization of engineering curricula for K–12 classrooms where students build, evaluate, and improve designs. This one-week curriculum allows students to explore soft robotics through three building activities followed by a design activity. By broadening the definition of robotics to include soft robotics, students can learn how engineers from various disciplines work together to design robots for human interaction. For example, an exoskeleton is a wearable robot designed to enhance the strength of laborers or support individuals with mobility issues. Electrical engineers develop circuitry to power the device; mechanical engineers design and build the mechanical components; bioengineers ensure a safe, efficient human-robot interface; and designers provide fabrics for comfort and appeal. Collaboration across a diverse team is required to develop useful soft robots. These connections emphasize that many different academic backgrounds can participate in the field of robotics.
Background
Soft robotics has recently garnered widespread attention with applications spanning many fields. In the medical field, soft robots have potential use in surgery, drug delivery, and prosthetics (Cianchetti et al. 2018). NASA has begun to use soft robotics to improve existing space exploration vehicles and develop new technologies (Shah et al. 2021). Even Peeps and Company uses soft robotic grippers to package their delicate marshmallow chick candies (Sand 2020).
Soft robotics can not only broaden the definition of robotics for students but also invite a larger audience to participate. It is well documented that among mechanical engineering and electrical engineering fields—both of which are commonly associated with robotics—there exists a large gender disparity with ~16.5% and ~15.4% of undergraduate degrees awarded to women, respectively (ASEE 2020). Extracurricular robotics programs have shown a positive impact in increasing a students’ likelihood of enrolling in engineering majors; however, girls participate in these programs at much lower rates than boys (Burack et al. 2019). Soft robotics has potential to bridge this gap due to its focus on human-centered design, and, was recently shown to increase tinkering self-efficacy for female students (Jackson et al. 2021). This design-based field requires no extensive knowledge of mechanics, circuits, or coding to get started, unlike most traditional robotics activities. Combined with the relatively low cost of materials, soft robotics become more accessible to students and schools.
The curriculum presented here was specifically designed for high school–age students. We successfully implemented these activities with ~80 high school juniors in an introductory physics class. The activities garnered positive feedback from students and teachers. When asked about the soft robotics activities, one female student stated, “I love them, and I got to show them off to my little brother and sister… the fact that I got to learn all these new techniques and got to work with stuff I never used to was a new and nice experience.”
Three soft robotic activities
The goal of this curriculum is for students to complete three soft robotic builds, a cable-based Shape Deposition Manufacturing (SDM) Actuator, a pneumatic Soluble Insert Actuator (SIA), and a textile McKibbens muscle actuator (see Figure 1 A-C). The SDM design (Berndt et al. 2019) and SIA design (Greer et al. 2021) have been modified from previous literature and tutorials from the Soft Robotics Toolkit website (Holland et al. 2018) to take advantage of 3D printing and increase ease of implementation for educators. The McKibbens muscle (Engen 1959) has also been adapted from previous literature for classroom use. After building all three actuators, students progress through a design activity to improve the current designs based on bioinspiration from grippers in nature. The builds emphasize the importance of hands-on activities to increase student engagement with new material; the design activity highlights the importance of identifying limitations and improving upon them based on inspiration from other experiences.
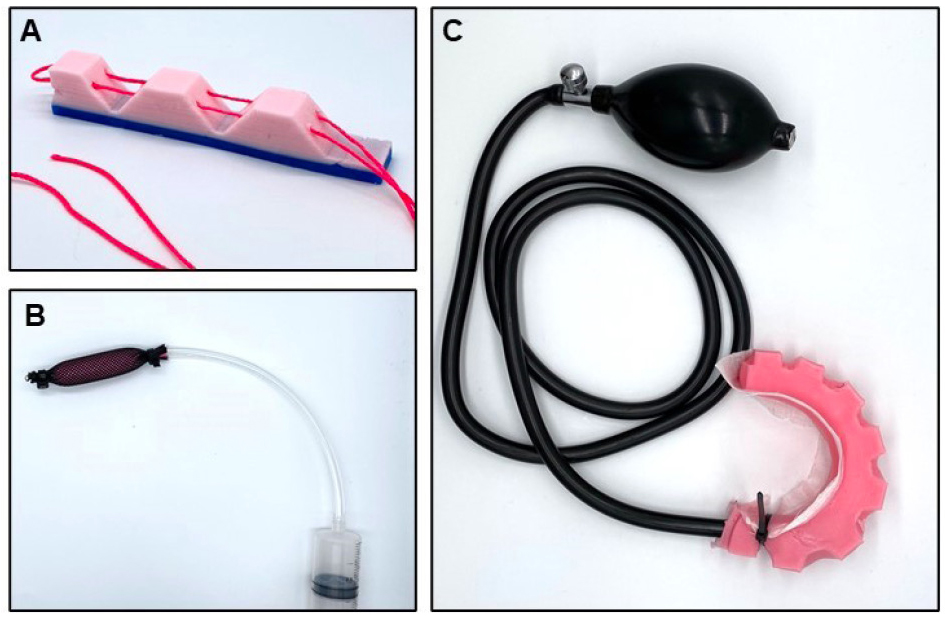
Final build for all three soft robotic actuators: (A) SDM actuator, (B) SIA pneumatic actuator, (C) McKibbens muscle actuator.
The curriculum can be completed in four 45- to 50-minute periods with the first three periods focused on building the actuators and the last period dedicated to demolding and the design activity. Students should work in pairs for all four periods. Each student pair will need three activity kits, one for each actuator build. (Educators will need to gather necessary materials, prepare these kits, and 3D print molds for the kits before beginning the curriculum.) A list of materials is provided, as well as 3D printing CAD files and student instructions and worksheets (see Online Supplemental Materials). Student instructions and worksheets are written in English and most steps have an associated picture. For English learning students, extra support may be required to successfully build the actuators. Students who are enrolled in specialized education or have limited motor skills may also benefit from extra assistance during builds. The schedule shown in Figure 2 details the recommended outline for a four-day curriculum and preparation needed for each day.
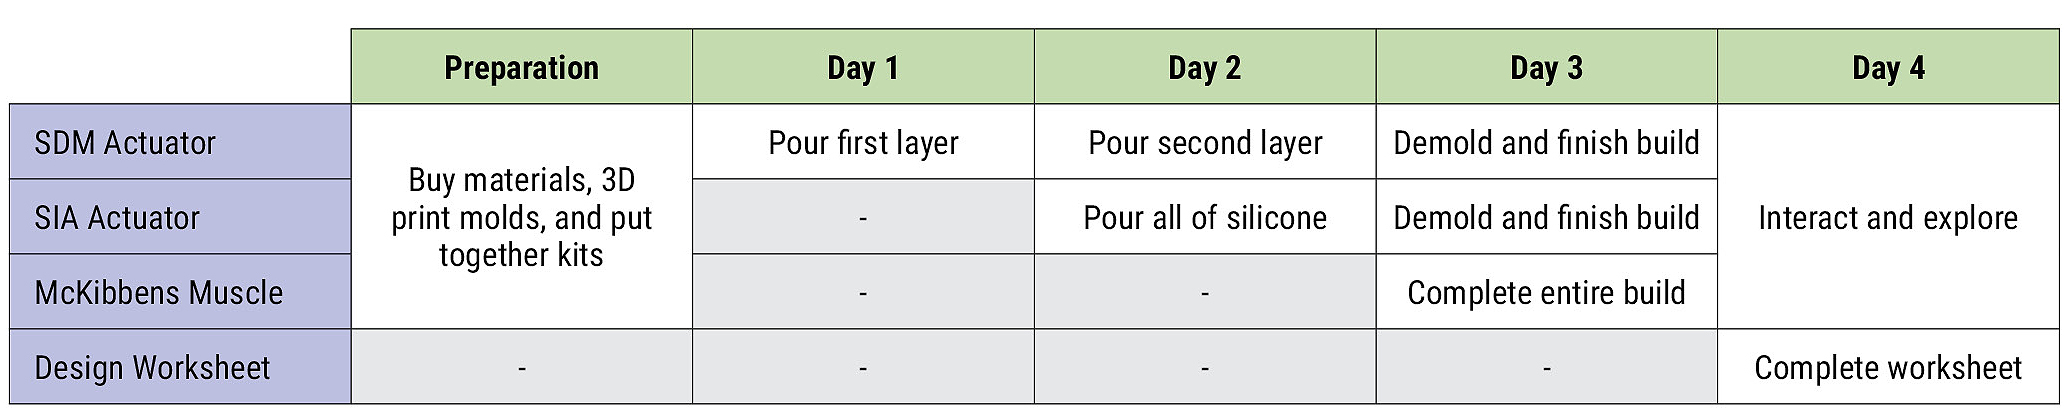
Daily schedule for three soft robotic activities and design worksheet.
Engage (Day 1)
Day 1 entails introduction to the soft robotics field and pouring the first mold of the SDM cable actuator. The introduction includes relevant examples of soft robotics in action, such as the examples mentioned in the background section. These examples provide context so students can grasp the concept of soft robotics and their applications to everyday life. A presentation with descriptions, images, and videos of these examples is provided (see Online Supplemental Materials). Students should also familiarize themselves with the terms located in the Glossary. These terms are relevant to the soft robotic builds and used throughout the curriculum.
Explore and explain (Day 1)
After the introduction, students complete the Day 1 instructions of the build. Both silicones used in the build are skin safe but can be delightfully messy; ensure tables are properly covered with tablecloths and students wear nitrile gloves. While students are building, teachers should allow them to work individually at their own pace and only intervene when necessary to promote self-sufficiency and problem-solving during builds. Students will first spray their 3D-printed molds with mold release, which allows the actuator to be easily removed once cured (the rationale for use can be compared to cooking spray used at home). Next, students prepare their silicone mixtures by adding colored dye and mixing. Teachers can explain the chemical changes occurring in the material; Part A and Part B are physically mixed, causing the molecules to crosslink and bond forming solid silicone (see Figure 3).
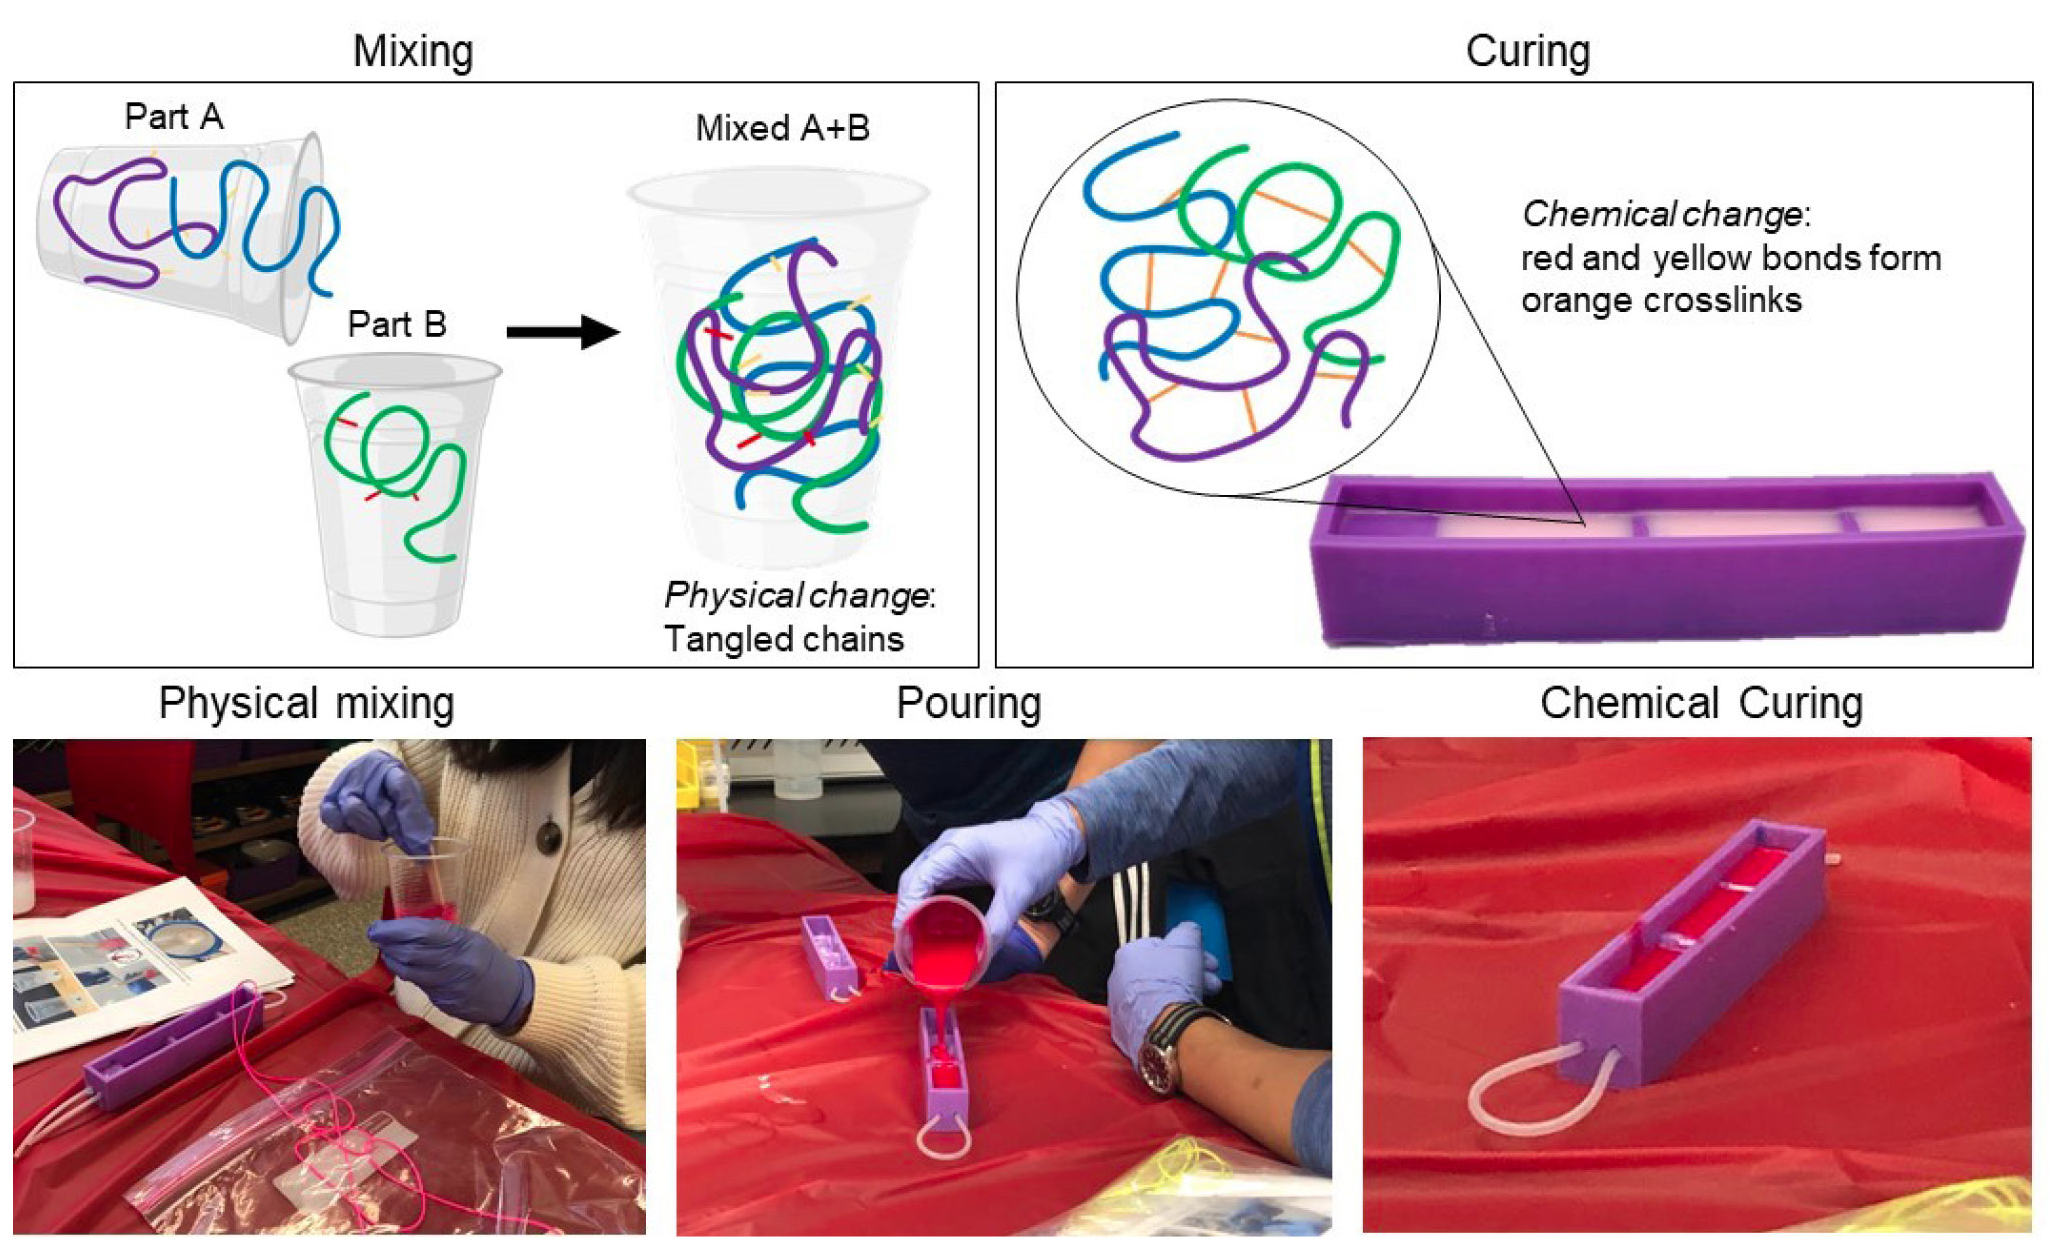
Graphic depicting the physical change that occurs when the two parts of silicone are mixed, and the subsequent chemical change when the silicone cures.
Once students have completed the Day 1 instructions, they can label their molds and store them in a dry, room-temperature location to cure overnight. The rest of the SDM cable actuator kits will also be used later and should be stored away.
Explore and explain (Day 2)
On the second day, students begin by retrieving their SDM molds from Day 1 and pouring the second layer as detailed in the Day 2 instructions for the SDM cable actuator. This process should be familiar to students since it is identical to the Day 1 instructions but with a different type of silicone and no need for coloring dye. Degassing the SIA silicone with a vacuum is necessary so holes do not form when it is inflated. See instructions for details on using a vacuum chamber. After students complete the Day 2 instructions of the SIA pneumatic actuator, store their molds next to their SDM molds so they can also cure overnight.
Elaborate (Day 3)
On Day 3, students will complete the entire McKibbens muscle actuator and demold both the SDM and SIA actuators. Teachers first distribute the McKibbens muscle kits and explain how this actuator mimics the contraction/shortening of muscles in the body. In our recent implementation, teachers found this had relevant ties to biology and anatomy courses facilitating discussions on interdisciplinary aspects of STEM. Making this connection enhances students’ understanding of how muscles work and how a McKibbens actuator can be used in an exosuit to perform musclelike functions. After completing this activity, students move on to demolding the SDM and SIA molds.
Students should follow the respective Day 3 instructions to remove the actuators from their molds and finish the builds. For the last 10–15 minutes of class, students interact with and explore the actuators’ abilities. Encourage students to use the clawlike gripper to pick up a variety of objects such as markers, pencils, and water bottles (see Figure 4) and to take note of what they were able to grasp and what they were not able to grasp. This will prepare them for the Day 4 design activity.
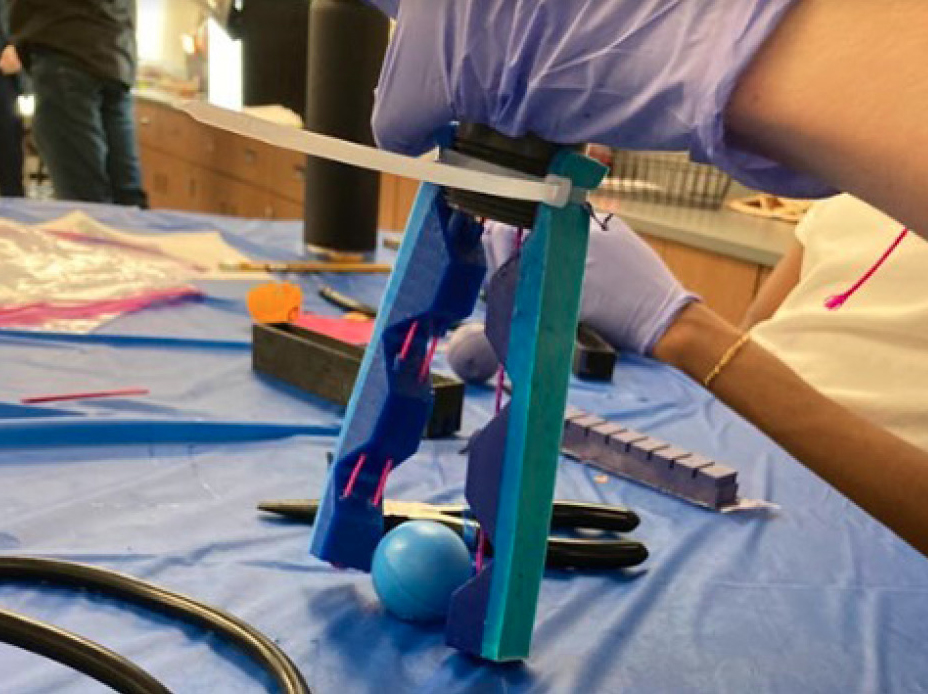
A student attempting to pick up a bouncy ball with the clawlike gripper made from two SDM actuators.
Evaluate (Day 4)
Day 4 concludes the curriculum with a design worksheet that leads students through the engineering design process. Students explore the limitations of the actuators and brainstorm changes to address those limitations. Teachers should facilitate discussion and encourage students to think of all possibilities when suggesting design improvements. Such improvements could include changing the size of the finger, increasing its stickiness, or even adding fingernails to make it more human looking. If time permits, a class discussion and debrief of the activities can be conducted by asking students, “What did you enjoy?” and “How can we use these devices?”
Reflections
Although we have iterated on the designs to make them successful during implementations, some of the demolded actuators occasionally have malformations and may not function to their full capacity. In these rare cases, teachers can remind students that mistakes are a common part of the engineering process. Teachers can use this as an opportunity to engage students in the design process by prompting thought and discussion regarding revisions and improvements to minimize errors, as many of these activities were developed in this same way.
In our implementation of this curriculum, both students and teachers responded very positively. Teachers shared that students seemed more engaged with the soft robotics activities when compared to a typical school day. Some students even posted videos of their actuators in action to TikTok. This exemplifies students’ excitement about soft robotics and pride in their builds.
Students also demonstrated a better understanding of the soft robotics field and relevant engineering majors after the curriculum. Students were asked “What major do people who work on soft robotics study?” before and after the curriculum. The results, depicted in the word clouds in Figure 5, display that many students answered “I don’t know” initially. After the curriculum, however, students answered with more relevant engineering majors such as mechanical engineering and bioengineering, showcasing a deeper understanding.
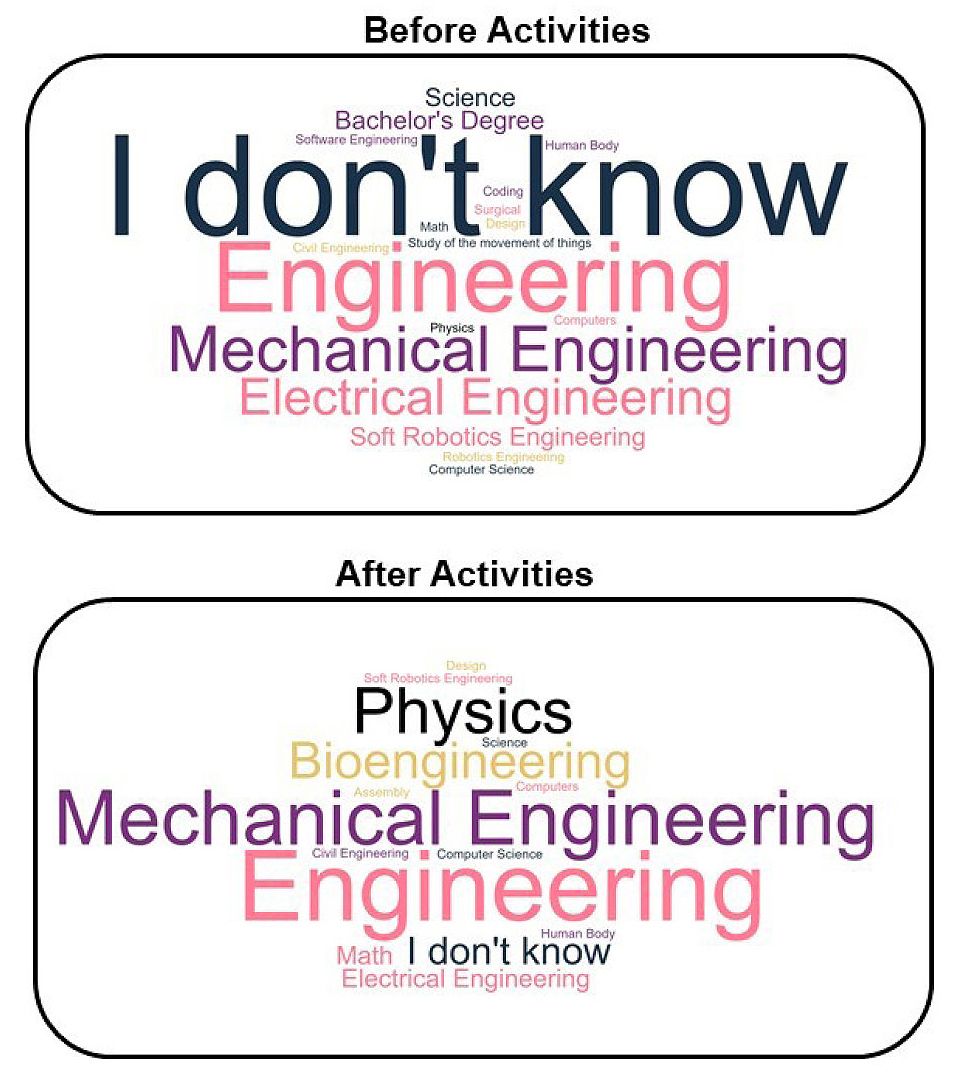
Word clouds representing students’ responses to the question “What major do people who work on soft robotics study?” before and after the curriculum.
Conclusion
Our soft robotics curriculum can serve as an introduction to this emerging field, where students can directly interact with soft robots and engage in the engineering design process. The curriculum expands students’ understanding of how engineers think, build, and collaborate. We observed equal engagement from young men and women in the class. Soft robotics also has potential to be more accessible than traditional robotics due to lower costs and a low knowledge barrier to entry—thus making it a viable tool in attracting a more diverse set of students, especially female students, to the field of engineering.
Acknowledgments
This material is based upon work supported by the National Science Foundation under Grant No. 2106286. We would also like to thank the students and teachers for participating and assisting in the implementation of this curriculum.
Safety Notes
- The silicone used is skin safe, but nitrile gloves should always be worn during the fabrication process.
- Be careful when using the dye or dyed silicone; it can stain clothing.
- Wash hands with soap and water after working with silicone.
- Follow the teacher’s instructions for disposal of all waste materials at the end of each day.
Online Supplemental Materials
McKibbens muscle actuator instructions: https://bit.ly/3FF0Dtq
SIA pneumatic actuator instructions: https://bit.ly/3yXajf2
SDM cable actuator instructions: https://bit.ly/3Z7AQ45
CAD files for 3D printing: https://bit.ly/42seJIw
Design activity sheet: https://bit.ly/40pt72l
Presentation slides: https://bit.ly/3Jw0xFL
Glossary
Actuator: A device that converts any type of energy (mechanical, electrical, etc.) into movement
Cross-linking: The process of molecules in a polymer connecting with one another to change the polymer’s physical properties
Cure: Hardening of silicone after being properly mixed
Pneumatic: Powered by air
Polymer: A natural or synthetic material made from large molecules
Soft robotics: A field focused on the development and construction of robots made from compliant, soft materials such as silicone or rubber
Holly Golecki (golecki@illinois.edu) is a Teaching Assistant Professor of Bioengineeringat University of Illinois Urbana-Champaign, Urbana, IL. Thomas Tran is a Bioengineering Undergraduate, Elizabeth McNeela is a Bioengineering Undergraduate, and Jason Robinson is a Bioengineering Undergraduate at the University of Illinois Urbana-Champaign, Urbana, IL. Jill McLean is a Physics Teacher at Centennial High School, Champaign, IL. Karin Jensen is a Biomedical Engineering Assistant Professor at the University of Michigan, Ann Arbor, MI.
Curriculum Engineering Inclusion Instructional Materials Lesson Plans Science and Engineering Practices STEM Teacher Preparation Technology Three-Dimensional Learning High School